ScreenPort SDI+ USER GUIDE
Introduction

Apple devices feature amazing displays that often exceed the quality of dedicated portable and onboard SDI monitors. In addition to color accuracy, wide gamut, and slim form factor, they offer a responsive touchscreen interface and incredible computing power. But they lack video input.
ScreenPort SDI+ adds video input to iPad, iPhone, or Mac and turns it into a professional 3G-SDI monitor capable of capturing up to 1080p60 video feed with your personal portable device. ScreenPort app provides monitoring, recording, playback, and image processing tools unmatched by most professional monitors.
Features
- Video, audio, metadata monitoring & recording
- SDI embedded or analog audio capture
- Auto-recording using camera SDI flags
- Streaming to remote monitors over the internet
- Compatible with QTAKE applications
- Battery-powered operation
- Bus-powered operation when using Mac
- Wired and wireless connection to a host device
- Predefined and custom frame-lines
- Custom 3D LUT import and processing
- Waveform, vectorscope, and histogram analysis
- Focus peaking and customizable false color
- Future-proof design upgradable by firmware
Box Contents
ScreenPort SDI+ package includes:
- ScreenPort SDI+ device
- Two WiFi antennas
- Power adapter with international plugs
- USB-C to USB-C power & data cable
- USB-C to Lightning power & data cable
- Cardboard box with protective foam insert
Connectors and Controls
Video Input:
3G-SDI
Audio Input:
3.5mm unbalanced stereo / balanced mono
Video Output:
3G-SDI loop-through
Data ports:
Ethernet
WiFi (2.4/5.0 GHz, 802.11 a/b/g/n/ac, 2 x 2 MIMO)
USB-C
Power:
5V DC 15W USB-C port
Dual Sony NP-F style battery mount
Control:
Software control over USB-C or network
Operating frequency:
2400 - 2483.5 MHz
5150 - 5850 MHz
Max RF Output power:
< 20dBm EIRP - 2.4GHz frequency band
< 23dBm EIRP - 5GHz frequency band
Power Options
ScreenPort SDI+ offers multiple power options for its operation:
USB-C Power Adapter (included)
When portability is not a requirement, ScreenPort SDI+ can be powered using included AC/DC power adapter. Moreover, power will be passed to iOS devices allowing users to charge it. The power adapter accepts input of 100-240V, 50/60Hz, 0.55A max, and produces output of 5V 3A.
Battery slots
The most portable powering option is to use onboard batteries. ScreenPort SDI+ has two battery slots for Sony NP-F style batteries. Users can opt for the original Sony NP-F970 (7.2V, 7800mAh) or compatible batteries from other brands. Some vendors offer NP-F batteries with lower capacity and smaller sizes, which may be more suitable in some cases. Please note that ScreenPort SDI+ cannot charge batteries.
USB-C Power Bank
The more portable powering option is using an external battery or power bank. The compatibility requirement for the power bank is a 5V 3A USB-C power output.
Computer USB
When used with a computer, you can use a USB connection to transfer data and power, so no additional power source is needed for ScreenPort SDI+ operation.
Mounting
ScreenPort SDI+ contains three holes at the bottom side of the device for custom mounting accessories. Holes will fit 2.2mm self-tapping screws.
Getting started
Follow these steps to use ScreenPort SDI+ connected via USB cable to an iOS device or Mac:
- Install ScreenPort or QTAKE Monitor application on your iOS device.
- Connect a power source to the ScreenPort SDI+ device using a USB-C power connector or insert a charged battery into the designated slot.
- Power on ScreenPort SDI+ using the power switch (status LED will turn white). Power up sequence takes around 20 seconds.
- Connect a camera SDI output to the SDI input of the ScreenPort SDI+ using an SDI cable (the status LED will turn green if the valid signal is detected).
- Connect the USB-C data port of the ScreenPort SDI+ to your iOS device using a data cable.
- “Trust This Computer?” dialog will appear on your iOS device. Click the “Trust” button.
Connections
ScreenPort SDI+ offers multiple ways to connect to a host device.
USB
Connecting ScreenPort SDI+ USB data port to your host device provides the connection with the highest bandwidth. Therefore you can use the best visual quality without worrying your data connection will drop frames. The downside of the USB interface is the limitation of use to a single device.
Ethernet
When connecting multiple ScreenPort SDI+ devices to multiple host devices, using the ethernet interface is the ideal solution.
When connected to a local network with an ethernet cable, a signal from each ScreenPort SDI+ will be available to any device connected to the local network.
Wi-Fi
Similar to an Ethernet connection, the Wi-Fi interface establishes a connection to the local network. However, in this case, the connection is established wirelessly, eliminating the need for physical cables. It is the most practical way to stream from ScreenPort SDI+ to monitoring devices. However, it is essential to note that the Wi-Fi interface can be the most fragile network connection method. It is primarily due to the possibility of data packet drops due to lower signal quality or interference.
Access Point Mode
Access Point Mode transforms how you can use your ScreenPort SDI+ device. Instead of relying on existing Wi-Fi infrastructure, ScreenPort can create its own Wi-Fi network with support for up to 8 wireless clients. This mode requires firmware 2.54 or higher and ScreenPort app 1.6 or higher.
New devices ship with Access Point Mode enabled by default. To enable Access Point Mode on your existing ScreenPort SDI+ device, tap SETUP in the ScreenPort app, then tap Network and set Access Point to ON.
If you need to connect to an on-set Wi-Fi network, set Wi-Fi to ON instead. It will automatically turn Access Point off but will retain your settings for future use.
ScreenPort app
You can control the ScreenPort SDI+ device using the ScreenPort application. When connected to an iOS device, ScreenPort SDI+ will be automatically detected. The sections below describe basic functionality for monitoring, recording, and playback.
Monitor
Make sure to set the LIVE/DISK button, located in the top left corner, to live mode. The viewer will display the image of the incoming SDI feed. FORMAT label located in the top bar will show the format of the SDI signal.
Audio Meters
If the SDI signal contains audio, meters above the image viewer will show the audio level of the LIVE signal. During playback, meters will show the audio levels of the playback.
Metadata
If the SDI signal contains camera metadata, ScreenPort SDI+ will extract it and display it in UI toolbars. Timecode and clip name are located in the bottom part of the screen. Camera and lens metadata is located in the top part of the screen.
Record
If the LIVE mode is ON, tap the white circle icon to initiate a recording session. ScreenPort app will record incoming video and audio signals into a media file. Tap the record icon again to finish recording. The app records a timecode if it is present in the SDI signal. In case of a missing timecode, it records the current system time instead.
Auto-record
In addition to manual recording, some cameras send SDI record flags to initiate automatic recording. To set the ScreenPort SDI+ auto-record mode, tap the AUTO REC button (ARRI and SONY cameras are currently supported).
Browse
Tap the VIEW/CLIPS button in the bottom left corner to show the clip browser. Use the DAYS/CLIPS button in the top left corner to switch between days and clips mode. Each day item represents a folder that contains all clips shot during that day. Tap the day thumbnail to show corresponding clips.
Load
Tap the LOAD/SELECT button to switch between load and selection modes. When the load mode is active, you can tap the clip thumbnail to load the clip into the viewer.
Select
When selection mode is active, you can tap or drag your finger through browser items to select them. Selected items appear in blue.
Delete
Tap the DELETE button to remove items from the browser and delete corresponding media files from the device.
Playback
Once you load the clip into the viewer, you can play it. In addition to real-time playback, there are two buttons to the right of the PLAY button, allowing you to navigate the clip frame by frame. Use those to the left of the PLAY button to jump to the clip start/end.
Slider
The time slider resides above the playback icons. Use it to scrub through the clip. The slider represents the whole duration of the clip.
Jog
For more precise clip navigation, drag your finger horizontally over the viewer.
Functions
Switching the INFO/FUNC button to function mode provides access to various functions of the ScreenPort app.
SDI Source
This field identifies the connected camera. ScreenPort SDI+ can extract timecode, clip name, and other camera and lens metadata from ARRI, Sony, Canon, Panasonic, and RED digital cinema cameras.
Setup
The bottom right corner of the ScreenPort user interface contains the TOOLS/SETUP button. Switching this button to setup mode reveals additional controls.
Device Control
Tap the BITRATE field to select the quality of the encoder output. A lower bitrate might be more suitable for wireless streaming. If you intend to wire ScreenPort, higher bitrates are available to provide better image quality. You can further control the encoder by setting it to constant (CBR) or variable (VBR) bitrate. Use the NETWORK field to connect to an existing Wi-Fi network.
Mute
You can turn off Live audio using the MUTE LIVE button. Use MUTE DISK to mute playback audio. Muting live audio will not affect audio recording.
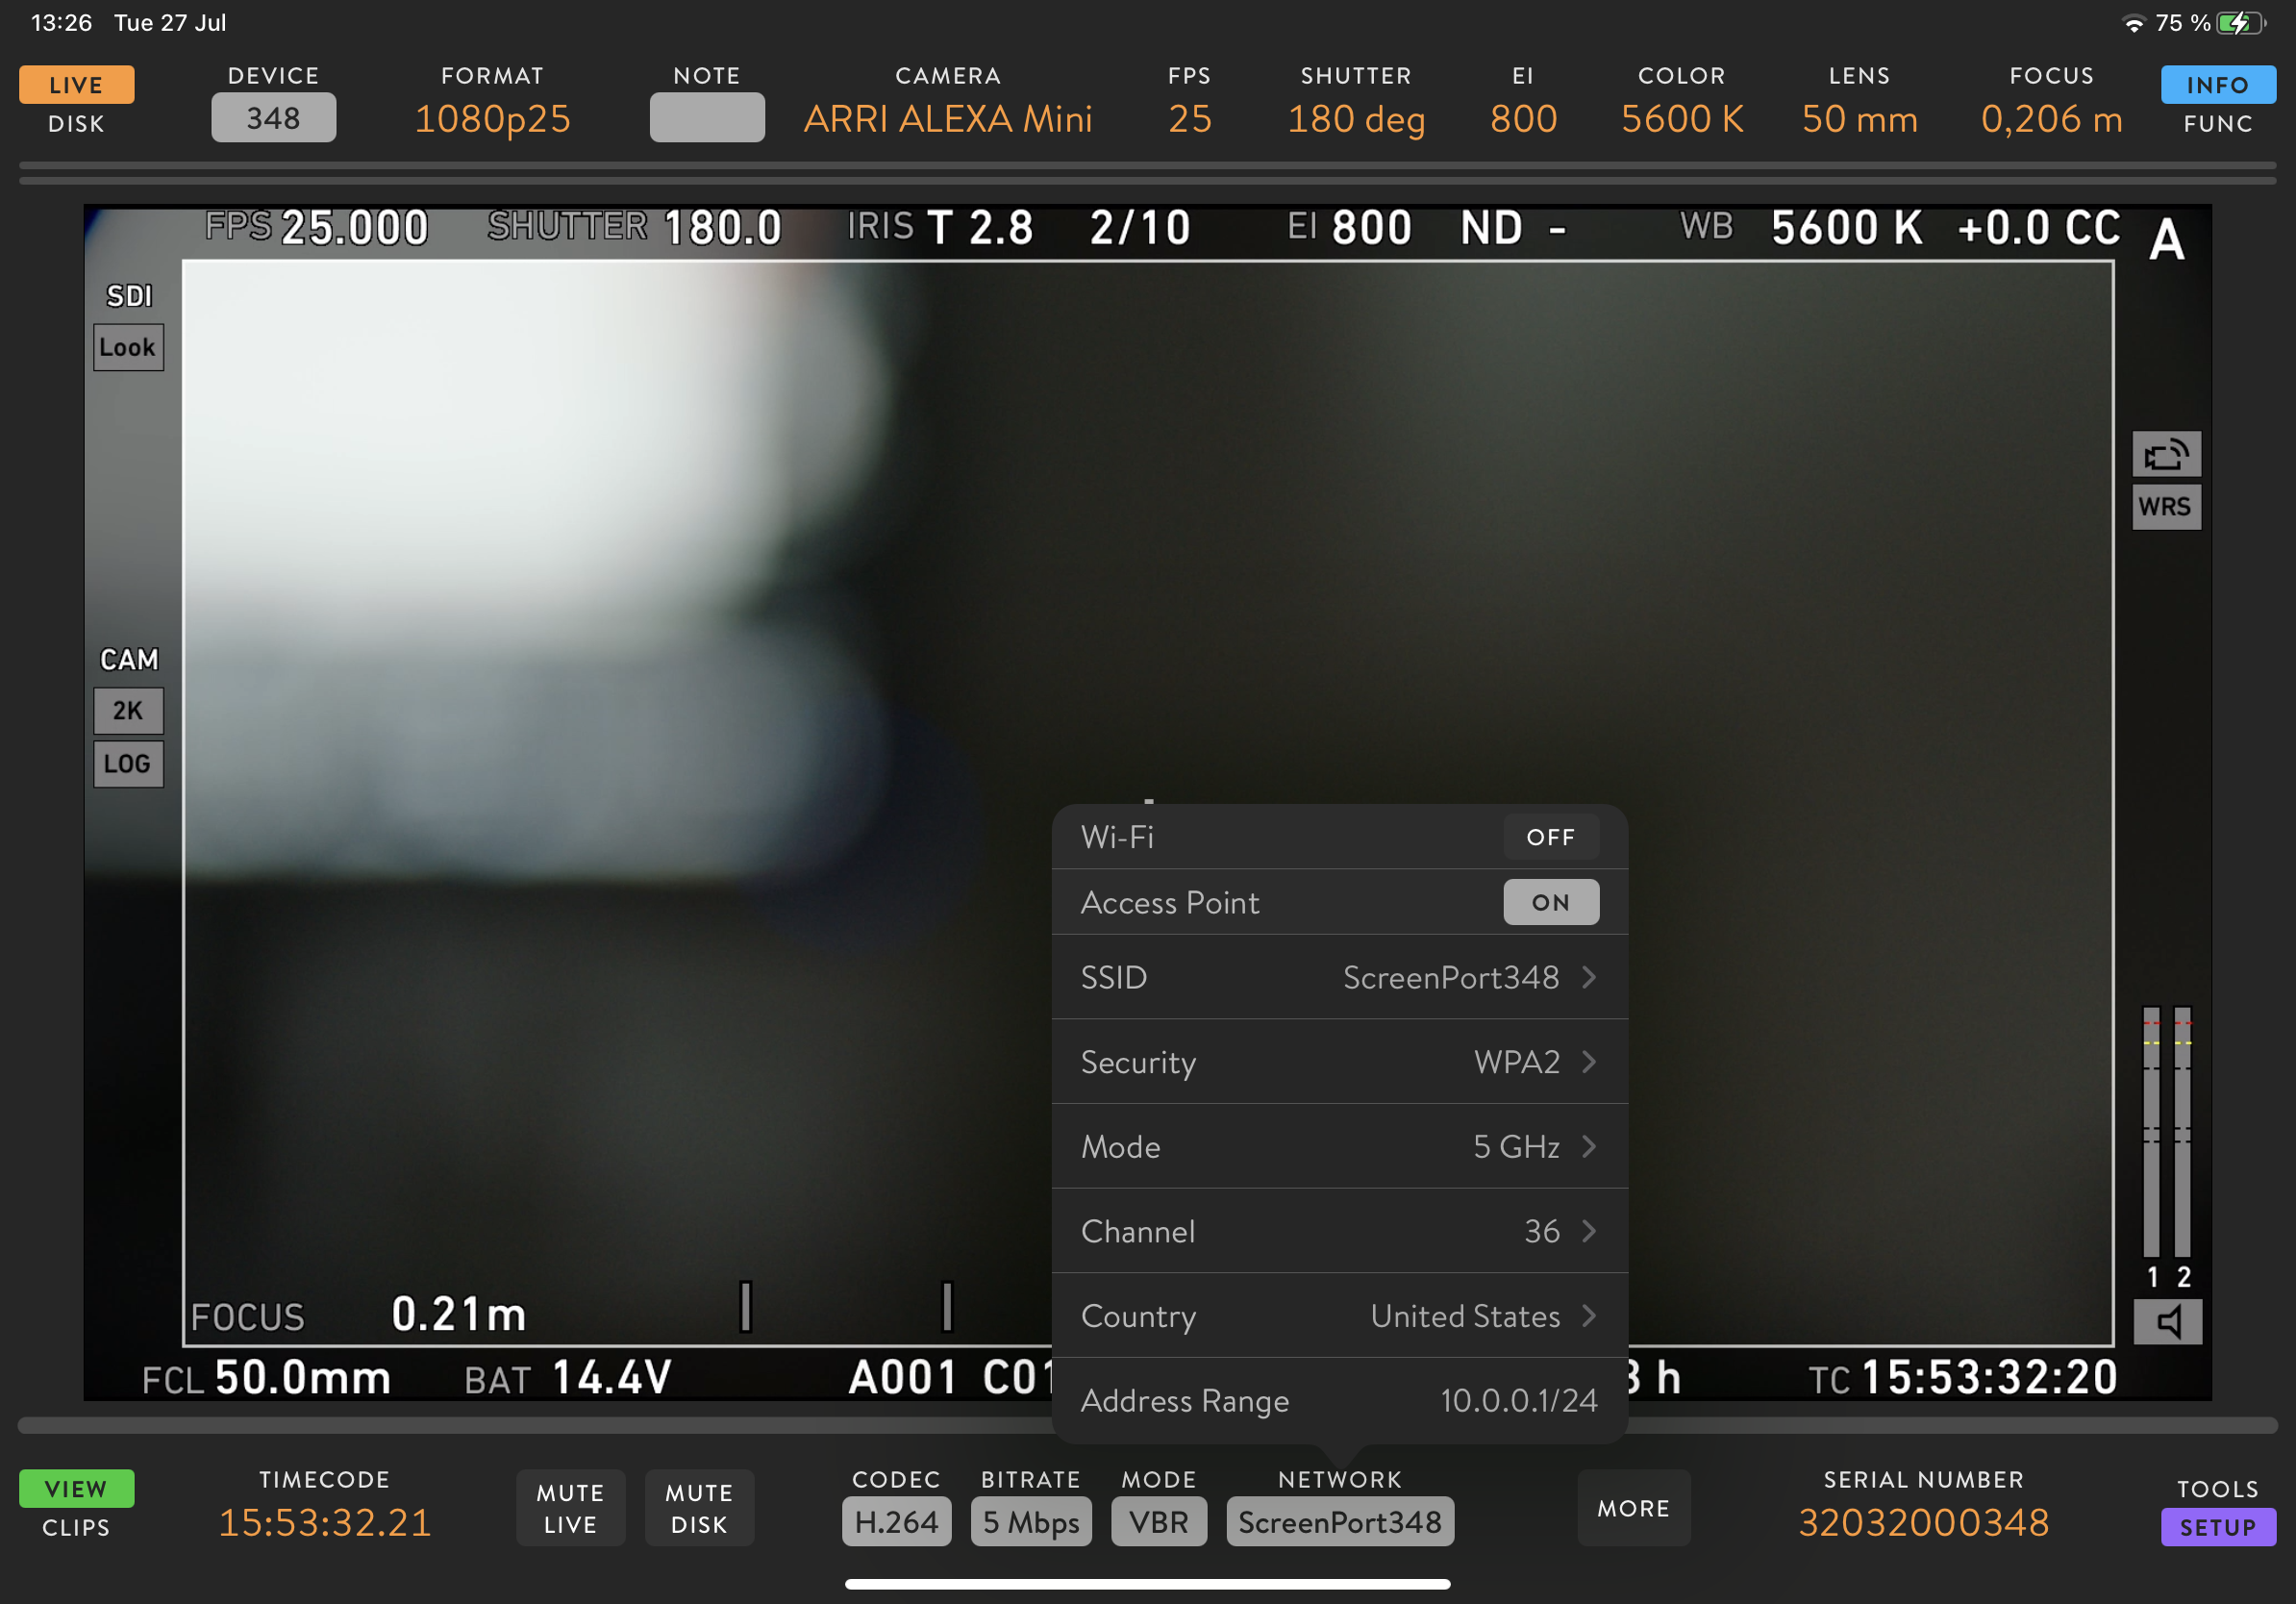
Network
Tap the NETWORK field to access Wi-Fi and Access Point controls. Enable Wi-Fi to connect to existing Wi-Fi infrastructure. To create a new Wi-Fi network for client devices to connect to, enable Access Point instead.
When enabled through the ON/OFF switch, the Wi-Fi section expands to show available Wi-Fi networks. Allow a few seconds for scanning to complete after enabling. Tap a network to connect and enter the Wi-Fi password if prompted. There is a checkmark on the right of the connected Wi-Fi network name.
When Access Point is enabled, Wi-Fi will automatically turn off. The Access Point section will expand to show additional settings. To edit a setting, tap the corresponding row.
To change the access point password, tap the SSID field. It will open a dialog where you can set both SSID and password. To change the SSID, but keep your current password, leave the password field blank.
Advanced Network Settings
To set a manual IP address for your ScreenPort SDI+ device’s Ethernet or Wi-Fi interface, tap the MORE button to reveal Advanced Network Settings. Tap the corresponding Configure IP row and set the mode to Manual. When set to Manual, you can edit the IP address, subnet, router, and DNS fields by tapping any of them.
Audio Settings
Tap the MORE button to open Audio Settings popover. If your SDI source is using audible timecode, you can set TC Channel to Left or Right to mute it.
QTAKE Monitor app
You can control ScreenPort SDI+ also using the QTAKE Monitor application. When connected to an iOS device, the application will automatically detect ScreenPort SDI+. The sections below describe basic functionality for monitoring, recording, and playback.
Create Project
QTAKE Monitor is a client application capable of connecting to QTAKE Stream or QTAKE Sync (formerly QTAKE Server) for project synchronization. After the existing QTAKE project is downloaded into QTAKE Monitor, you can use the app as a standalone monitor/recorder without connection to QTAKE Sync. Once QTAKE Monitor is re-connected, it will synchronize media and metadata into the QTAKE ecosystem.
Select SDI Input
QTAKE Monitor can display up to 9 views and each view can display different content. In order to set the active view to SDI input, tap the Select View Source in the top right corner and select ScreenPort or SP and last digits of unit’s serial number. If the device is not listed, refer to troubleshooting page.
Record SDI Input
When the view is in LIVE mode, you can tap the bottom middle part of the SDI view to initiate the recording session. The app records incoming video and audio signals into a media file. Tap the bottom middle part of the view again to finish recording. In addition to manual recording, some cameras send SDI record flags to initiate automatic recording. Refer to the Device Settings section to set the ScreenPort SDI+ auto-record mode.
Set In/Out Range
Each clip in QTAKE Monitor can have multiple ranges to allow only selected parts of the media file to play. Use IN and OUT buttons to set the desired range during recording or playback.
Playback
Tap the REPLAY button located in the top bar to play the last recorded clip. Tap the BROWSE button to open the clip browser and select the clip to load into active view. View mode will change from LIVE to DISK. Tap the bottom middle part of the active view in the DISK mode to initiate playback. Tap the top middle part of the view to switch between two playback modes: using ranges or ignoring ranges. Tap the top left or right view corner to jump to the previous or next range. To move the playhead frame-by-frame, tap the bottom left or right corner.
For more details about advanced functionality, please refer to QTAKE Monitor User Guide.
Recording
It is crucial to understand that recording functionality resides at the application level, not within ScreenPort devices. They act as sophisticated encoders and streamers, providing high-quality video, audio, and vital metadata. Compatible applications within the QTAKE ecosystem handle the actual capture and storage of this content.
Compatible applications are:
- QTAKE Pro and QTAKE (macOS)
- ScreenPort App (iOS/iPadOS/macOS)
- QTAKE Monitor App (iOS/iPadOS/visionOS/macOS)
Each application offers a slightly different workflow, which is detailed below.
Recording with QTAKE (macOS)
When using your ScreenPort SDI+ with QTAKE, the workflow integrates seamlessly with its robust recording capabilities:
- Ingest Stream: First, ingest the device’s stream into your QTAKE project. To do this, go to Project Settings and select the STREAM tab in the INPUT SOURCES section.
- Standard QTAKE Recording: Once the device’s stream is successfully ingested and active as an input, recording operates exactly as it would with any other video input in QTAKE. You can initiate recording using QTAKE’s standard record controls, manage clips, and utilize all of QTAKE’s project management features.
For detailed instructions on configuring inputs and managing recordings within QTAKE, please refer to the QTAKE User Manual.
Recording with ScreenPort App (iOS/iPadOS/macOS)
The ScreenPort app provides a straightforward way to view and record streams directly on your iOS/iPadOS/macOS device.
- Device Detection: The ScreenPort app automatically detects your device, whether the device is connected directly via USB or discovered on the same local network.
- Device Selection (if applicable):
- If multiple sources for the same signal (e.g., both USB and network connections) are detected.
- Or if multiple ScreenPort devices are available on the network.
- Use the Device Selector at the app’s Top-left corner to choose the desired device or signal source.
- Storage & Export Options:
- Default Storage: By default, the ScreenPort app records clips to its internal app storage. Please note that the content stored here is not directly accessible from the iOS Files app, and there are no built-in export options within the app.
- Export-Enabled Storage (Recommended for Export): To enable exporting of your recorded clips and make them easily accessible, you must grant “Full Photos Access” to the ScreenPort app in your iOS/iPadOS settings (Settings > ScreenPort > Photos > Full Photos Access). Once enabled, all subsequent recordings will be stored directly in your iOS Photos library, allowing for easy management, sharing, and export.
- Initiating Recording:
- Manual Recording: Tap the app’s dedicated Record button to start and stop recording.
- Auto Rec: Alternatively, enable the Auto Rec option. When active, the app will automatically begin recording whenever it detects an active video signal from the connected device.
Recording with QTAKE Monitor App (iOS/iPadOS/visionOS/macOS)
The QTAKE Monitor app is designed for remote monitoring and integration with the QTAKE Cloud environment, offering recording capabilities within that framework.
- Load Device Stream: Within the QTAKE Monitor app, navigate to Select View Source and choose your ScreenPort stream to load it into the active view.
- Input Settings: Once the device’s stream is successfully loaded into a view, the Right Sidebar displays the Input option, which allows you to manage specific settings related to the incoming stream.
- Storage & Workflow Considerations:
- Internal Storage Only: Unlike the ScreenPort app, the QTAKE Monitor app always records to its internal app storage. Besides integration with QTAKE Sync (formerly QTAKE Server), there are no direct export options for recorded clips.
- QTAKE Sync Integration: If you intend to utilize QTAKE Sync for proxy media upload and remote collaboration, planning this before creating your project in QTAKE Monitor is critical. Projects created without initial QTAKE Sync integration cannot be uploaded to QTAKE Sync subsequently. This design facilitates a streamlined Cloud workflow from the outset.
For a detailed recording walkthrough within the QTAKE Monitor app and suggested Cloud workflows, please refer to the QTAKE Monitor User Guide.
Firmware Update
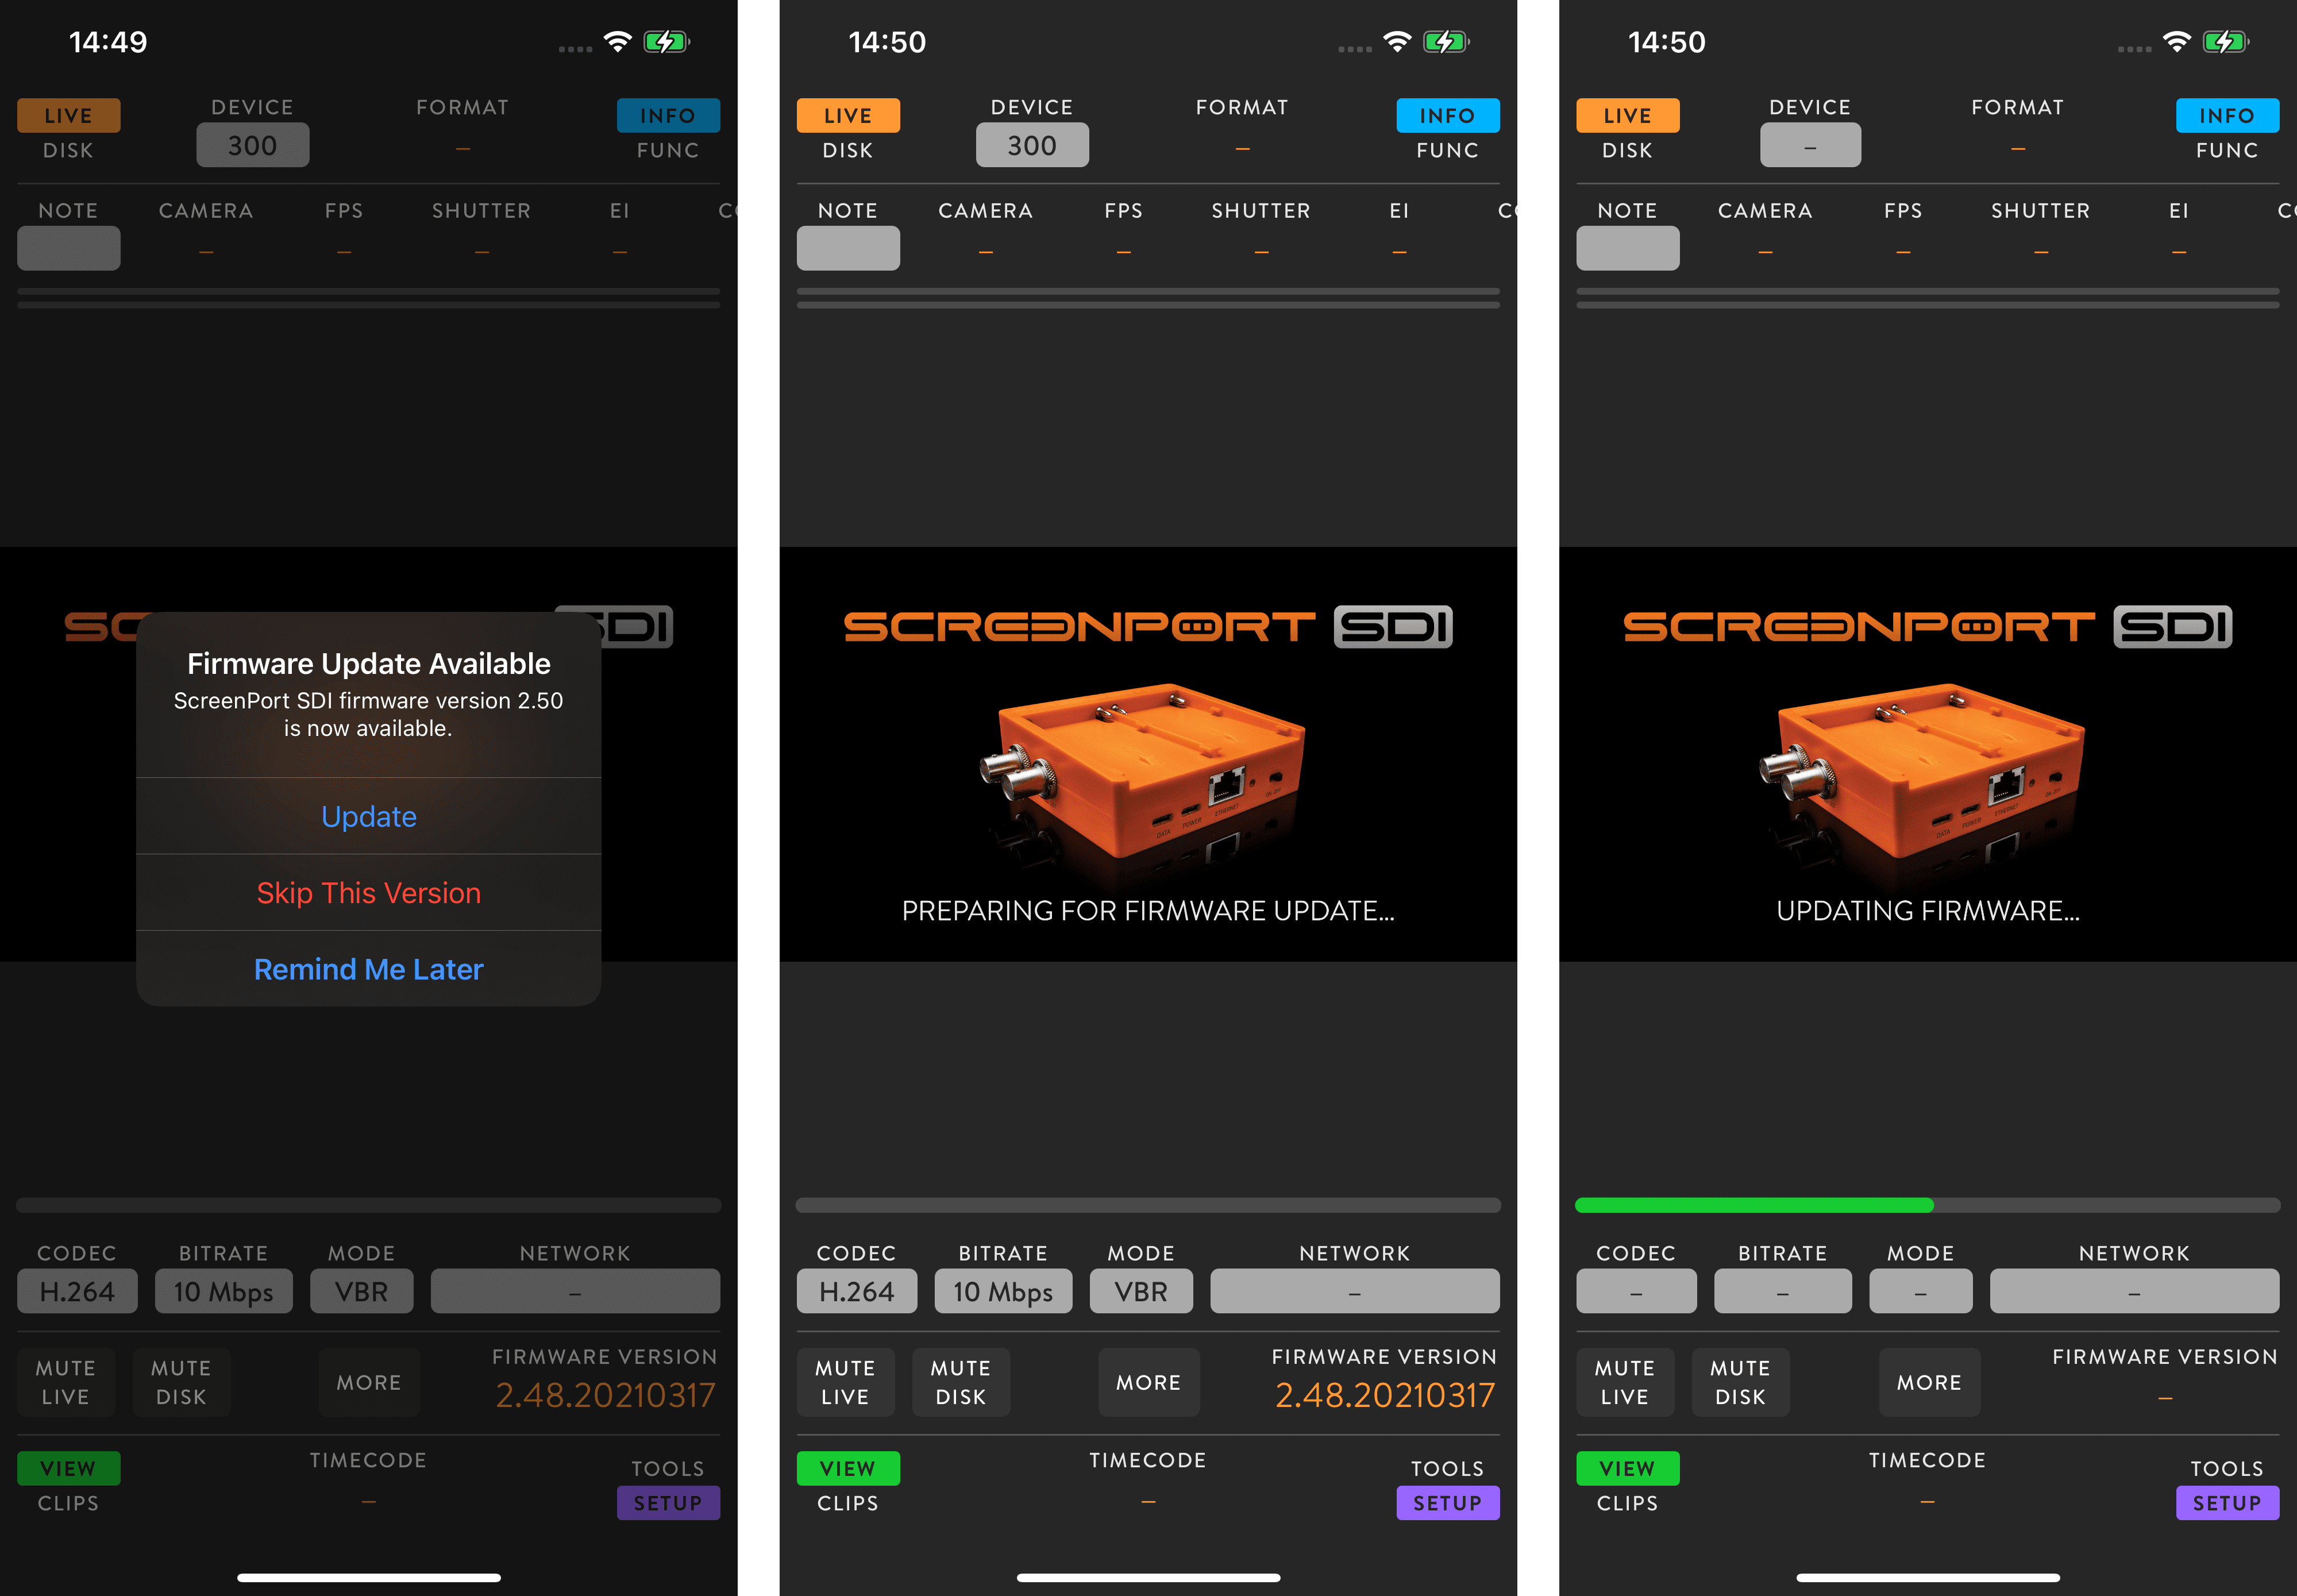
Firmware update of the ScreenPort SDI+ is a simple procedure. To update your ScreenPort SDI+ firmware, launch the ScreenPort app on an iPhone or iPad connected to the internet, then connect your ScreenPort SDI+ device via USB. If a newer firmware version is available, the ScreenPort application will notify you. Proceed with the update process for the new firmware to be downloaded and applied. Tap UPDATE to start the firmware update, then wait for the process to finish. You will see the update progress via the playback slider. Your device will restart twice.
Troubleshooting
The following table provides instructions on solving the most common problems related to the use of ScreenPort SDI+. If your problem is not on the list, contact the manufacturer or your reseller.
| Problem | Possible reason | Solution |
|---|---|---|
| Power LED does not light up. | Device is not powered up. | Turn power switch on. |
| Device does not power up. | No external power. | Supply external power. |
| No input signal. | Invalid signal sent by SDI source. | Provide valid SDI signal. |
| No pass-through output signal. | Missing input signal. | Check the input signal. |
| No input or output signal. | Broken SDI cable. | Replace SDI cable. |
| No video in the app. | Broken data cable. | Replace data cable. |
Important Safety Instructions
- Carefully read and follow all instructions and keep them for future reference.
- Do not use this device with water.
- Clean only with a dry cloth.
- Do not use this device with any heat sources or near fire.
- Protect all cables.
- Use the antenna included in the package that is approved by the manufacturer. The antenna gain that is used with this device cannot exceed 3.2dBi.
- Refer all servicing to qualified service personnel. * Servicing is required when the device has been damaged in any way, either by physical or electrical means.
- This product uses semiconductors that can be damaged by electrostatic discharge (ESD). When handling, care must be taken so that the device is not damaged. Damage due to inappropriate handling is not covered by the warranty.
.png)
Disposal Information
ScreenPort SDI+ shall be disposed of separately from household waste. When it reaches its end of life, take it to a collection point designated by local authorities. Separate collection and recycling at the time of disposal will help conserve natural resources and ensure that ScreenPort SDI+ is recycled in a manner that protects human health and the environment. For more information about electronic and electrical waste equipment that will ensure the safety of human health and environment disposal, recovery, and collection points, contact your local city center, household waste disposal service, reseller, or equipment manufacturer.

EU compliance Statement

INCORE hereby declares that this wireless device is in compliance with the essential requirements of the RED Directive 2014/53/EU.
Download copy of EU Declaration of conformity.
COMPLIANCE
If for import of ScreenPort SDI+ to or its operation within any country other than Slovakia it is required to fulfill additional legal requirements than those provided by the manufacturer herein, you agree to obtain all permissions and for legal compliance.
Copyright and Legal Notices
ScreenPort SDI+ is a trademark of IN2CORE s.r.o.
All other trademarks are the property of their respective owners.