QTAKE Sync USER GUIDE 3.0
ABOUT QTAKE
QTAKE is the most advanced software designed and developed for video assist and DIT professionals. It is used to log, capture, playback, edit, and process video output and RAW recording of digital cinema cameras.
ABOUT QTAKE Sync
QTAKE Sync is the center point of the QTAKE ecosystem. It is a metadata collaboration system specialized for on-set use with iPad or iPhone. Thanks to tight integration with the high-end QTAKE Video Assist system, it provides an instant review of each take on QTAKE Monitor clients. This immediate access to media is the key to accurate, efficient annotation by any department that can provide valuable data for a production workflow. In addition to local on-set use, QTAKE Sync can run in the cloud to provide secure worldwide access or push the data into your existing digital asset infrastructure.
New in 3.0
- License Activation and Deactivation
- Project-Specific License Activation
- Media Sync Status
- Free Uploads of Assets
- Upload Visualization
- Unified Projects Tab
- Editable Metadata in Clips Tab
- Private Clips
- Synchronized Trash
- Automatic Deactivation of Flexi Model
HOW IT WORKS
Once QTAKE synchronizes a project with QTAKE Sync, it uploads H.264 or HEVC proxy media files and metadata to QTAKE Sync, making them available to clients using the QTAKE Monitor application or another QTAKE in a multi-unit setup. It enables clients to request and review any recorded clip directly in QTAKE Sync, independent of QTAKE. Like QTAKE, QTAKE Sync also supports extensive clip metadata. After entering information on an iPad, it will immediately synchronize across all clients and QTAKE(s) to keep all users and systems up to date.
QTAKE Sync client access is based on Users and Roles. When you are invited to a QTAKE Sync project, initially, you have no Role. Assigning a Role by Admin defines your level of access. If you have no Role assigned, you can only playback clips and view basic metadata. With a Role, you are permitted to see and edit all metadata, create new metadata groups, and add fields to existing metadata groups.
SYSTEM REQUIREMENTS
QTAKE Sync 3.0 requires macOS 14.0 (Sonoma) or higher and a network connection.
Network Requirements
To access independent playback over the local network, enable traffic to and from the following ports on the QTAKE Sync system:
- TCP 8500 – 8600
- TCP 44443
For QTAKE Cloud Sync, enable traffic for the following:
- api.qtake.cloud, TCP 443, 44443
- sync.qtake.cloud, TCP 8500, 8501, 443 and 44443
- storage.googleapis.com, TCP 443
- qtake.storage.googleapis.com, TCP 443
QTAKE Requirements
QTAKE Pro or legacy QTAKE 1.6 or later.
You can always find up-to-date QTAKE hardware recommendations at qtakehd.com/hardware.
QTAKE Monitor Requirements
QTAKE Monitor 5.0 or later.
Supported devices for clients connecting to QTAKE Sync include any iPhone, iPad or iPod touch running iOS 16 or later, Apple Vision Pro running visionOS 2.0 or later, and any Mac computers running macOS 10.15 (Catalina) or later.
SECURITY NOTICE
USE OF LEGACY SOFTWARE
The use of legacy software is strongly discouraged, particularly in environments with security, data integrity, or compliance requirements. Although some components may remain technically compatible, legacy software such as QTAKE 1.6 lacks critical controls to ensure data consistency and prevent undetected transfer errors.
Moreover, legacy software no longer receives security updates and has not been validated against recent security assessments. Known issues affecting database consistency and synchronization remain unresolved. For security-focused workflows, use of the currently maintained applications, such as QTAKE Pro and QTAKE Sync, is strongly recommended.
BEFORE YOU START
For performance reasons make sure to UNCHECK the following feature in macOS System Preferences or System Settings:
- Energy Saver - Put hard disk(s) to sleep when possible.
- It is recommended to set computer sleep to NEVER.
- Turn off SPOTLIGHT indexing service for your MEDIA location in System Preferences, by putting the location into the PRIVACY section. See the MEDIA LOCATION section for more information about QTAKE Sync media storage.
QTAKE Sync License
You can rent QTAKE Sync licenses through QTAKE Rental Shop. To rent QTAKE Sync from QTAKE Rental Shop, you will need to create a QTAKE Shop account.
With version 3.0, the licensing for QTAKE Sync has been significantly streamlined and updated. QTAKE Sync licenses are now managed via the QTAKE Pro configurator, utilizing the same convenient activation and deactivation mechanism as QTAKE Pro. This unified approach greatly enhances convenience, particularly when switching between different machines, as your licenses can be easily transferred. Once you load the QTAKE Pro configurator, scroll down and expand the QTAKE Sync section.
You can also create a QTAKE Shop account and register your machine directly from QTAKE Sync. See the LICENSE section for more information.
To create a Rental Shop account and rent QTAKE Sync or QTAKE modules, visit QTAKE Rental Shop at shop.qtakehd.com
For instructions on how to use the shop, please see: shop.qtakehd.com/instructions.
QTAKE Sync functionality is separated into several modules:
SYNC Module
SYNC is the base module that provides most of the QTAKE Sync functionality: creating and synchronizing projects, managing users and roles, and creating import and export folders. It can serve local network clients and optionally connect to QTAKE Cloud Sync. While you can upload multiple projects to QTAKE Sync, only a single project can be active with the SYNC module.
IO Module
IO module is used to integrate with 3rd party services. New clip metadata and proxy media will immediately be uploaded to Moxion or Shotgun to keep the users up-to-date.
AVID Module
AVID module adds AVID export functionality to QTAKE Sync. In addition to native DNxHD and DNxHR transcoding, it provides the export of the complete clip metadata using ALE files.
CENTRAL Module
CENTRAL module is used to run your own central server on a local network. It provides synchronization of multiple QTAKE units over a local network.
Synchronization of remote units over the internet connection is provided by QTAKE Cloud Sync.
PRO Module
PRO module allows you to synchronize other clip media types, such as ProRes, DNxHD, RAW, etc.
Free Uploads of Assets
QTAKE Sync allows free asset uploads without a paid license. In addition, users can work with the first 30 clips per project at no cost, including playback, review, export, and annotation. This change introduces several practical benefits:
- QTAKE Sync no longer requires a separate trial/NFR version. Since users can upload an unlimited number of assets and fully work with the first 30 clips for free, the standard application can be used both for evaluation and, when licensed, for proper on-set operation.
- Projects can be prepared in advance without activating a paid license. Assets can be uploaded in advance, and a license can be activated later when full functionality is required. It avoids paying for a license on days when only asset preparation is needed.
- In multi-unit productions, a second unit can upload clips for review by the main unit without holding its own QTAKE Sync license. Provided that the main unit is properly licensed, assets uploaded by the second unit can be reviewed by the main unit, reducing licensing costs for units.
INSTALLATION
To install QTAKE Sync, download the up-to-date QTAKE Sync installer from the Download section after logging in to the QTAKE Rental shop and scrolling down. Run the installer. It will guide you through the installation process.
The first time you run QTAKE Sync you will be greeted with a EULA (End User Licensing Agreement). You will need to enter Name, Company, Email and Address of the Licensee in order to accept the EULA.
USER INTERFACE
QTAKE Sync UI
The QTAKE Sync user interface is designed as a single window with multiple tabs, providing simple and fast access to all features.
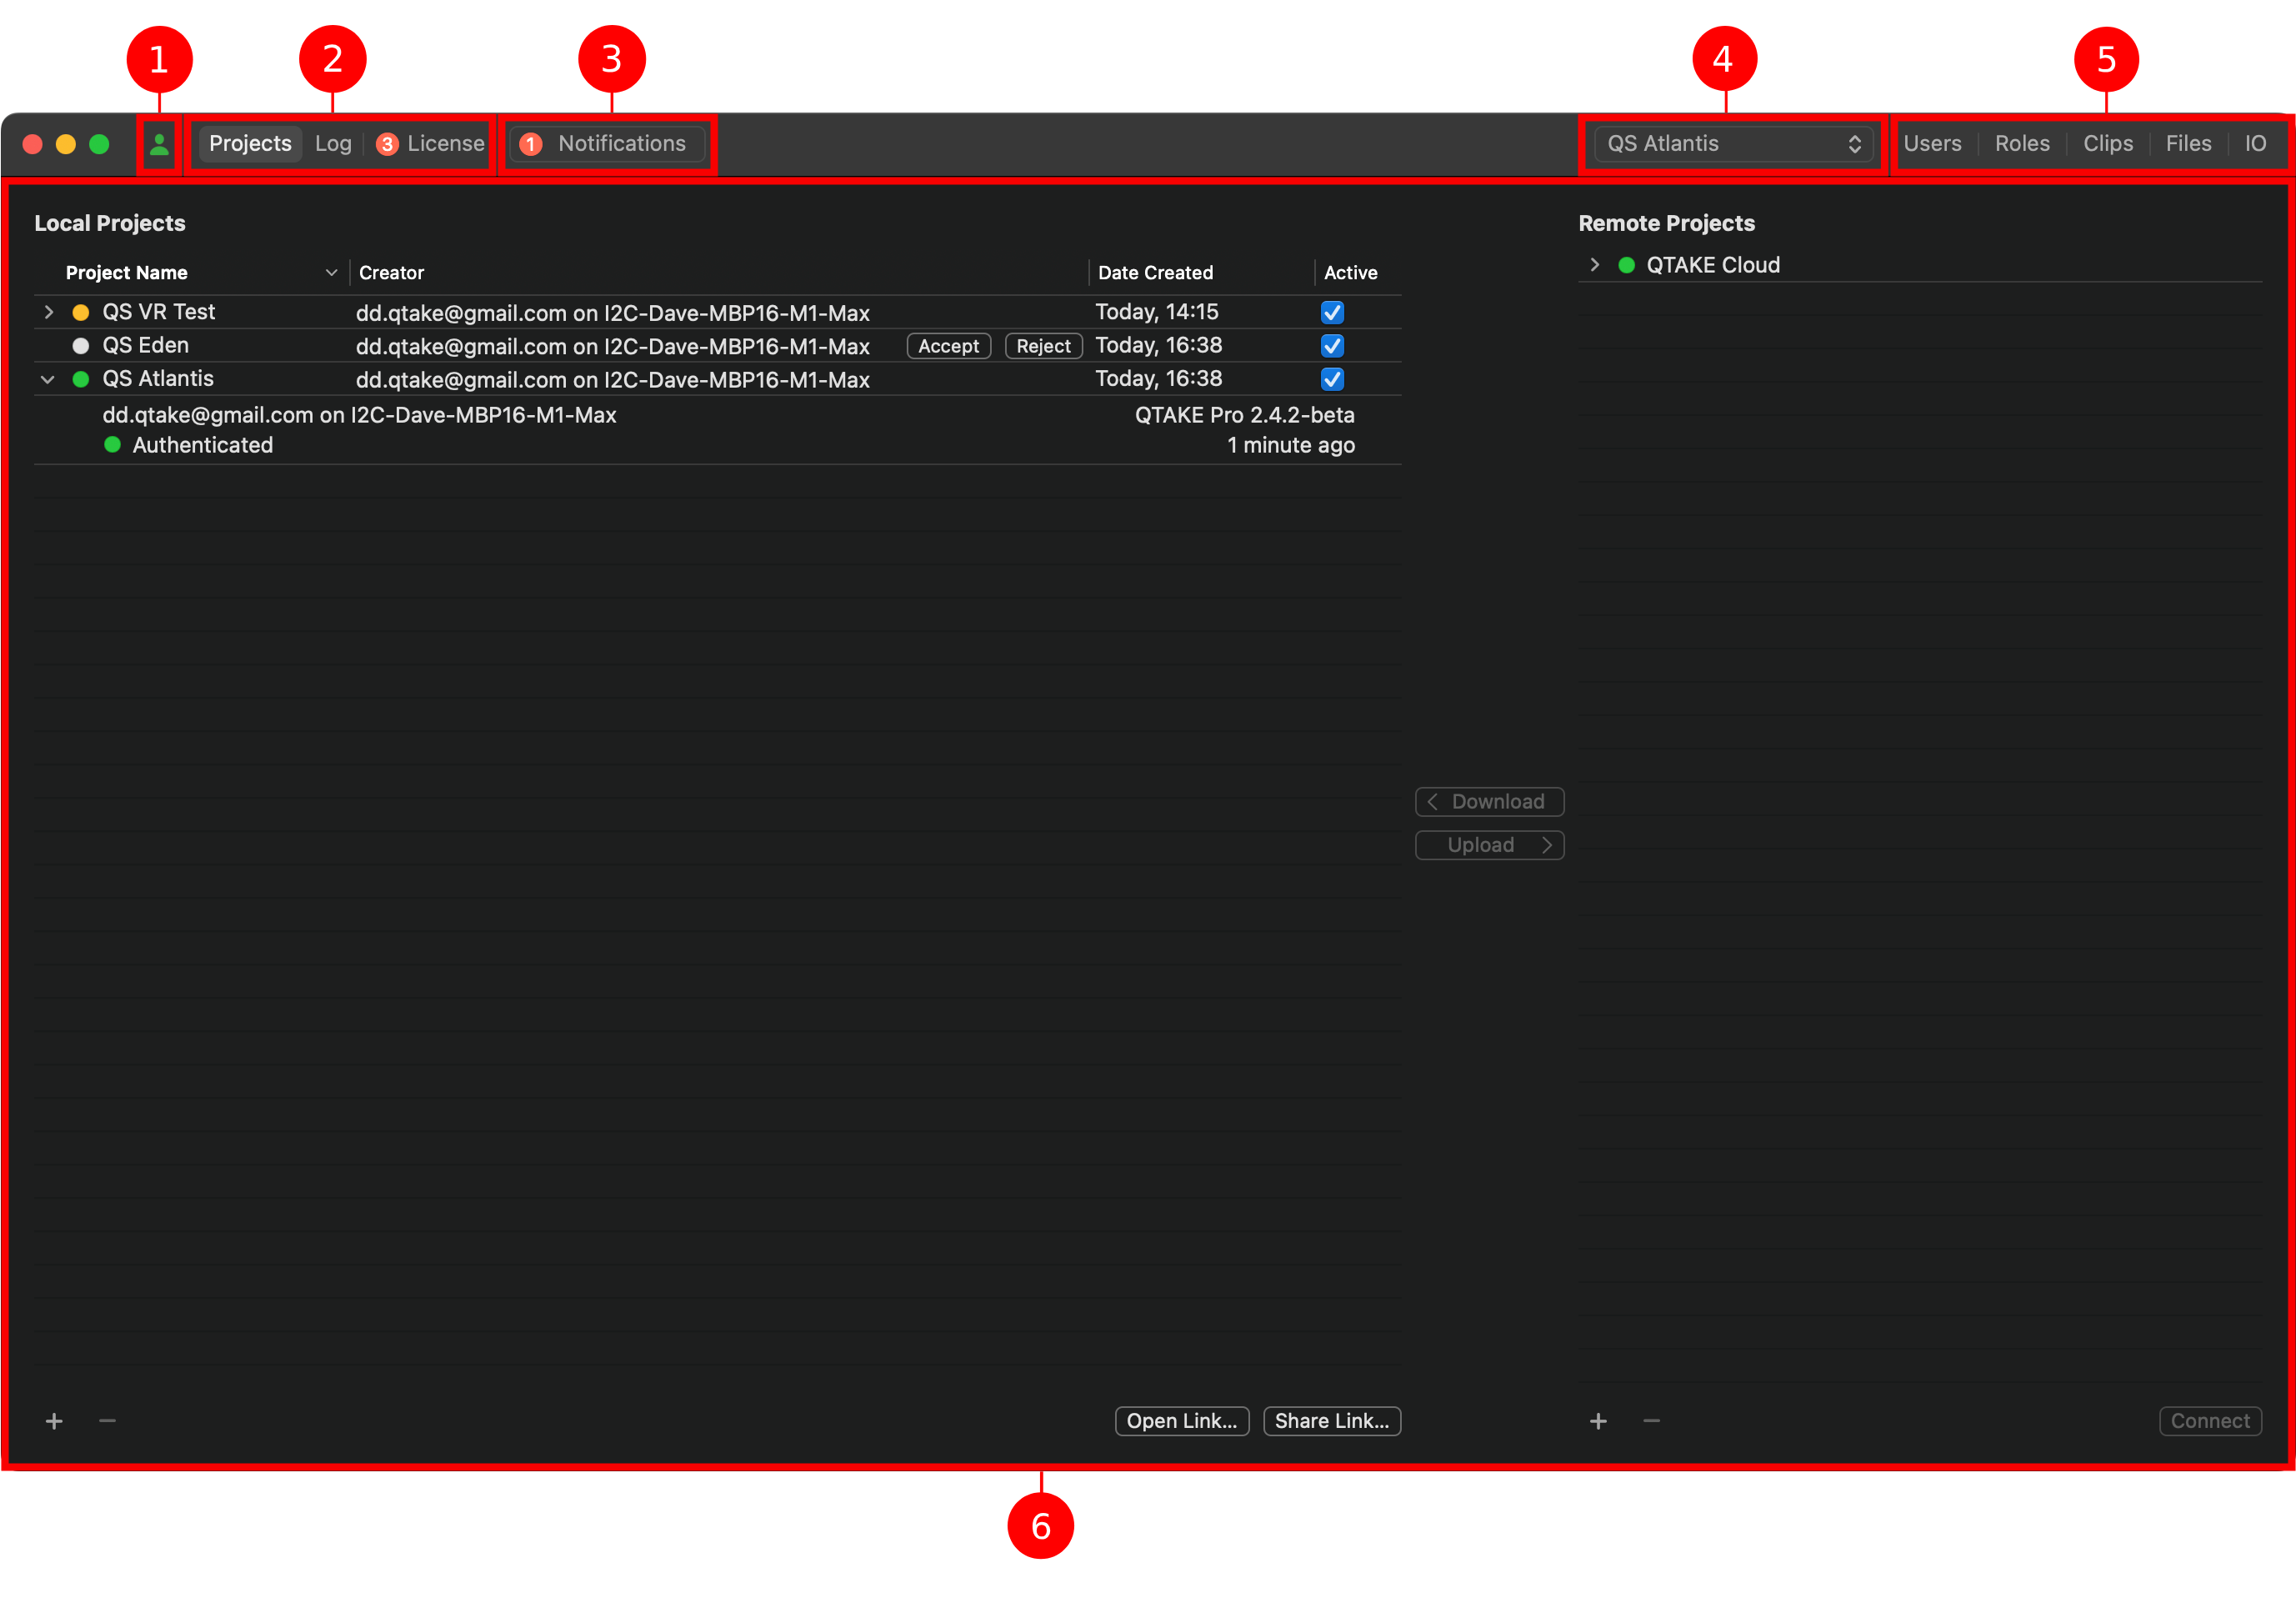
- User button - Allows you to log in with your user credentials.
- Projects & application tabs - Synchronizes with QTAKE and QTAKE Cloud and views the status of your Sync and license.
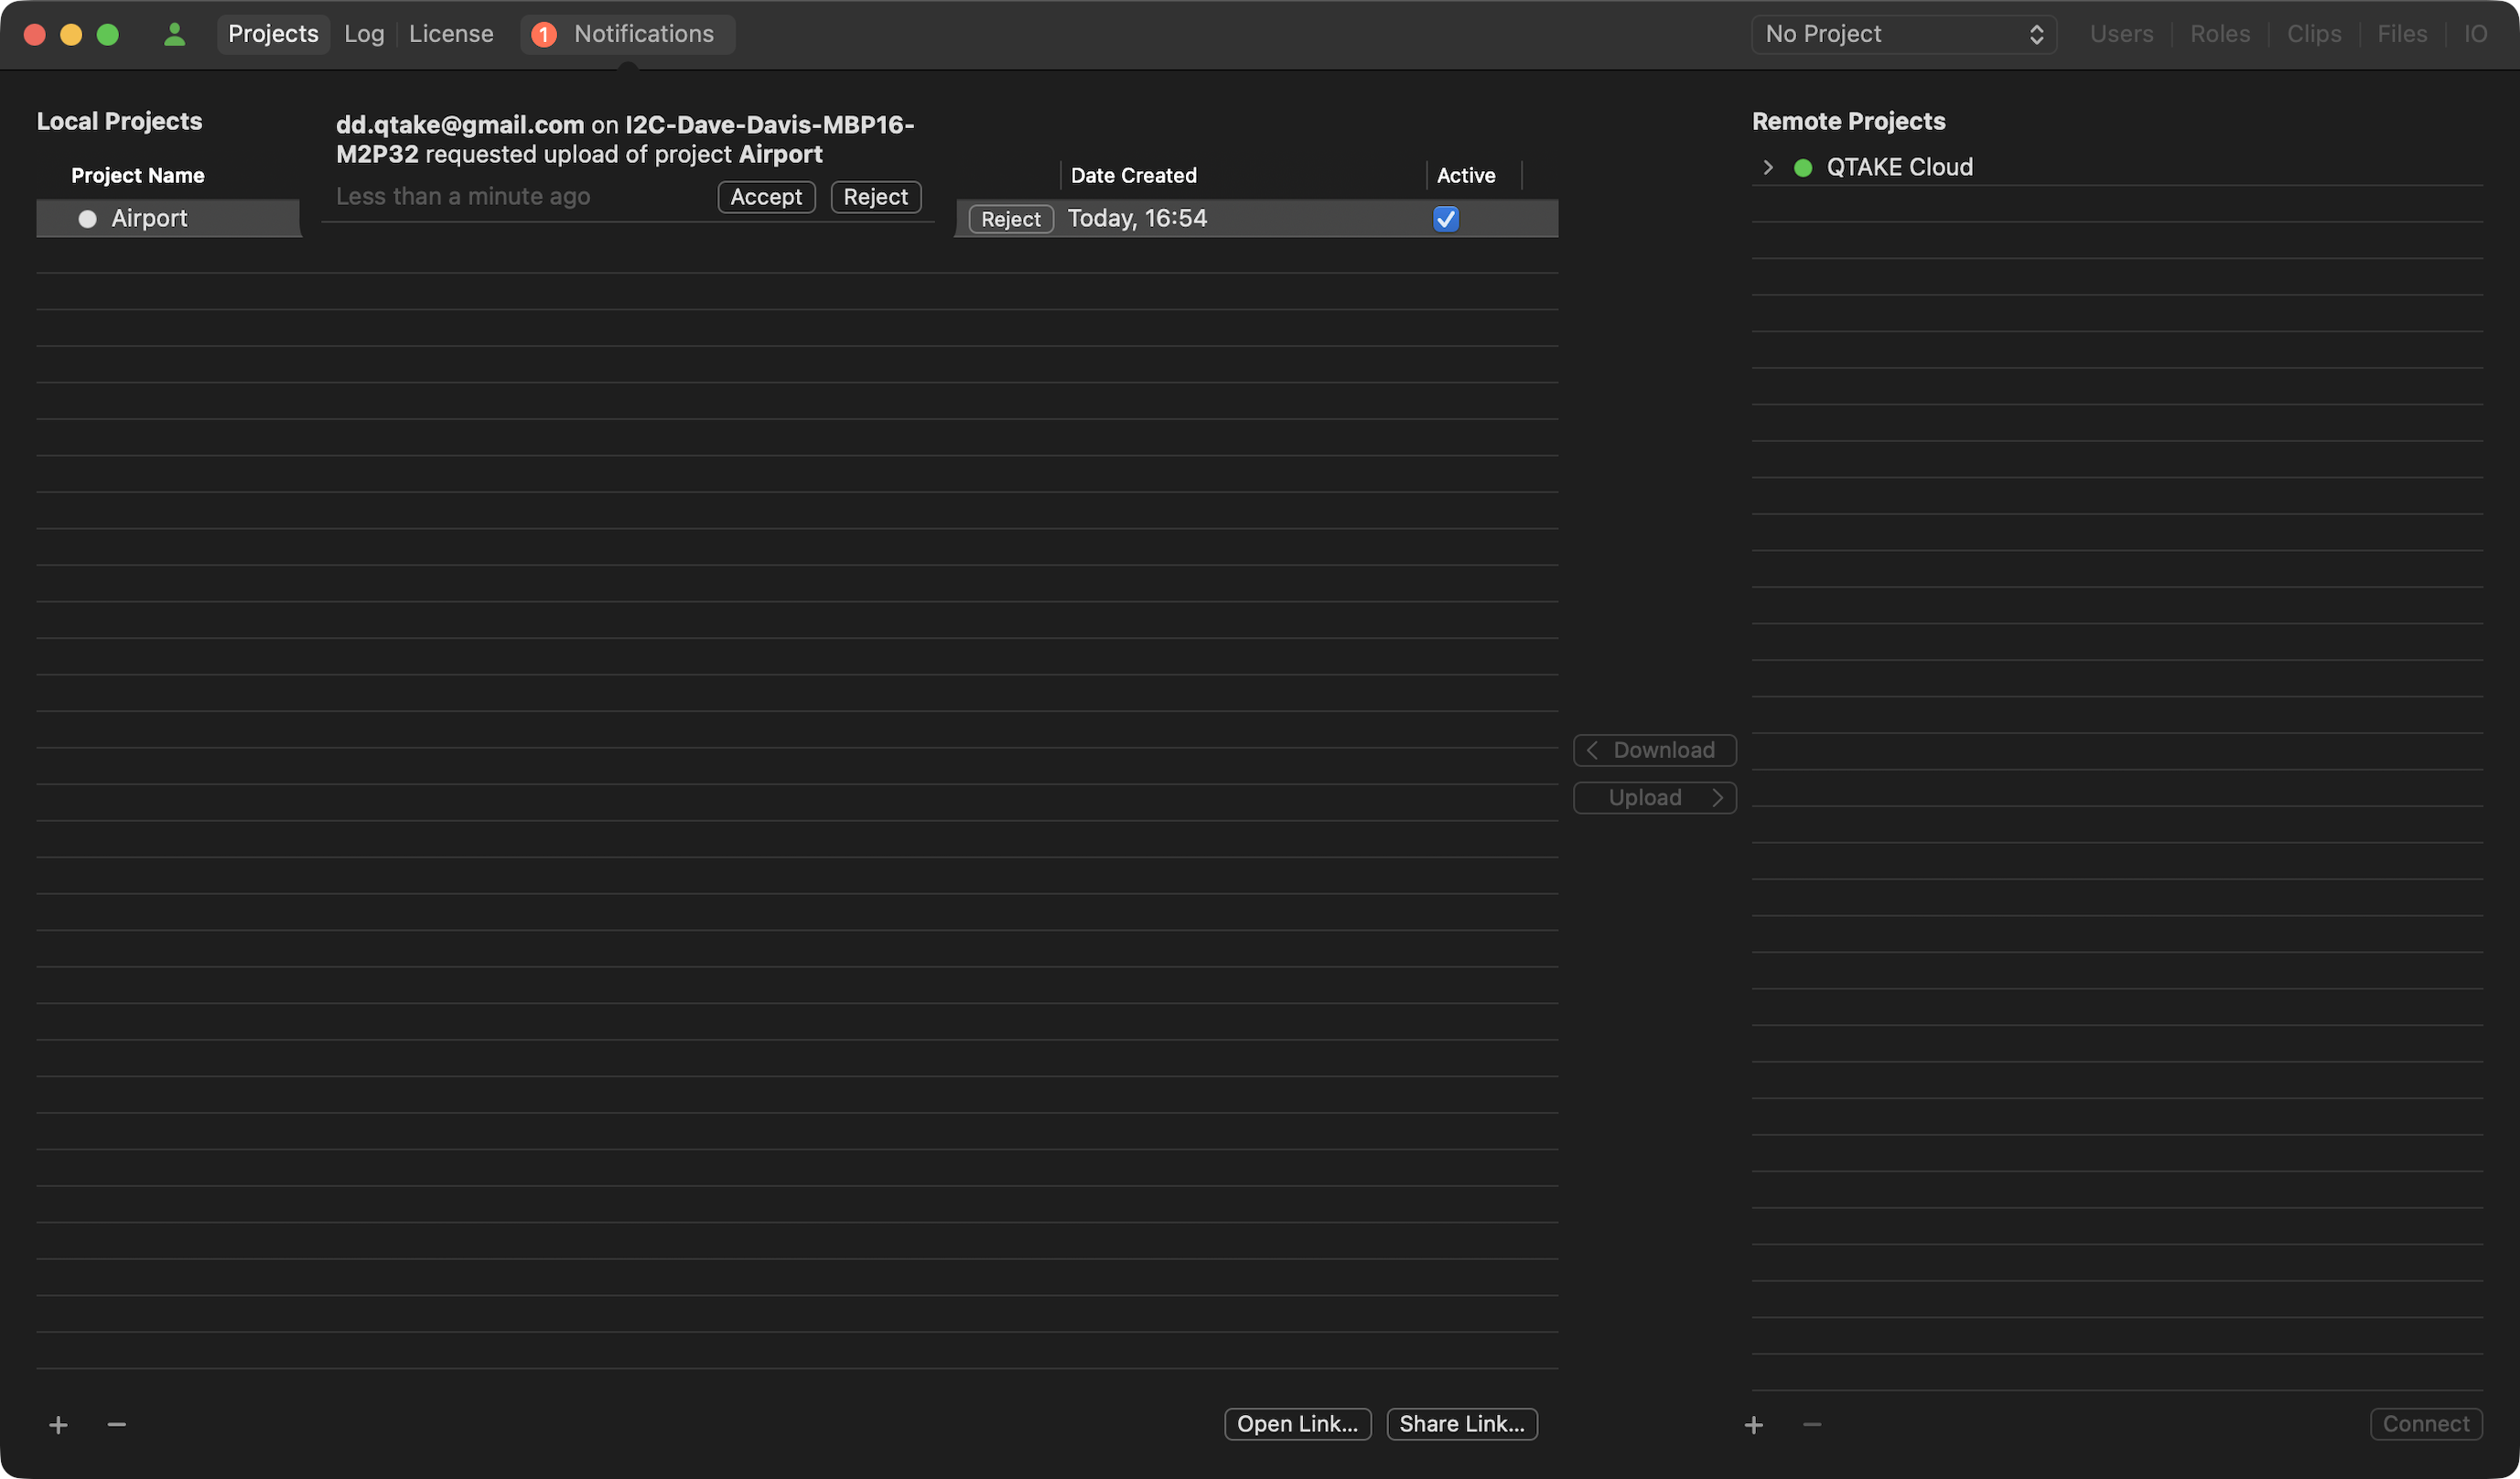
- Notifications area - Displays notifications such as project synchronization requests and user approval requests.
Displayed only when there is a new notification. After the required action is completed, the tab is disabled again. - Project selector - Active project name.
- Project tabs - Approve users, and manage permissions and media in the selected project.
- Main application area - Shows controls for the selected tab.
NOTE:
The Projects and application tabs are always accessible, even when you do not have an active project or a valid license. The Project tabs (Users, Roles, Clips, Files, and IO) are only available when a project is selected.
Settings
When running QTAKE Sync in the foreground as an active application, you can access its menu items. Settings pane is located in the main menu, under the application name.
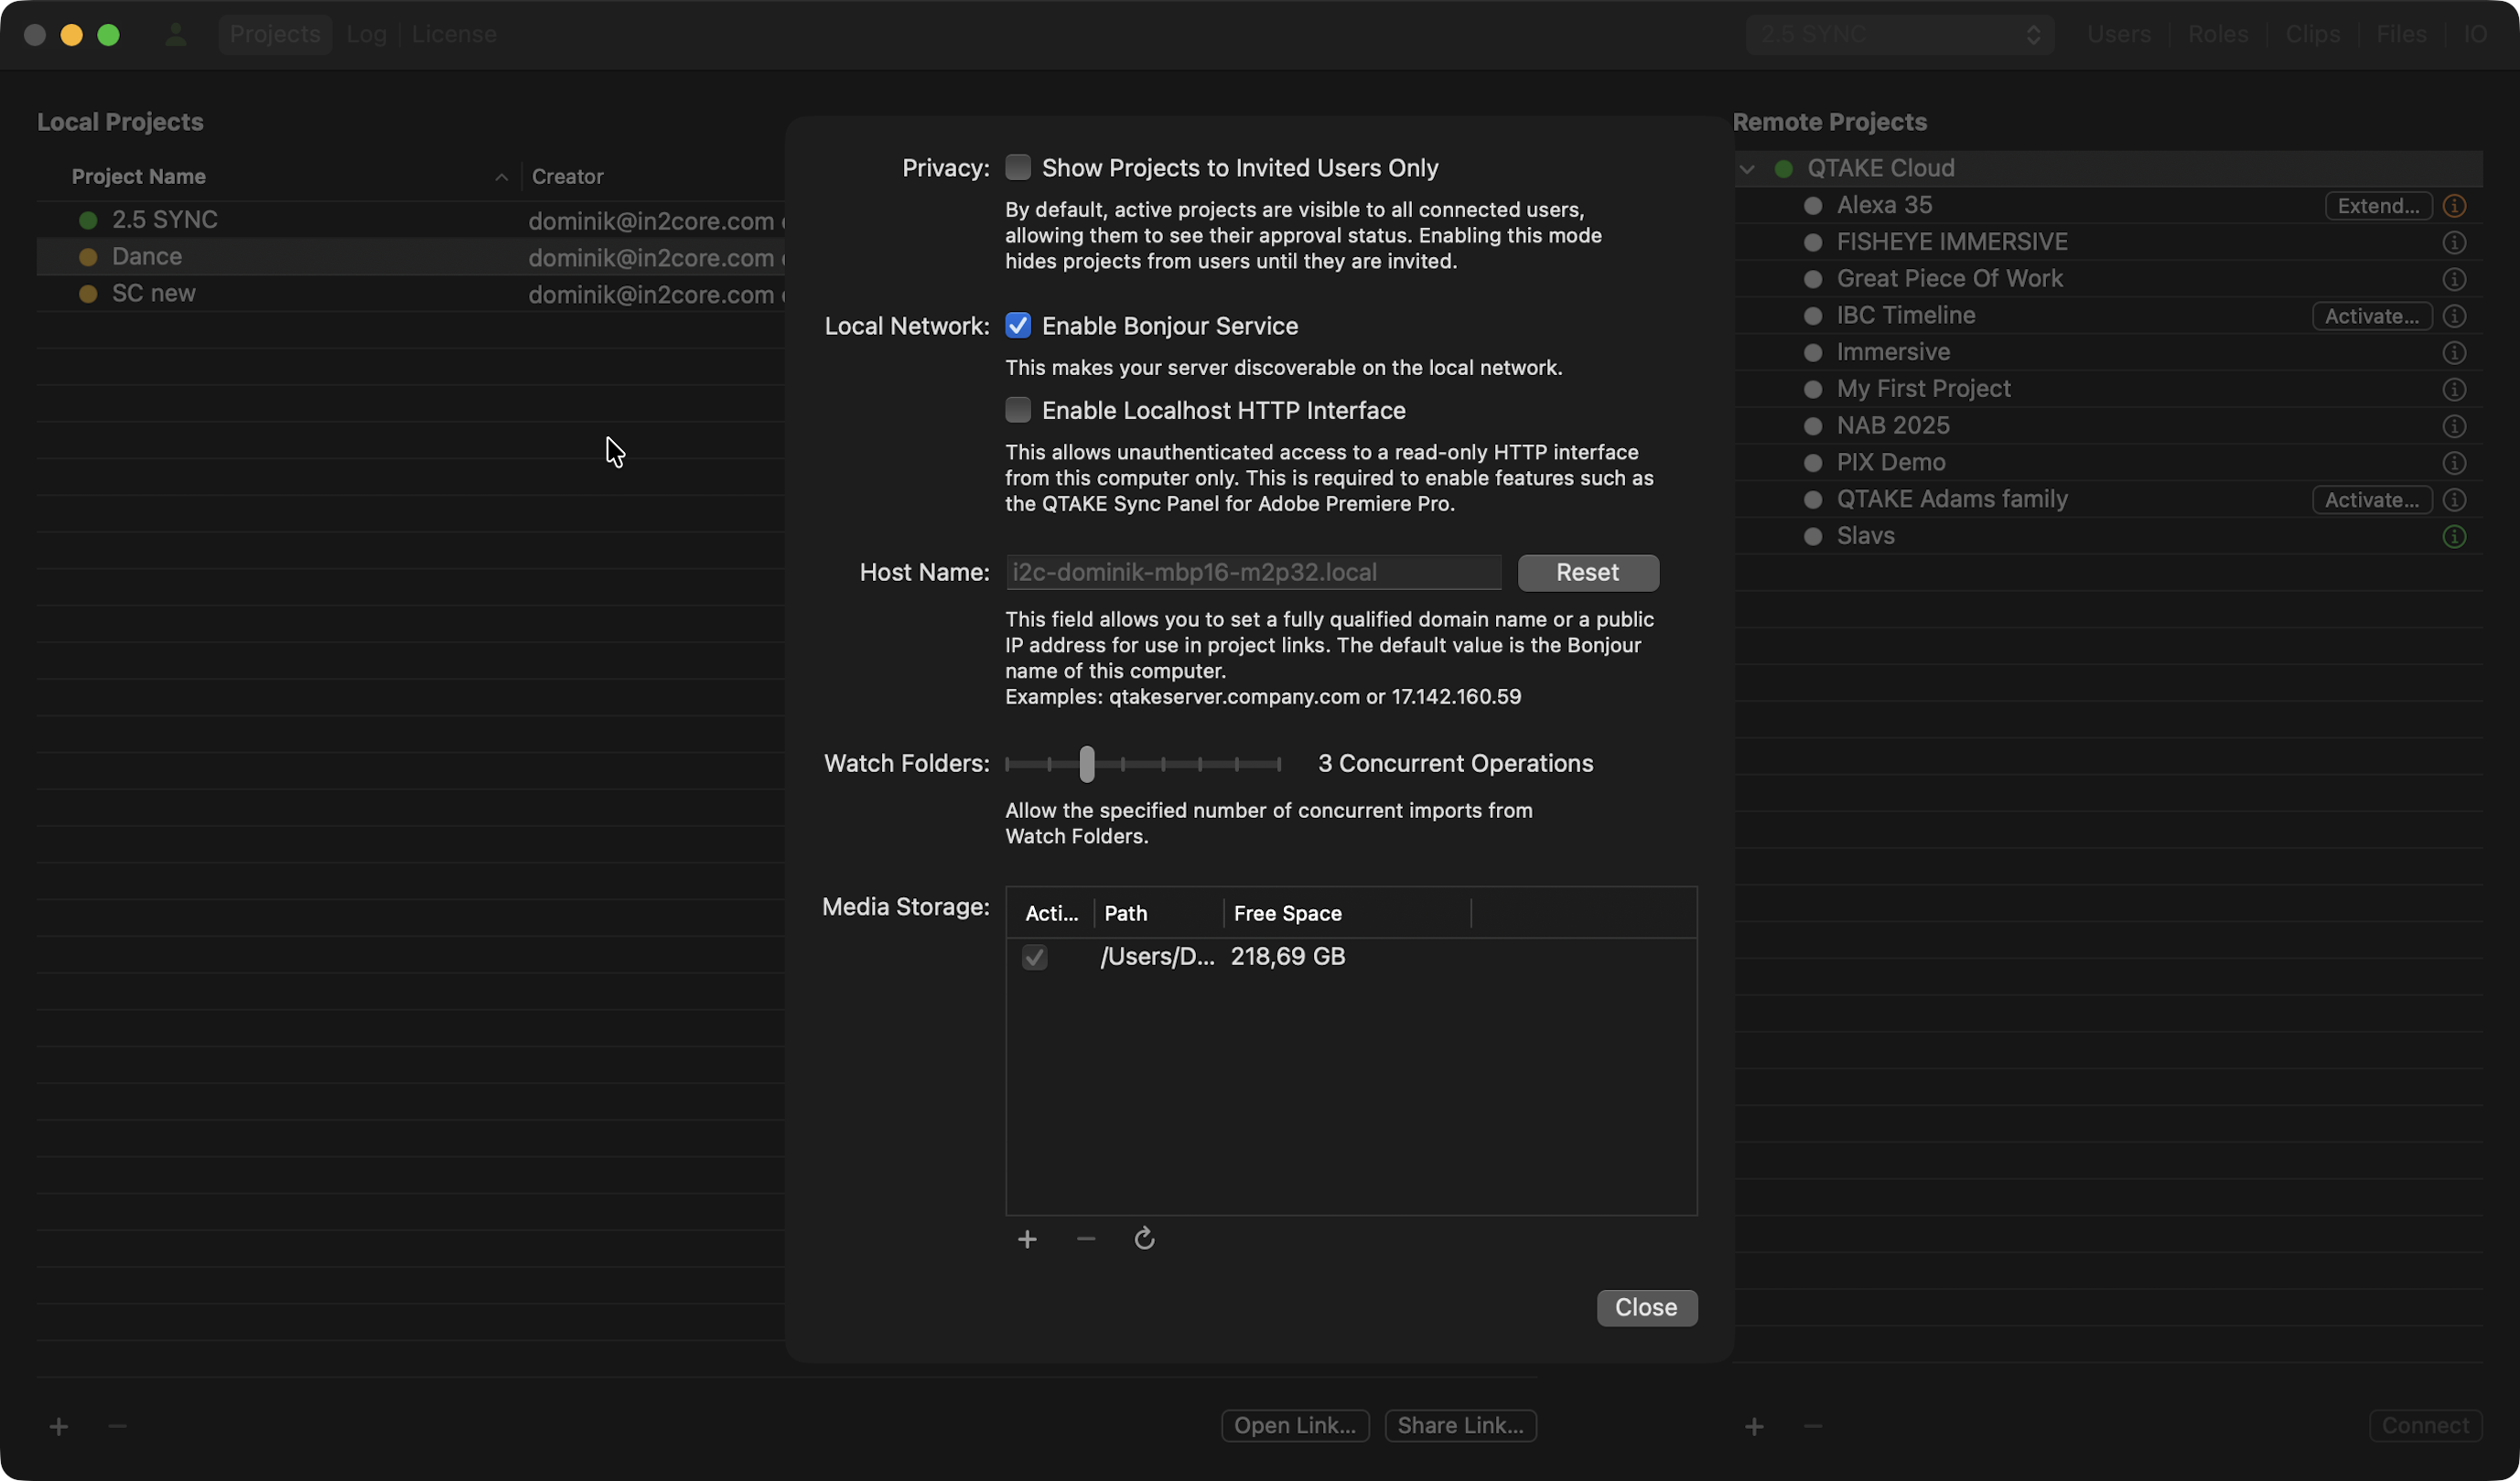
Show Projects to Invited Users Only
When enabled, this setting hides all projects from the QTAKE Monitor project list unless the user has been explicitly invited. It prevents unauthorized users on the same Wi-Fi or LAN from seeing project titles or requesting access.
To use this feature effectively, the Administrator must pre-populate the Invited Users list within the Project settings using the users’ registered QTAKE Cloud email addresses.
Enable Bonjour Service
This allows computers running QTAKE or QTAKE Sync and iOS devices running QTAKE Monitor to find QTAKE Sync on a local network. If the Bonjour service is disabled, clients will need to manually enter the hostname or IP address of the QTAKE Sync in order to connect.
Host Name
This is the address that QTAKE clients will use to connect to QTAKE Sync. Project links and QTAKE Sync links will by default include the Bonjour name of your QTAKE Sync. However, the Bonjour name will only work on a local network (provided the Bonjour service is not disabled). If you are setting up a remote or cloud-based QTAKE Sync, you can use this field to provide either a fully qualified domain name or a public IP address. Clicking Reset will revert the field to the Bonjour name of your computer.
MEDIA STORAGE
By default, QTAKE Sync stores its media files in ~/Library/Application Support/com.in2core.QtakeServer/Media. You can add additional media locations by clicking the + button below. A dialog will appear, allowing you to type in or browse for the new media location. In case you wish to remove an existing media location, its media will be migrated to the new media location.
NOTE:
Do not attempt to manually add or remove clips from the media directory. QTAKE Sync only accepts files uploaded from QTAKE or QTAKE Monitor or imported via a watch folder.
RECOMMENDATION:
When running QTAKE Sync on the same computer as QTAKE, we strongly recommend that you use the same media drive. To do so, create a new folder (e.g. QTAKE Sync Media) at the root level of your media drive and add it here. When sharing a media drive with QTAKE, QTAKE Sync will use hard links to avoid having to copy your media. Note that while hard links are indistinguishable from actual copies in the Finder, you will know the system is working correctly when incoming media is tagged with a Local Link badge in the Files tab.
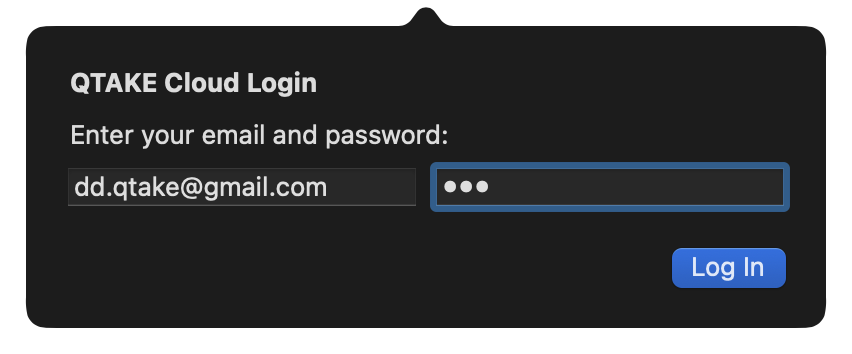
USER ACCOUNT
Click the User button to log in or create a QTAKE account. A QTAKE account is needed to synchronize projects with other clients. If you already have a QTAKE account, you can easily log in using the same login credentials. If you already have a QTAKE Shop account, utilize the same login credentials for QTAKE Sync as well. This saves you from having to log in to QTAKE Shop separately in the License tab.
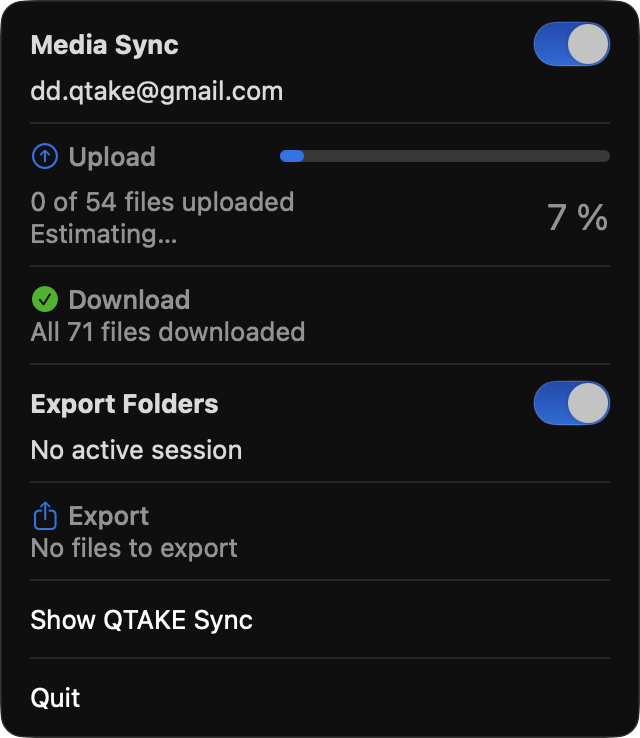
Upload Visualization in macOS Menu Bar
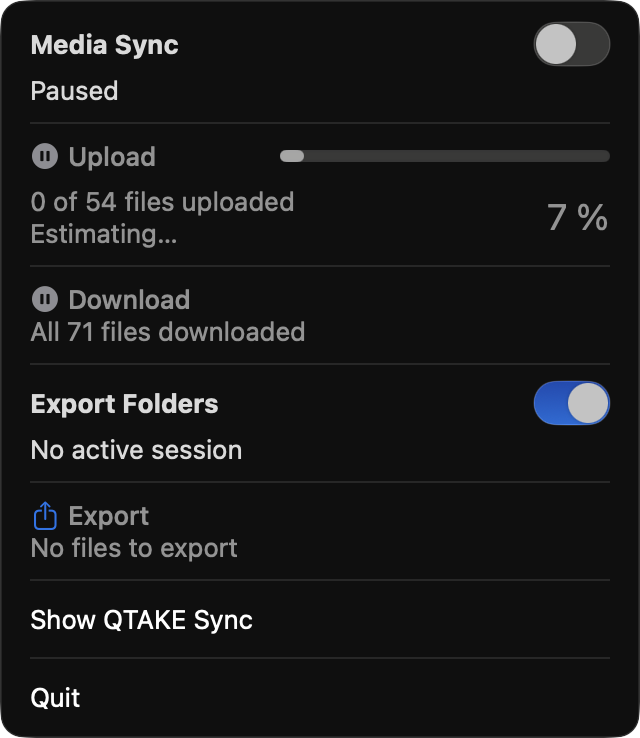
The QTAKE Sync Menu Bar Icon (located near the system clock) provides a high-level overview of server activity and quick access to critical sync controls. It allows you to monitor background tasks while working in other applications.
- Media Sync Status
This section provides real-time feedback on synchronization between your local storage and the QTAKE Cloud or other synced stations.
Progress Tracking: Displays the number of files remaining to upload and download.
Detailed Progress: Shows a percentage bar for current file transfers.
Enable / Pause: Toggle the sync engine ON or OFF instantly.
Tip: Pausing Media Sync is useful when you need to prioritize local network bandwidth for a high-speed data offload or a critical live stream.
- Export Folder Monitoring If you have configured an Export Folder, you can manage it here. Export Progress: Shows the status of files currently being processed or moved to the designated export directory. Enable / Pause: Stop or resume the export process without entering the main settings menu.
- Quick Actions At the bottom of the menu, you will find global commands for the application: Show QTAKE Sync: Instantly brings the main QTAKE Sync window to the front. Quit: Gracefully shuts down the server and all background sync processes.
|
|
QTAKE Sync
Projects
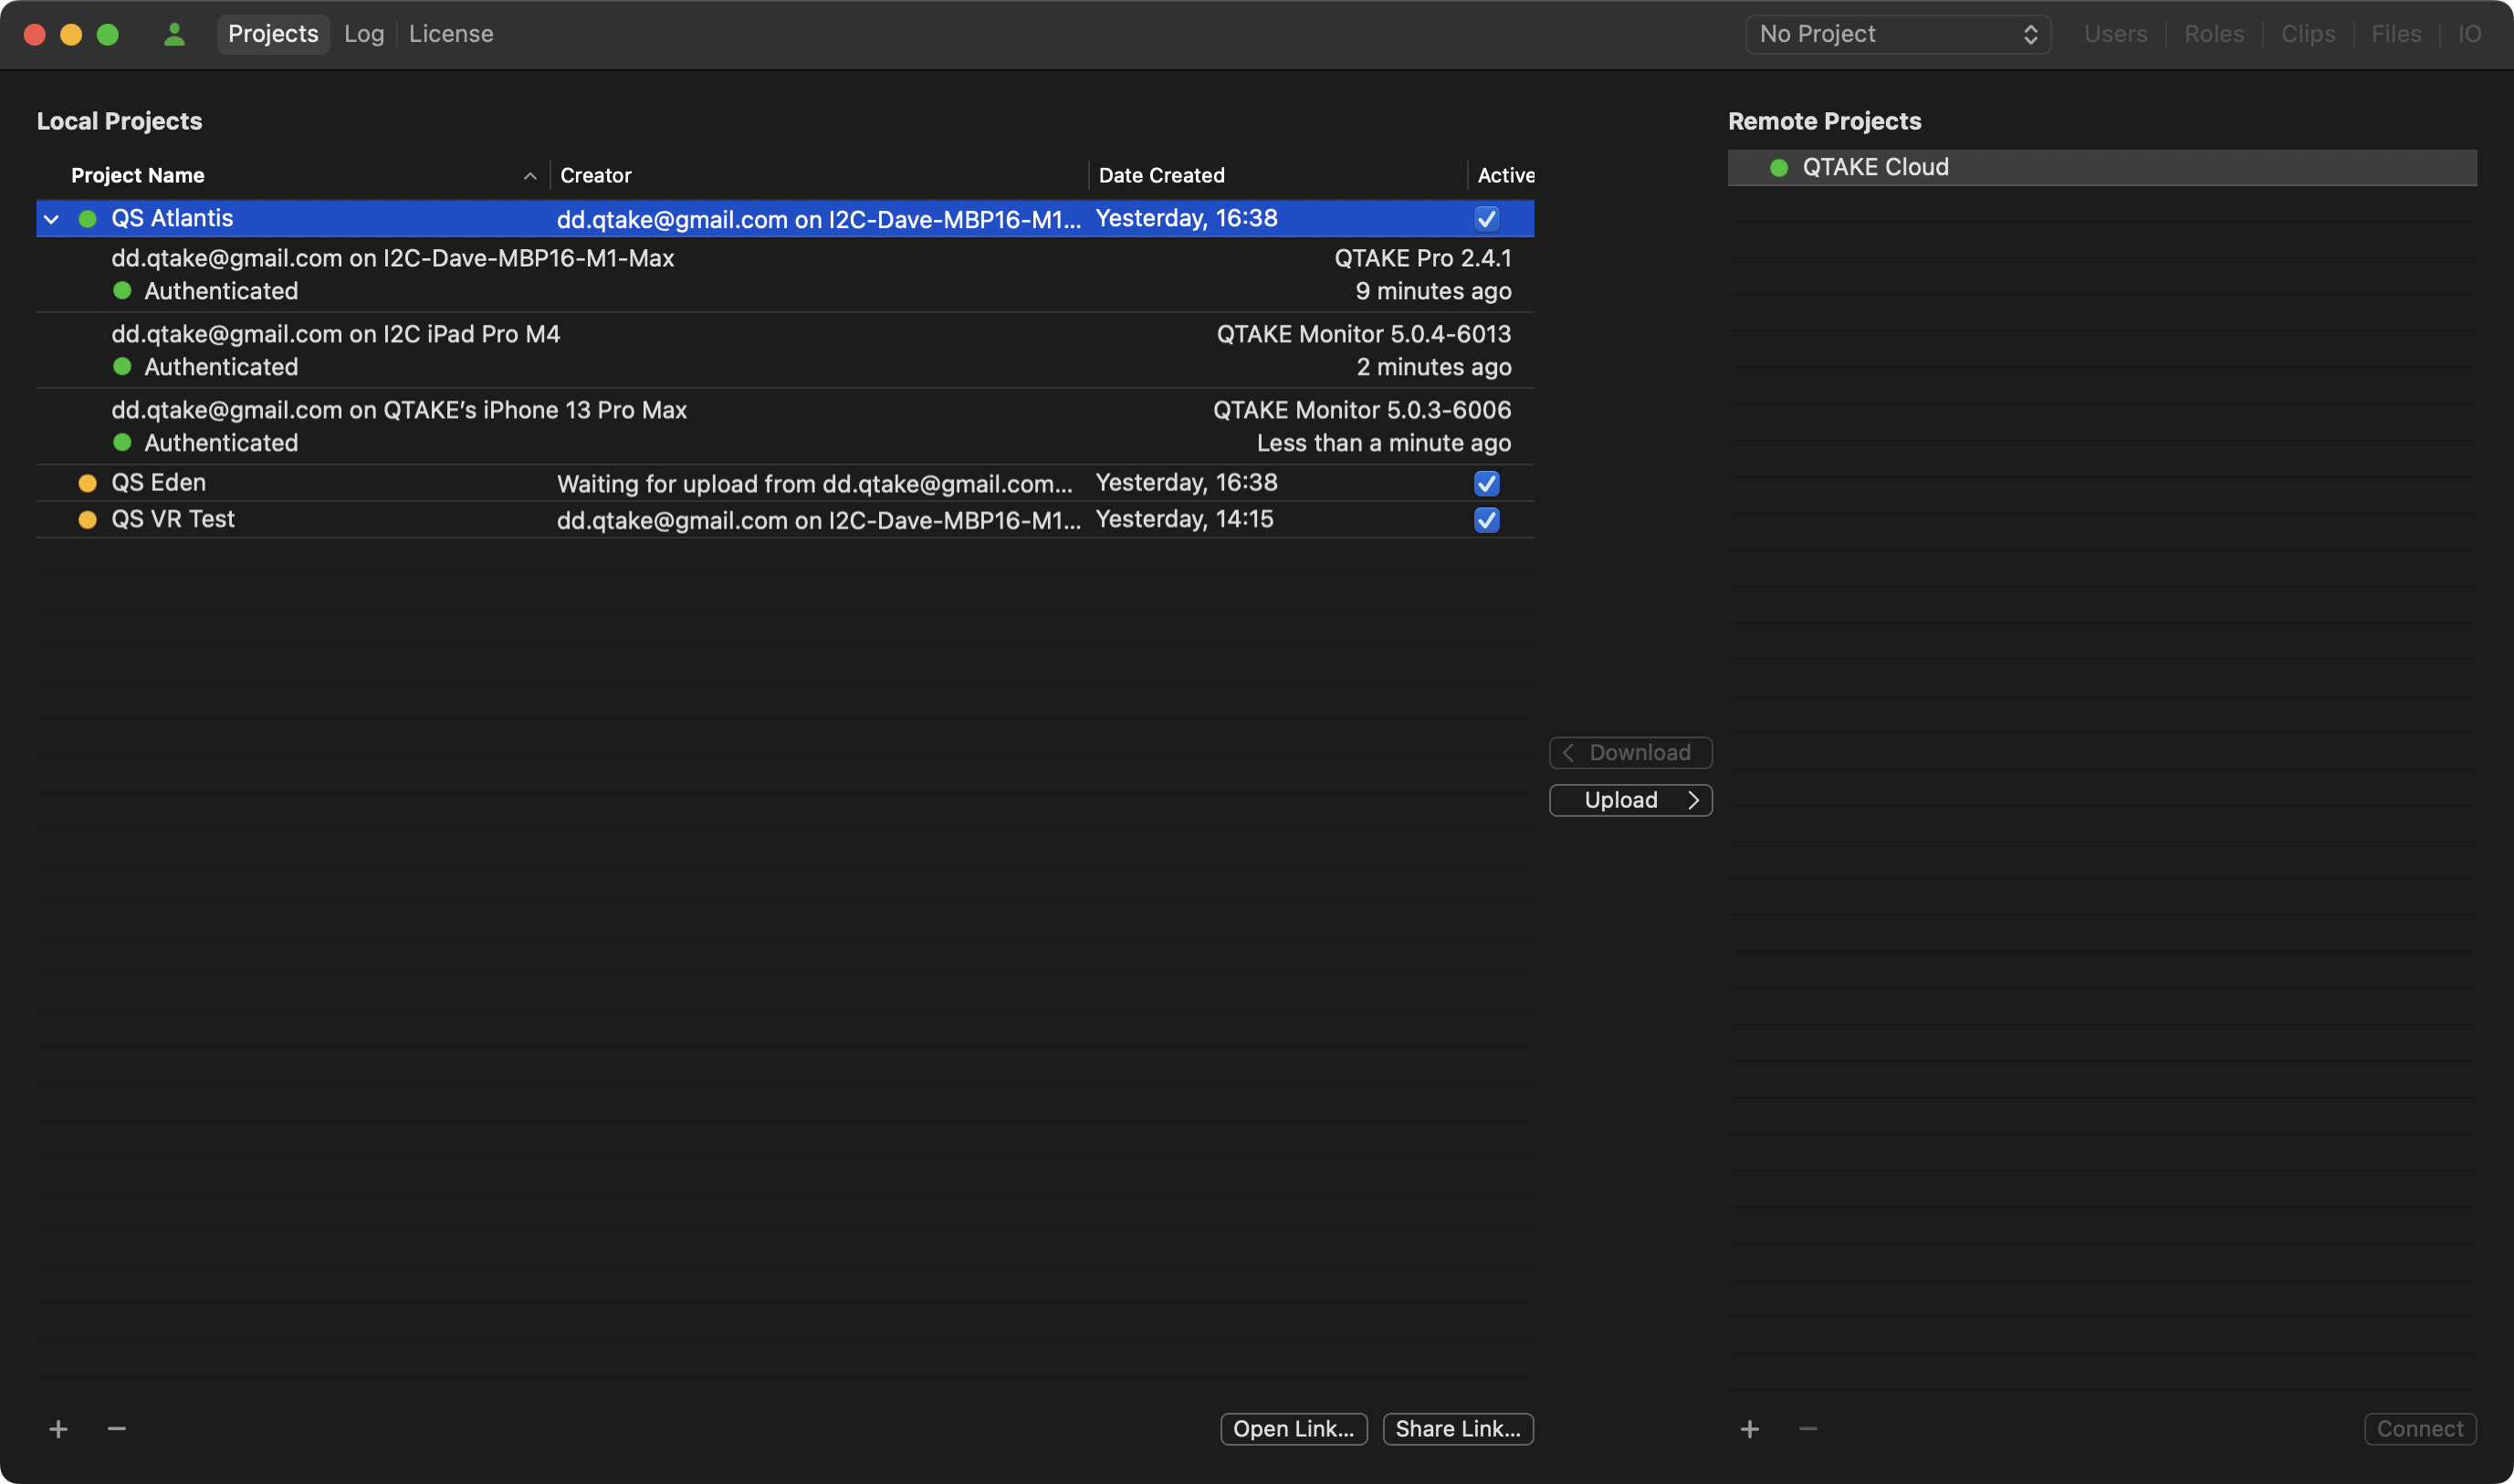
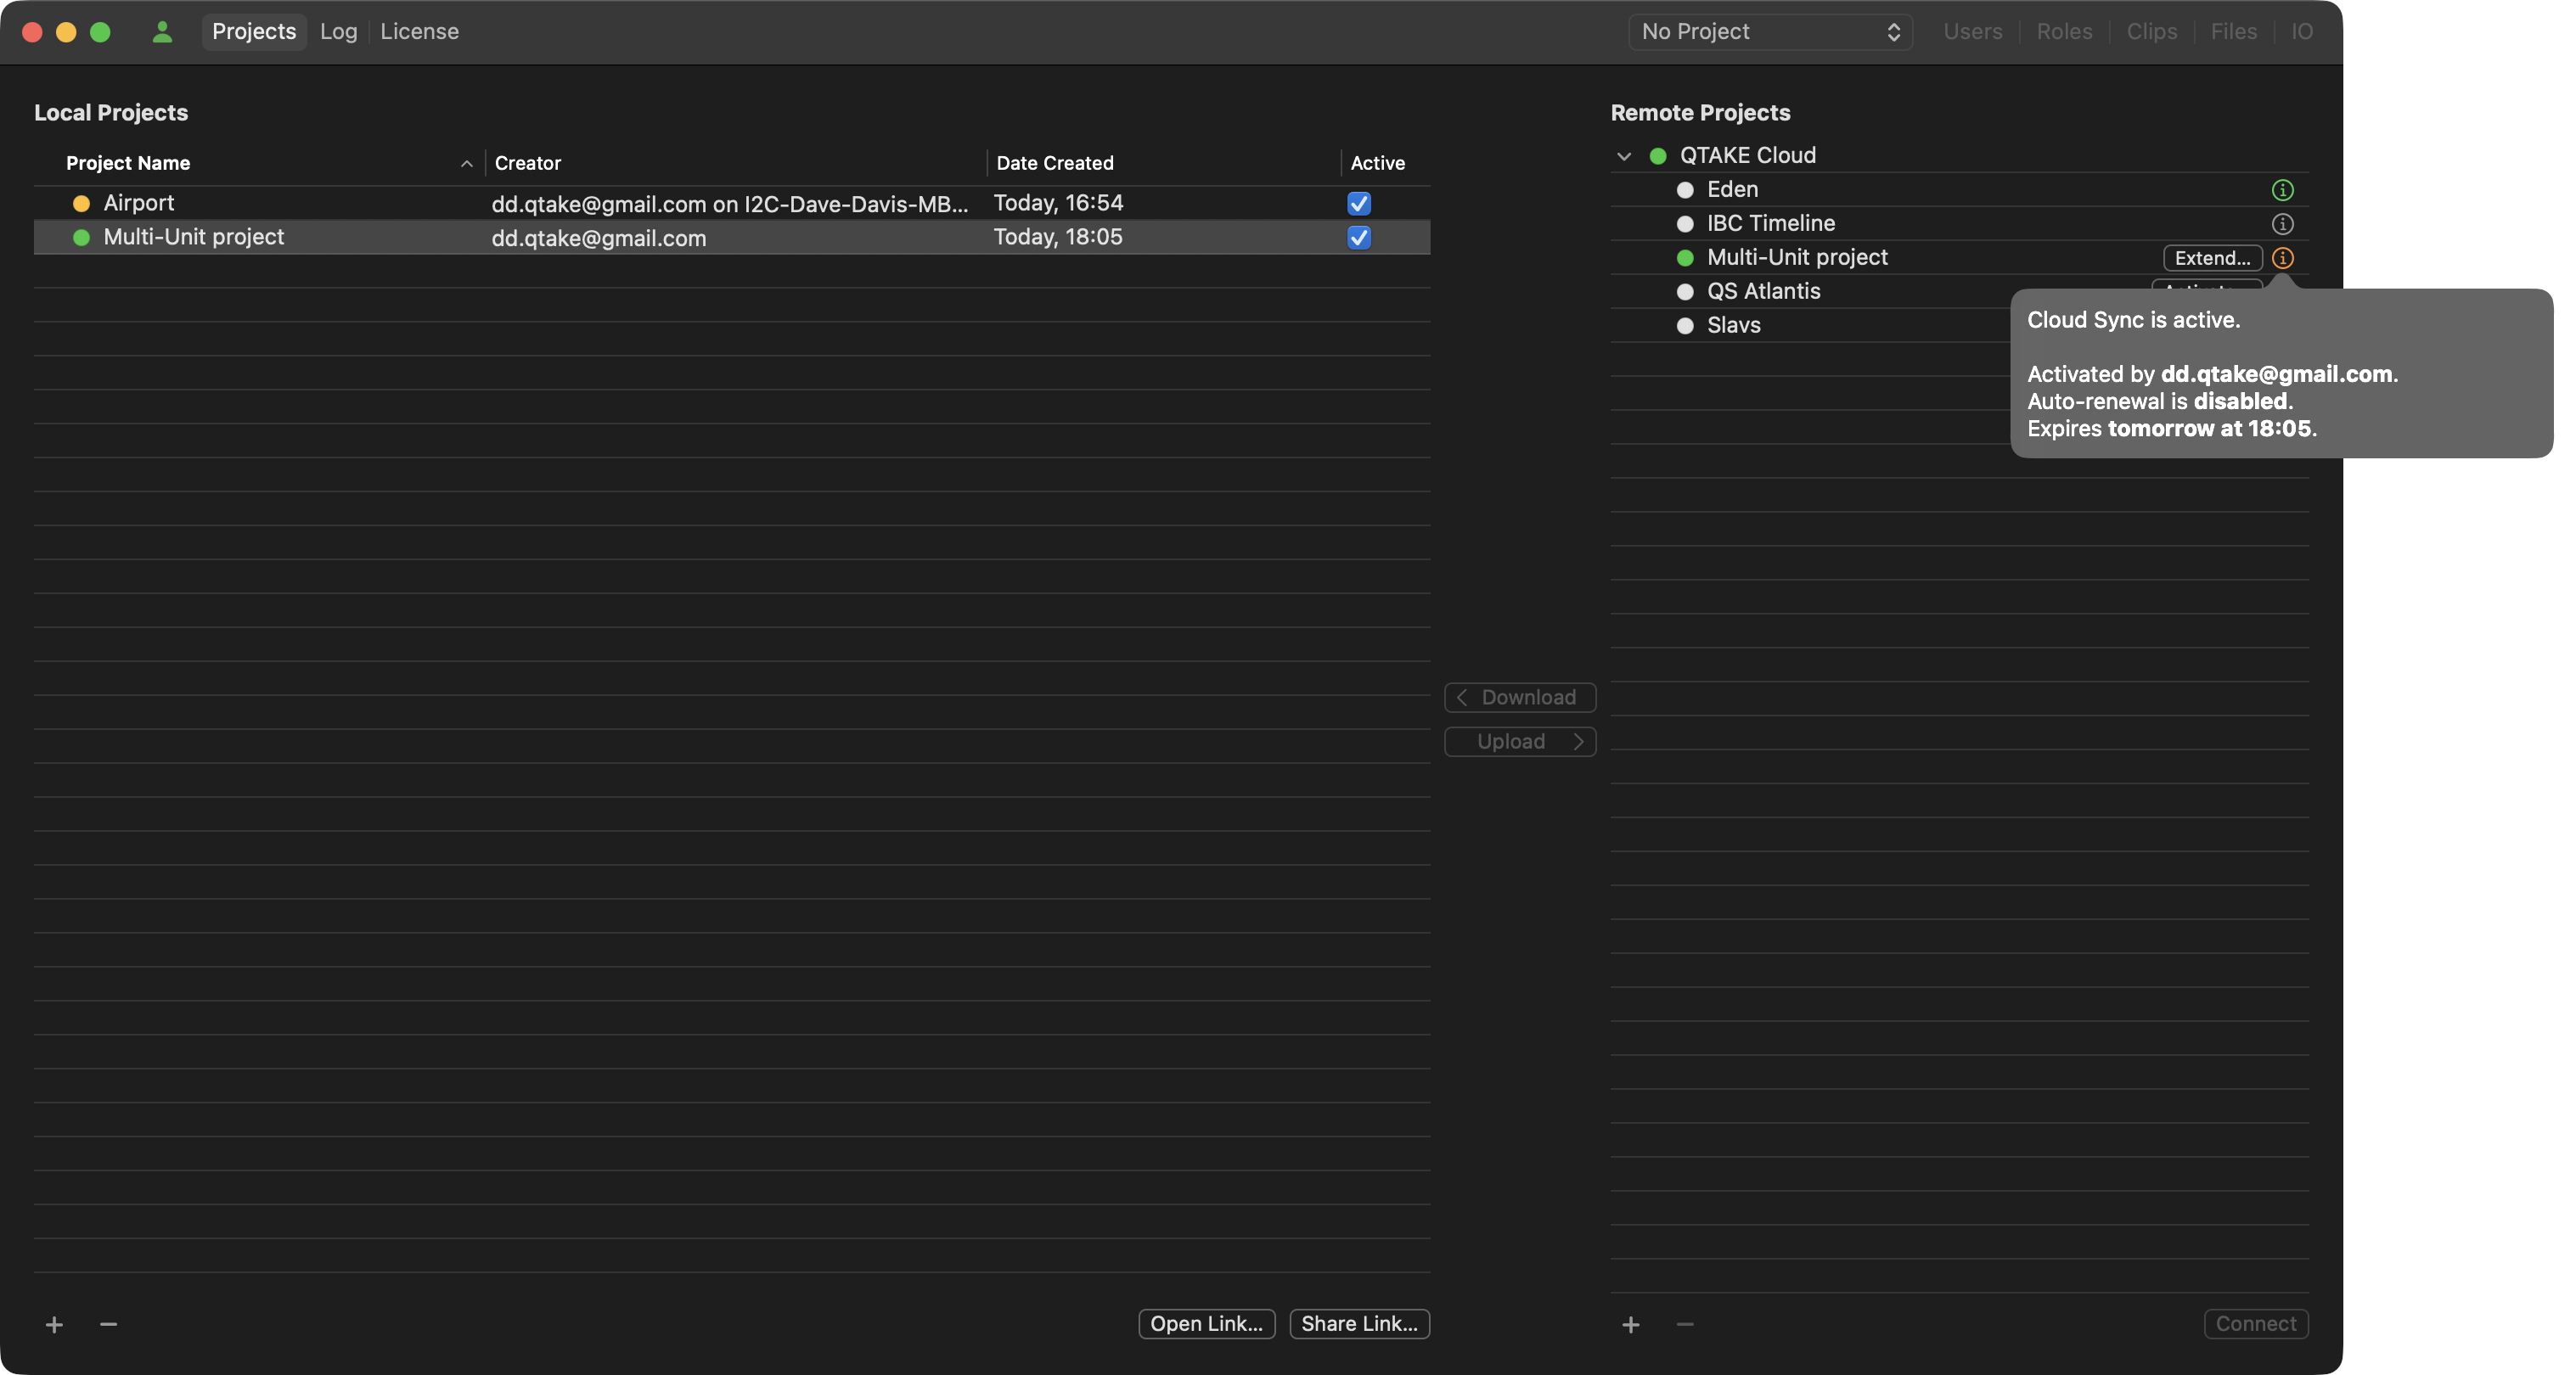
The Projects tab lists local and remote projects, allowing you to synchronize projects between multiple units via QTAKE Cloud. The main program area is divided into two columns. The left column lists local projects. These projects have been either created through QTAKE Sync, uploaded from QTAKE, or downloaded from QTAKE Cloud. In the Creator column, you can find the email of the user who created the project.
Unified Projects Tab
Starting with version 3.0.0, the Connections tab has been merged into the Projects tab, and all project connections are now displayed under the active project name.
When an active connection to a project is established, an arrow is displayed in front of the project name.
Click the arrow to either expand or collapse the recent connections.
When expanded, client devices connected to a local project are listed.
With each connection, you will see the device name, the logged-in user, the application version, the connection status, and the date and time the status was last updated.
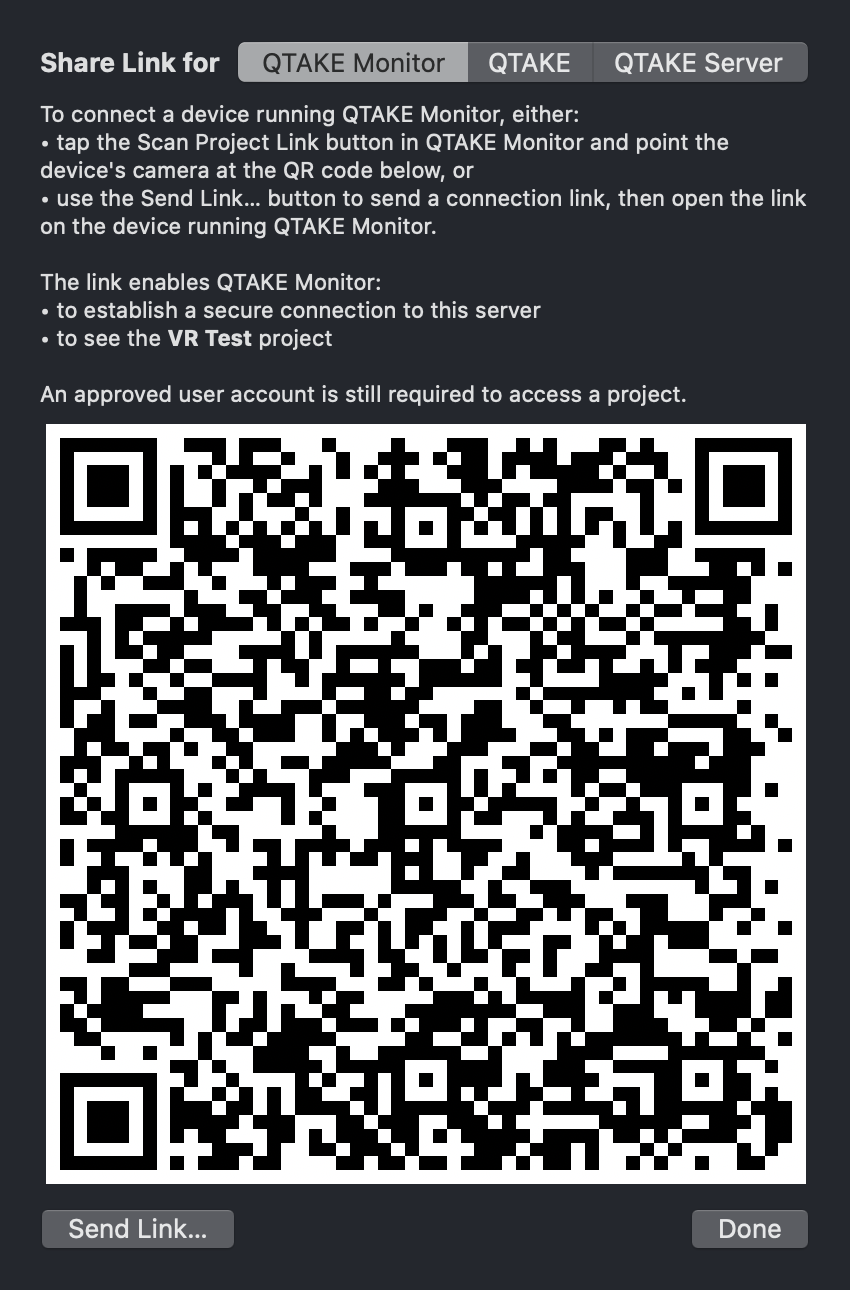
Share Project Link
Security is paramount when making project assets available over a network. QTAKE and QTAKE Sync employ a multi-layered security approach. An internet-facing QTAKE Sync with a domain can verify its authenticity with an SSL certificate. However, a local Sync cannot, so in order to ensure its identity QTAKE Sync deploys pre-shared certificate fingerprints. Before QTAKE clients (QTAKE, QTAKE Sync, and QTAKE Monitor) can connect to a QTAKE Sync project, it needs to provide such a fingerprint via the Share Project Link button. Project links can be shared with QTAKE Monitor via QR code, AirDrop, Messages, Mail, or other applications that support hyperlinks.
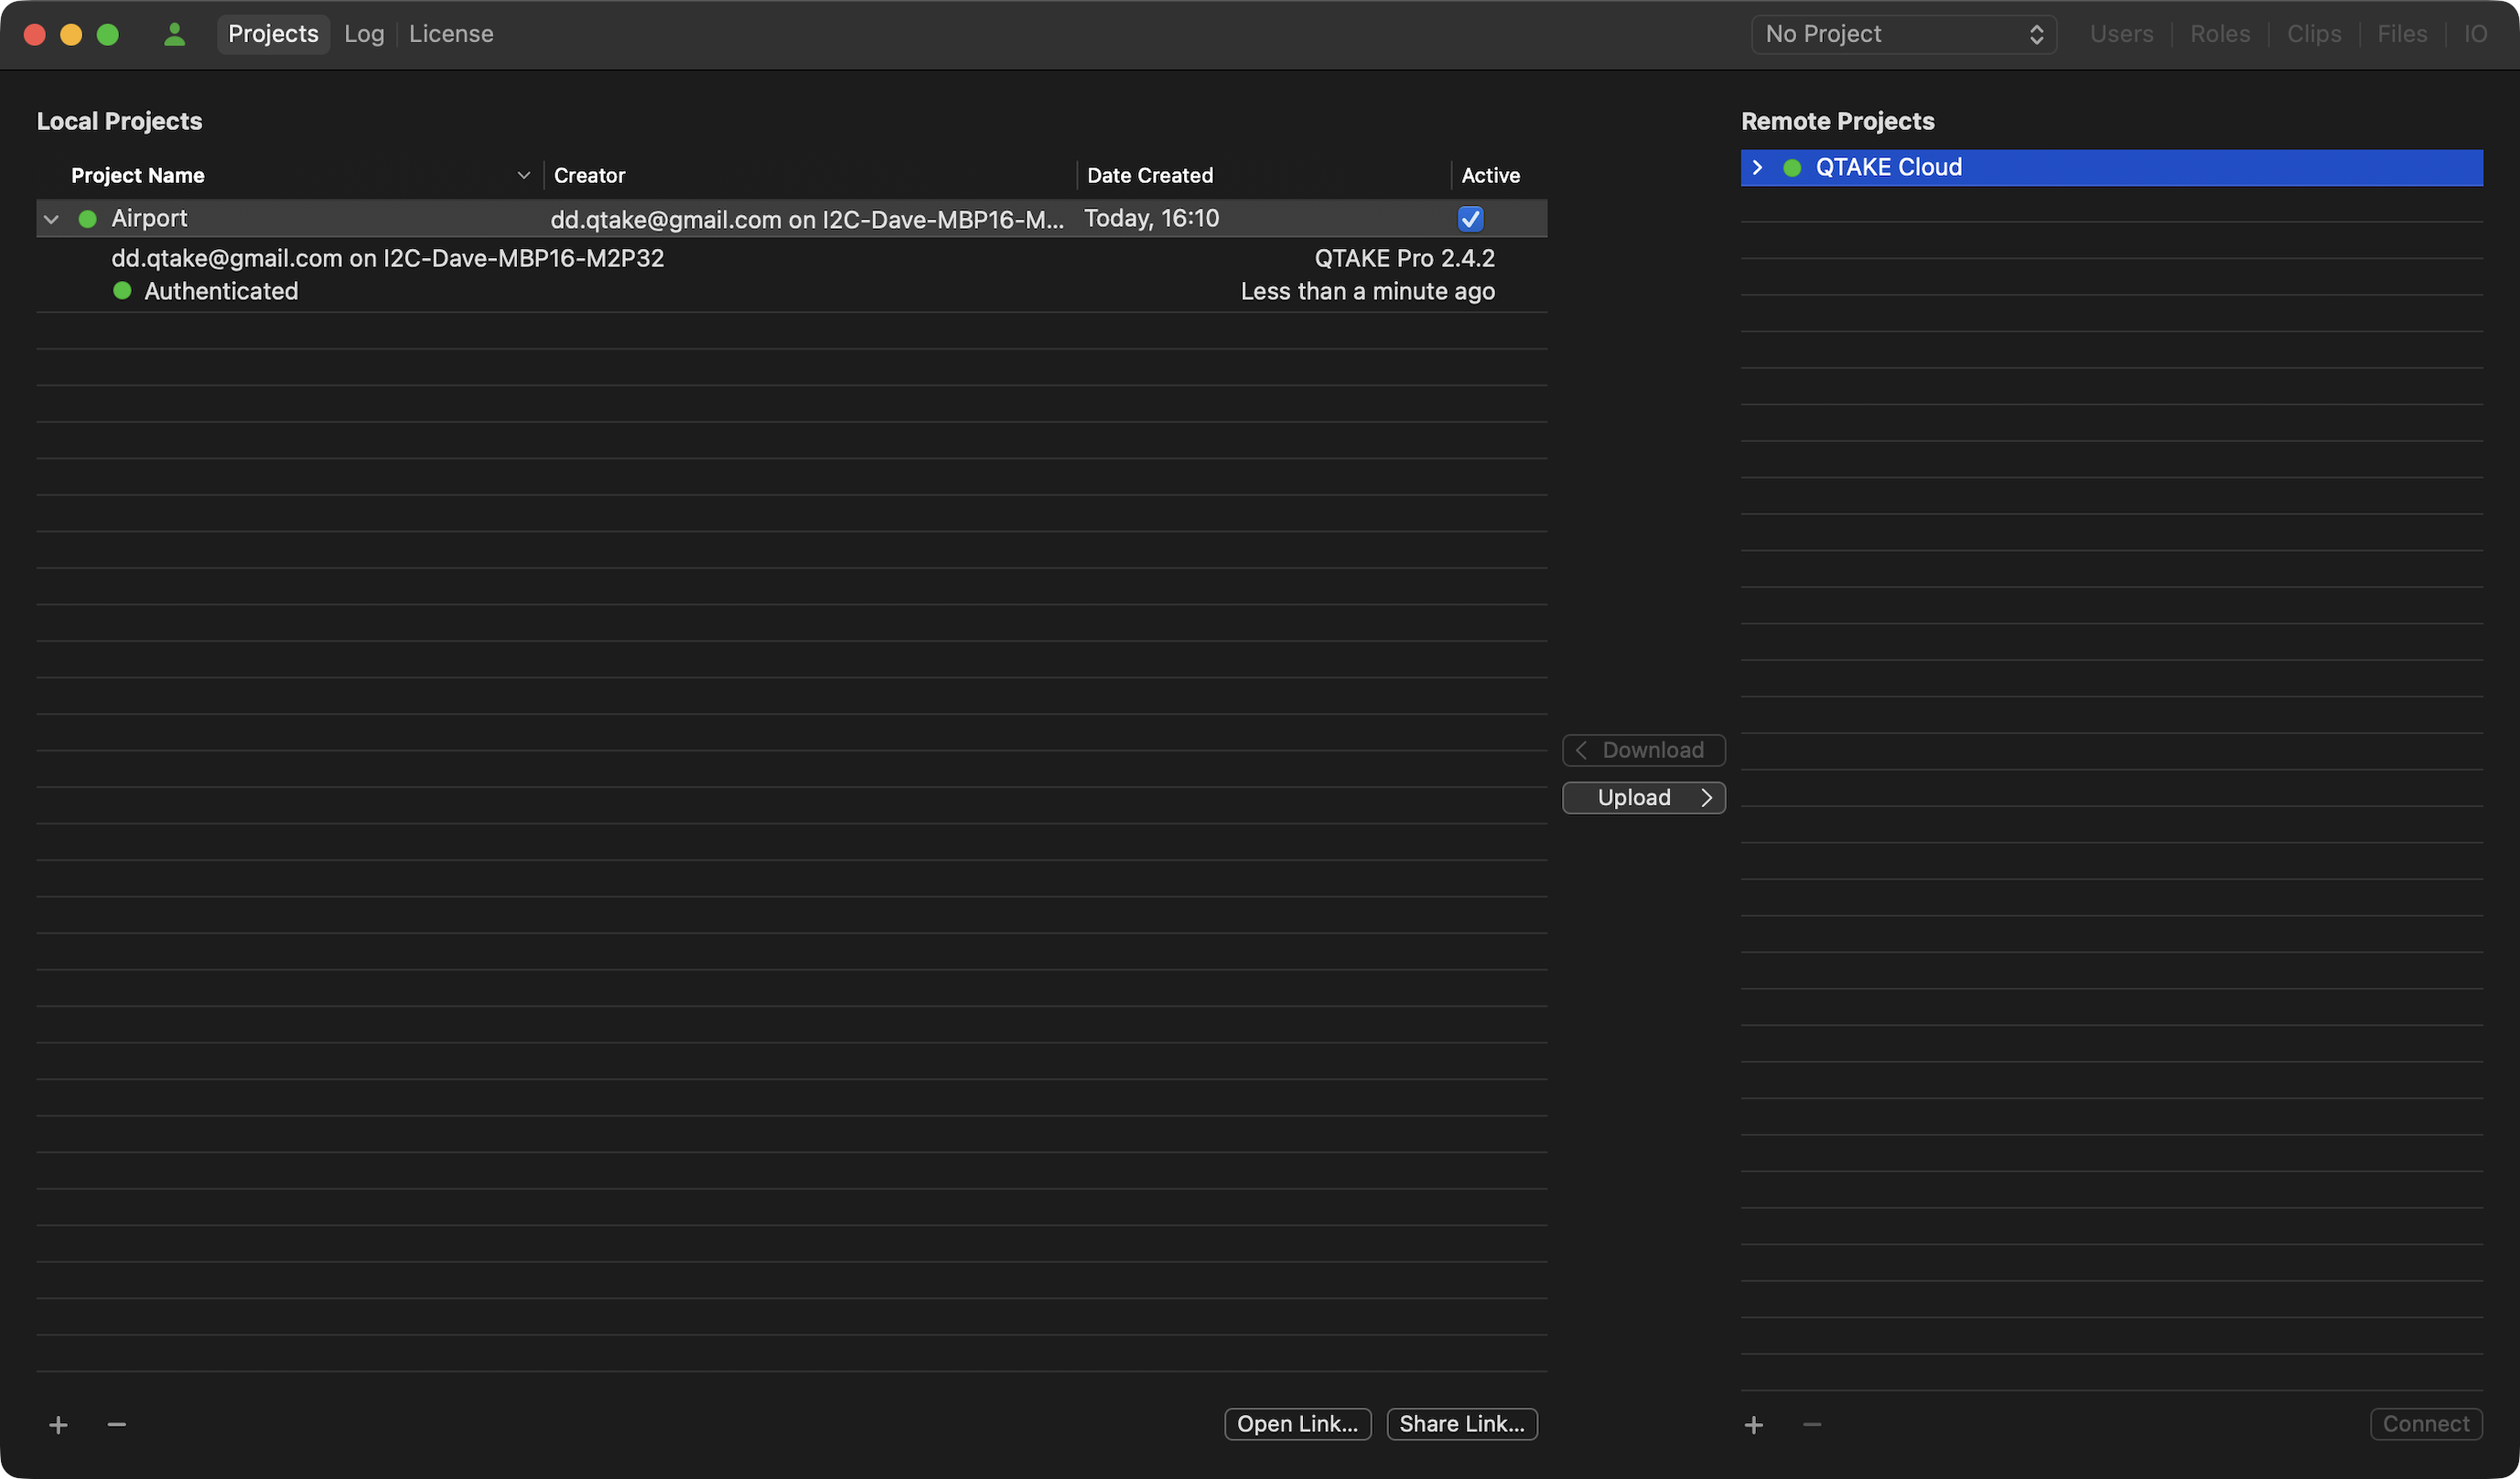
Upload or Download a Project
The Remote Projects list is by default populated with QTAKE Cloud and QTAKE Syncs that have been located via Bonjour on a local network. If a project link has not been shared, Sync instances in the list will be marked with an orange dot. Hovering the mouse over a status dot will show the status of the connection. When the status dot is green you can request to download authorized projects. You can alternatively select a local project to upload. The remote Sync administrator will receive a notification and can approve the upload request.
To add a QTAKE SYNC that is not on a local network or has disabled the Bonjour service (see the ENABLE BONJOUR SERVICE section above), click the plus sign (+) at the bottom of the Remote Projects list. You will then have to manually enter the IP address or the hostname of the remote QTAKE Sync.
Once a project has either been downloaded from or uploaded to a remote QTAKE Sync, the projects will stay synchronized, provided there is a network connection between the two.
NOTE:
Typically, there is a single instance of QTAKE Sync on a local network, which manages data synchronization across all connections.
However, if there are two QTAKE Sync instances on a local network working on the same project in a multi-unit setup, you will have to upload the project to QTAKE Cloud, which will manage the data synchronization between the units as a higher-level instance.For this reason, make sure there is no connection between QTAKE Syncs under the Remote Projects tab to avoid any conflicts.
Remove Projects from QTAKE Sync
The Projects tab also allows you to remove local projects from QTAKE Sync. Select the project in the Local Projects list and click the minus (-) button. This will also remove all associated media files.
QTAKE Cloud Sync
To sync your projects across units in multiple locations and to make your content accessible outside the bounds of the local network, upload your project to QTAKE Cloud. To upload your project, select it under Local Projects, then select QTAKE Cloud on the right side, and click Upload.
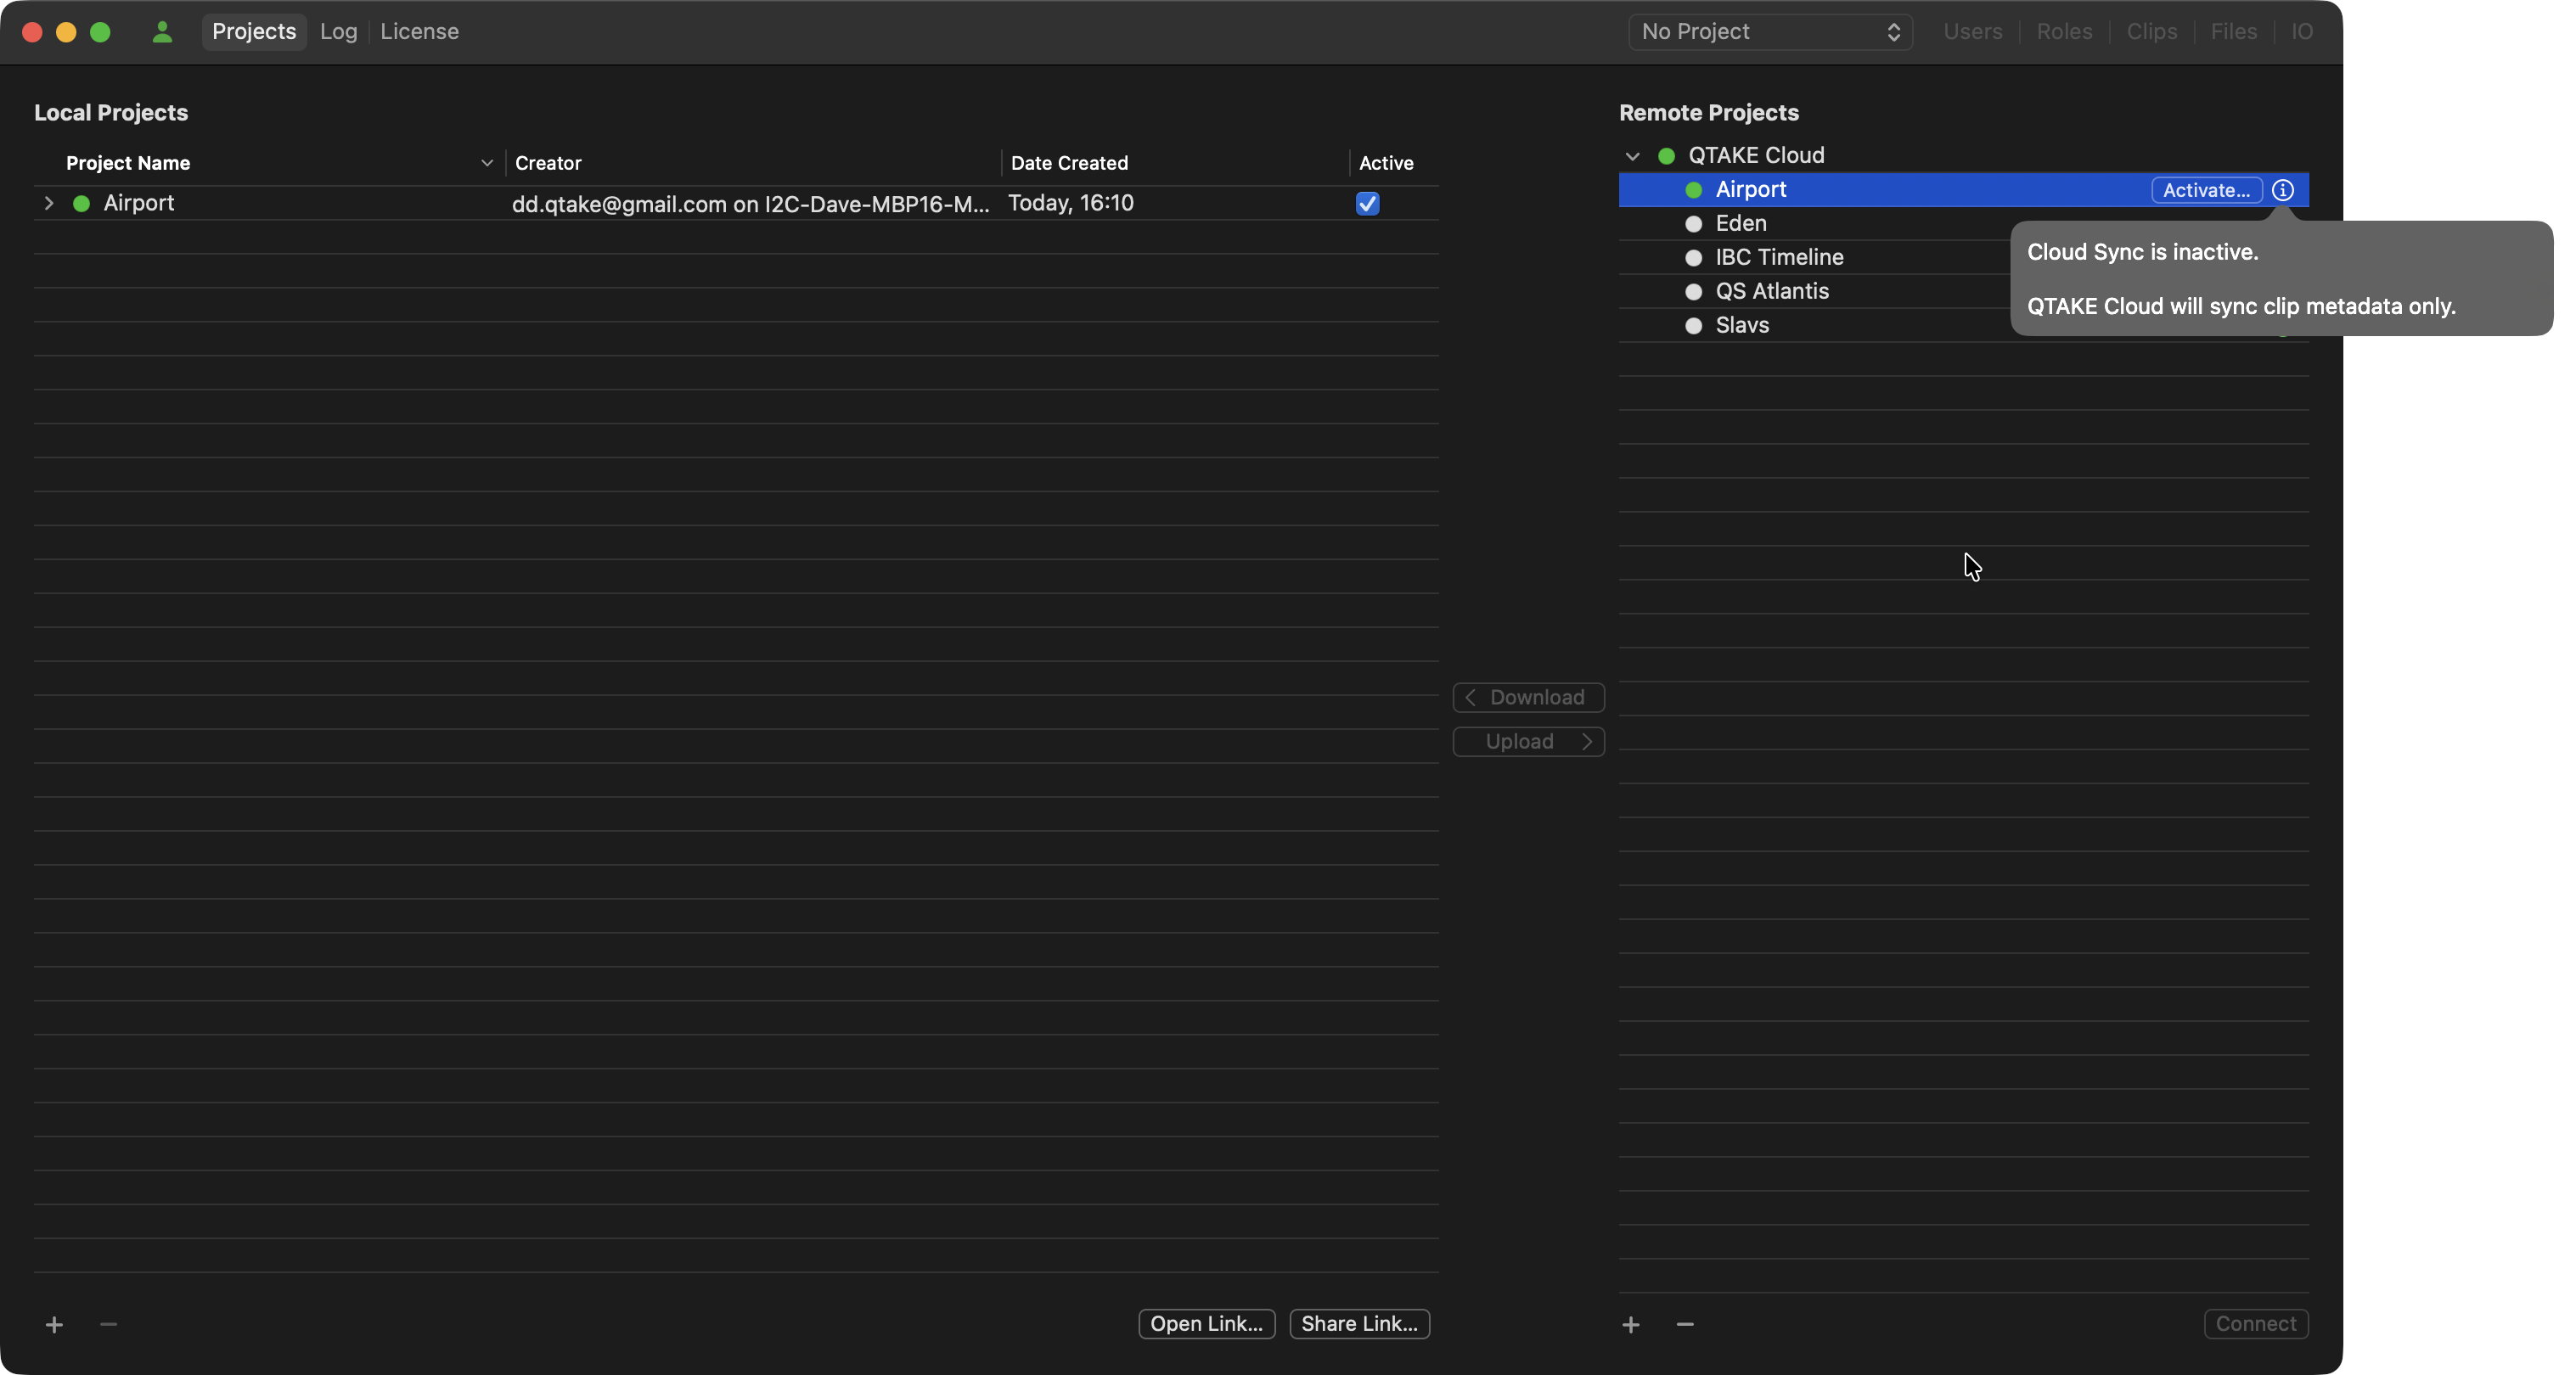
Activation
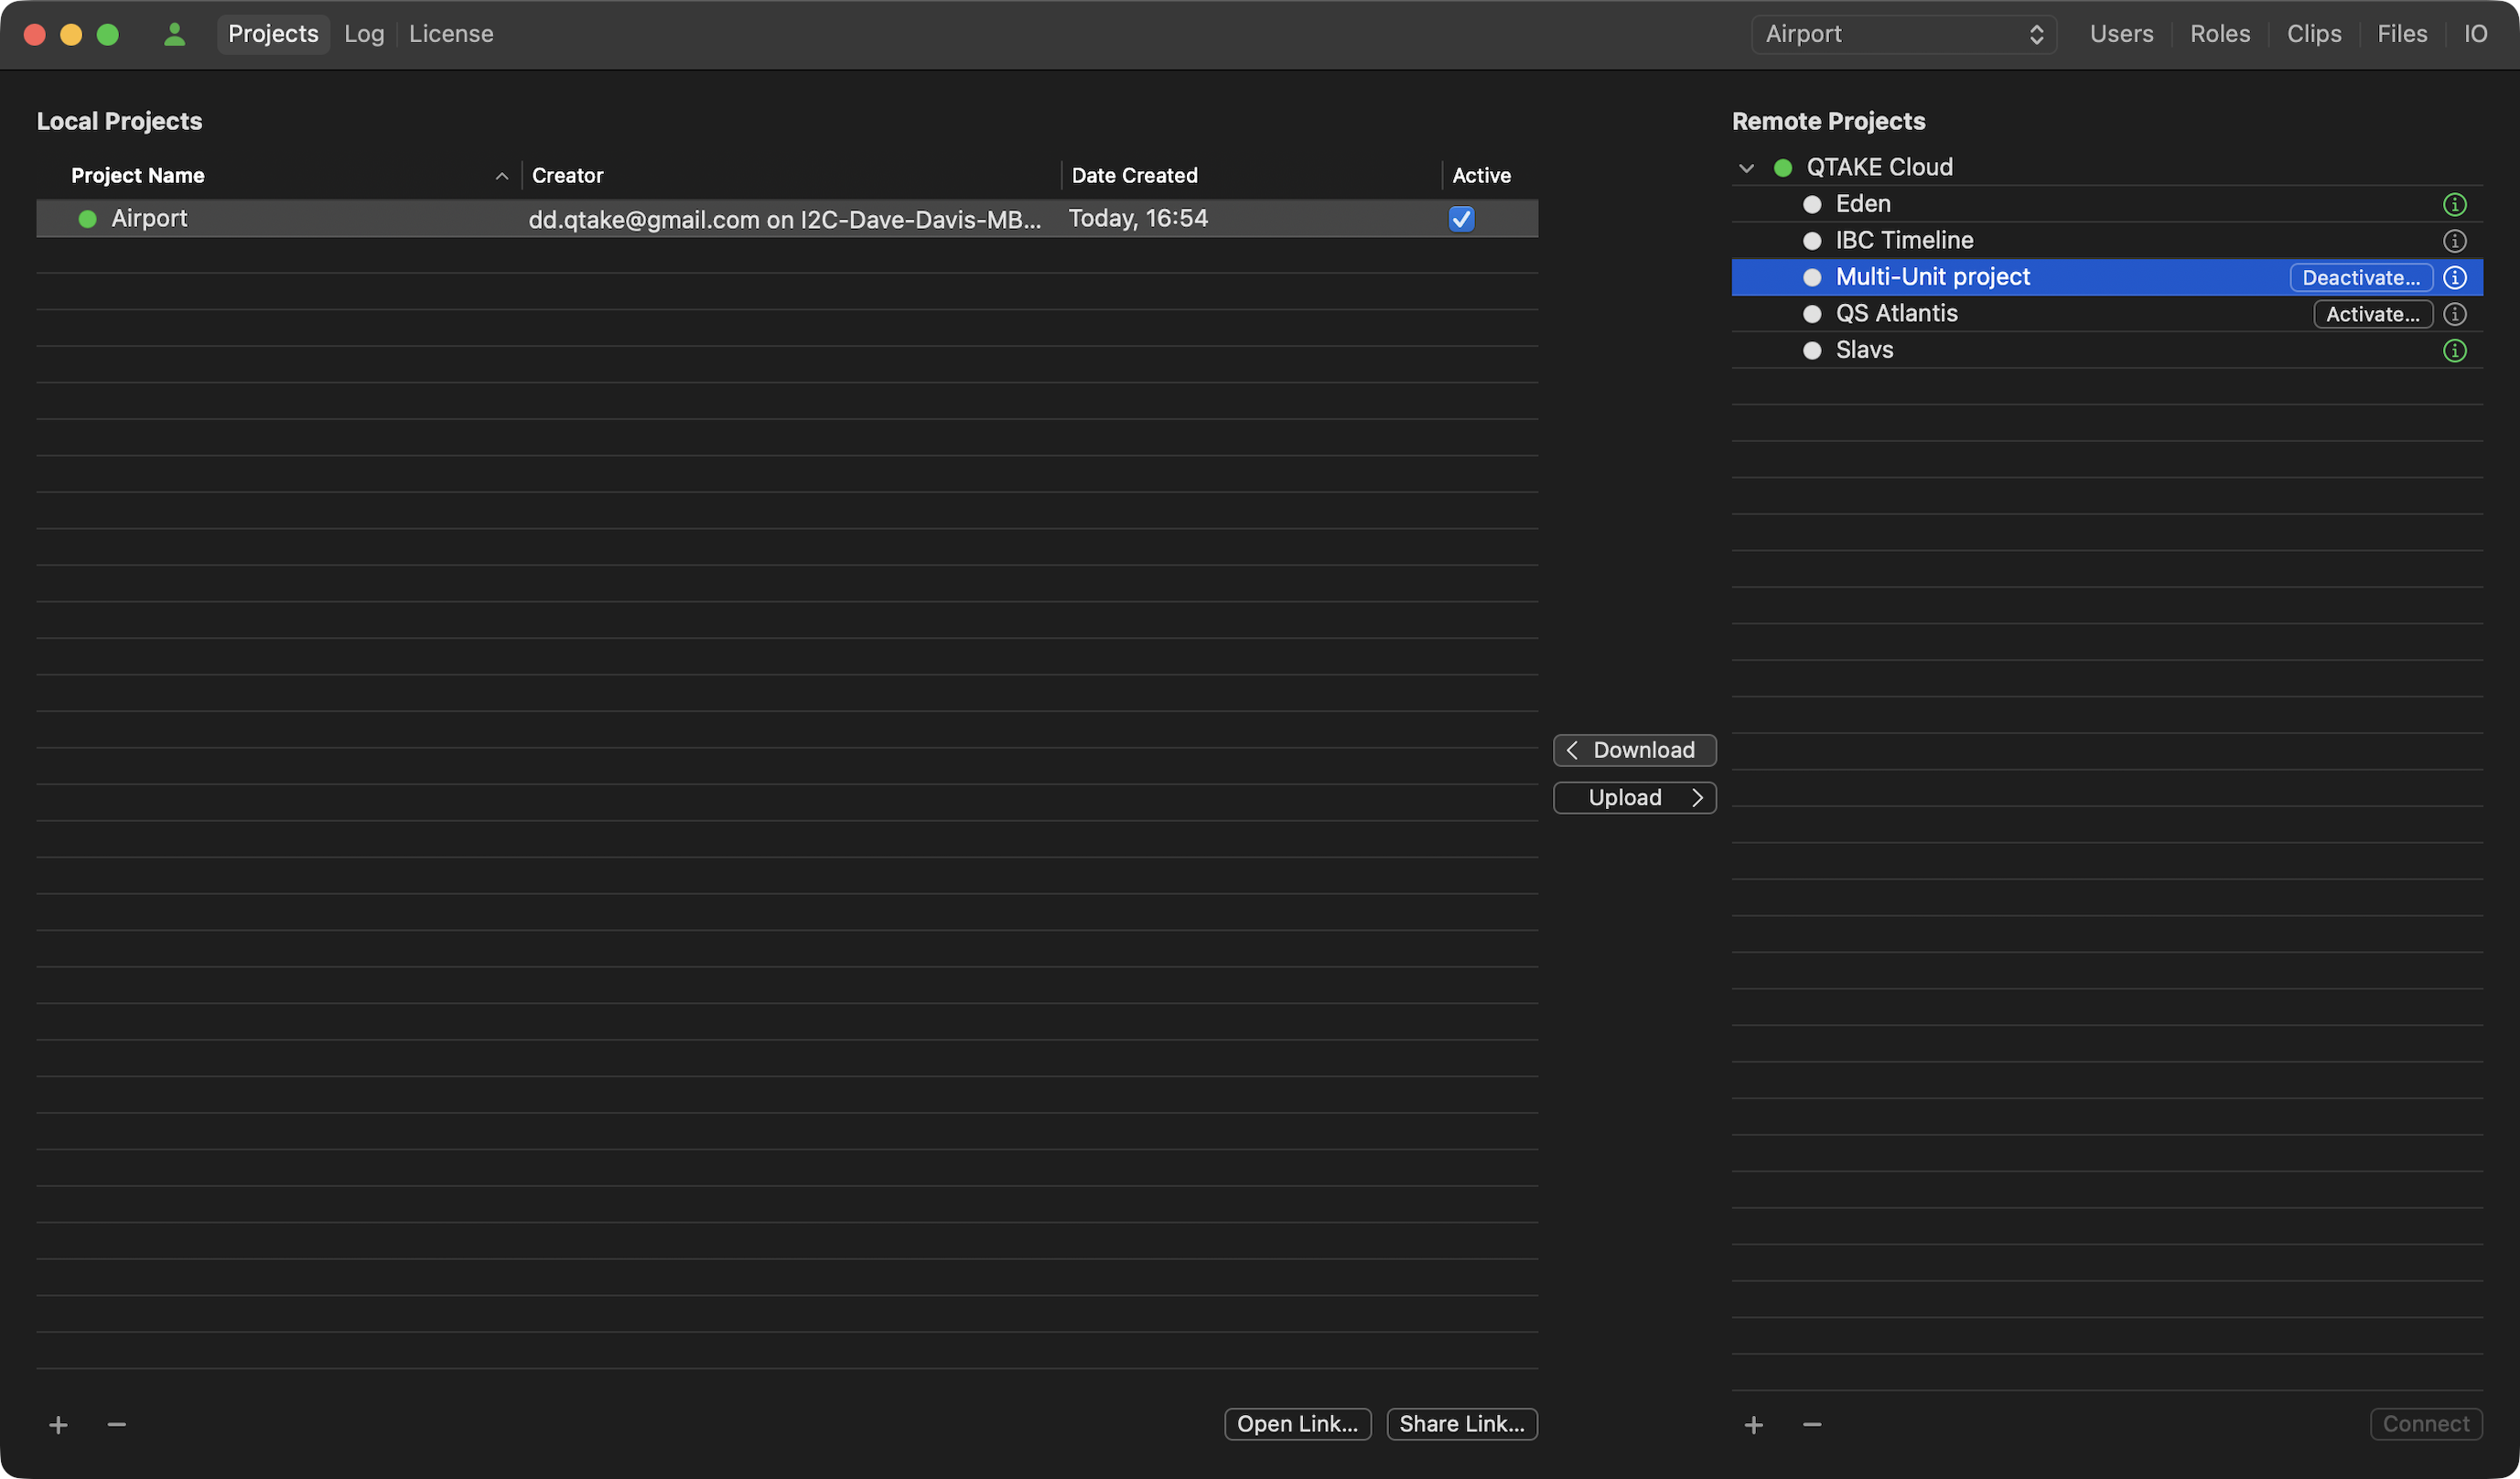
QTAKE Cloud provides metadata and thumbnail synchronization free of charge for all projects. However, to synchronize project media files, Cloud Sync activation is necessary. After uploading, an Activate… button appears next to the project name in the QTAKE Cloud section of the Projects tab.
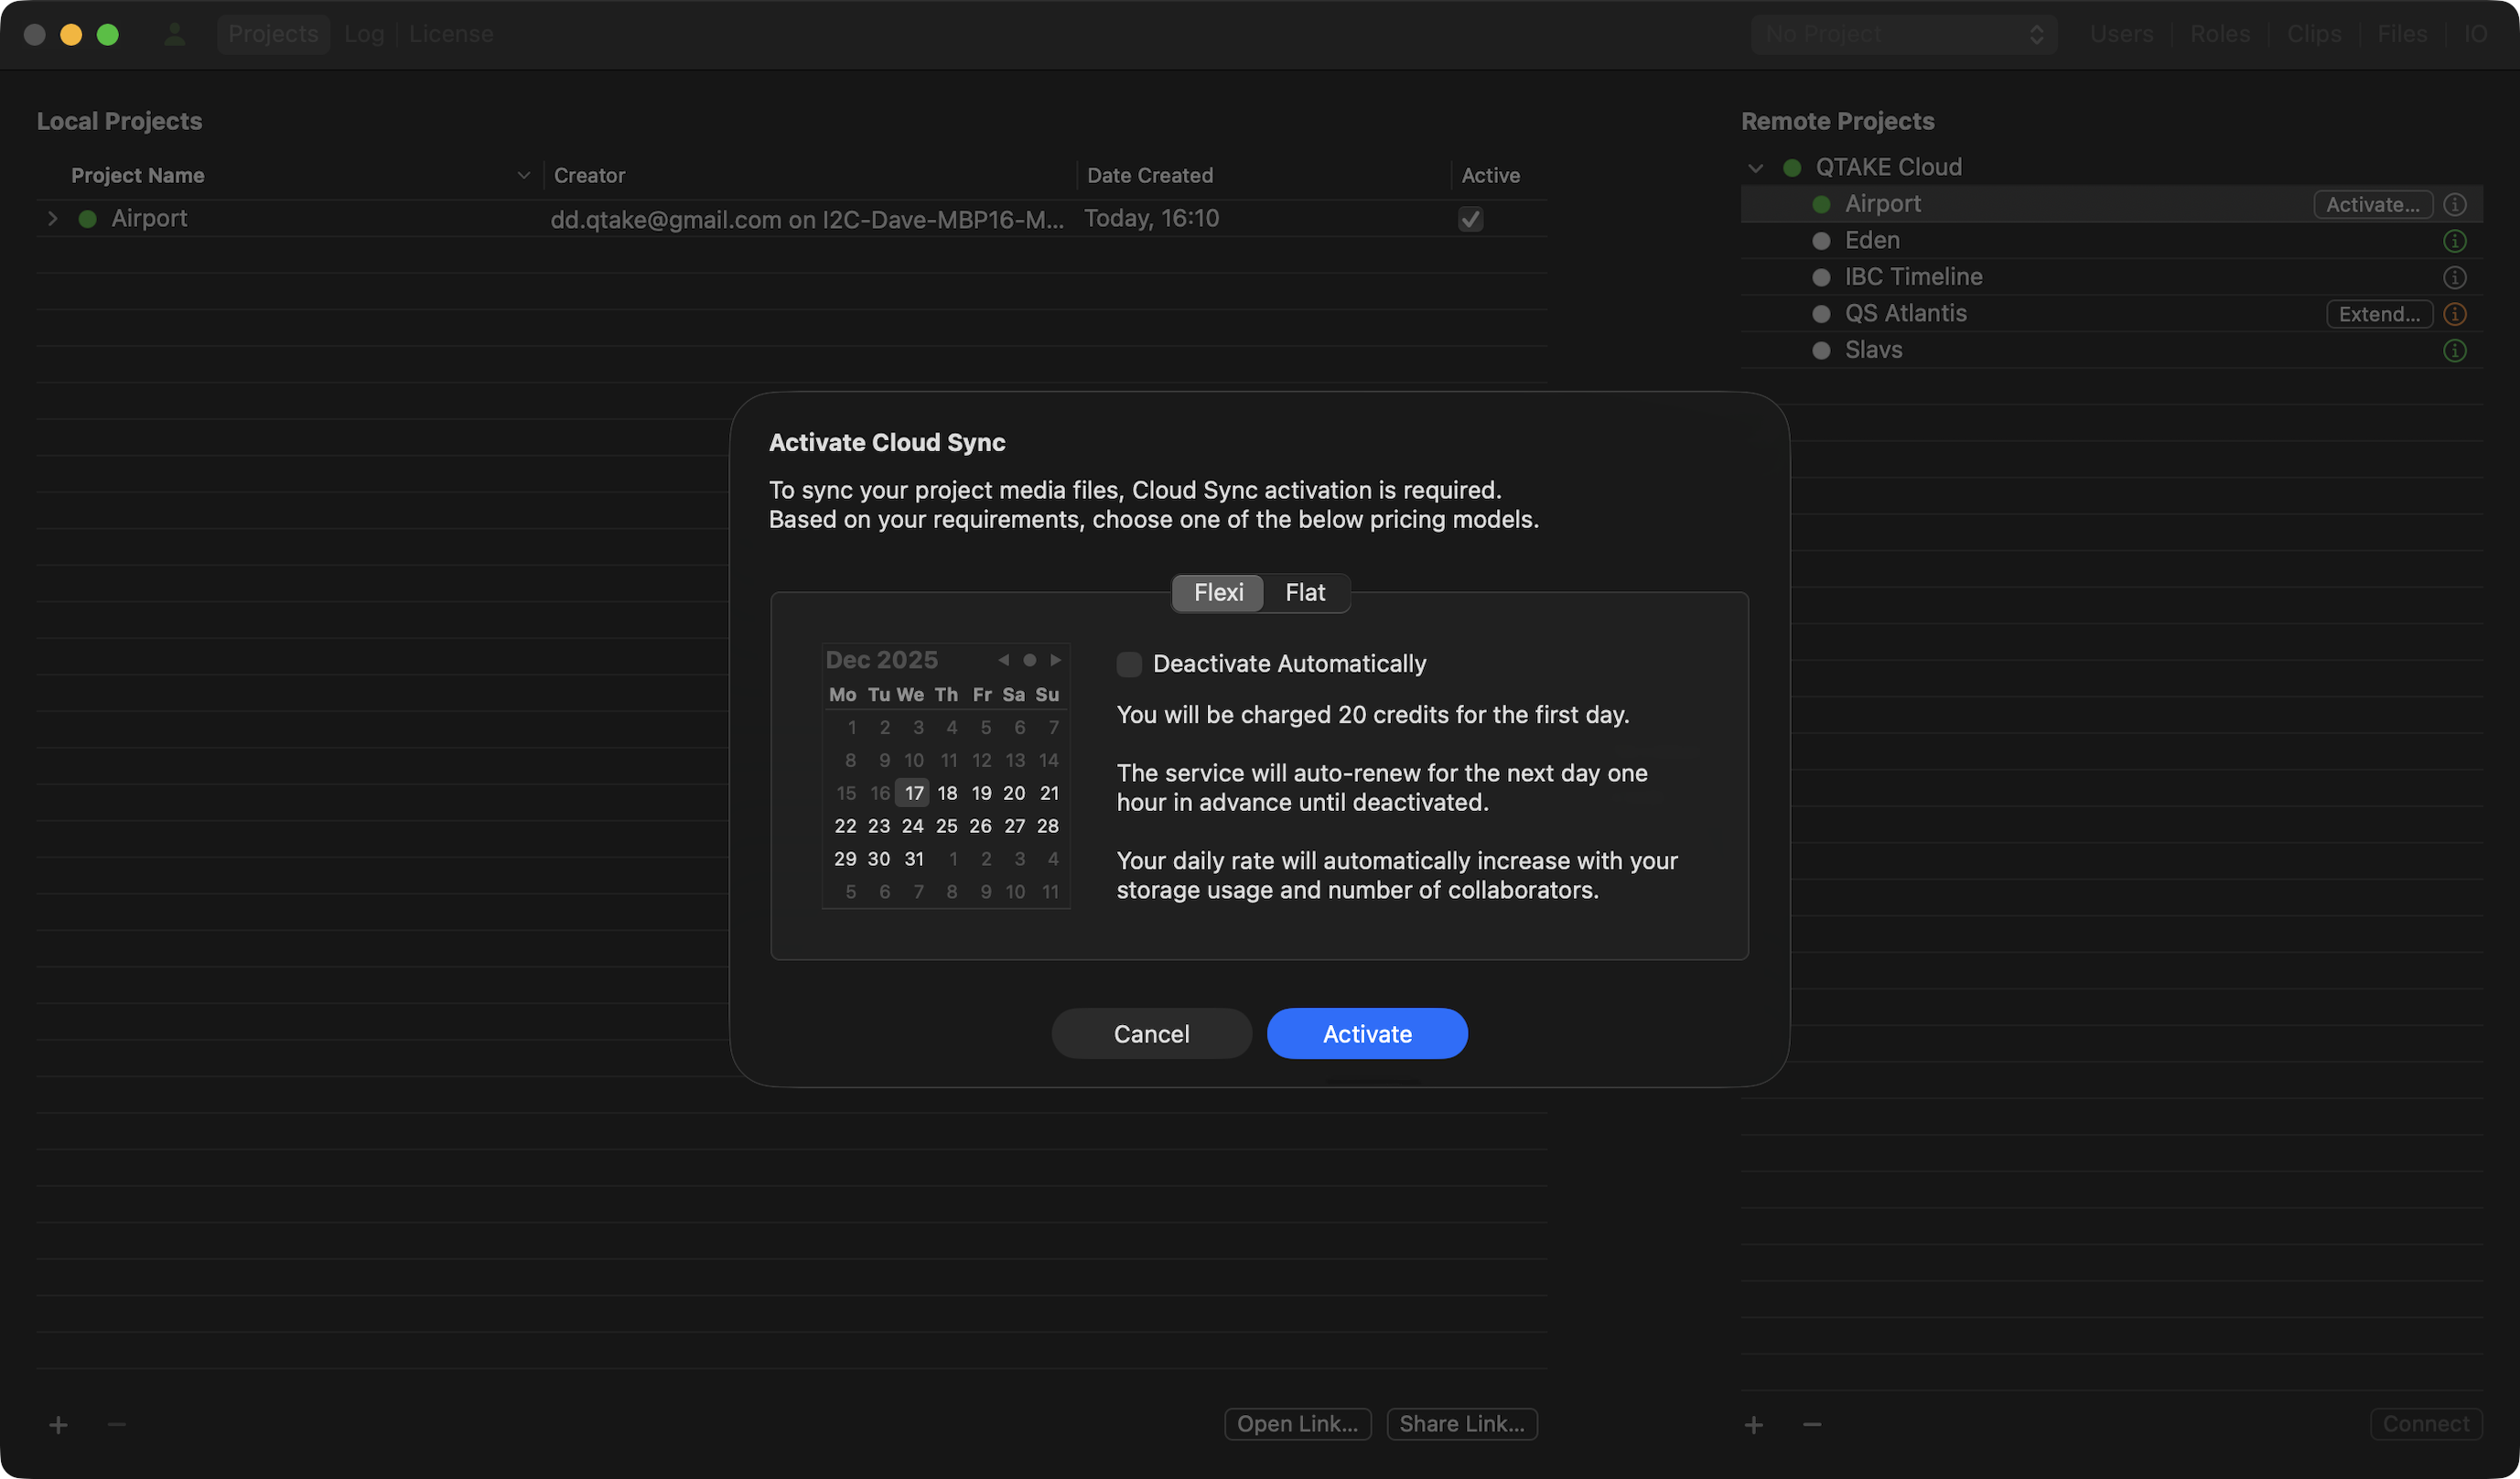
Clicking Activate… opens a dialog window with a selection from two available pricing models:
- Flexi – is an automatic renewal service that renews daily until you deactivate it.
This service will automatically renew the following day, activating one hour before its expiration, unless manually turned off.
The daily rate for this service will be automatically adjusted based on your storage utilization and the number of collaborators.
Note that an insufficient credit balance won’t deactivate Cloud Sync.
If you go low on credits and the auto-renewal fails, Cloud Sync will remain active with access to thumbnails and metadata only.
If you check the Deactivate Automatically option, the calendar will get enabled, allowing you to select the end date. In this case, the automatic renewal will end at the end date, and media synchronization will stop. - Flat – one-time fee payment covering a defined number of months and weeks. Once you select an end date, QTAKE Cloud will adjust it to conclude at the end of the upcoming 7-day period.
After activation, your project media files will begin uploading to QTAKE Cloud. The files are accessible to approved users within the Cloud Sync activation period and are automatically deleted two days after its end.
Note:
During the upload process, clips are not available for client playback. They become available only after the upload process is completed.
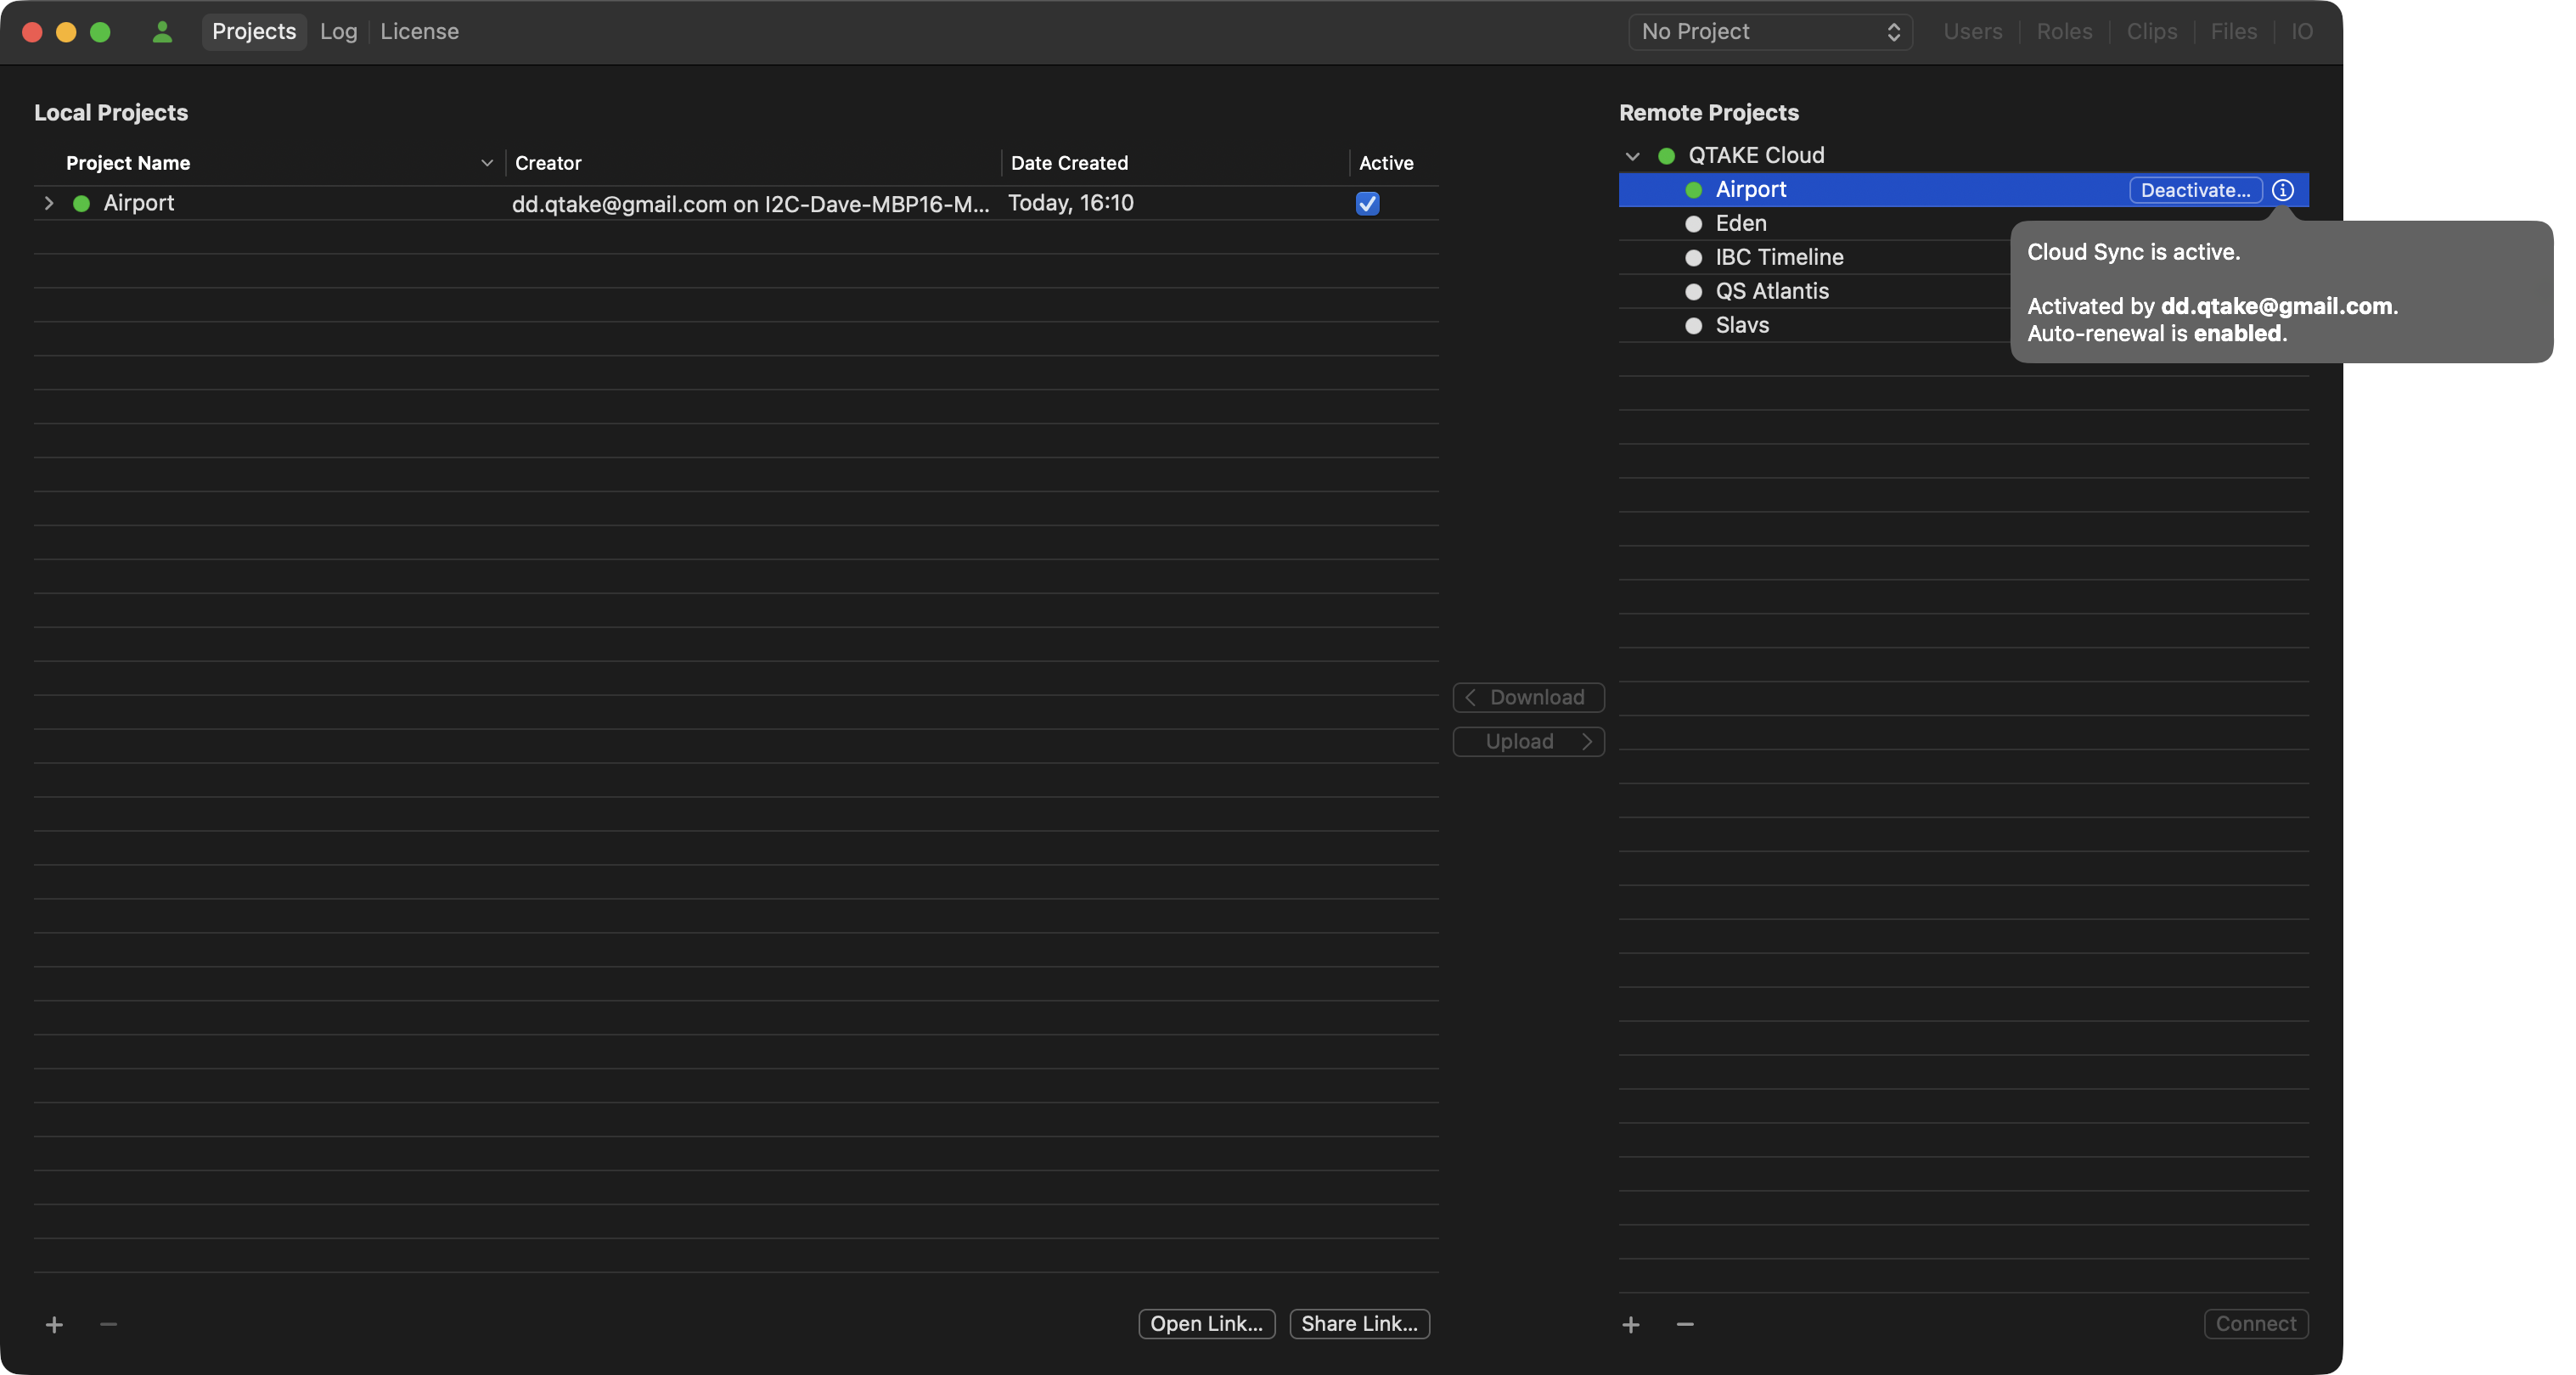
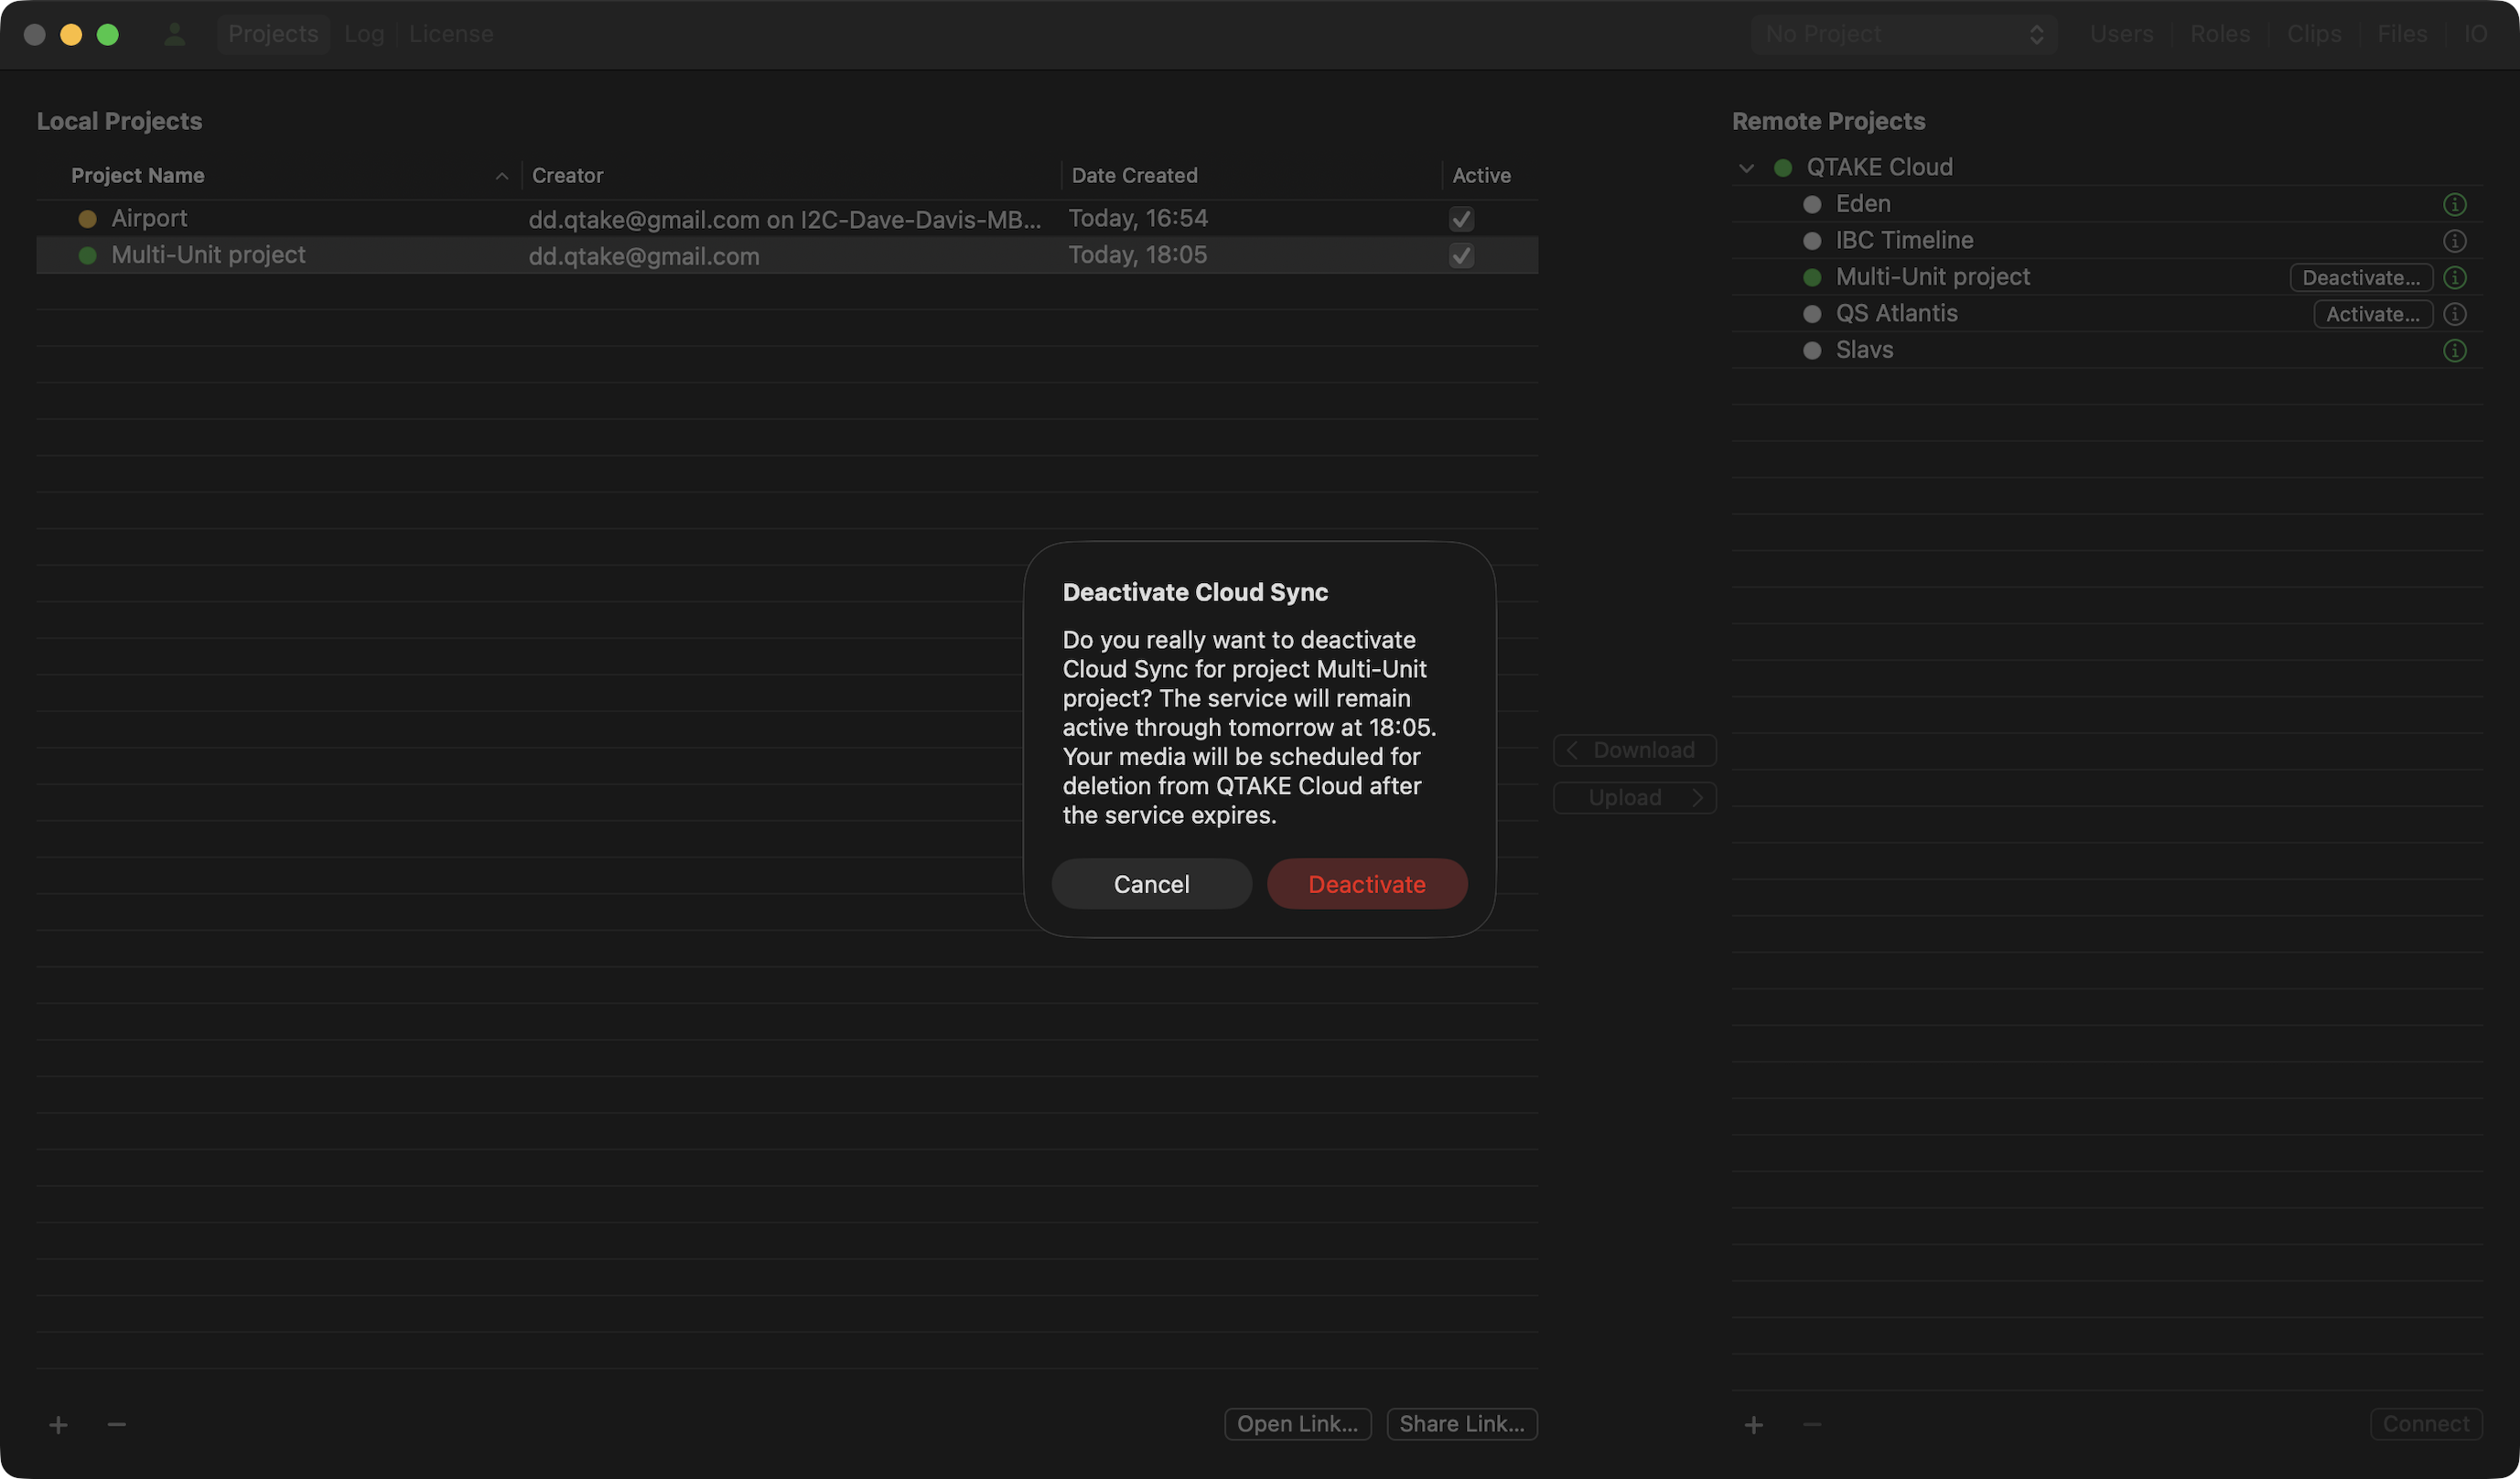
Deactivation
Flexi Pricing model
You can activate and deactivate Cloud Sync at any time during the Cloud Sync active period. When activating the service, you can also select the end day. Deactivation does not affect project access. It only cancels auto-renewal. The service will remain active until Cloud Sync expires. Media files will be deleted from QTAKE Cloud Storage two days after Cloud Sync expires.
Flat Pricing model
Since this is a fixed pricing model for a specified period, you cannot manually deactivate it. You can only extend the period. The service will remain active until Cloud Sync expires. Media files will be deleted from QTAKE Cloud Storage two days after Cloud Sync expires.
Deletion
Your metadata and thumbnails will remain in QTAKE Cloud at no cost until you delete the project. Applicable within AND outside of the QTAKE Cloud Sync active period. However, you can choose to delete the project at any time. This action immediately deletes the database from QTAKE Cloud and schedules project media for deletion, which will happen within two days. To delete your project from QTAKE Cloud, select it under the QTAKE Cloud item, then click the minus (-) button below. Deleting your project locally under Local Projects does not remove it from QTAKE Cloud and vice versa.
Deactivation vs. Deletion
Flexi model deactivation or auto-renewal failure |
Flexi & Flat model deletion |
|
|---|---|---|
| Project database and metadata | No change (free) | Deleted immediately |
| Thumbnails | No change (free) | Deleted within 2 days |
| Media | Access terminated immediately | Deleted within 2 days |
Since the Flat pricing model is set for a specified period and auto-renewal does not apply, you cannot deactivate it manually. You can only extend the Cloud Sync activation period.
Suggested Use Case
- Create a project using QTAKE or QTAKE Sync.
- Upload project to QTAKE Cloud. The project database with thumbnails and metadata is stored and Synced at no cost.
- Invite other units, users, and clients that can access the project using the QTAKE Cloud web interface or QTAKE Monitor app.
- Test workflows using available database, thumbnails, and metadata.
- When Production approves, Activate QTAKE Cloud Sync using Flexi or Flat pricing model according to production needs. At this stage, project media upload to QTAKE Cloud starts.
- When the project is finished, delete it from QTAKE Cloud (following the steps mentioned in previous sections). QTAKE Cloud will delete the project database immediately and schedule its media for deletion.
Project Status Indicators
Each project listed is accompanied by a colored dot that indicates its current synchronization status. These color codes provide you with a quick visual reference:
- White – The project is disconnected and not being synchronized.
- Red – An error has occurred, and Two-Factor Authentication (2FA) is required to resume synchronization.
- Yellow – The Login or Password has expired, and the project is currently not being synchronized.
- Green – The connection is active and functioning correctly; the project is being synchronized successfully.
These status indicators help you quickly identify and troubleshoot connectivity or authentication issues with your projects.
Hover over the project indicator to reveal more information.
Log
The Log tab shows the application log for QTAKE Sync. When troubleshooting an issue, our support may ask you to provide the application log for QTAKE Sync. Clicking Send Log will take a snapshot of the current application log and open it in your default email client. Change the Subject field and add any additional information regarding the issue to the body of the email message. You can also copy and paste the message into an external email client.

License
The License tab gives you an overview of the license modules you have activated. If you want to log in to a different account or create a new one, click the User button next to the Projects tab.
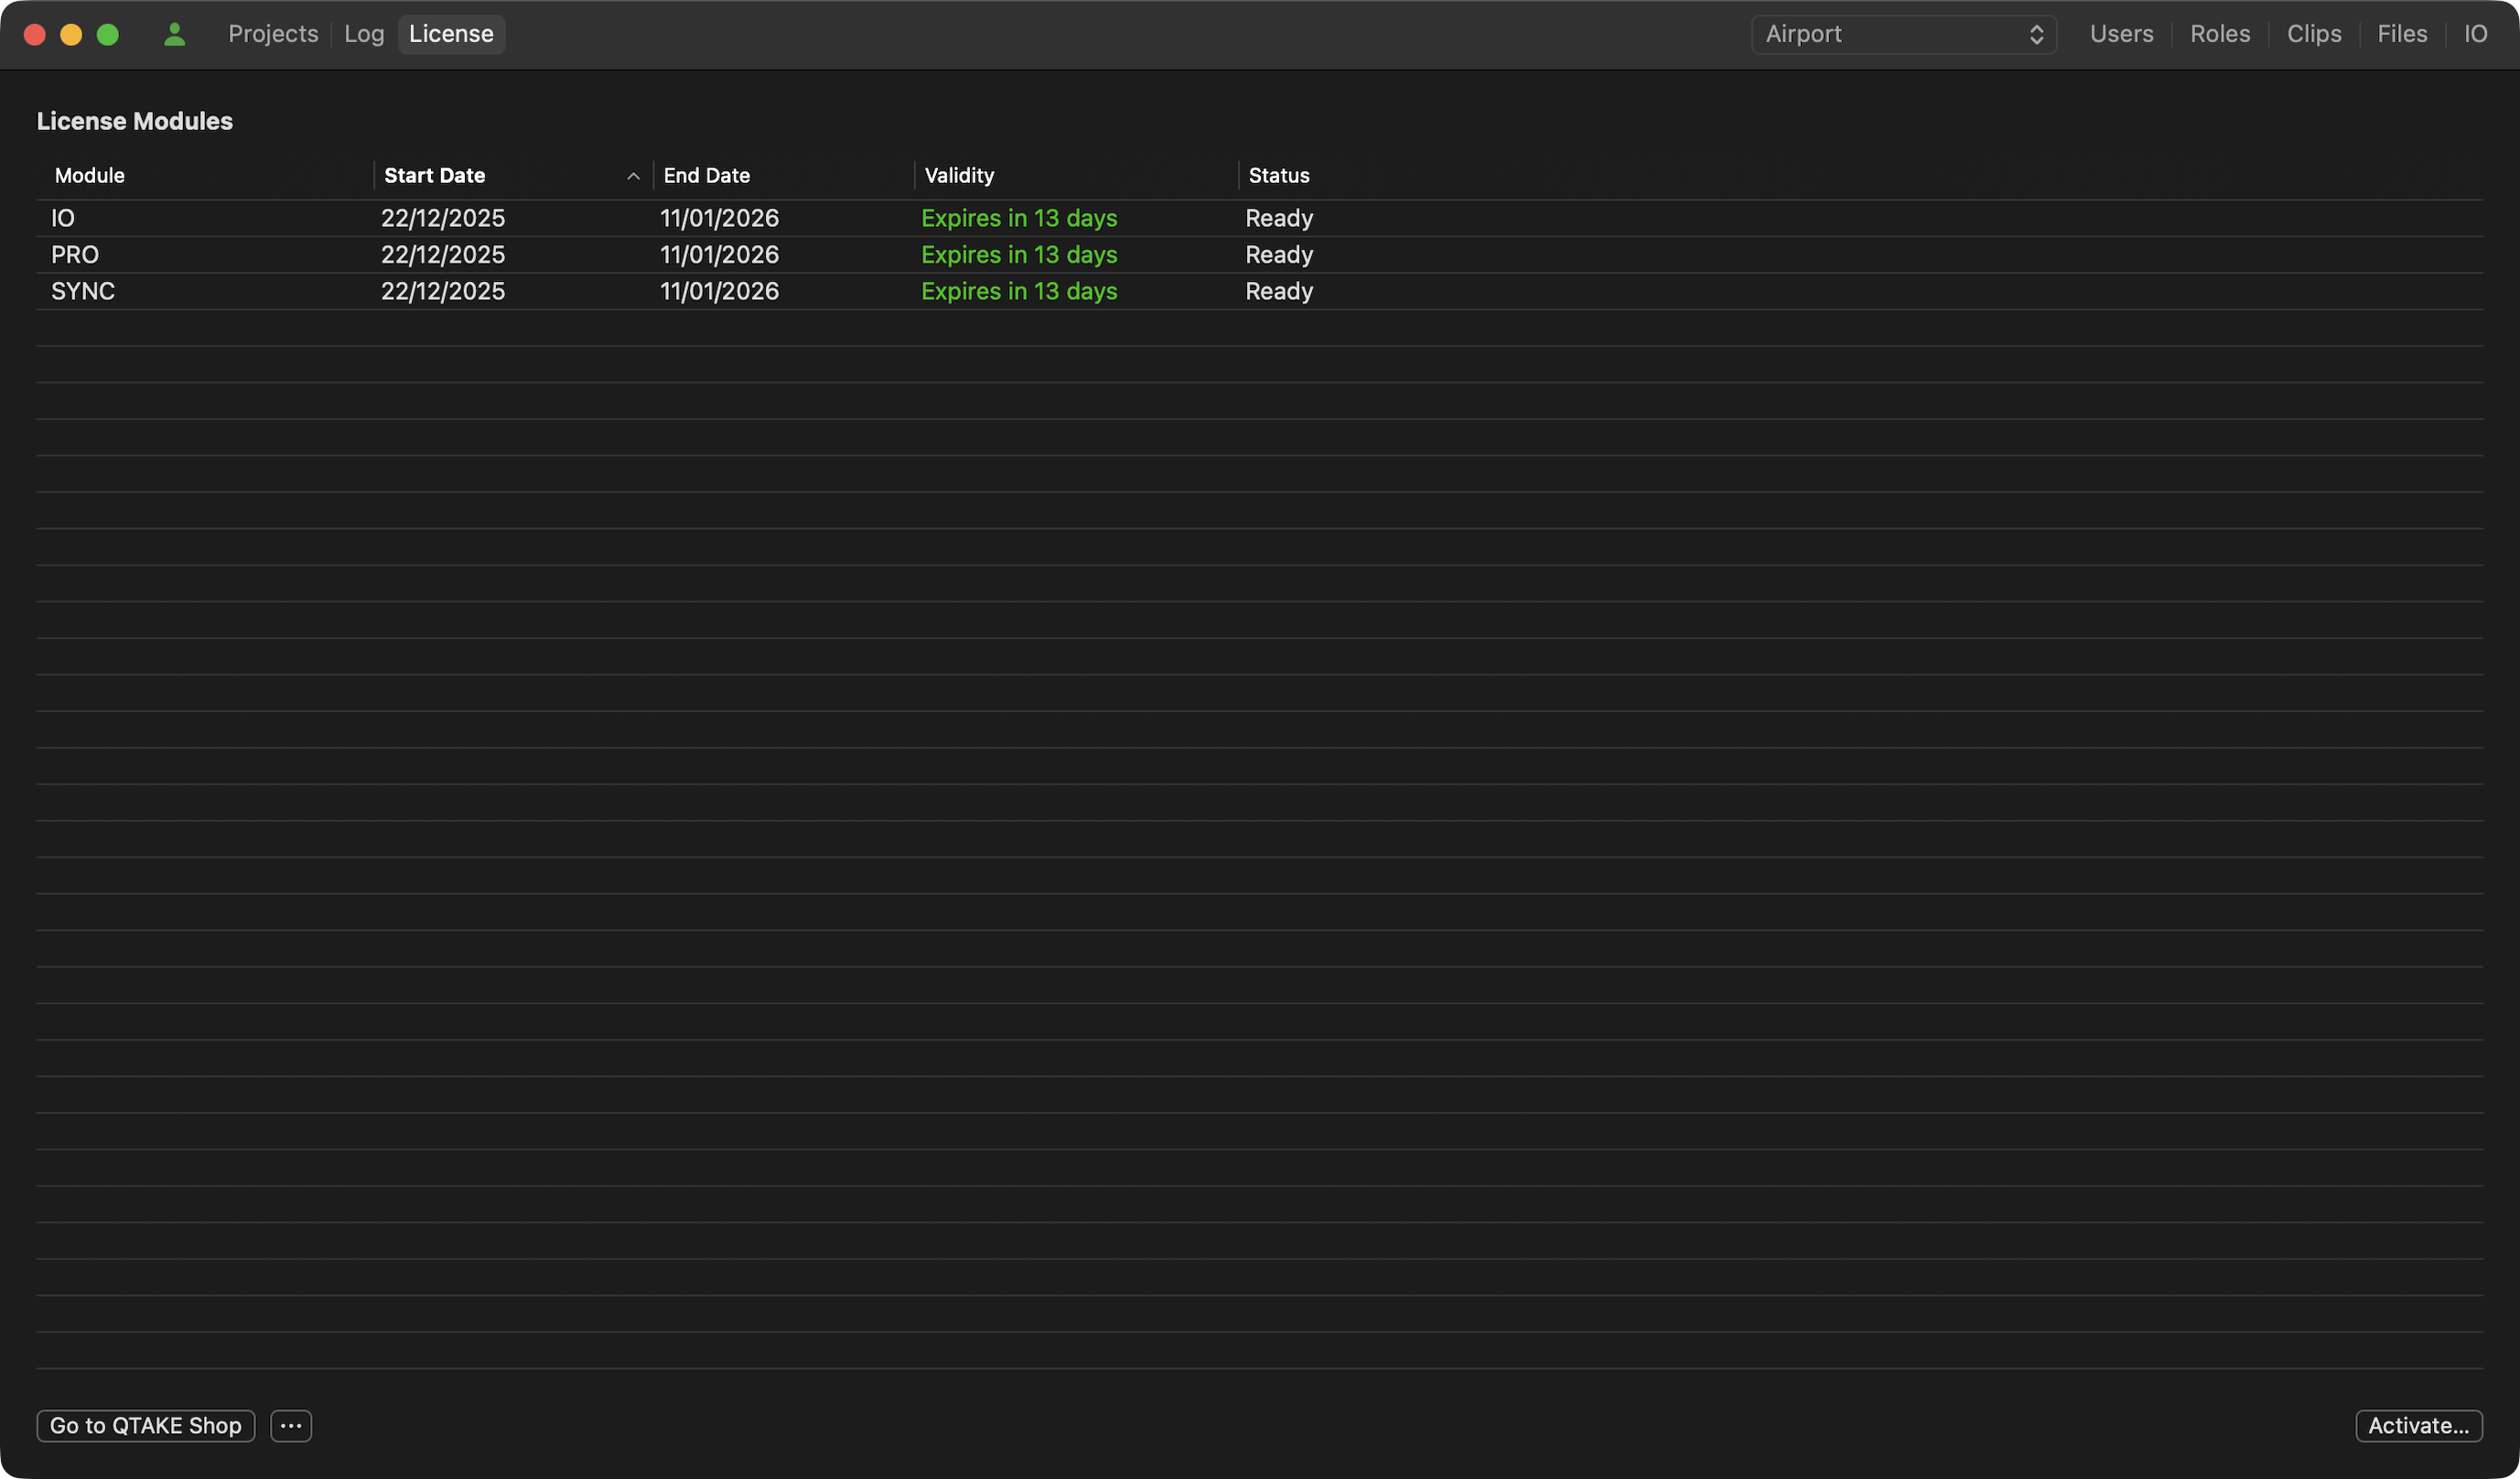
Clicking the Go to QTAKE Shop button will also open your browser and take you directly to QTAKE Shop to manage your licenses. If you are not logged in to a QTAKE Shop account when pressing these buttons, you will be prompted for your details, and you can also create a new account.
Starting with QTAKE Sync version 3.0, the licensing system has been updated. Licenses are now managed via the QTAKE Pro configurator.
Read more
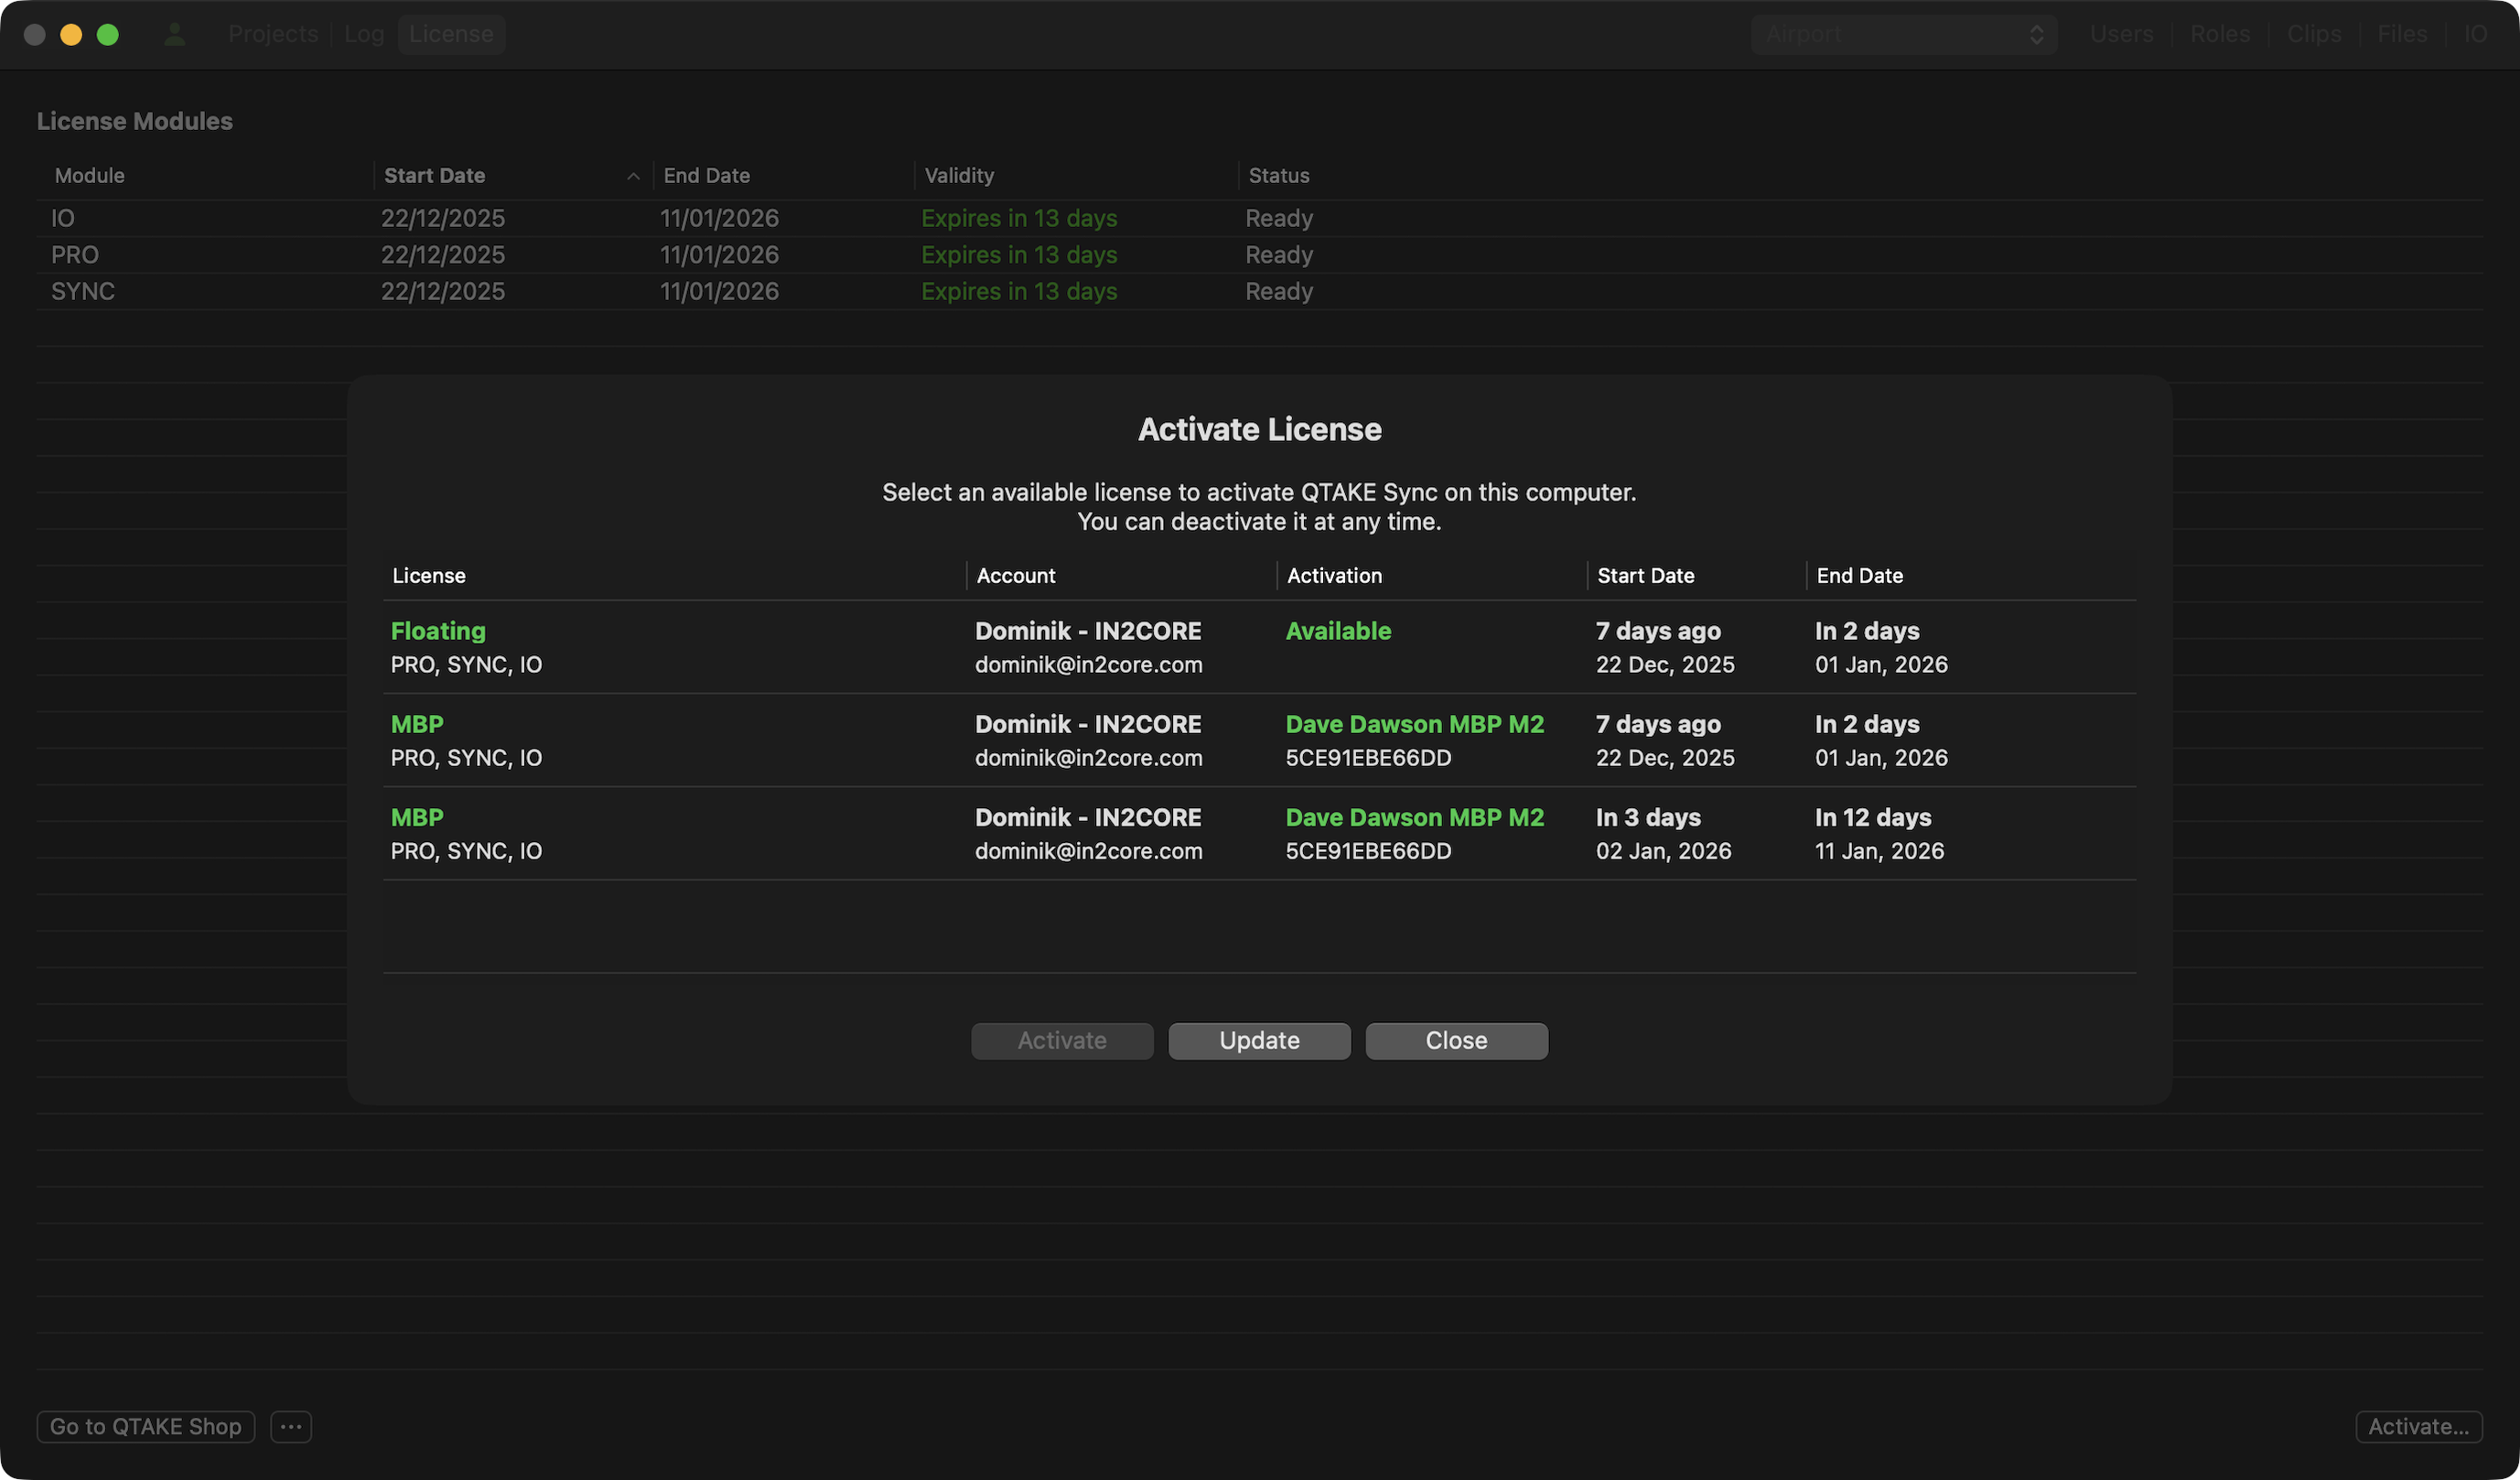
Activate License
To activate or deactivate a license created in the QTAKE Rental Shop, click the Activate button. The pop-up window will open, displaying a list of your available licenses.
- Available status: Licenses marked as Available in the Activation column are ready for use.
- Active status: Licenses already in use will display the computer name and ID where they are currently activated.
Project Assignment during Activation
QTAKE Sync supports project-specific licensing, allowing an eligible operator to decide which project a license is activated for. It removes the previous limitation where only one QTAKE project could be activated per computer. As a result, multiple QTAKE Sync licenses can now be activated on a single computer in overlapping dates, with users choosing which modules are assigned to which projects.
When you select an available license and click the Activate button, you will be prompted to choose how to assign the license. Use the dropdown menu to select one of the following options:
- Active Project: The license is tied to the project currently set to Active in the Projects tab. If you change the active project later, the license will remain valid and follow the new active project for the duration of its validity.
- Specific Project: The dropdown also lists all projects currently uploaded to QTAKE Sync and visible in your Projects tab. If you select a particular project from this list, the license is locked only to that project. This option is particularly useful for commercial workflows with frequently changing projects, as it eliminates the need for manual deactivation and reactivation. It also provides a practical workaround on computers without Secure Enclave support – such as older Smart Assist models – where license deactivation is not available.
| Assignment Type | Behavior | Best Use Case |
|---|---|---|
| Active Project | License follows the user's current selection in the Projects tab. | DITs or Operators working on multiple small jobs or testing. |
| Specific Project | License is restricted to the chosen project, regardless of the Active status. | Invoicing specific productions or keeping costs separated for different clients. |
To activate and deactivate an existing license package, the following port must be enabled:
shop.qtakehd.com, TCP port 443
Emergency License File
Clicking the 3 Dots button next to Go to QTAKE Shop will reveal:
- Show EULA - which lets you review the QTAKE Sync End User License Agreement
- Request Emergency License
If the online license activation service is unreachable, you will need to request license activation via email. Use the Request Emergency License option to open a dialog with the option to COPY ID or EMAIL ID to license@in2core.com and provide additional info on which modules you need to get activated. After you receive a response email with the temporary license file, double-click the attachment with the .qtakelic extension to open the QTAKE Sync app and load the license.
PROJECTS
PROJECT
The Project selector is a drop-down menu containing the name of the active project ready for synchronization. To make changes to a project or its users, ensure the project is active and selected in the drop-down list. If the project you want to manage is not in the list, hover over the Project status indicator under Local Projects or Remote Projects to discover the reason.
The Users, Roles, Clips, Files, and IO tabs will become active when a project has been selected. Note that projects you download will appear in this menu only after the initial sync is completed and the project limit has not been exceeded.
There can be only one project active. If you are unable to manage a project due to the “ Project limit exceeded status, you need to ensure only the intended project has the Active column checked.
USERS
When a client tries to connect to a QTAKE Sync his email address will appear in the Users list.
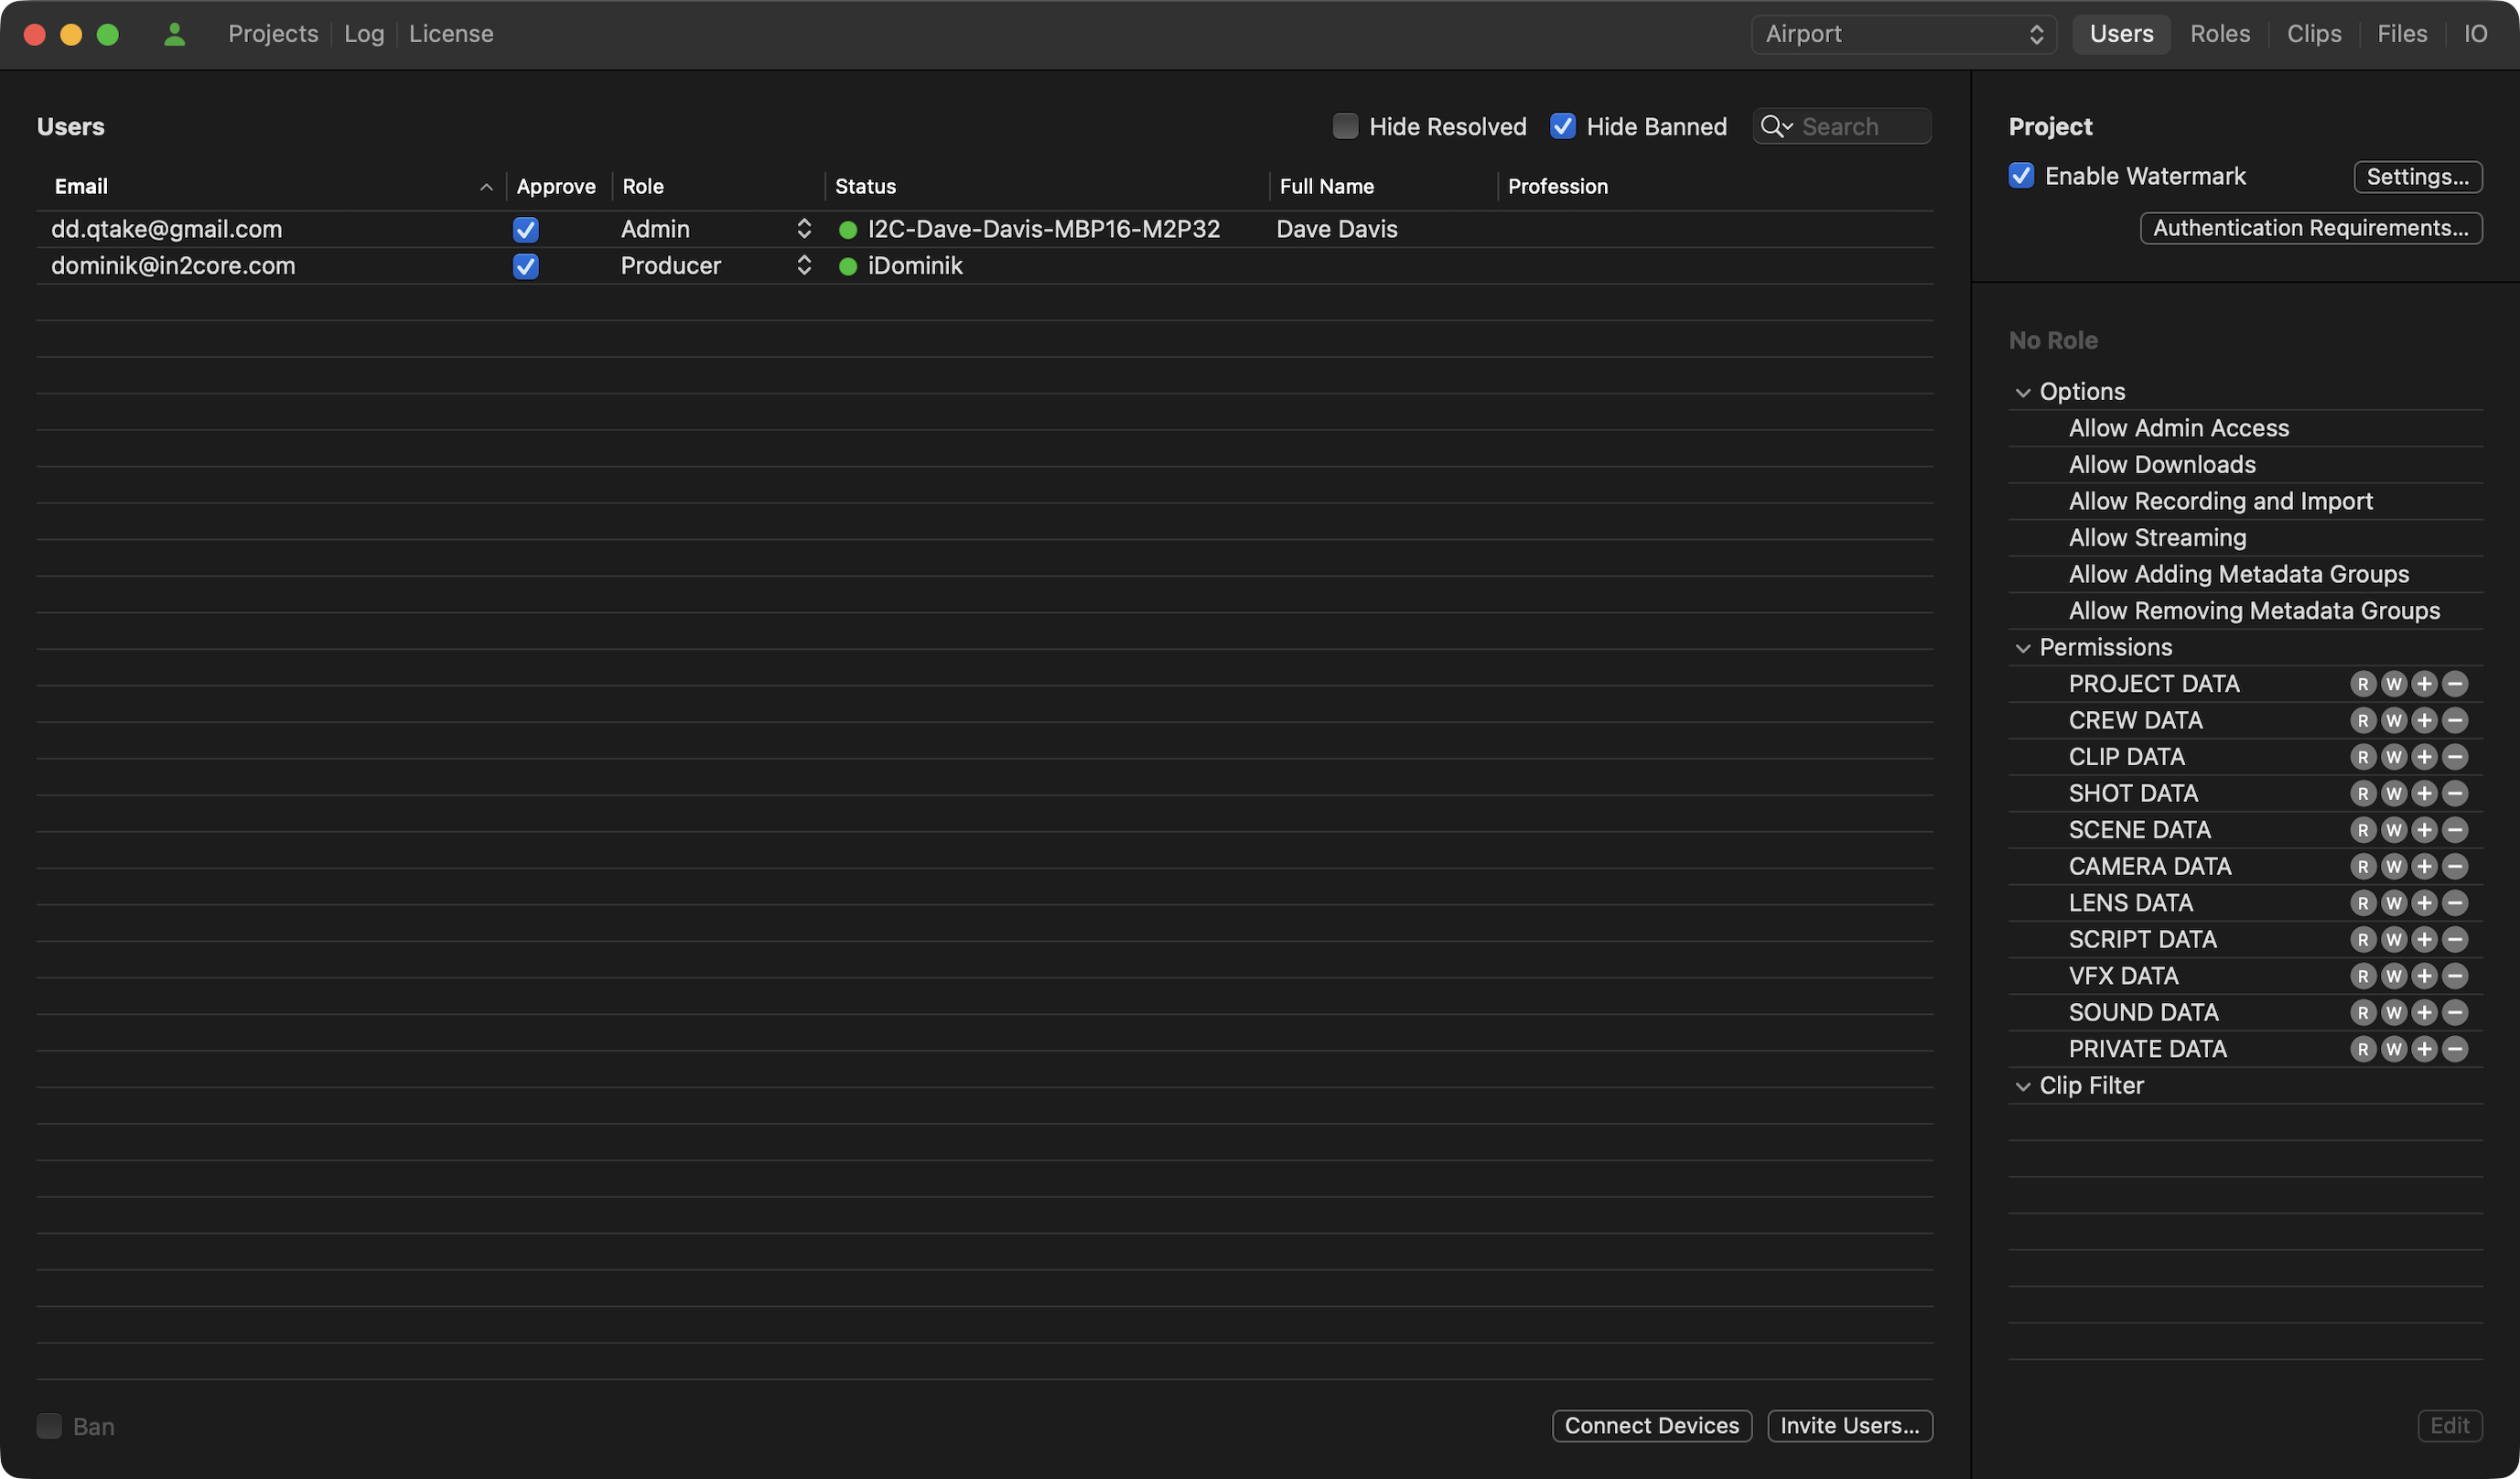
Afterward, the QTAKE Sync administrator can approve the user for basic playback access by clicking the check box in the Approve column. An approved user with No Role will not have access to any metadata other than the CAM, ROLL, SCENE, SHOT, TAKE, and RATING information.
The Full Name and Profession fields can be edited by double-clicking on the area next to the Approve checkbox.
Clicking the Ban checkbox will mark the selected user as banned. The user name (email) will appear with a line through the name to identify it as banned. A banned user is automatically unapproved and denied access to QTAKE Sync.
NOTE:
There is no need to “create” users in QTAKE Sync before they connect. Instead, users sign up for QTAKE Cloud in the QTAKE Monitor application and are automatically added to the Users list after receiving a project link or scanning the project QR code. It simplifies user management, as users can be approved with a single click in QTAKE Sync.However, you can also invite multiple users in a few clicks. Click the Invite Users button. In the pop-up window, you can paste a list of multiple email addresses separated by a comma.
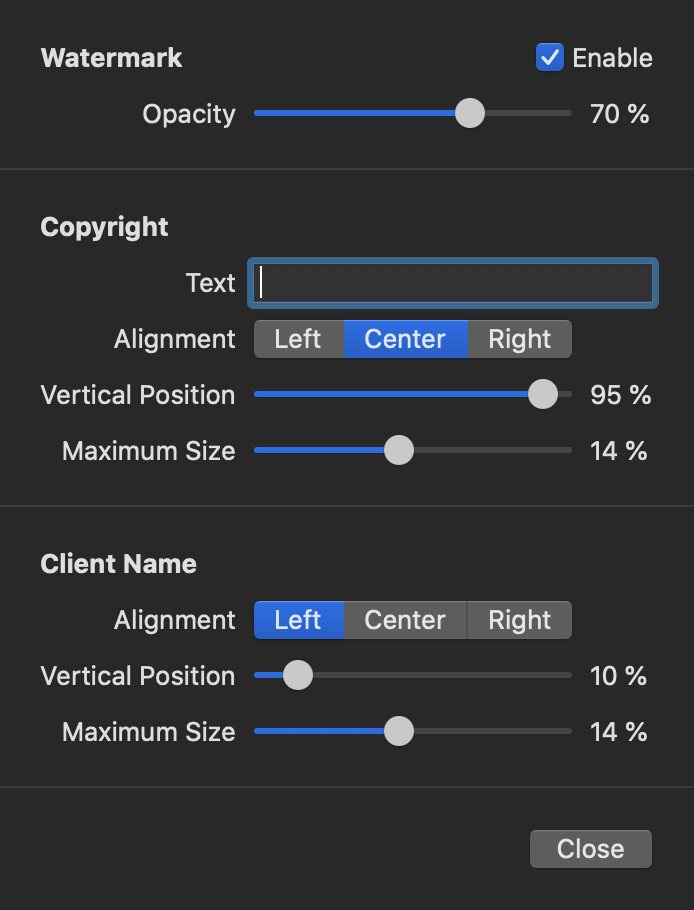
WATERMARK
A custom Copyright Watermark can be created for each project. Users will see this watermark together with their Email displayed as an overlay when playing back clips in QTAKE Monitor. The top slider controls the Opacity of both watermarks. The Alignment, Vertical Position and Maximum Size of the Copyright watermark and the Client Name watermark are individually adjustable. The watermark can be disabled for individual roles. The watermark settings for a project are synchronized with QTAKE.
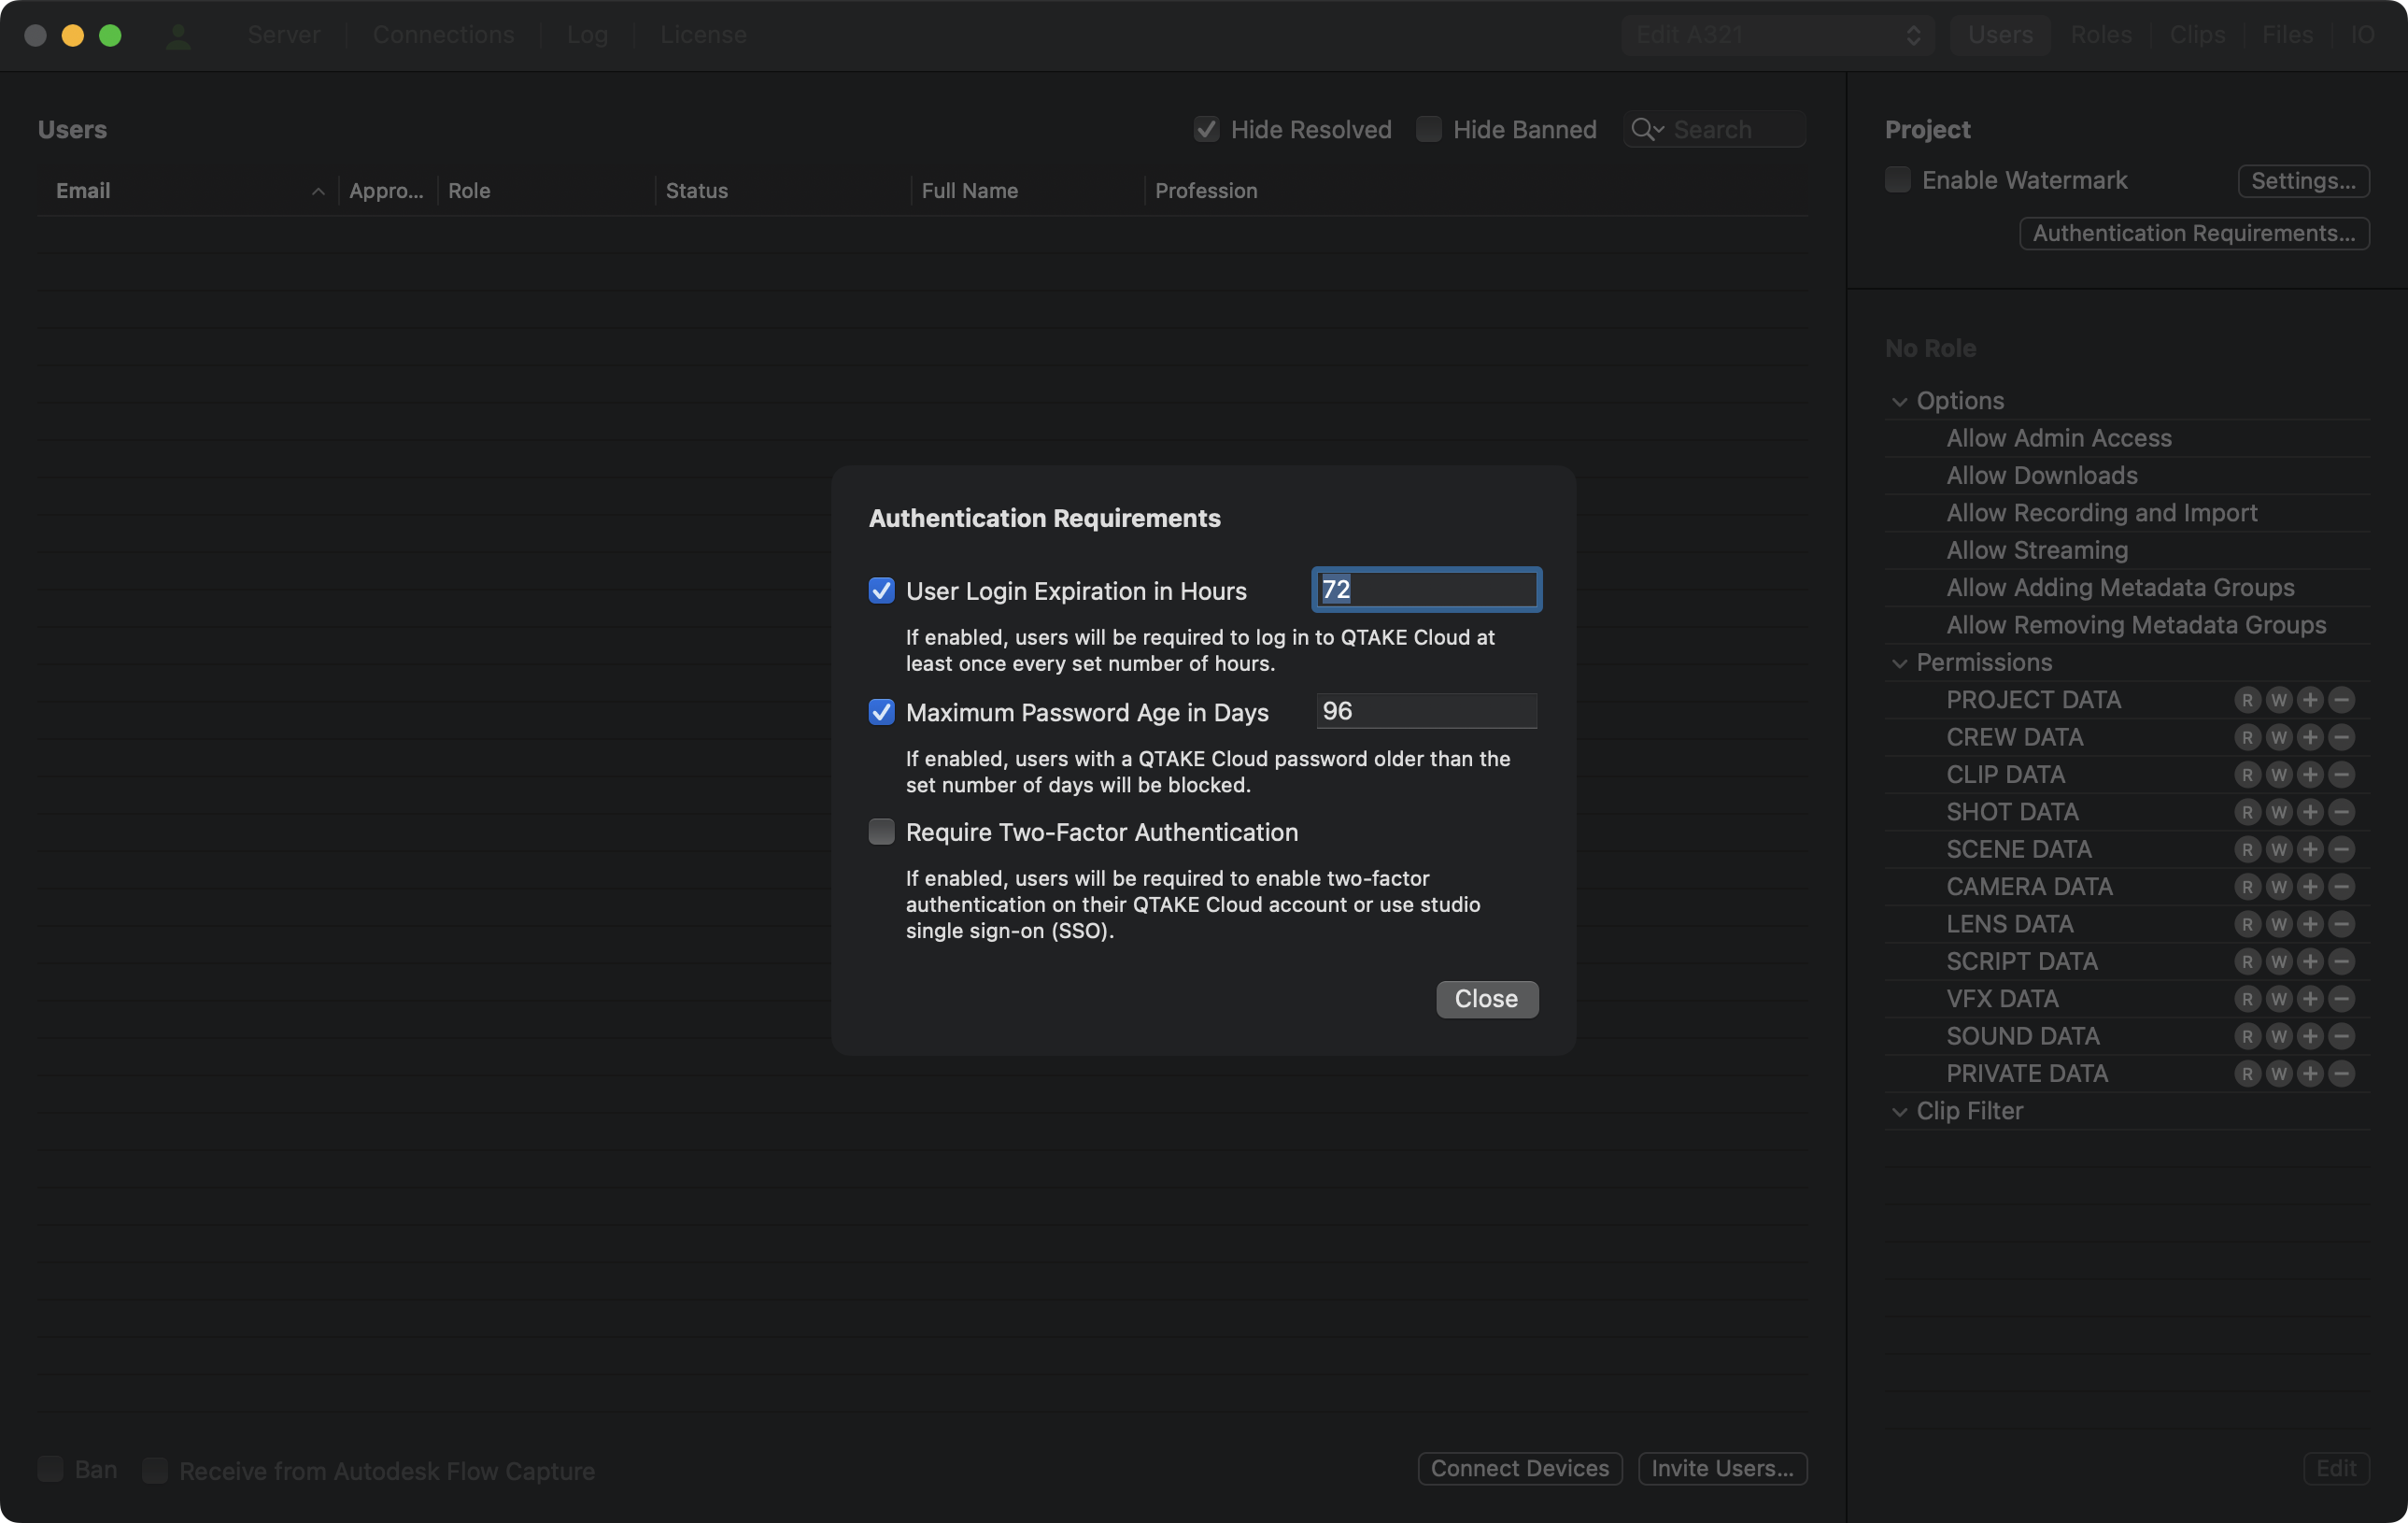
Authentication Requirements
Like QTAKE Pro, QTAKE Sync requires Two-factor authentication. Login and password expiration options are also available. These requirements are project-based. You can enable them all on one project, and another one can run without any of them active.
All Authentication Requirements are synced with QTAKE and QTAKE Cloud and, when enabled, apply to both QTAKE Sync and QTAKE Stream functionality.
Since the requirements apply to all users and user roles, including Admin, ensure you meet them. Project Status Indicators will help you monitor whether you meet the project requirements to ensure project synchronization.
To troubleshoot connected clients, use the Projects tab to show you their status.
ROLES
Roles are, in essence, groups of users with a similar function on a set. For users to read and write additional clip metadata, a Role has to be created and assigned to them. To create a Role, click the plus sign at the bottom of the Roles section of the interface. When a Role is selected, you can give it a name and change its permissions.
COPY TO PROJECT
Instead of recreating Roles and metadata fields in each project, you can copy them from one project to another with the Copy to Project button.
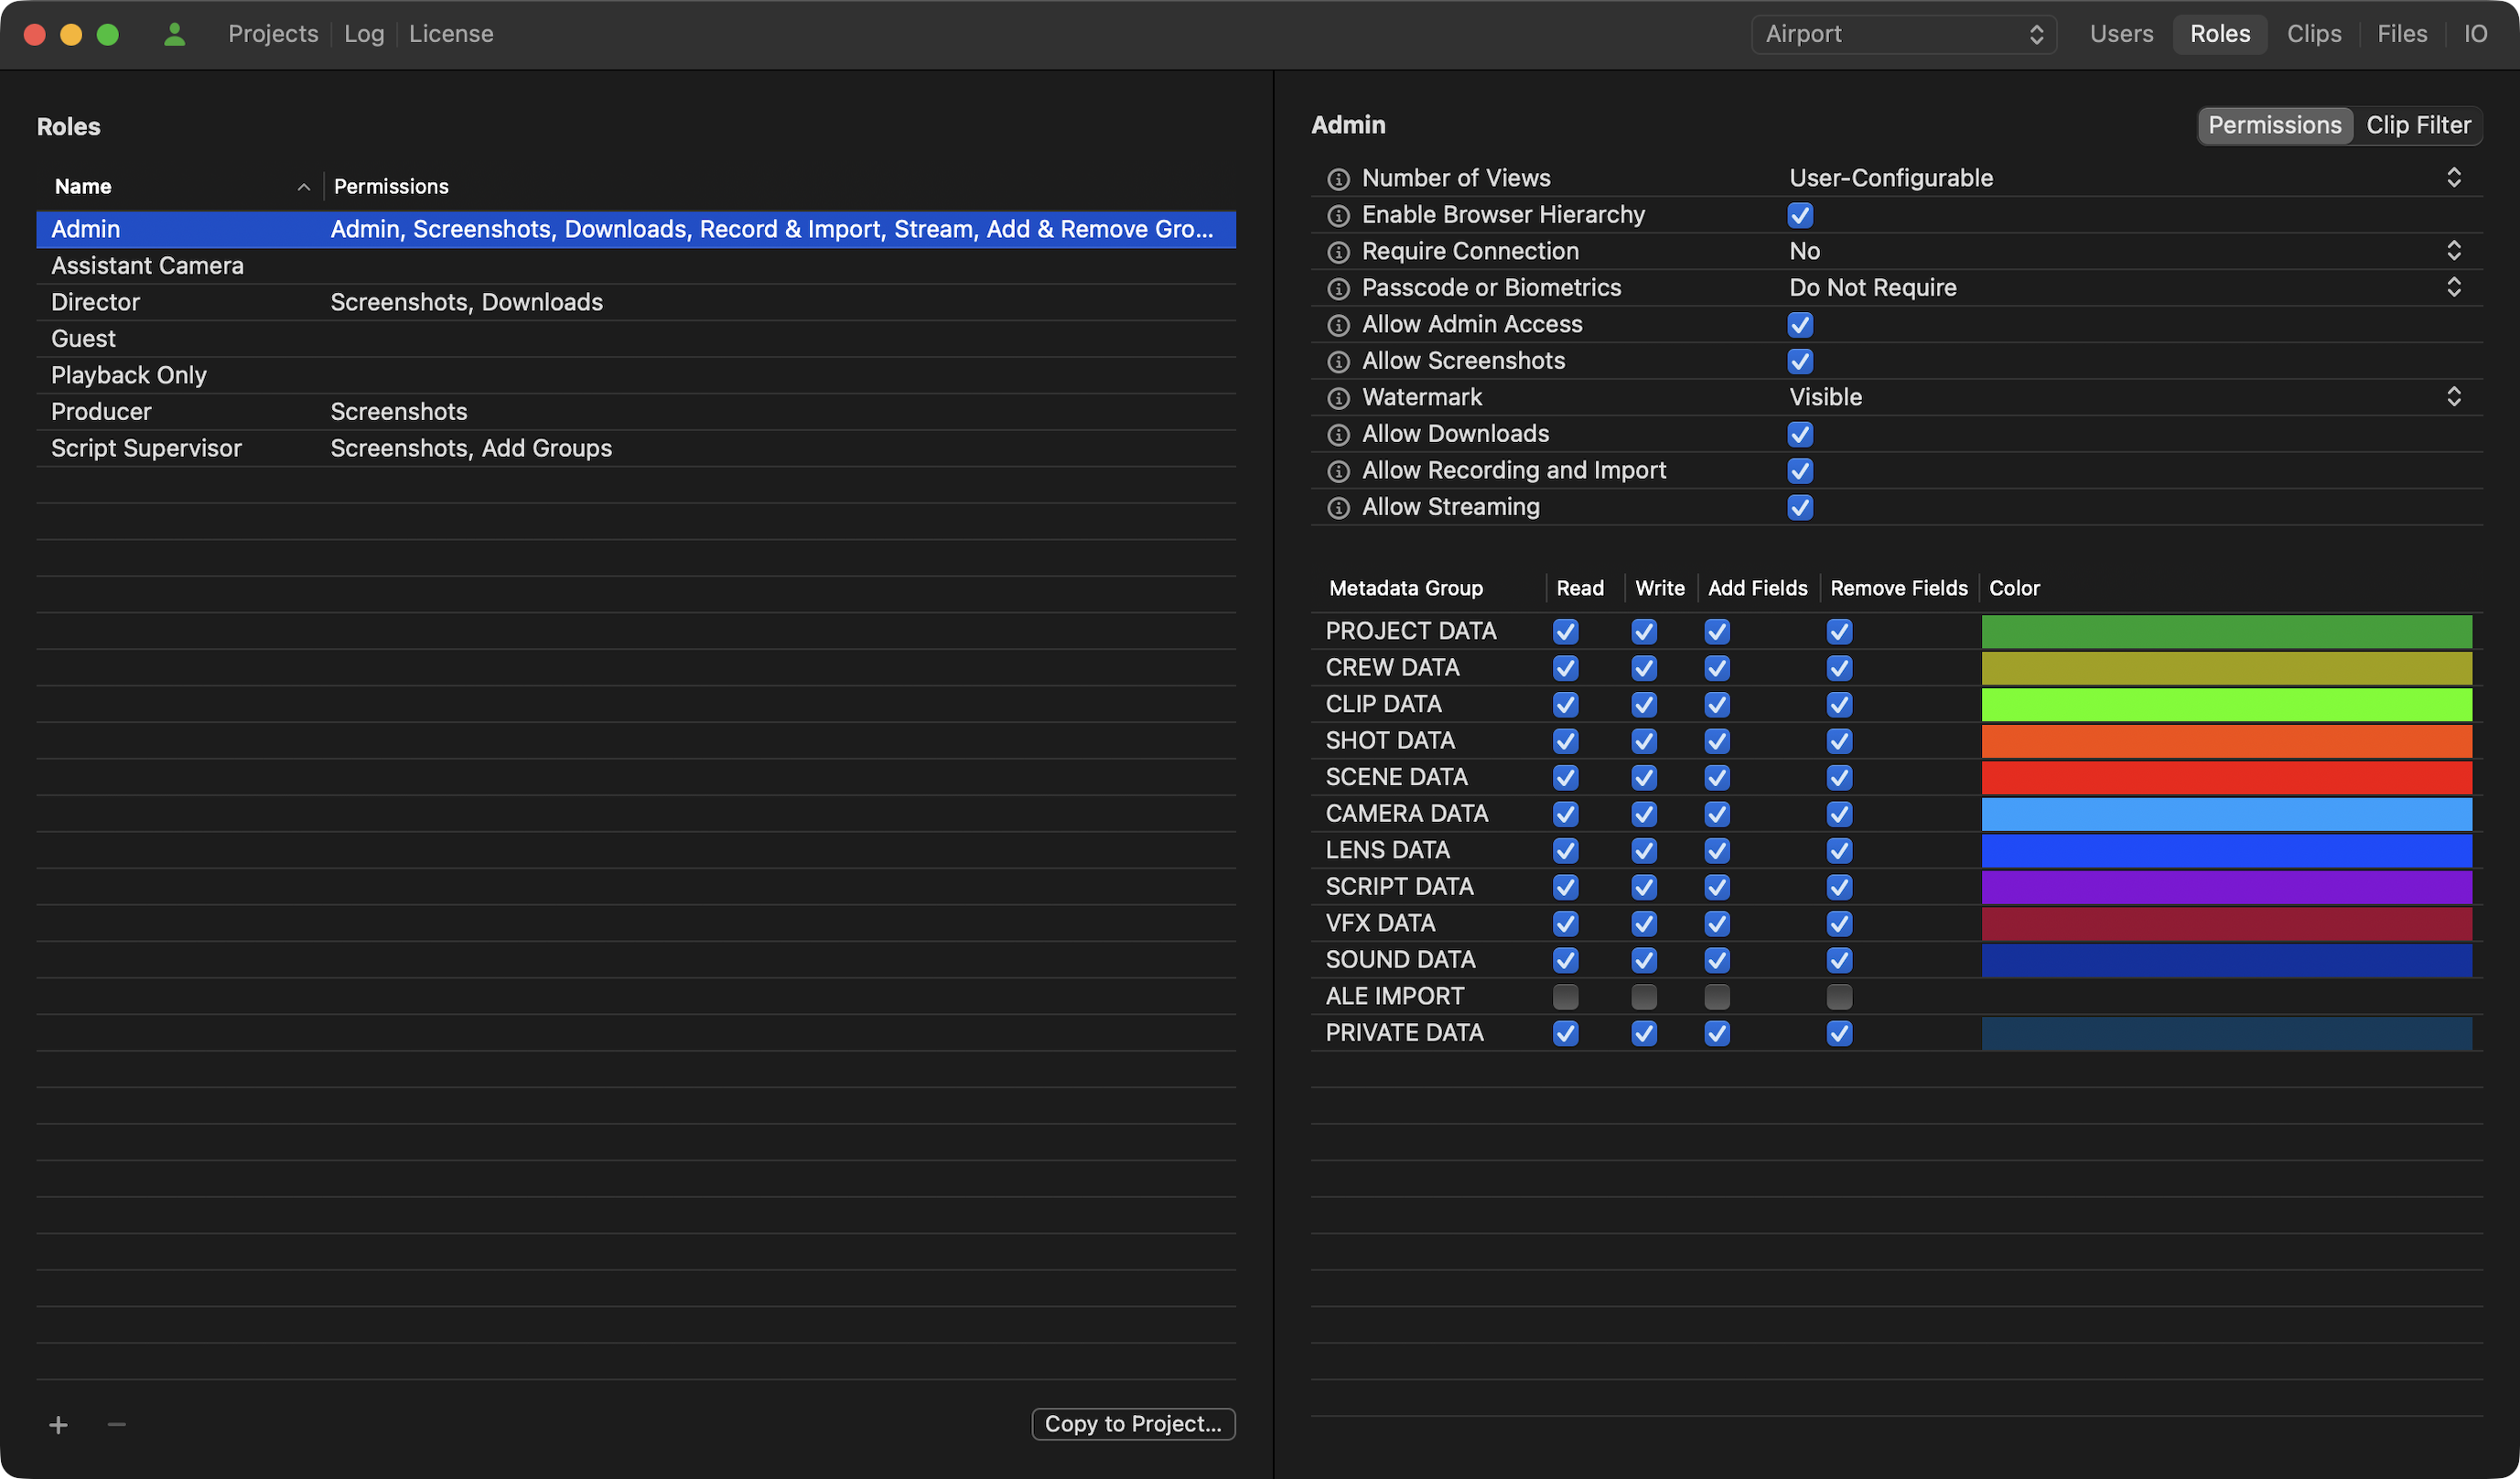
Number of Views
You can set either the User-Configurable option, which allows QTAKE Monitor users to choose the number of Views in Settings, or set a fixed number from 1, 2, 3, 4, 6, 8, or 9. Fixed number overrides user setting.
Enable Browser Hierarchy
Sets the default browsing mode in QTAKE Monitor. Hierarchical mode groups clips into scenes and shots. It only sets the default; users can change this setting.
Require Connection
This dropdown lets you select the type of connection required to access clips. The following options are available:
- No - no requirements, users with this Role can access clips in offline mode
- Any Server - access to clips is allowed when connected to a QTAKE Sync or QTAKE Cloud
- Local Server - QTAKE Sync connection is required to access clips
Passcode or Biometrics
This dropdown controls project access for the selected Role. The following options are available:
- Do Not Require - users with this Role have access to the project even on devices that do not have a system passcode or password
- Require - a system passcode or password is required for project access
- Require and Verify - a system passcode or password is required, and the user is prompted to enter it for project access
Allow Admin Access
This option grants Role access to the ADMIN interface in QTAKE Monitor. It enables the User to perform tasks such as Approving, assigning Roles, banning, and modifying permissions for other Roles directly in QTAKE Monitor, without having to use the QTAKE Sync interface.
Allow Screenshot
Allows users with this Role to take screenshots and record the screen.
Watermark
Defines the types of watermarks applied to viewed content. Visible watermark must also be enabled separately for the project. Forensic watermark requires a separate license.
Allow Downloads
Allows downloads and content caching on end-user devices running QTAKE Monitor. When disabled, users will not be able to play clips without a connection to QTAKE Sync or download clips for offline viewing.
Allow Recording and Import
This checkbox will grant Role permission to create new clips using the record or import functions in QTAKE Monitor.
Allow Streaming
This option allows streaming from QTAKE Monitor Beta. Streaming is a technology preview and requires a build of QTAKE Monitor Beta from TestFlight. This permission is not required for streaming from QTAKE.
Allow Adding Metadata Groups
This permission allows the Role to add custom metadata groups. See the Metadata section for more details.
Allow Removing Metadata Groups
This allows the Role to remove custom metadata groups. In addition, the Role needs the Remove Fields permission in that group to remove the group itself.
METADATA AND PERMISSIONS
Information about a clip, such as the slate information or the camera shutter angle, is called metadata and is organized into Metadata Groups in QTAKE and QTAKE Sync. Every project has a set of default metadata Groups called Predefined Groups. A user with the correct permissions can add Fields to those groups, but it is not possible to remove predefined Groups or Fields. In the Users tab, you can control each Role’s permissions for metadata groups. The following permissions can be assigned:
| Permission | Effect |
|---|---|
| Read | Role can view the group and all fields, but is not allowed to change any values |
| Write | Role can view fields and change values |
| Add Fields | Role can add custom fields in addition to being able to change the values of existing fields |
| Remove Fields | Role can remove custom fields in addition to being able to change values of existing fields* |
* Predefined fields cannot be removed.
In addition to the above, a role can be permitted to add or remove complete metadata groups. To remove a group, the Role must also have the Remove Fields permission for that group.
The Color column in the Metadata Group table allows you to set the color tint of the Metadata Group in QTAKE Monitor. Changing the color is purely cosmetic; distinct colors make navigation between Metadata Groups easier.
CAUTION
Giving a Role permission to Remove Metadata Groups or Remove Fields can be dangerous. Removing fields or groups will remove all data associated with those entities for all users. Assign permissions with care.
Clip Filter
In addition to the permissions above, the Role can also limit access to clips. It is done using shared bins. Users assigned this Role will be able to access only the clips in the selected bins.
CLIPS
The Clips tab shows the currently selected project clips along with the Clip Processing Status. Clips with the Failed status message next to them have not been imported. It could be due to the absence of an H.264 or HEVC proxy file recorded by QTAKE or the imported file format being incompatible. For files originating from a Watch Folder, please refer to the IO section below.”
Unlike previous versions, starting with QTAKE Sync 3.0, Camera, Roll, Episode, Scene, Shot, Take, and Note fields are editable. Double-click the field to start editing. While editing, you can use the TAB key to navigate quickly through the editable fields.
When you have a clip selected in the Clips list or a media file in the Media list, you can use the SPACE key for a quick clip preview.
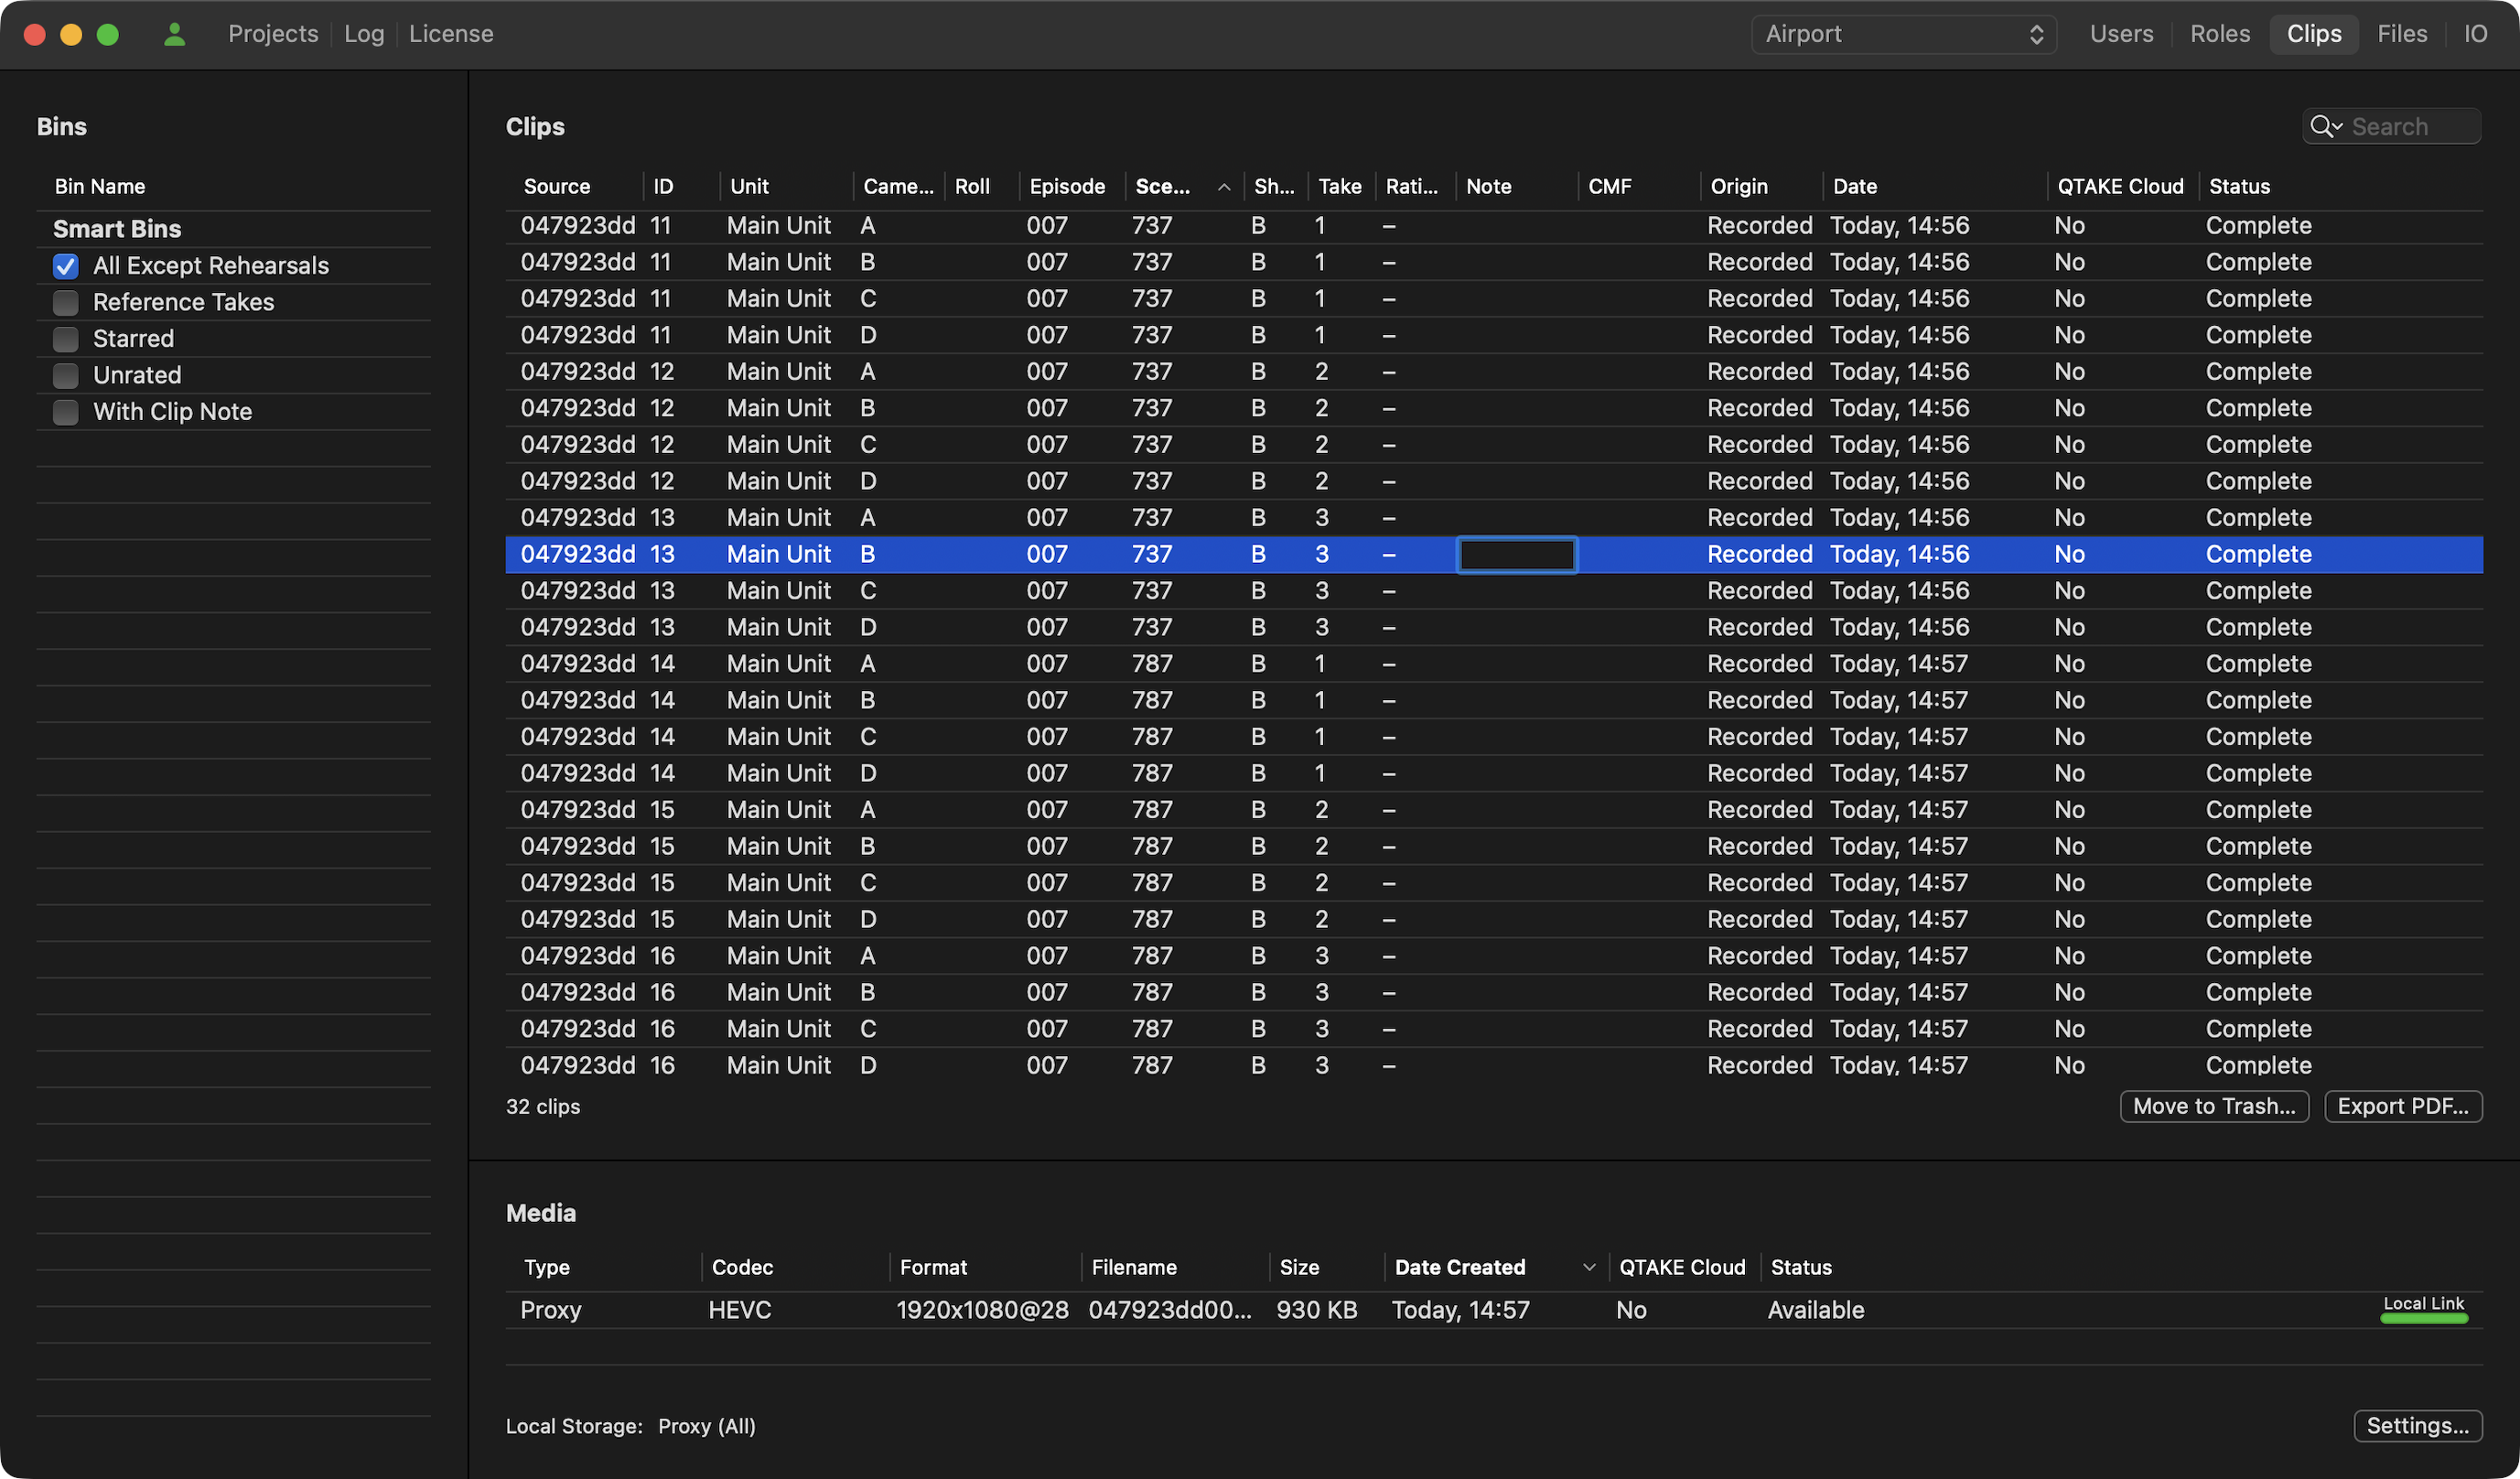
BINS
Many parts of QTAKE Sync use a concept called Bin to display or process a subset of the clips in the project. The Role Clip Filter, PDF Report, and Export Folders all use bins to define what clips to display or include. Regular Bins are similar to folders. They serve as organizational containers for your clips, but you need to manually add clips to them.
SMART BINS
A SMART BIN is a special kind of Bin, which is automatically populated with clips using custom rules. QTAKE Sync defines a few default Bins, but using QTAKE or QTAKE Monitor application allows you to create custom Smart Bins based on any metadata fields.
SHARING BINS
To create a shared bin on your iPad or iPhone, swipe left, over its name in the list of Bins, and tap Share. You can use these Bins in QTAKE Sync to, for instance, export a custom PDF Report that only includes clips from that Bin. Bins can be combined to further narrow down clip selections. For example, creating a shared Bin that only includes clips from a specific scene and combining that with the Starred Bin will only show you clips from that scene with one or more star ratings.
Clip Filters
The Bins list lets you filter what clips will appear in the Clips list by checking or unchecking various Bins. The Bins list will, in addition to the default Smart Bins, display any user-created Bins that have been marked as Shared. See BINS for more information.
Media
The Media list shows what media files have been uploaded to QTAKE Sync for the selected clip in the Clips list. The Settings button opens a window where you can choose what media QTAKE Sync should request and store for the clips in the project. Each column represents one media type, and you can further refine what clips are uploaded using Bins. See BINS.
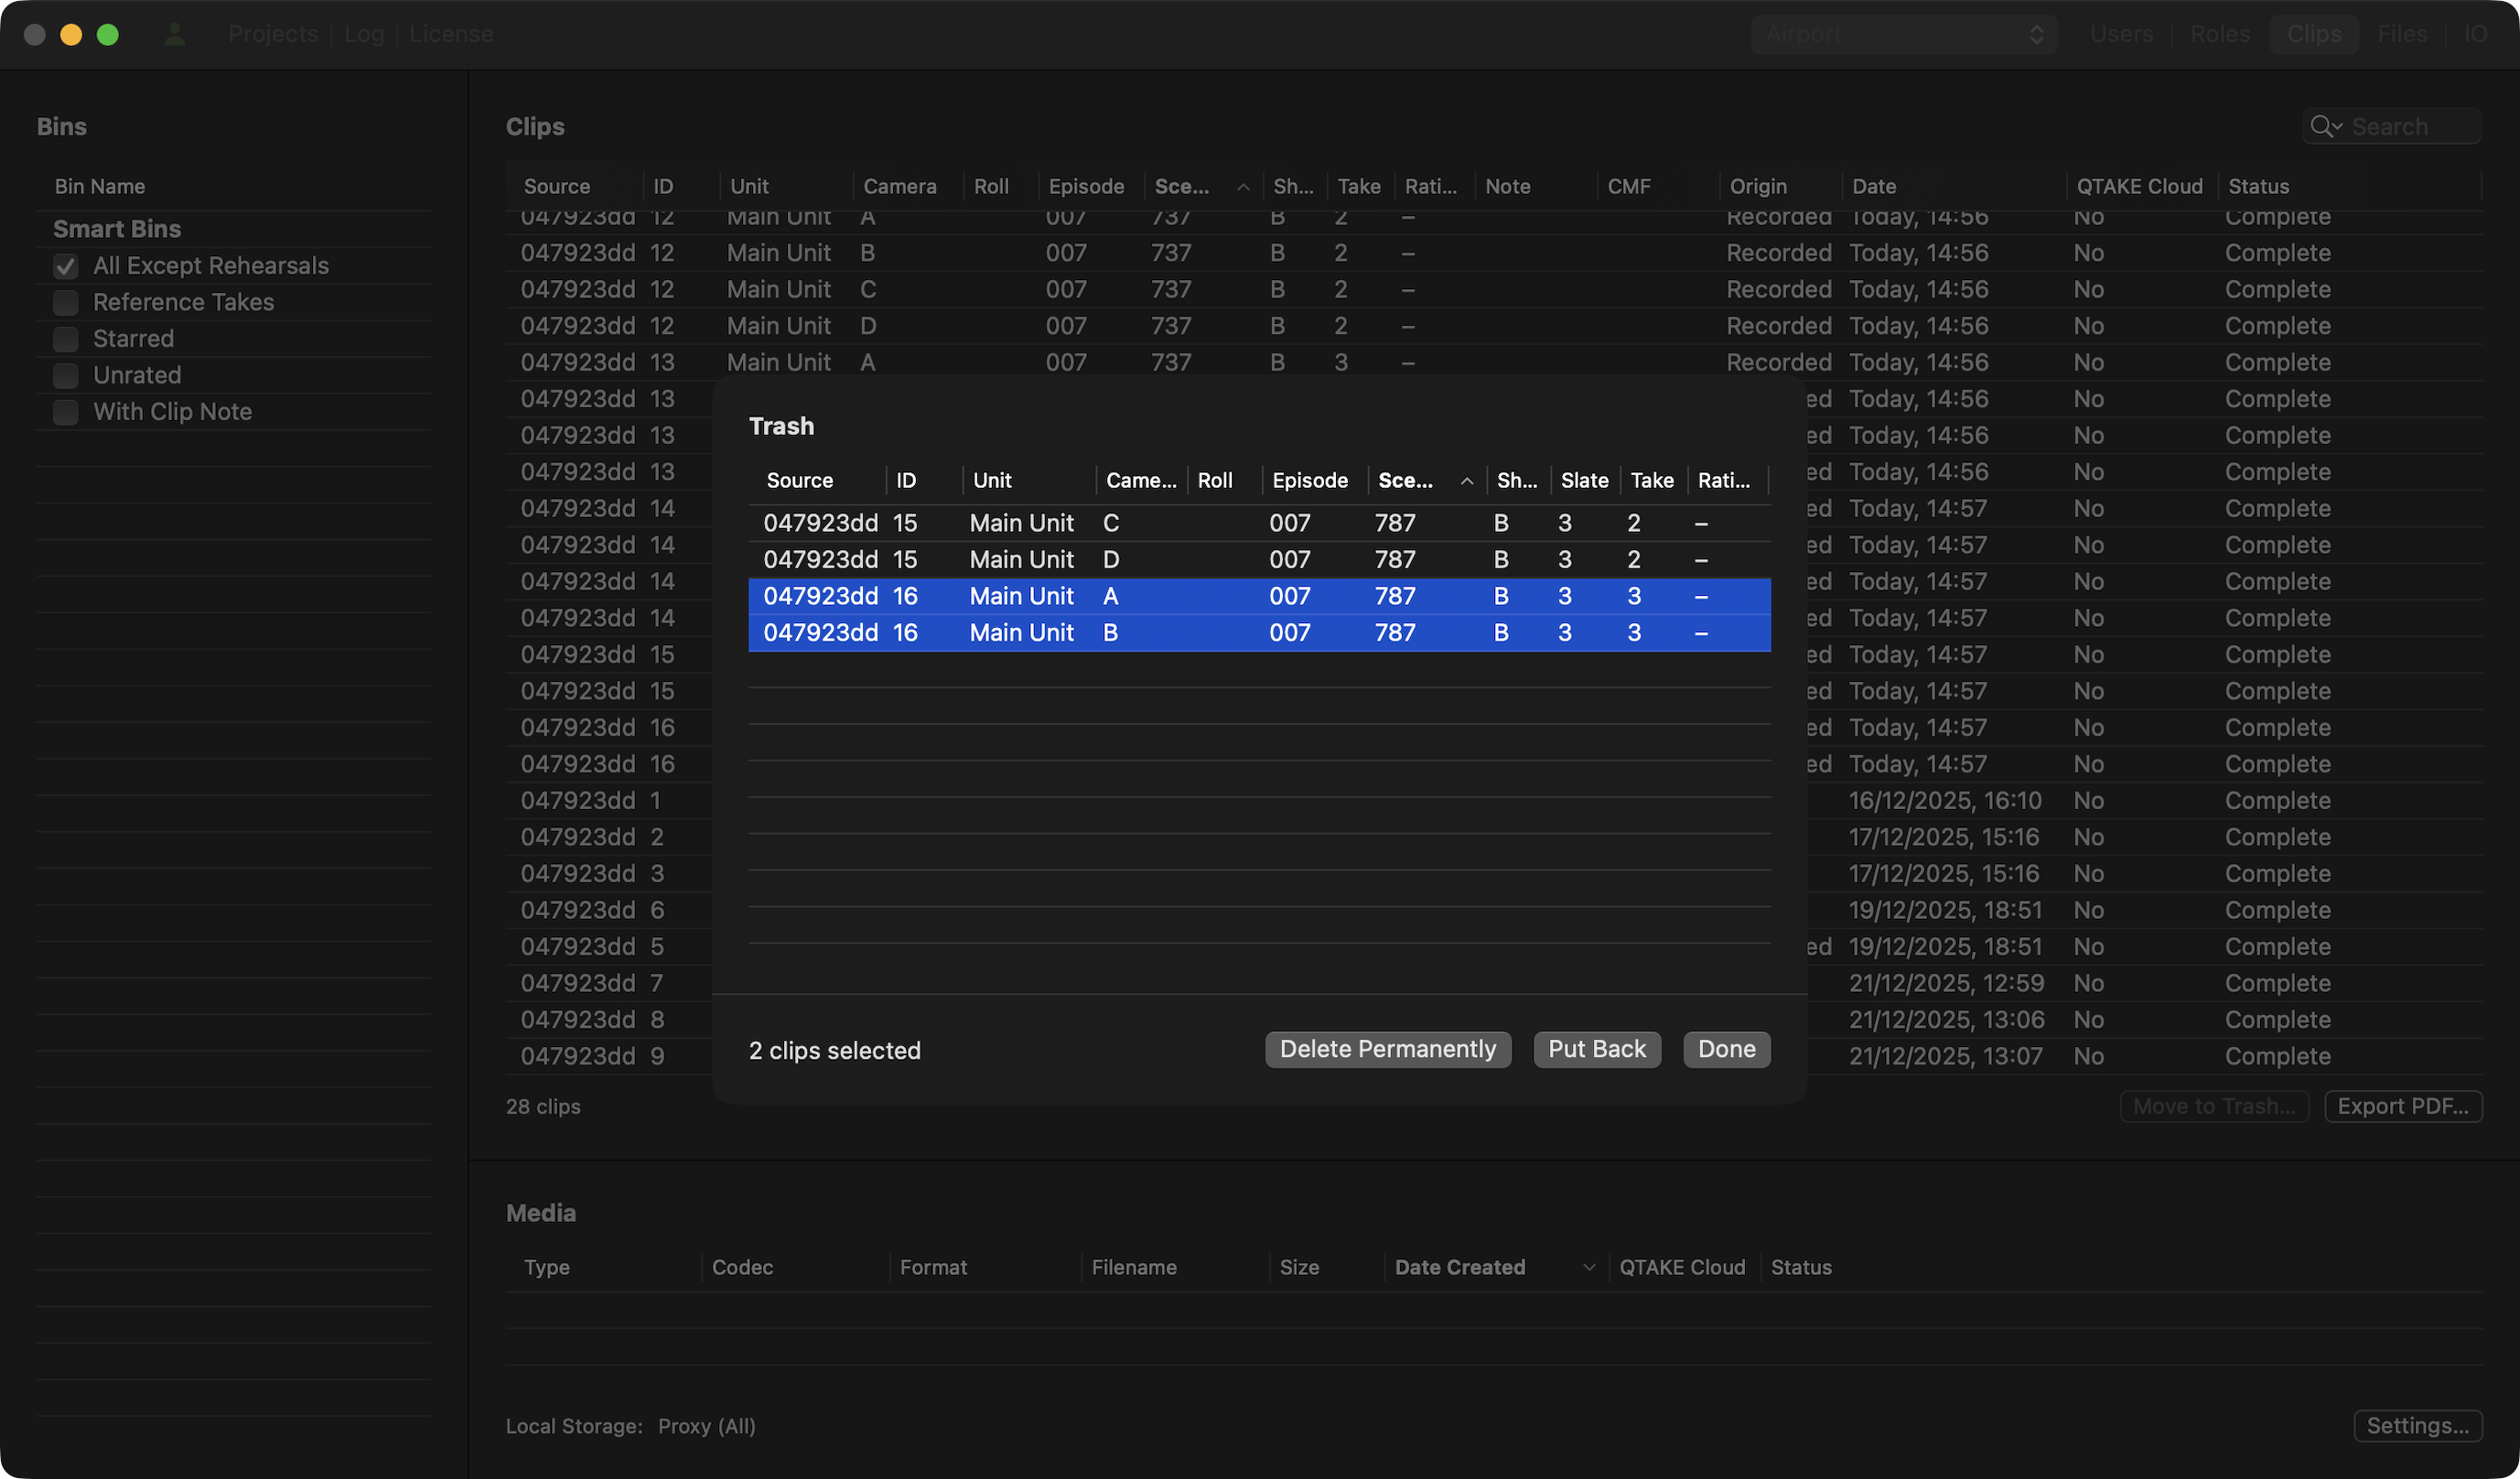
Move to Trash
Deleting clips in the synchronized QTAKE ecosystem is a two-step process. First, you need to move clips to trash using the Move to Trash function. QTAKE Sync has it located in the Clips tab.
Then you can either put them back or permanently delete them. Go to the File menu and click Open Trash to display the contents of the trash bin.
All Trash-related operations are synchronized across the entire ecosystem, including QTAKE.
EXPORT PDF
QTAKE Sync can generate PDF Reports with thumbnails and metadata for each clip. The selection of clips included in the report is defined by what shared Bins you selected in the Clips tab. PDF Reports are generated based on a template that defines the layout and content of the report. QTAKE Sync includes two predefined templates, a Project Report template, and a Camera Report template. You can create new templates by duplicating and editing one of the existing templates (See Creating a Template for more details) in the template editor. The flexibility of the template editor allows for custom reports for any department that requires them.
PDF Report Templates
To create a new PDF report Template, click the Export PDF button in the Clips tab (or go to the File menu, Export PDF) and select the template you would like to base your new report on. Click the Duplicate button and name your new PDF report template. The left side of the template editor lets you choose what metadata fields to include and the sorting order of the clips in the report.
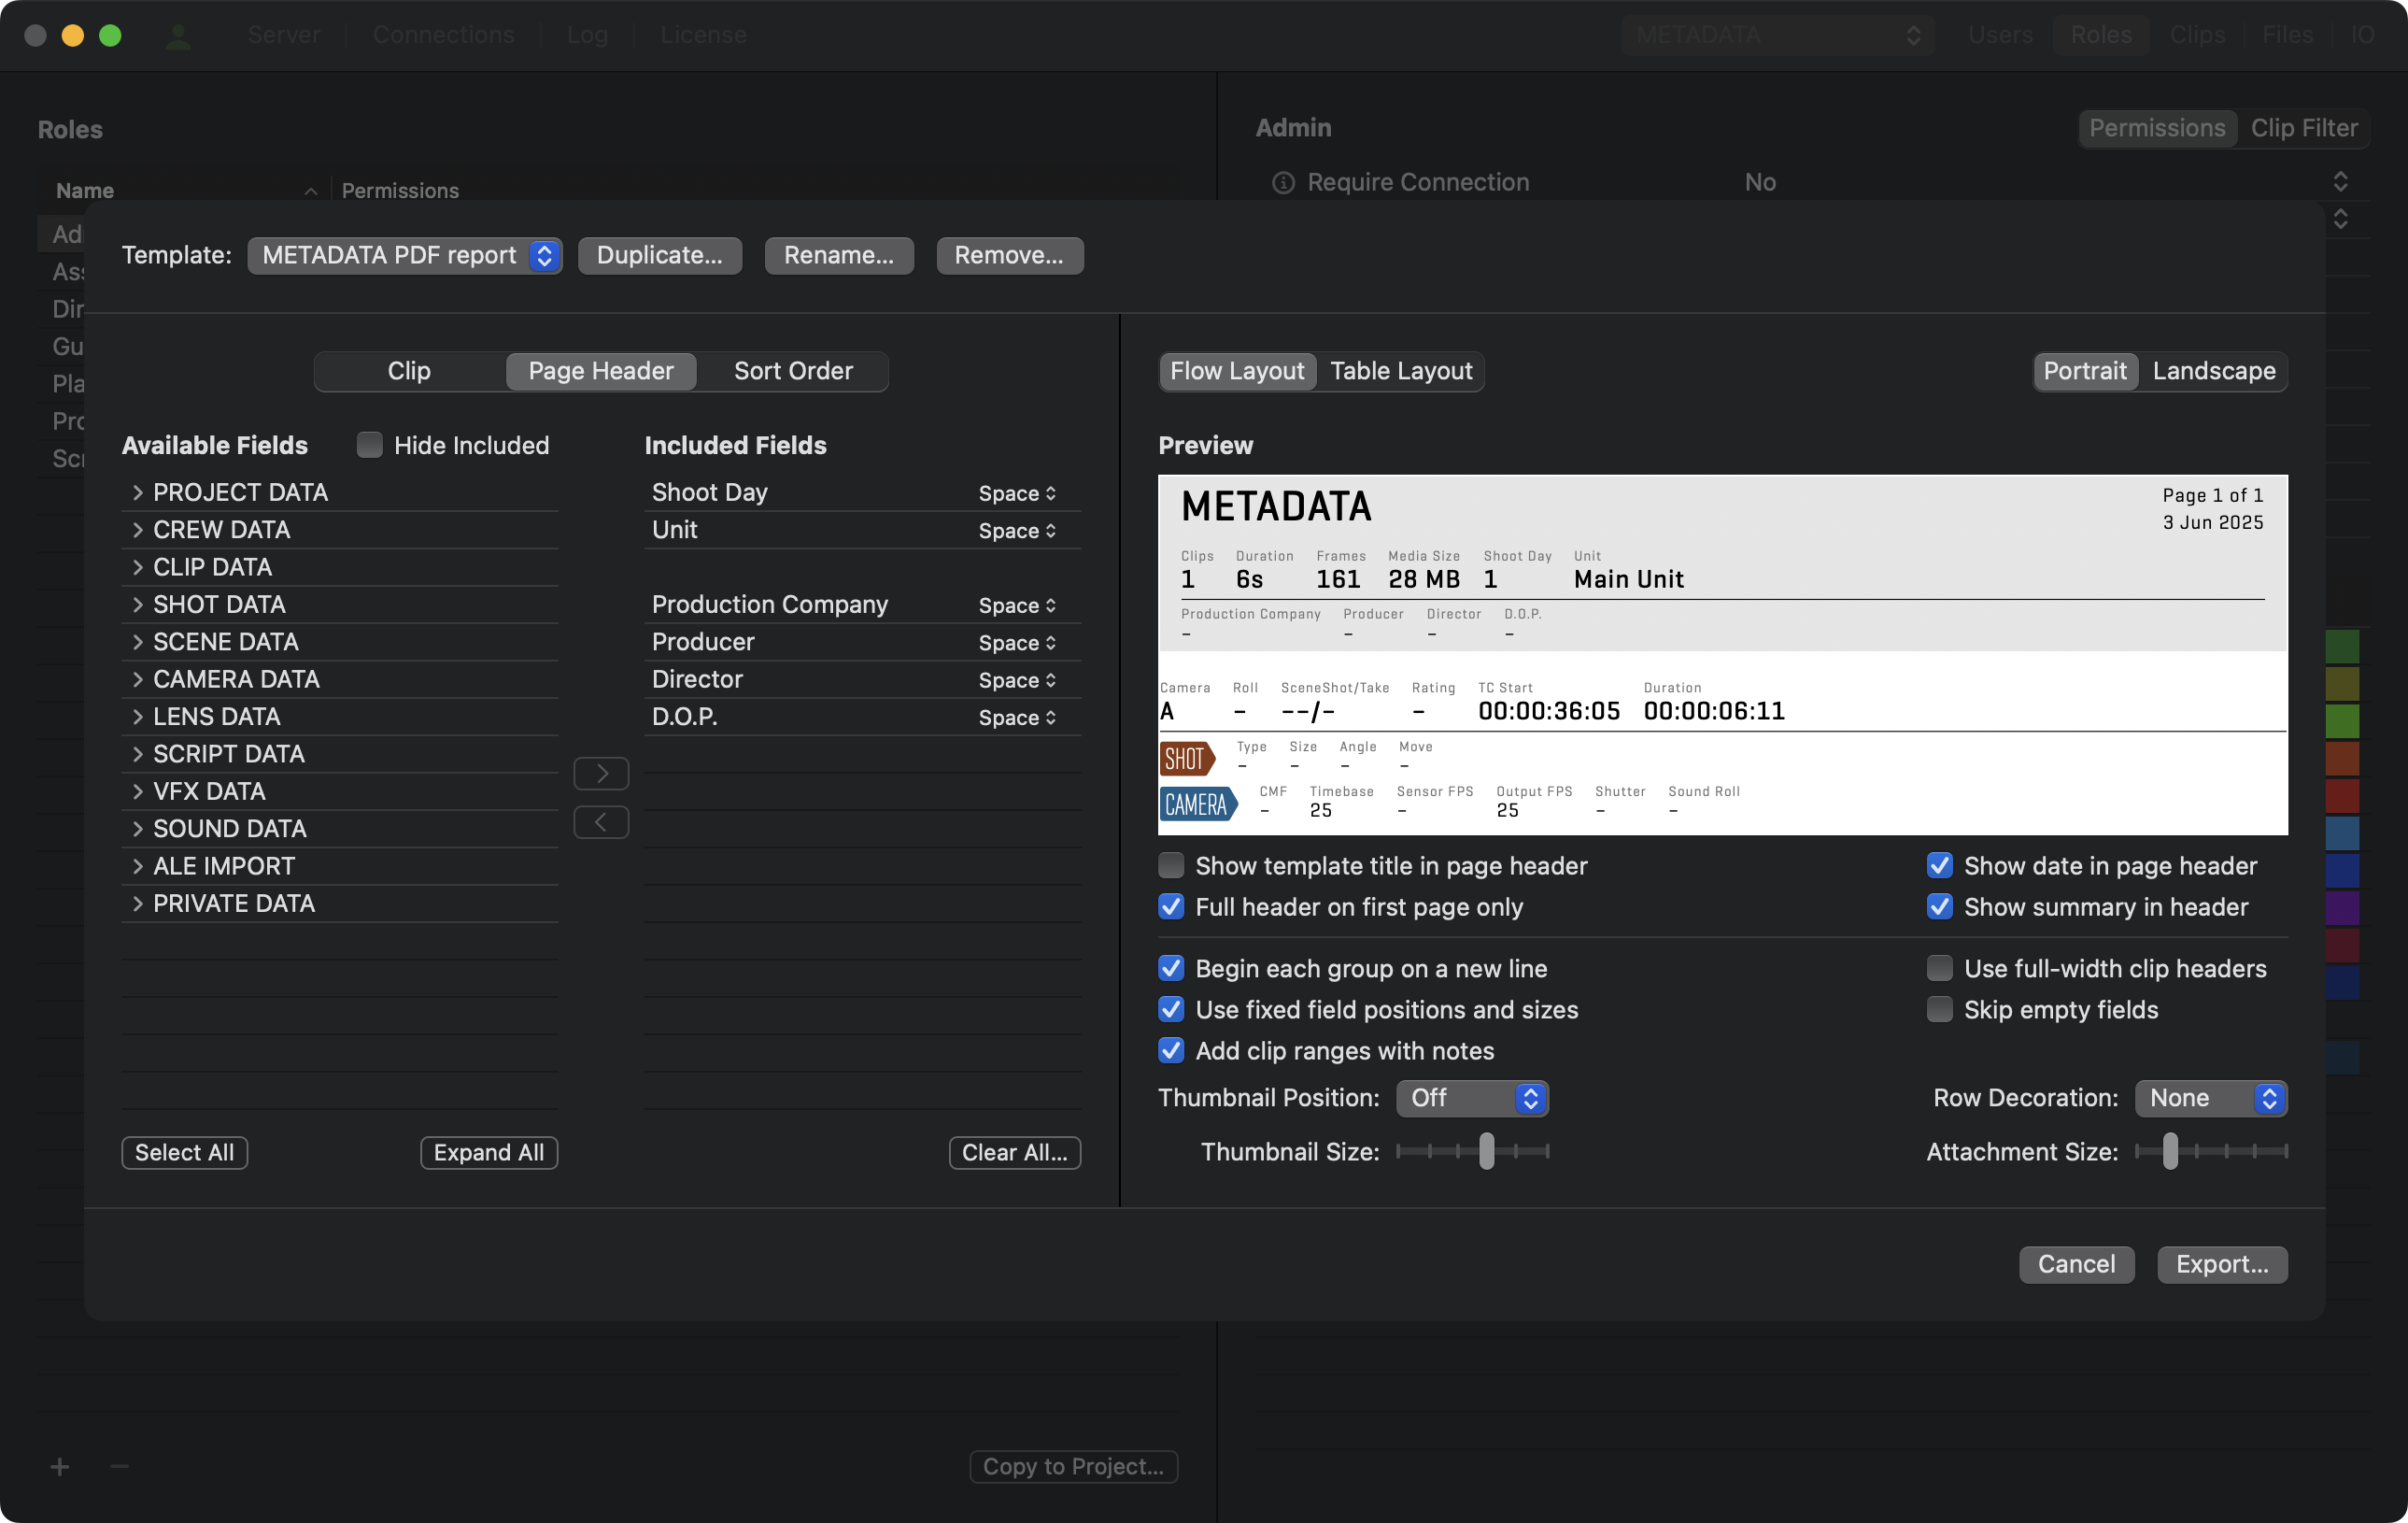
Adding and Removing Metadata Fields
Use the segmented button to choose whether to add the fields to the page header or create individual clip entries in the report. To add a field select it from the Available Fields list and use the arrow button (>). When the report is in Flow Layout, both the Page Header and the clip entries have a heading and a data section. These are separated by a horizontal line in the Included Fields list. Drag the field to move it between the data section and the heading. Each field in the Included list also has a drop-down menu to define its relation to the following field. The options are No Space, Slash, Space and New Line.
Fields added to the Page Header will show up in the gray section of the preview. The Page Header will be repeated at the top of each page in the report. The header would normally be populated with fields from the Project Data group, but you can optionally add fields from other groups. If fields with multiple values are added, the header will show all values separated by commas.
The Sort Order tab lets you control the sorting of clips and the page breaks of the report. Clips in the report are sorted, in order from top to bottom, by the fields in the Included Fields list. There is a horizontal bar dividing the Included Fields list into two sections just like in the Clip and Page Header. Fields added above this line will cause the report to be divided into sections separated by page breaks based on their values.
REPORT LAYOUT
The right side of the template editor contains a preview of the report and controls for the page layout. A segmented button near the top lets you choose between a Flow Layout and a Table Layout for the report. Select the Camera Report in the Template drop-down menu for an example of a report in the table layout.
You can add the template name and the date when the report was generated to the report header by checking the Show template title in the page header and Show date in the page header checkboxes.
Checking the Full header on the first page only checkbox will remove fields below the horizontal line in the Page Header tab on all report pages except for the first.
The bottom row of controls allows you to change the layout of the clip entries. Unchecking Begin each group on a new line allows for a more compact layout by putting the metadata groups closer together. Use fixed field positions and sizes will make sure that fields stay in the same place in each clip entry by adjusting the field size in the report to accommodate the clip with the largest amount of characters in that field. Use full-width clip headers will adjust the thumbnail to allow more information in the header. Skip empty fields will remove fields without data from the report. You can also adjust the thumbnail position and row decoration for the clips.
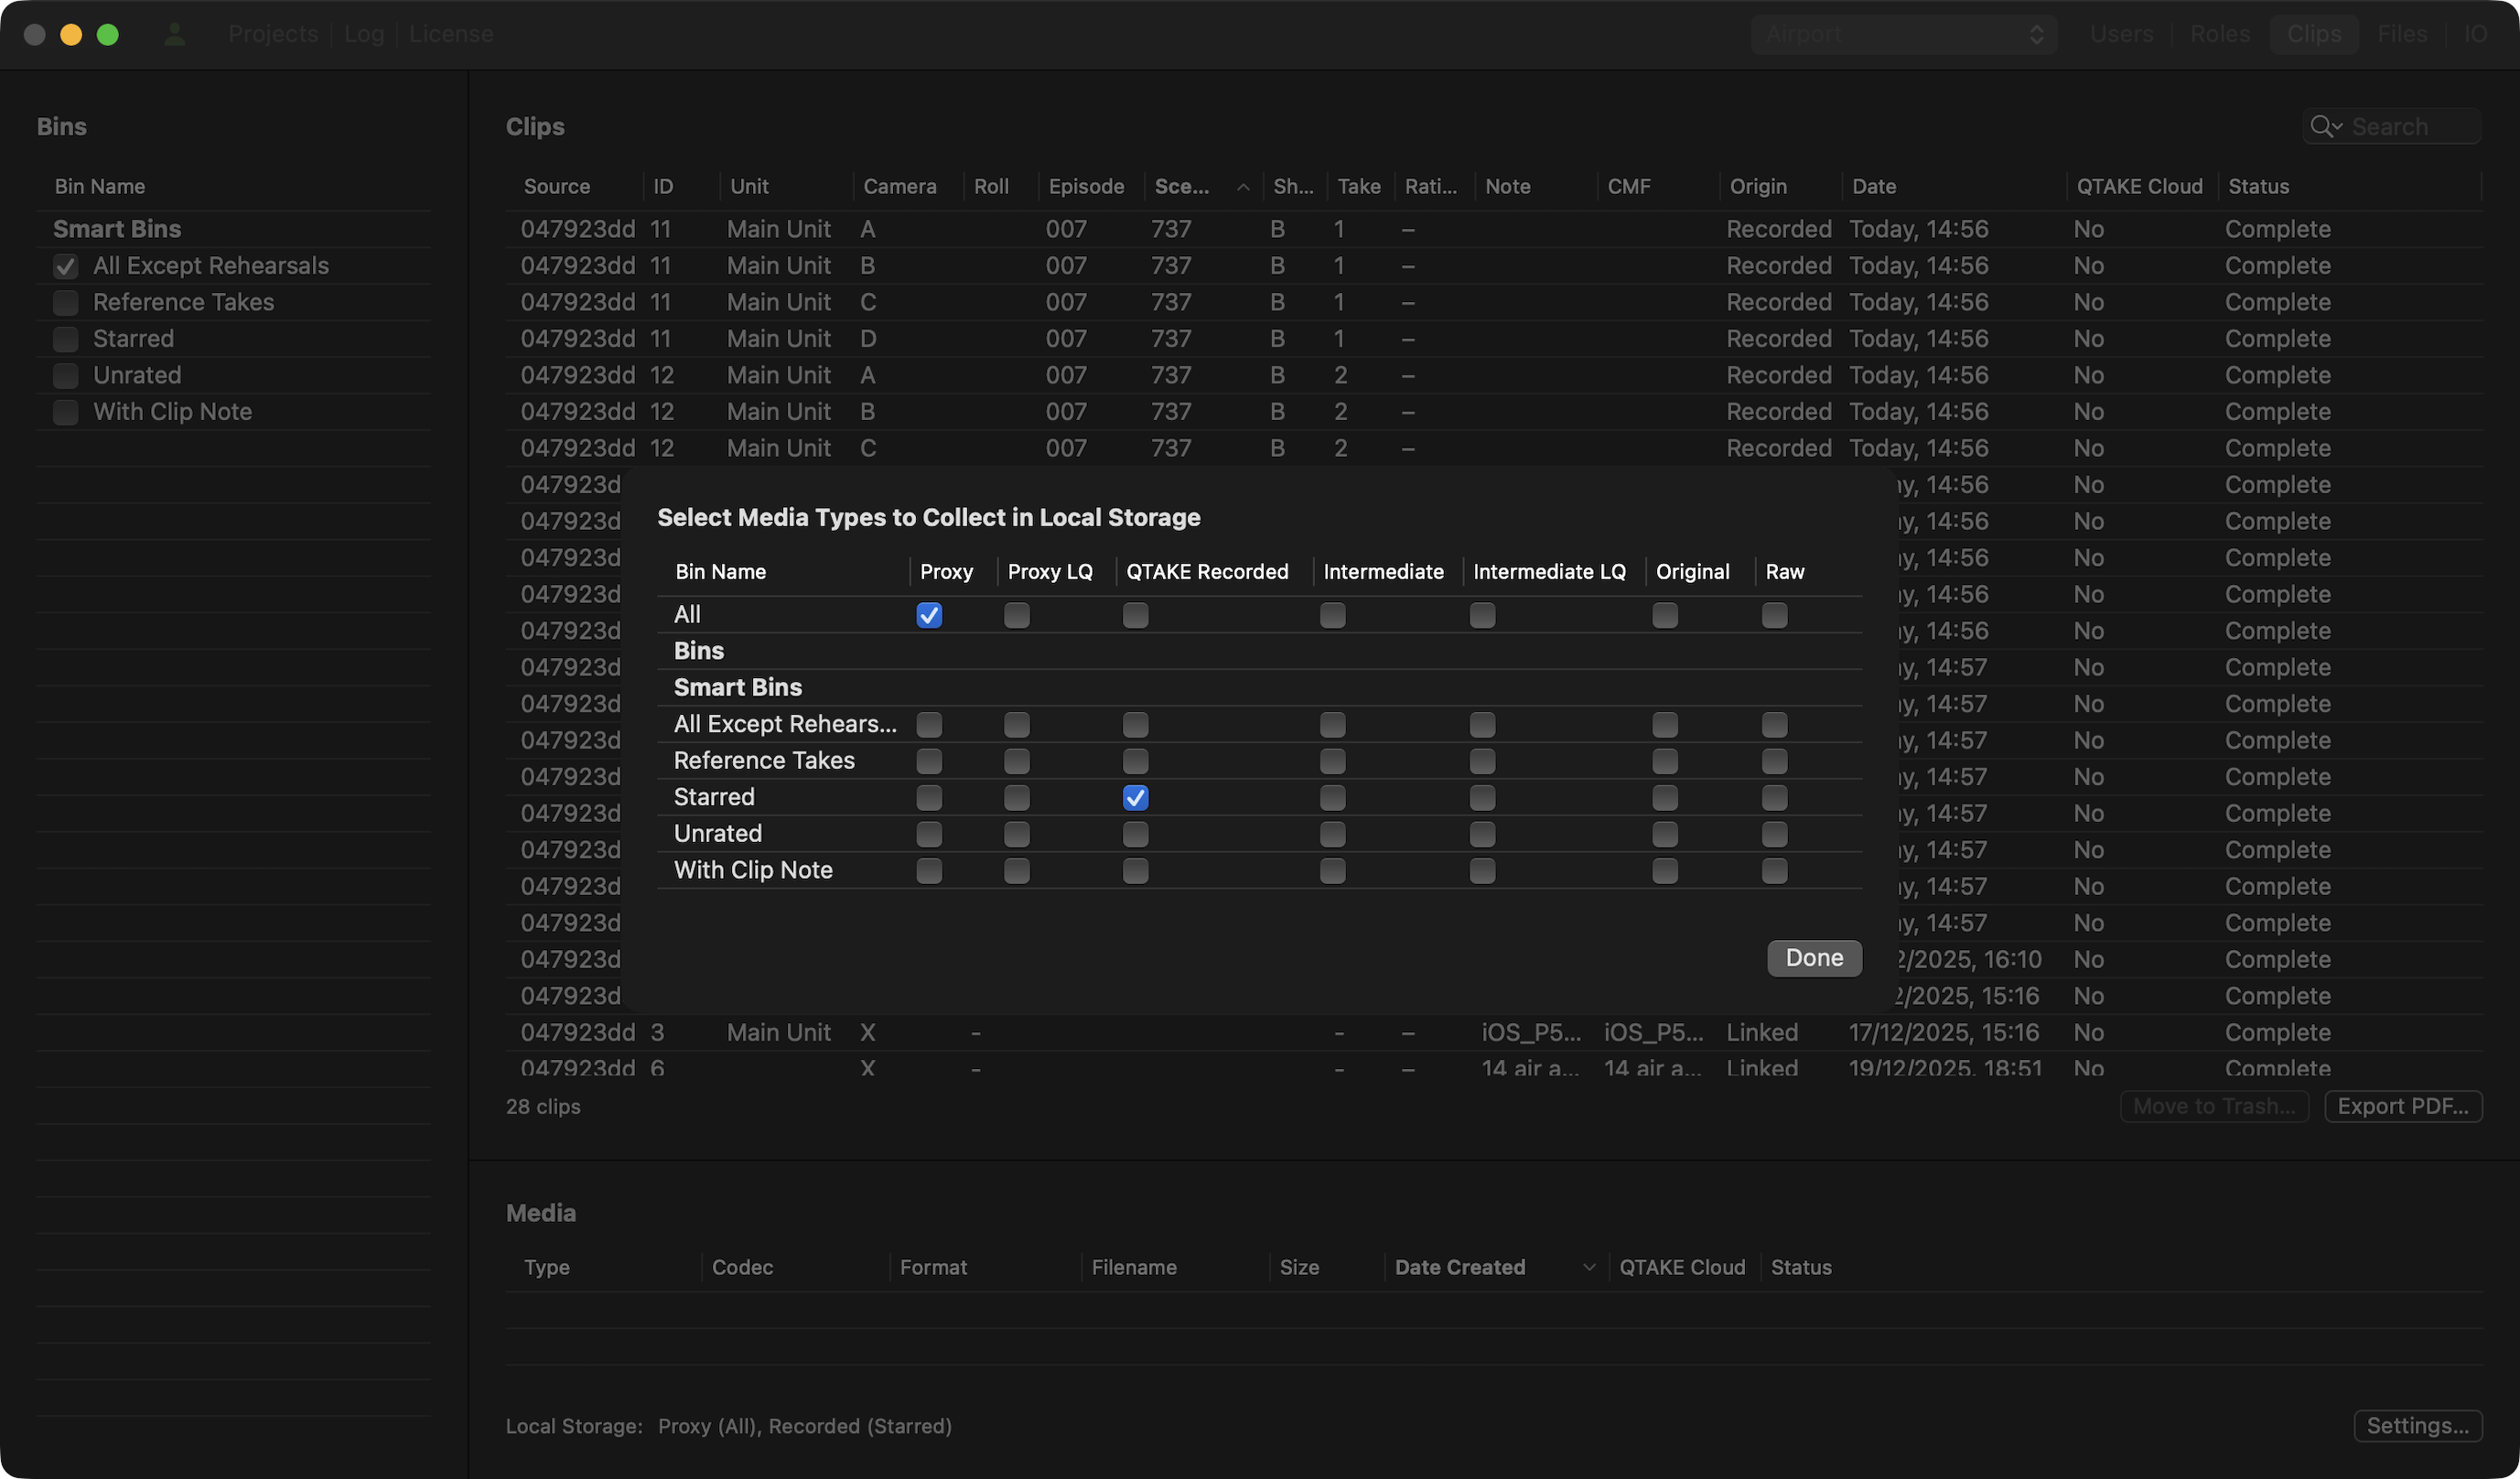
Local Storage Settings
When you click the Settings button located at the bottom right, you can select the media type that QTAKE Sync will store locally. By default, all Proxy media files are included. However, you can take a more selective approach by using Bins to specify which clips and media types you want to include.
Note that QTAKE Monitor and QTAKE Cloud currently pick up only Proxy media files. The Pro license module is required for non-Proxy media types.
FILES
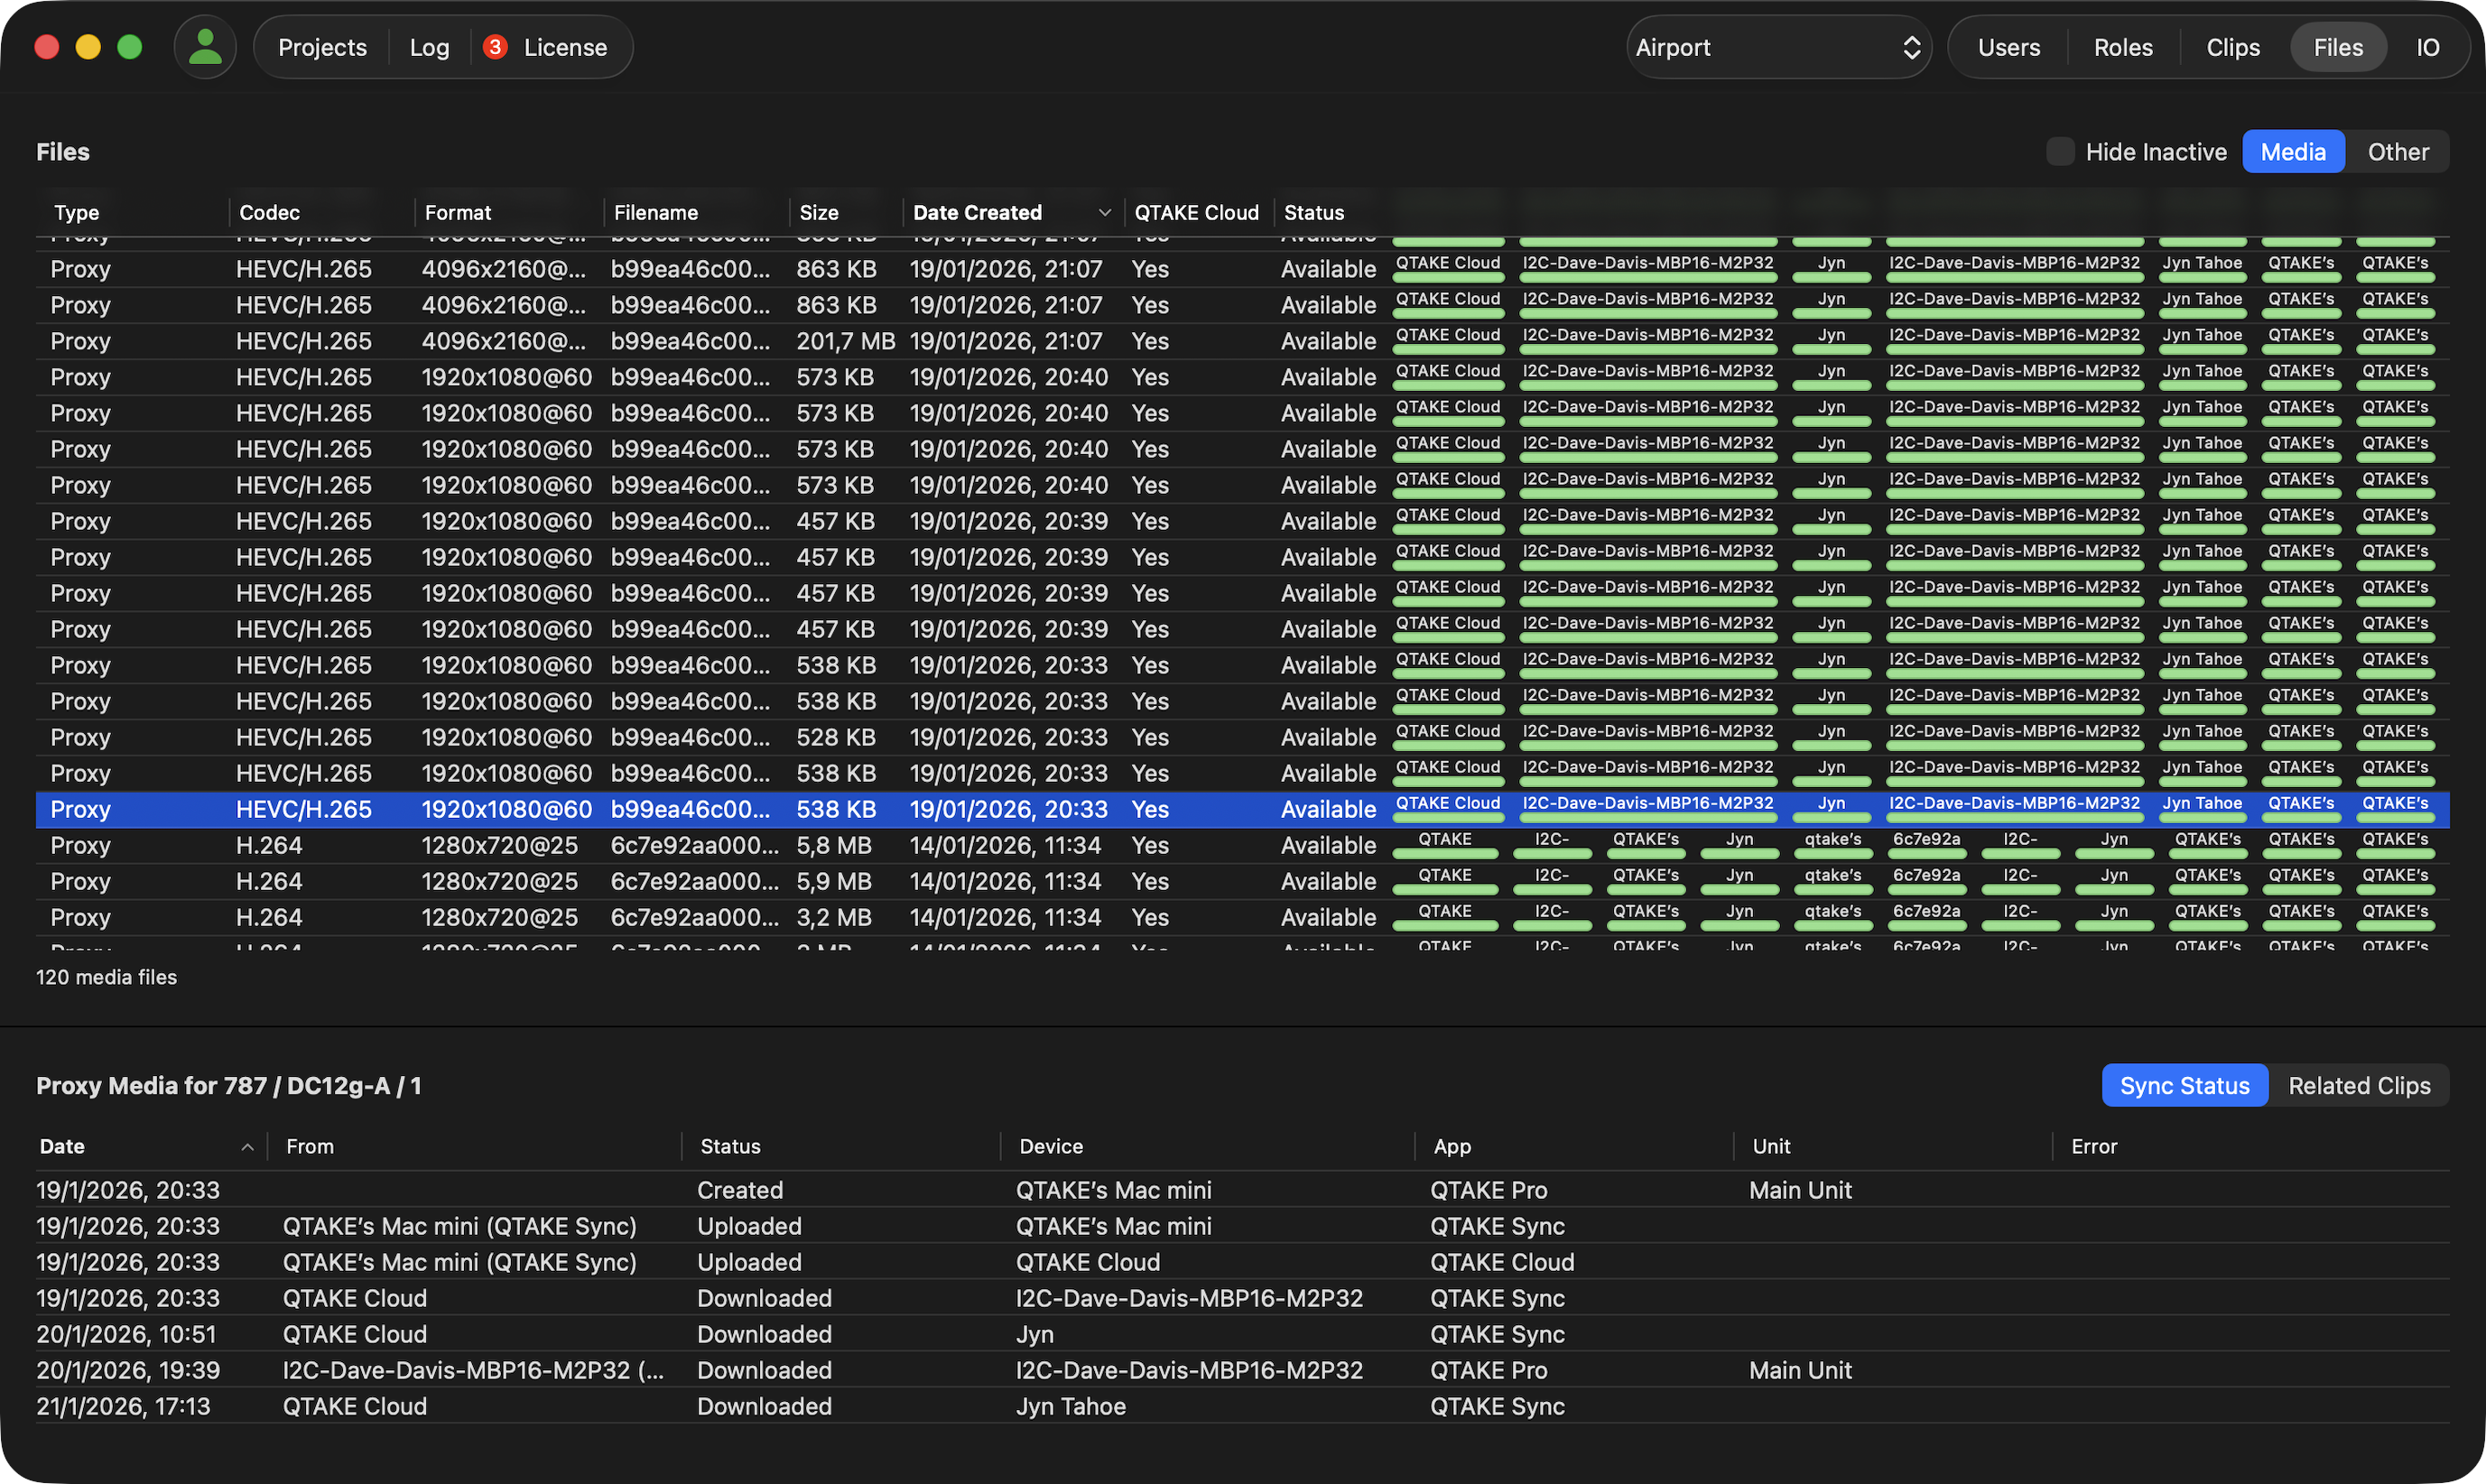
The Files tab shows the upload status of all clips’ files and metadata attachments in the selected project. Metadata attachments are created when photos or videos are uploaded to an Attachments type field by a QTAKE or QTAKE Monitor client.
The Files list shows all files uploaded to QTAKE Sync, as well as those already downloaded to approved devices. You can filter inactive files to show only files with the in-progress status by checking the Hide Inactive checkbox. The Media | Other segmented button allows you to filter clips’ media files or other related files like Thumbnails or metadata attachments.
Media Sync Status
The Media Sync Status feature provides a clear overview of the storage and synchronization state of every media file across all connected devices. It allows users to track asset distribution in real time and quickly confirm that files have been successfully synchronized when sharing clips between systems.
Status Indicators (Upper Table)
The main Files table includes permanent Download Status Badges for each device associated with the project. These badges provide an immediate visual representation of the file’s presence on each unit.
- Device Badges: Each column represents a specific device. The badge color with the device name indicates whether the file is uploaded, downloading, or successfully stored on that device.
- Detailed Tooltips: Hovering the mouse over any status badge reveals additional related information.
File Detail Panel (Lower Table)
When a file is selected in the upper table, the bottom section provides a granular breakdown of that file’s history and relationships through two primary tabs:
Sync Status Tab
This tab displays a list of all devices that have attempted to download the selected media file. It is the primary location for troubleshooting synchronization issues.
- Device List: Shows every unit involved in the sync.
- Detailed Status: Indicates the current state of the file on that specific unit.
- Error Reporting: If a download fails, the Sync Status tab displays specific error messages from the device, allowing quick identification of network or storage issues.
Related Clips Tab
Switching to the Related Clips tab reveals the relationship between the media file and the project metadata. It displays all clips associated with the selected media file, including scene, take, and camera information, ensuring that users can easily identify which footage the file belongs to.
IO
The IO tab contains controls that let you set up watch folders to import media and export folders to export media from the project. The Upload Integrations section allows you to configure QTAKE Sync to synchronize with third-party collaboration services, specifically Autodesk Flow Capture and Autodesk Flow Production Tracking.
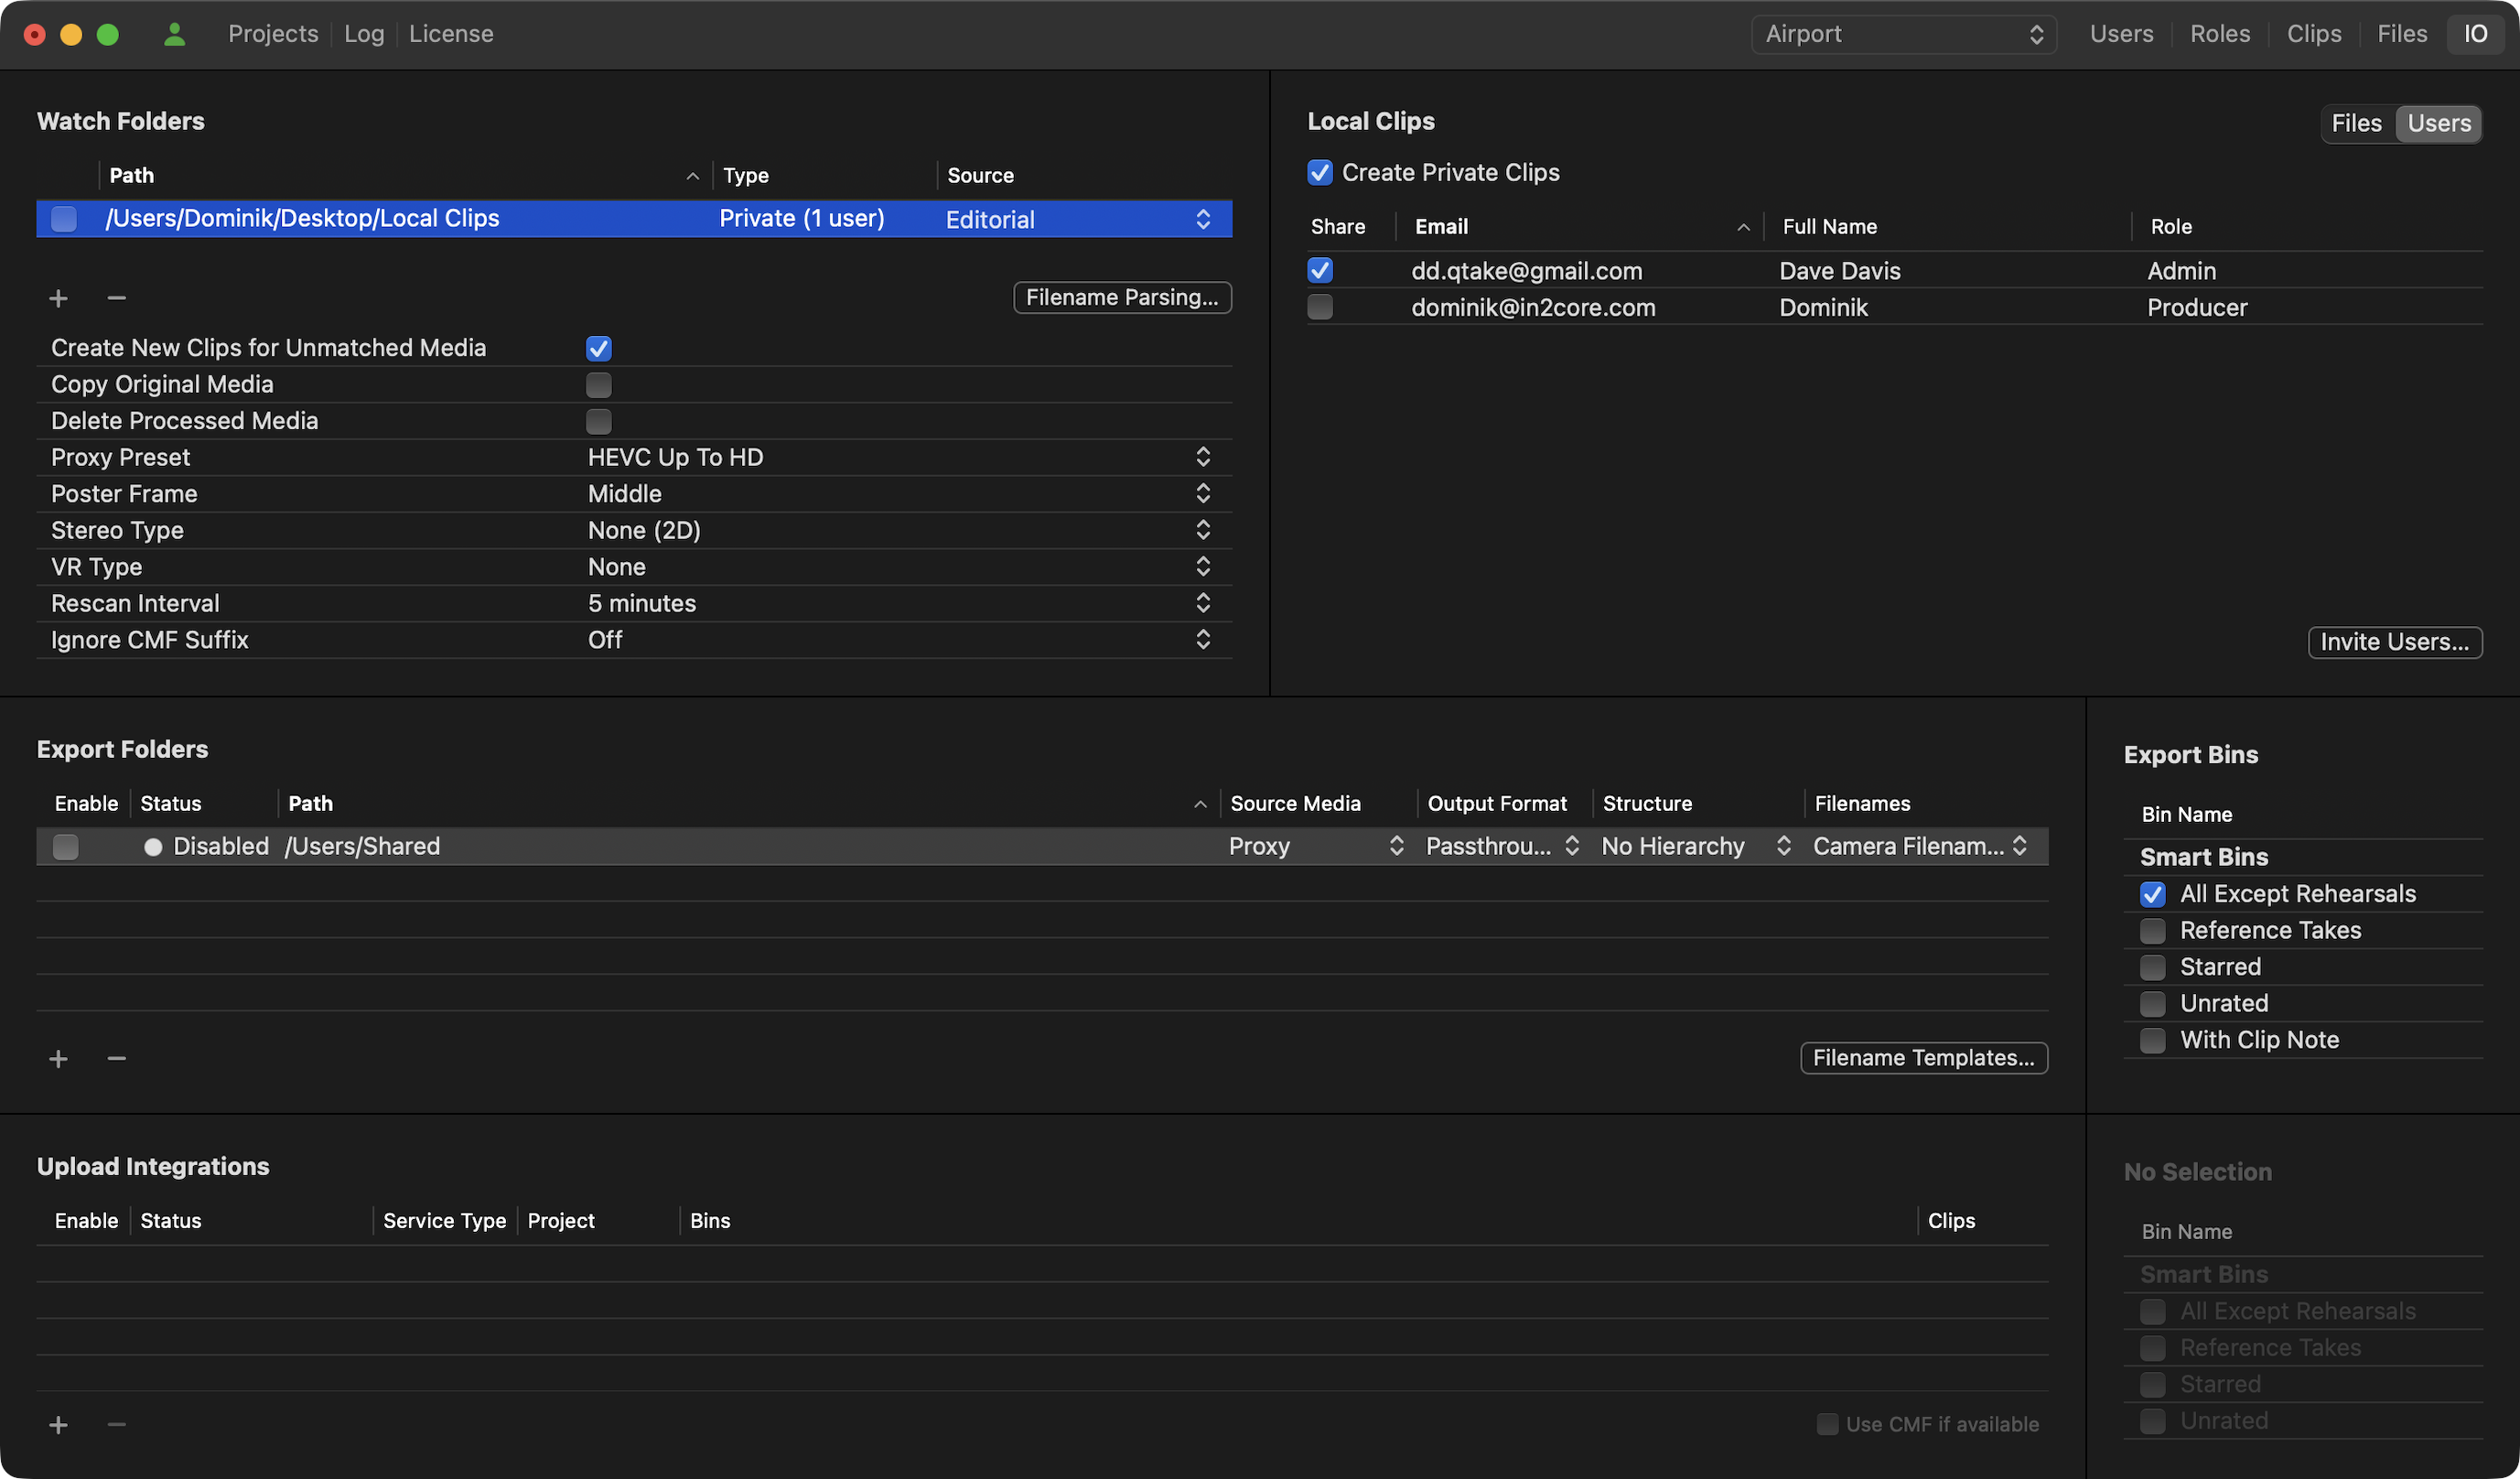
Watch Folders
A watch folder is a designated folder that allows clips to be imported directly into a QTAKE Sync project. Once a watch folder has been set up and you check the folder path, QTAKE Sync will periodically check it for new media.
To set up a Watch folder, click the plus sign in the bottom left corner of the Watch Folders section and browse for the designated folder. QTAKE Sync will immediately catalog the contents of the folder. You can monitor the import process on the right, in the Local Clips section, with Files selected in the segmented button.
By default, QTAKE Sync will only import media that has a matching Camera Media Filename(CMF) and clip in the project database. It allows you to replace existing QTAKE Sync media with graded media from an external dailies software solution. By checking the Create New Clips for Unmatched Media option, you can override the default behavior and have QTAKE Sync import any compatible media it finds, creating new clip entries for media that do not match an existing clip or CMF. You can also copy whole folder structures into the Watch Folder. When importing clips, QTAKE Sync will interpret subfolders as /SCENE/SHOT/TAKE/ metadata.
Checking the Delete Processed Media option will remove files from the watch folder after they have been imported.
The Proxy Preset lets you manage incoming Proxies.
The Poster Frame option determines whether the first frame or a middle frame is used as the thumbnail.
Use the Stereo Type when importing stereoscopic content.
Use the VR Type when importing VR content.
Set the Rescan Interval to 2, 5, or 15 minutes for periodical checks for new content in a folder. Otherwise, set it to Off for a single folder content import.
The Ignore CMF Suffix selector can be set to Off or to ignore the last 1 - 10 characters.
EXAMPLE
/WatchFolder/10/A/1/Clip.mov will add the following metadata: Scene:10 Shot:A Take:1
/WatchFolder/11/Clip.mov will add the following metadata to the clip: Scene:11
Private Clips
The Watch folder lets you import Private clips into a project. You can import content that will be visible only to approved users.
Create a separate watch folder for private clips by using the plus (+) button in the Watch Folder section. Then, check the Create Private Clips option in the Local Clips section after clicking the Users part of the segmented button. Check the Share column for intended users. Then check the private folder path in the Watch Folder section to start the catalog process.
You can check and uncheck the Share permission, as well as the global Create Private Clips permission, at any time. The visibility of the folder’s content for users will be adjusted accordingly.
Export Folders
Use the Plus (+) button to add an Export Folder. The Export Bins list lets you filter what clips are included in the export by checking or unchecking the checkbox next to the Bins. Each export folder can have its own set of Bins. See BINS.
The Media Type dropdown lets you select, what type of media to export to the folder. The Filenames dropdown lets you choose whether the media should use QTAKE Filenames or Camera Media Filenames, and you can even create custom filenames by creating a new template with the Filename Templates button. You can also choose whether the files should be organized into subfolders based on Camera, Scene, and Shot metadata or not. Clicking the checkbox will start the export of QTAKE Sync media to the folder. As long as the checkbox is ticked, new media will be copied to the export folder.
NOTE
To export media to an Export Folder, first, it has to be uploaded to QTAKE Sync. You can select what media QTAKE Sync should request in the Clips tab.
Upload Integrations
The Upload Integrations list lets you upload media from your project to external third-party media collaboration sites. QTAKE Sync supports Autodesk Flow Capture (formerly Moxion) and Autodesk Flow Production Tracking (formerly ShotGrid).
Click the plus (+) button to add an entry to the list. Upload Integrations are turned off by default, allowing you to adjust settings before the upload begins. The Upload Bins list allows you to filter which clips to upload by checking or unchecking particular Bins. Click the Enable checkbox when you are done adjusting to initiate the upload. You will be asked to confirm your third-party service Login details. You will be asked to confirm your 3rd party service Login details. QTAKE will automatically upload new clips that match the selected Bins.
The Use CMF if available checkbox overrides QTAKE Filename with Camera Media Filename if available, and the clip is not a rehearsal.
SECURITY
LOCAL QTAKE Sync
Project and QTAKE Sync Links
To ensure that the communication between QTAKE Sync and its clients cannot be intercepted or eavesdropped on, it deploys pre-shared certificate fingerprints. Before QTAKE clients (QTAKE, QTAKE Sync, and QTAKE Monitor) can connect to a QTAKE Sync, it needs to provide such a fingerprint via the Share Link button. Project link can be shared with QTAKE Monitor via QR code, AirDrop, Messages, Mail, or other applications that support hyperlinks.
Wi-Fi Security
We recommend using WPA2 encryption and a password that is not easily guessable. Due to the way WPA2 works, it is also a good idea to choose a non-trivial name (SSID) for the network.
Device Security
Devices (iPhones and iPads) are automatically encrypted. To take advantage of the encryption, we recommend locking your device with a passcode.
CLOUD-BASED QTAKE Sync
SSL Certificates
Rather than sharing Project link, an internet-facing QTAKE Sync with a domain name can utilize an SSL Certificate to enable synchronization between itself and other QTAKE clients.
The SSL certificate acts as an identity card for your QTAKE Sync. Certification Authority (CA) issues the certificate and it proves the certificate holder is the rightful owner of the signed domain name. Having an SSL Certificate installed in QTAKE Sync guarantees that communication between QTAKE clients and QTAKE Sync is encrypted in such a way, that it cannot be intercepted or eavesdropped on by unauthorized third parties.
The CA will verify that you are the owner of the domain name, usually by sending a verification email to an email address associated with the domain name. Then you will need to enter the Certificate and the Private Key into the Preferences - SSL Certificate window.
Firewall Settings
For QTAKE Sync to function, the computer or routers firewall needs to accept incoming traffic on the following ports:
TCP 44443
TCP 8500 - 8600
For license activation and deactivation:
shop.qtakehd.com, TCP port 443
See the Remote Server is Disconnected section for more details on troubleshooting port configuration.
TROUBLESHOOTING
TROUBLESHOOTING QTAKE Sync
No License
Make sure the correct QTAKE account is logged in and the appropriate license is activated.
Go to the License tab.
If you do not see an active license, click the Activate button at the bottom.
If the license is not registered, restart QTAKE Sync.
If these steps do not solve the problem or you do not have a license for QTAKE Sync, please contact IN2CORE support.
Remote Project is Not Listed in the Projects tab
If a remote project is not listed in the Remote Projects column, it has to be added manually. Click the plus (+) button and enter the hostname or IP address of the remote computer.
Remote Project is Disconnected
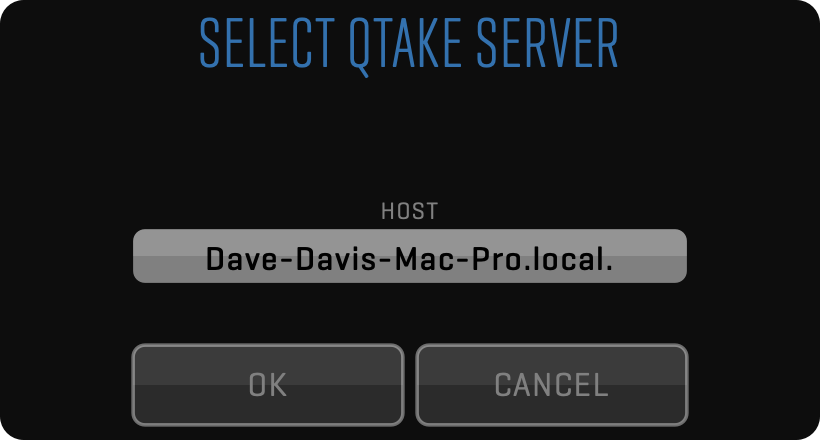
If any QTAKE application is having trouble establishing a connection to your QTAKE Sync, try using an IP address to connect instead of relying on Bonjour or hostname. This removes a potential point of failure.
This can either be accomplished by entering the Mac IP address into the Host Name field in QTAKE Sync’s Preferences, then sharing a project link again (the link should now contain the IP address you entered), or manually in each app:
- In QTAKE, go to SERVERS in the Open Project dialog located in FILE ROOM, click ADD and enter the IP, then highlight the added entry and click CONNECT.
- In QTAKE Monitor, go to Servers (third tab) in the Open Project dialog, click the plus button and enter the IP, then click the added entry to confirm the connection.
- In another QTAKE Sync connecting as a client, click the plus (+) button under Remote Projects and enter the IP, then highlight the added entry and click Connect.
If the connection is not working even with direct IP addressing, try running the following command in Terminal on the client computer (substitute the QTAKE Sync address for w.x.y.z):
nc -z w.x.y.z 8500
You can use the same command to verify other ports used by QTAKE Sync. The above command should print a message saying the connection succeeded. If not, contact your network administrator to troubleshoot the network configuration to ensure the above test succeeds.
QUICK SETUP
Single Unit Setup Guide
This guide assumes that you have a functioning installation of QTAKE 1.5 or later and a licensed QTAKE Sync 3.0 or later running on the same computer. If that is not the case, please refer to the installation instructions in either the QTAKE User Guide or the QTAKE Sync User Guide.
To test functionality on the client side, you will also need an iPad, iPhone, or Mac running QTAKE Monitor 4.5 and a working network connection between the QTAKE Monitor device and the computer running QTAKE and QTAKE Sync.
1) Launch QTAKE Sync and navigate to the Projects tab.
2) Launch QTAKE and create a NEW project, make sure to enable RECORD PROXY (H.264 or HEVC) for all inputs.
Note that by default QTAKE Sync stores only PROXY clip media files to optimize network data traffic. When uploading a project to QTAKE Sync and the RECORD PROXY option is OFF, no clips will be uploaded. To correct this you have 2 options:
- Select all clips in the QTAKE LIST table, click FUNCTIONS and RENDER PROXY. In the project settings, update the RENDER PROXY option to YES to enable the automatic uploading of all new clips to the QTAKE Sync. This ensures that with new QTAKE clips, their proxies will be uploaded to QTAKE Sync.
- In QTAKE Sync go to the Clips tab after all steps below are done, click Settings in the Media section next to the Local storage info. Here You can choose the clip media type to be uploaded to QTAKE Sync. Bear in mind that choosing media types other than PROXY will significantly increase data traffic over the network and upload time, which might not be the desired outcome.
* QTAKE Sync PRO license module is required.
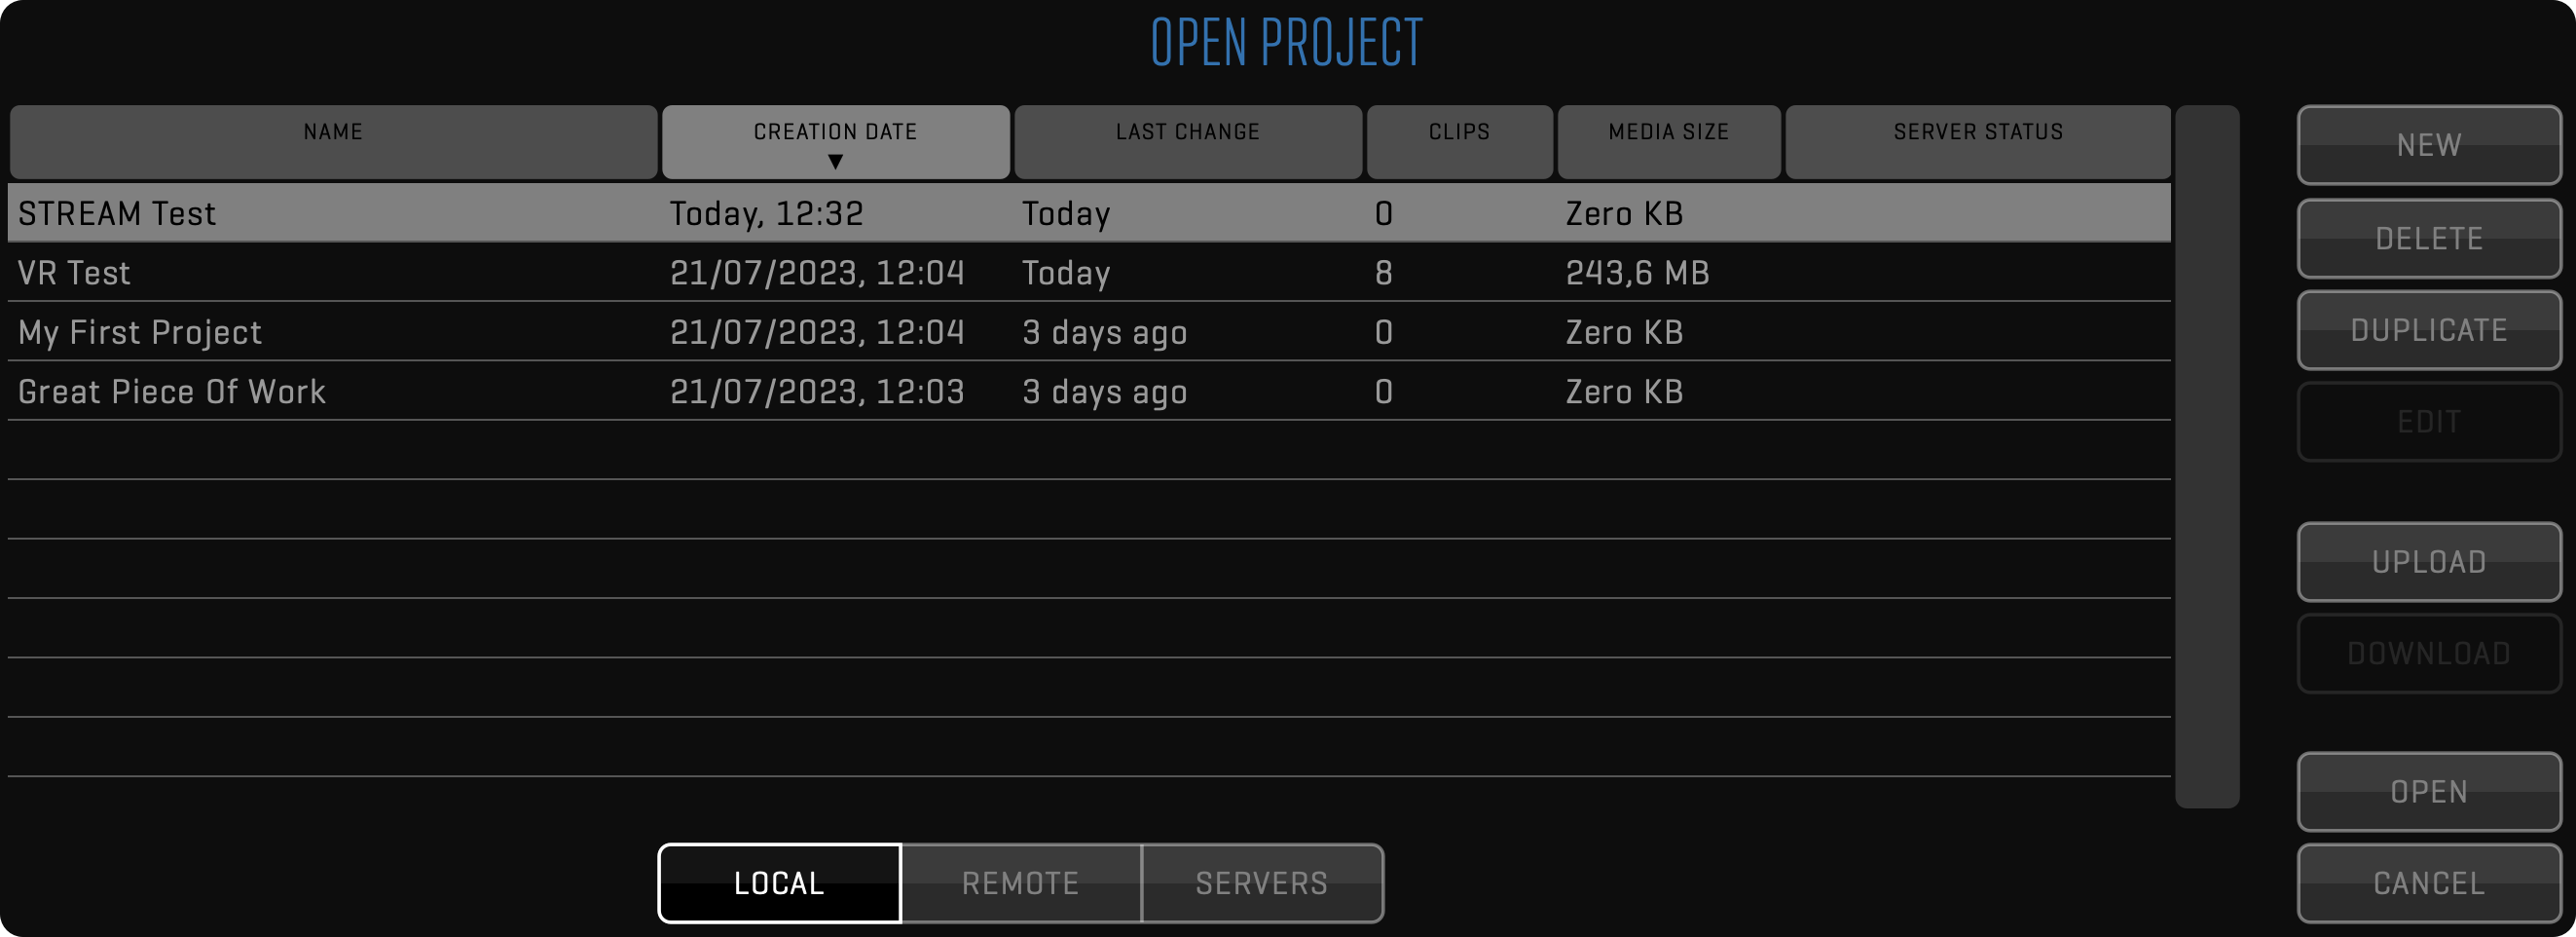
3) In the project list, click UPLOAD and select the computer running QTAKE Sync.
4) A window will inform you that the project upload needs to be approved in QTAKE Sync. Click the HIDE button to minimize QTAKE.
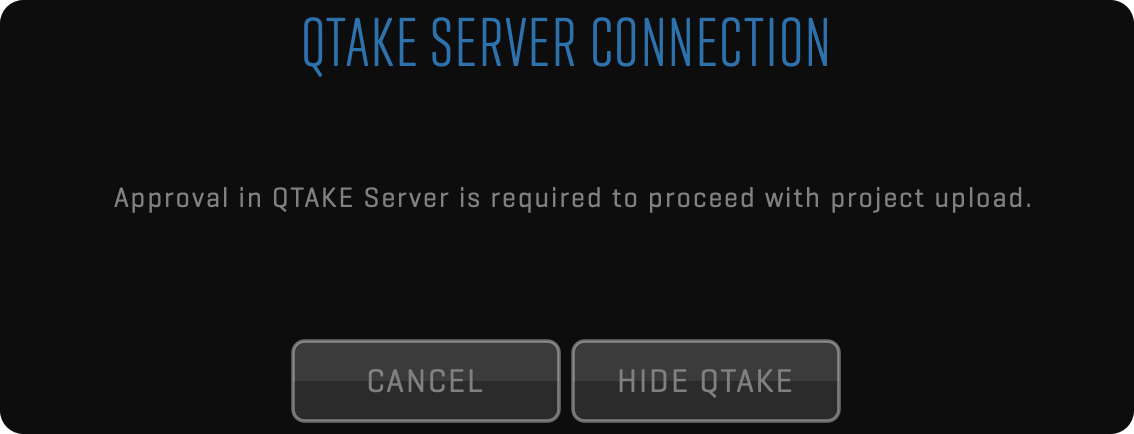
5) Go back to QTAKE Sync. You should now see a notification as well as your project in the list with a white dot, waiting to be accepted.
6) After accepting the upload, select the project in the Project Selector. Then go to the Users tab. You should see the QTAKE user in the Users list with the Approve checkbox checked. Click the Connect Devices button to add a QTAKE Monitor client. At the lower left corner, select QTAKE Monitor in the Connect selector.
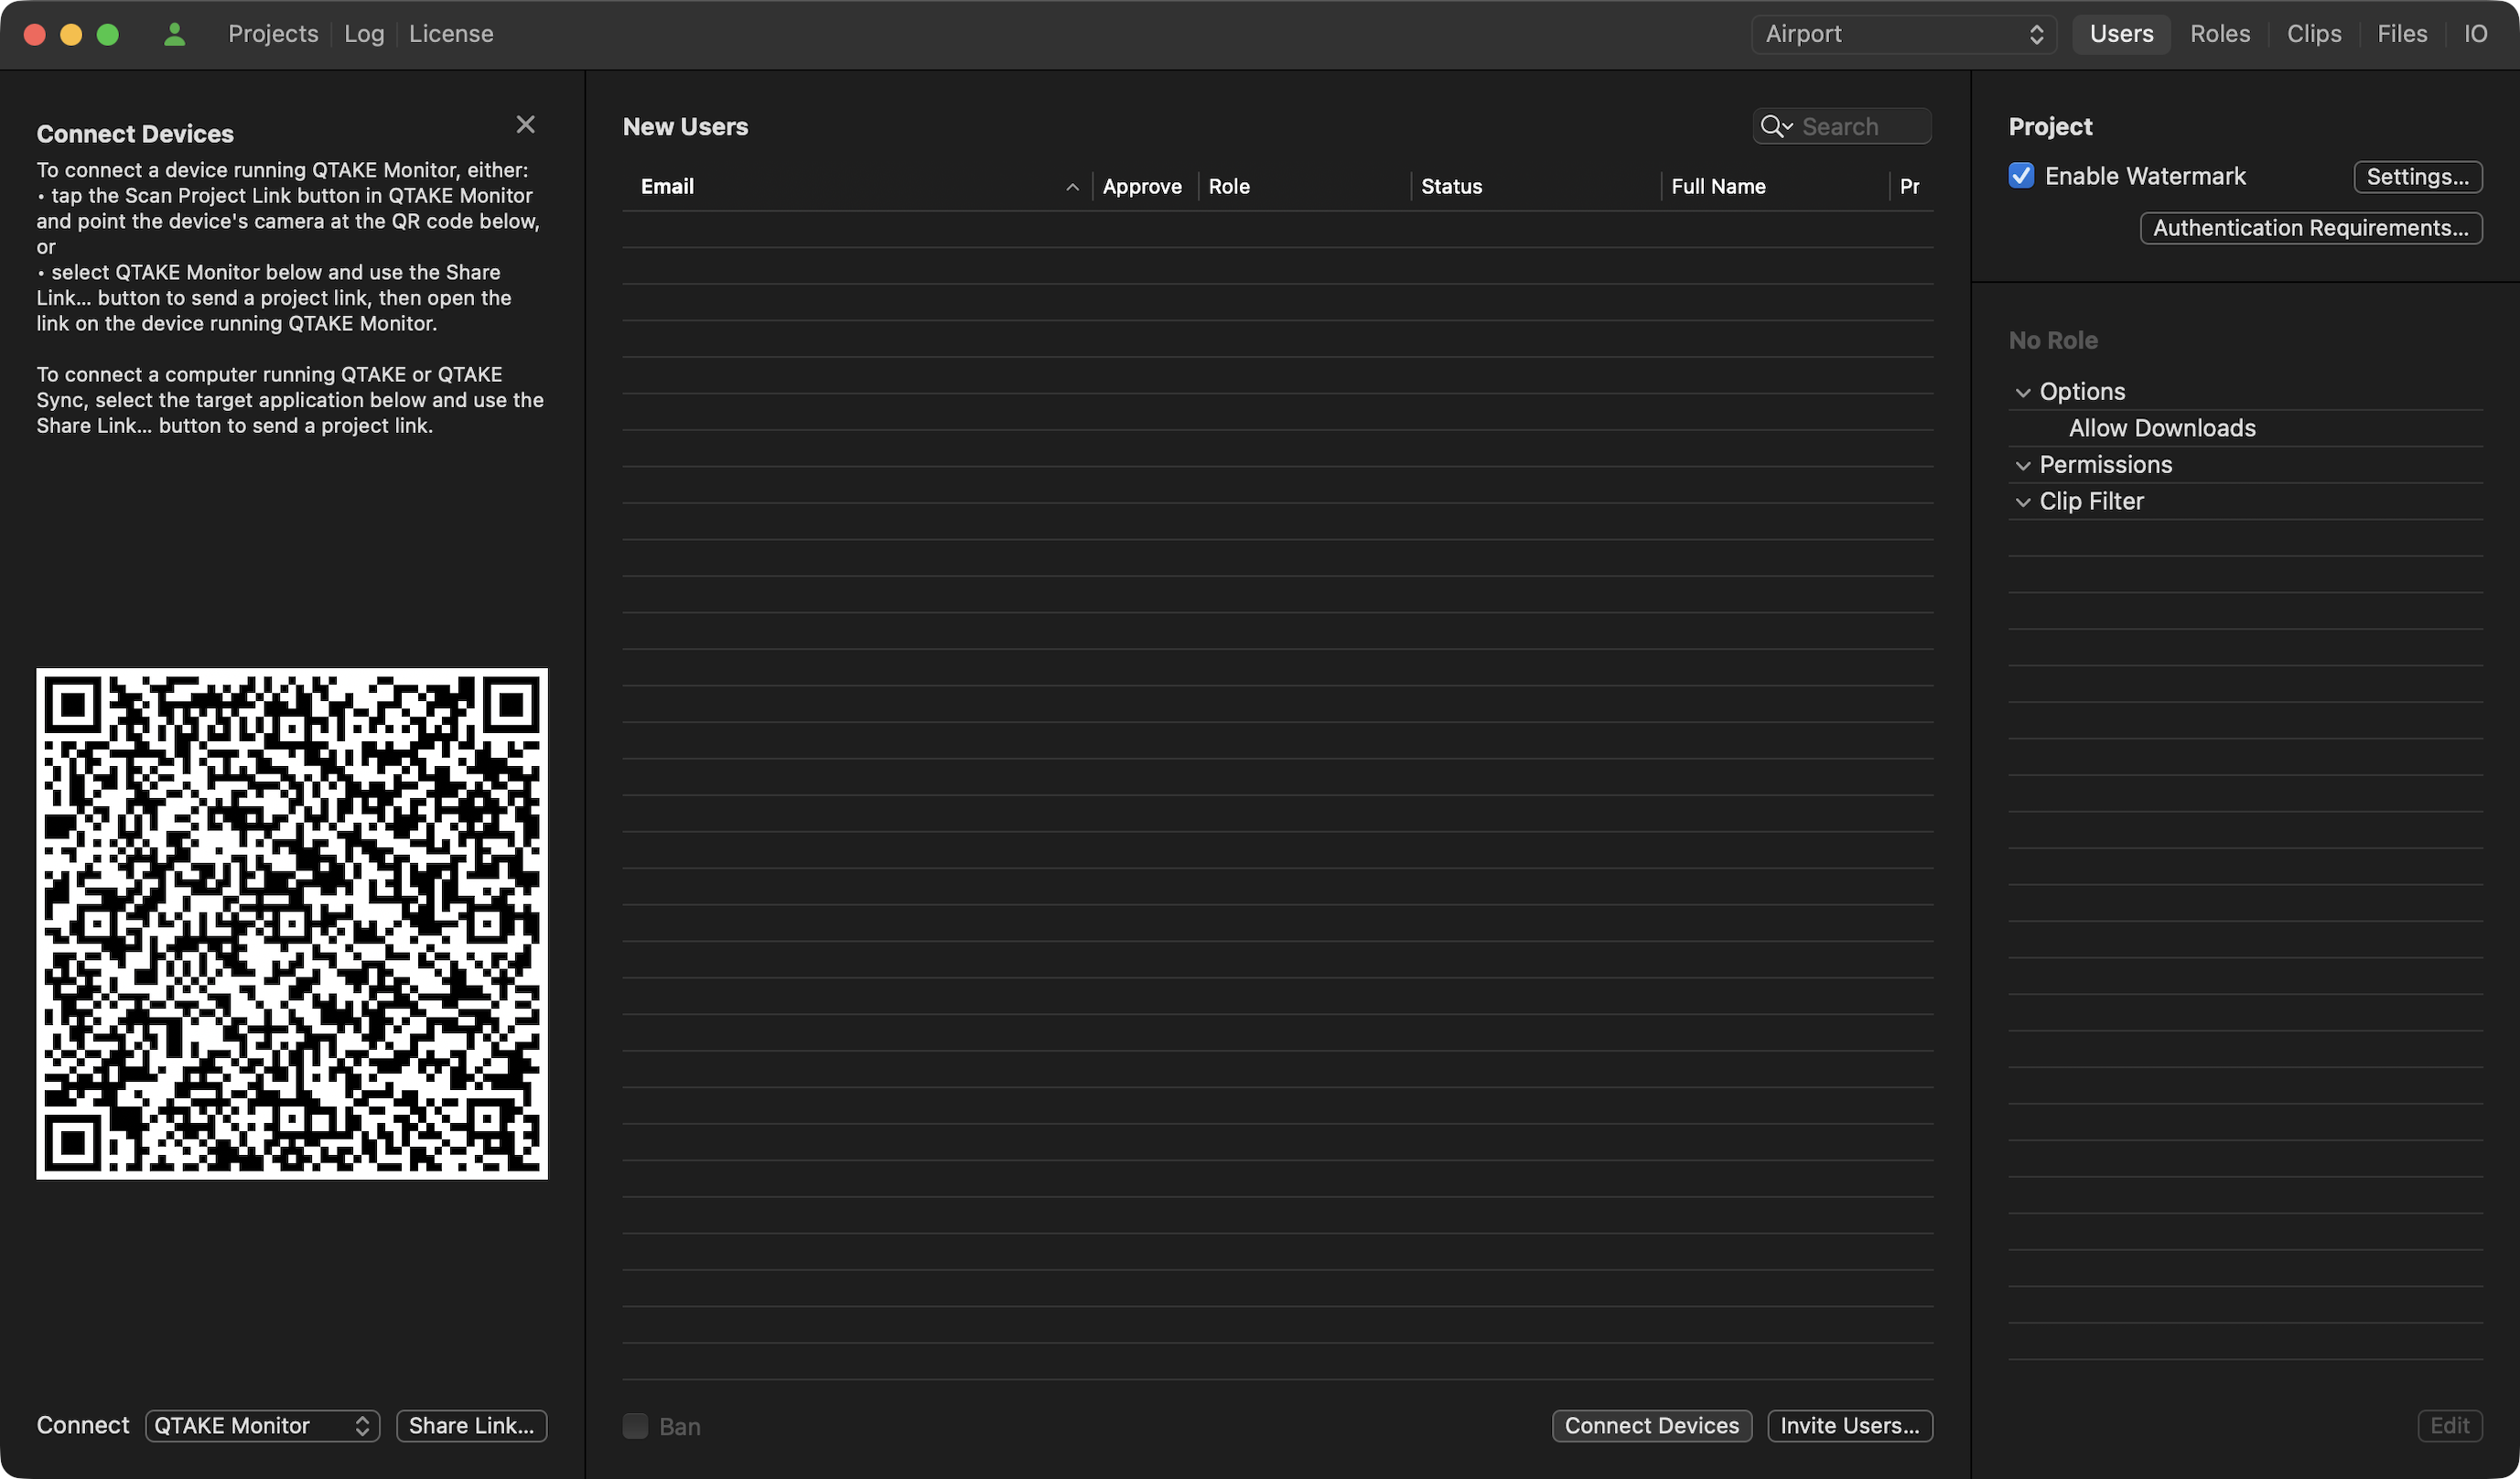
7) Launch the QTAKE Monitor app and log into QTAKE Cloud. Then in the Project list, tap Scan Project Link and scan the QR code presented by QTAKE Sync.
8) Go back to QTAKE Sync’s Users tab. Set the Role of the client to Script Supervisor, for instance. It gives the QTAKE Monitor client access to clips and the ability to edit clip metadata.
You can choose any existing Role or create a new one.
9) Done. Clips recorded in QTAKE are now uploaded to QTAKE Sync, and any user with permission can browse and play those clips in QTAKE Monitor.
Multi-unit Setup Guide
QTAKE Ecosystem is a unique set of powerful tools allowing seamless multi-unit collaboration that meets the needs of the most demanding productions. Use cases and workflows are not limited to the production period, but with the powerful QTAKE Cloud solution pre-production tasks like location scouting or onboarding can already be collaborated on if there is an existing QTAKE Cloud project. Post-production can still benefit from project and clip metadata and thumbnail access even if production stops the QTAKE Cloud Sync service.
Multi-unit collaboration requirements:
- Mac computer with
- licensed QTAKE Pro/QTAKE 1.6 per unit
- licensed QTAKE Sync per unit
- QTAKE Credits for QTAKE Cloud Sync activation and maintenance
They are consumed per project.
Starting multi-unit collaboration
The previous workflow illustrates project creation from QTAKE. This is an alternative approach where a project is created from QTAKE Sync.
1) Launch QTAKE Sync and navigate to the Projects tab.

2) Click the ‘+’ plus button located in the bottom left corner, name the project and click Create.
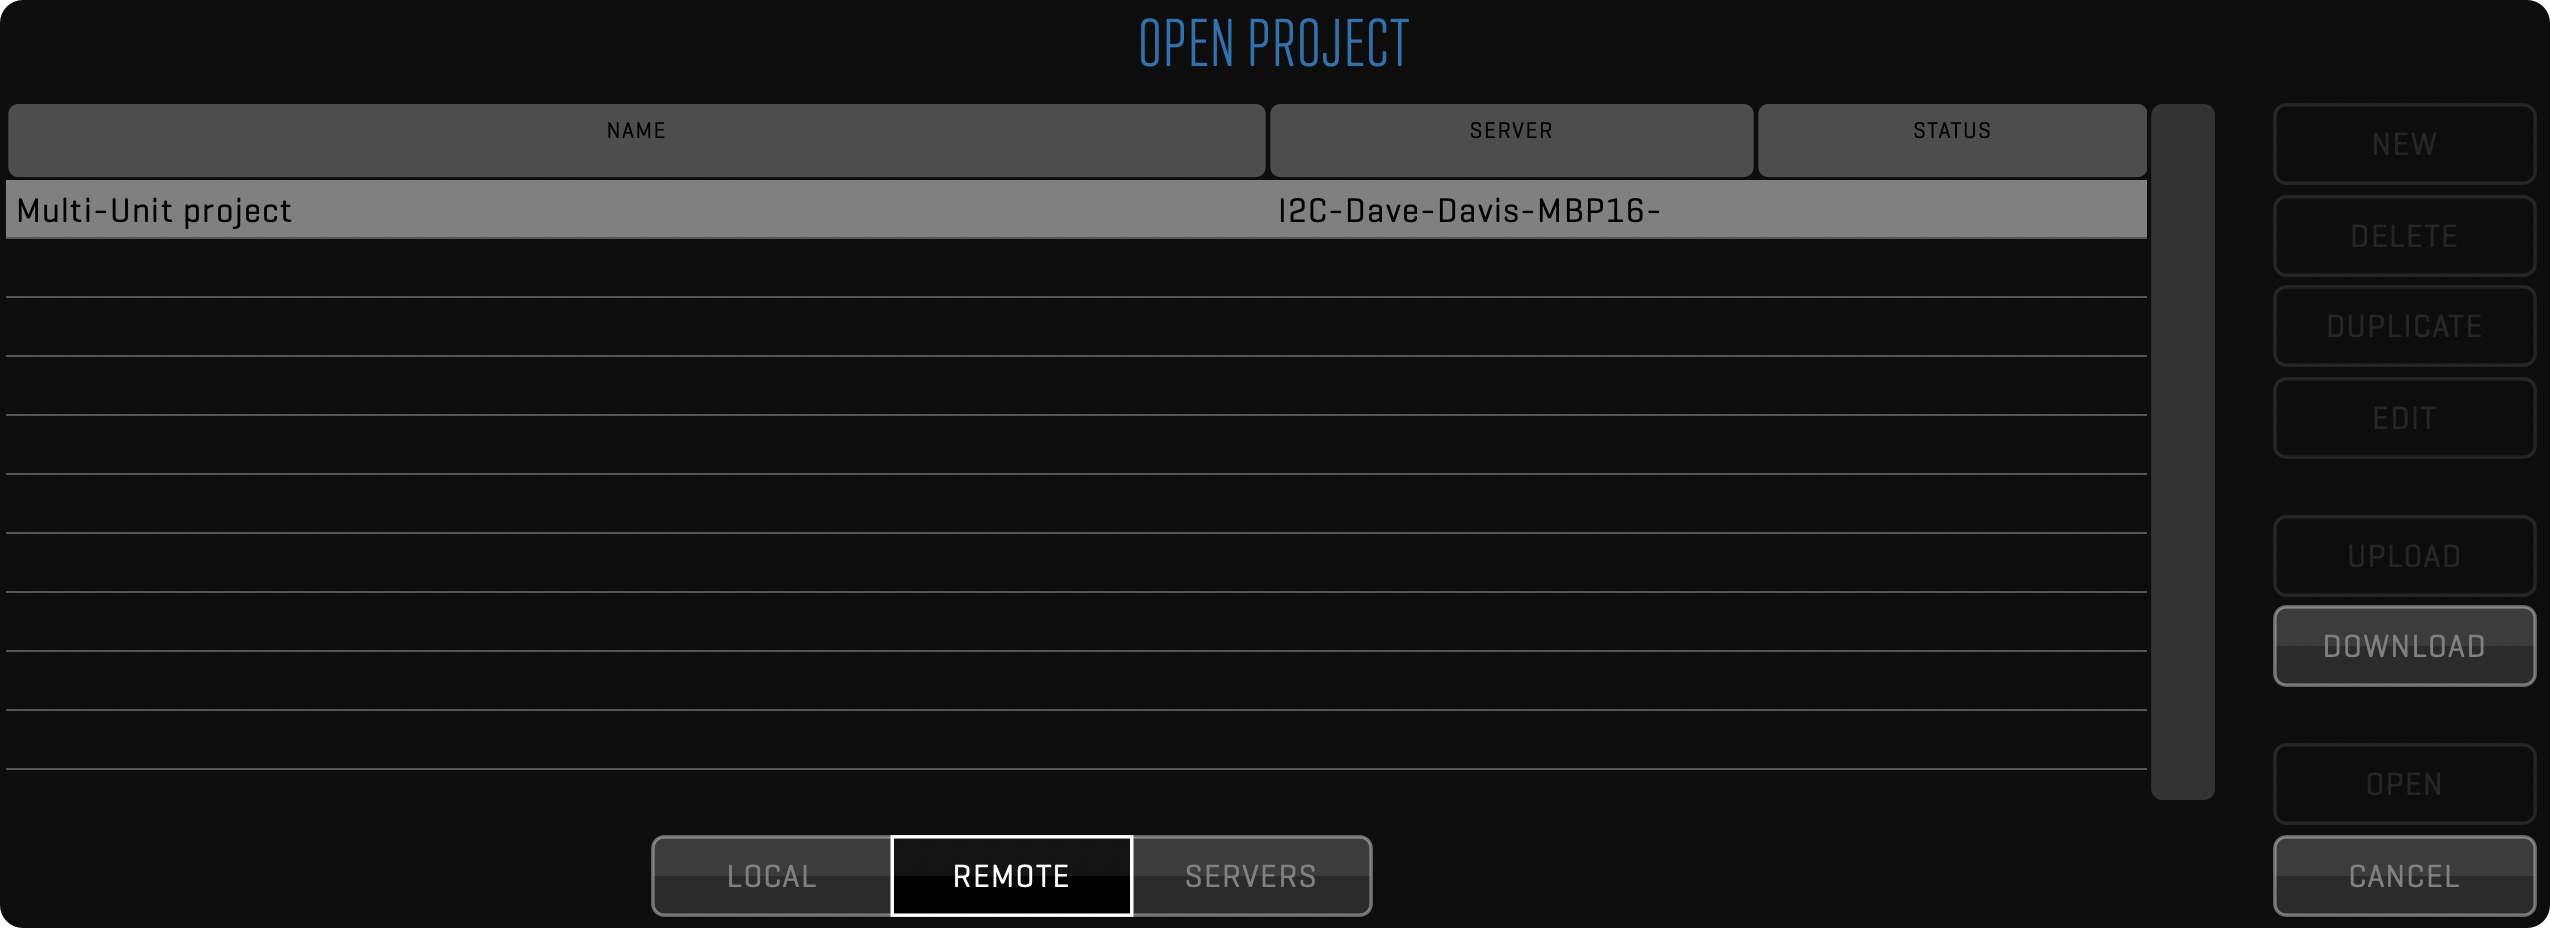
3) Launch QTAKE and click the OPEN button in the PROJECT toolbar.
Navigate to the REMOTE tab and highlight the project in the list.
Click the DOWNLOAD button, confirm the project settings, and in the UNIT tab set the Main Unit.
Make sure to enable PROXY, set the PROXY RESOLUTION and we recommend using HARDWARE acceleration if available.
4) Switch back to the QTAKE Sync’s Projects tab. Select the new project under the Local Projects, highlight QTAKE Cloud under the Remote Projects and click the Upload button in the middle.
5) The project is ready for remote collaboration, the project’s database, metadata, and thumbnails are synchronized free of charge. The Activate button is displayed next to the project name and you can activate the Cloud Sync service for clip media synchronization.
6) Navigate to the Users tab, click Invite Users, and invite the second unit QTAKE operator. Approve and assign a role for the operator.
7) On the second unit computer open QTAKE Sync and navigate to the Projects tab. Under the Remote Projects highlight the project and click the Download button. Now the project will be available under REMOTE projects in the the second unit QTAKE.
8) Repeat the Step 3 for the second unit. Make sure to set the correct unit.
9) Additionally you can collaborate on the project with the QTAKE Monitor app. Considering a Cloud project is created pre-production, it can be a great help during location scouting or onboarding. You can set common project metadata, shoot locations, and more.
10) Repeat Step 6 and then use the Open Project button in QTAKE Monitor app, or click the link in the invitation email.
Second unit joins from Diferent Project
The main purpose of multi-unit collaboration is to work on the same project. This way, all recorded takes, clip updates, and all metadata updates are immediately synchronized with all collaborating devices. This workflow describes a scenario where the Main and Second unit have respective local projects created and are already shooting. The Main unit has the project uploaded to the Cloud, and QTAKE Cloud Sync is active.
Multi-unit collaboration requirements:
- Mac computer with
- licensed QTAKE Pro/QTAKE 1.6 per unit
- licensed QTAKE Sync per unit
- QTAKE Credits for QTAKE Cloud Sync activation and maintenance
They are consumed per project.
1) On the Main unit QTAKE Sync select the project in the Project selector, go to the Users tab, and click the Invite Users button. Invite the Second unit QTAKE operator.
2) On the Second unit open QTAKE, open the project that is to join the multi-unit collaboration, go to Adjust Project Settings -> UNIT tab, and set Second Unit.
3) In the LIST SELECT all clips and set the META sidebar -> Clip Data -> Unit -> Second Unit to ensure all clips will be properly categorized.
4) In the FILE room -> EXPORT toolbar -> click the EXPORT QTAKE XML, select STANDARD MEDIA + COPY MEDIA, and make sure all clips are selected using the filters.
Click OK.
5) Still on the Second unit go to the QTAKE Sync application -> Projects tab and under the Remote Projects -> QTAKE Cloud you will see the project the Second unit operator has been invited to. Highlight the project and click the Download button.
6) Go back to QTAKE and click the OPEN button in the PROJECT toolbar.
Navigate to the REMOTE tab and highlight the project in the list.
Click the DOWNLOAD button, confirm the project settings, and in the UNIT tab set the Second Unit.
Make sure to enable PROXY, set the PROXY RESOLUTION and we recommend using HARDWARE acceleration if available.
7) In the FILE room -> IMPORT toolbar -> click FROM QTAKE and select the exported project.
8) Continue working on the Cloud project.
Acknowledgements
Portions of QTAKE Sync Software may be using copyrighted third-party material. The following list includes the general license agreements that may cover multiple packages, and the agreements specific to those packages.
Apple Core Audio Utility Classes
Disclaimer: IMPORTANT: This Apple software is supplied to you by Apple Inc. (“Apple”) in consideration of your agreement to the following terms, and your use, installation, modification or redistribution of this Apple software constitutes acceptance of these terms. If you do not agree with these terms, please do not use, install, modify or redistribute this Apple software.
In consideration of your agreement to abide by the following terms, and subject to these terms, Apple grants you a personal, non-exclusive license, under Apple’s copyrights in this original Apple software (the “Apple Software”), to use, reproduce, modify and redistribute the Apple Software, with or without modifications, in source and/or binary forms; provided that if you redistribute the Apple Software in its entirety and without modifications, you must retain this notice and the following text and disclaimers in all such redistributions of the Apple Software. Neither the name, trademarks, service marks or logos of Apple Inc. may be used to endorse or promote products derived from the Apple Software without specific prior written permission from Apple. Except as expressly stated in this notice, no other rights or licenses, express or implied, are granted by Apple herein, including but not limited to any patent rights that may be infringed by your derivative works or by other works in which the Apple Software may be incorporated.
The Apple Software is provided by Apple on an “AS IS” basis. APPLE MAKES NO WARRANTIES, EXPRESS OR IMPLIED, INCLUDING WITHOUT LIMITATION THE IMPLIED WARRANTIES OF NON-INFRINGEMENT, MERCHANTABILITY AND FITNESS FOR A PARTICULAR PURPOSE, REGARDING THE APPLE SOFTWARE OR ITS USE AND OPERATION ALONE OR IN COMBINATION WITH YOUR PRODUCTS.
IN NO EVENT SHALL APPLE BE LIABLE FOR ANY SPECIAL, INDIRECT, INCIDENTAL OR CONSEQUENTIAL DAMAGES (INCLUDING, BUT NOT LIMITED TO, PROCUREMENT OF SUBSTITUTE GOODS OR SERVICES; LOSS OF USE, DATA, OR PROFITS; OR BUSINESS INTERRUPTION) ARISING IN ANY WAY OUT OF THE USE, REPRODUCTION, MODIFICATION AND/OR DISTRIBUTION OF THE APPLE SOFTWARE, HOWEVER CAUSED AND WHETHER UNDER THEORY OF CONTRACT, TORT (INCLUDING NEGLIGENCE), STRICT LIABILITY OR OTHERWISE, EVEN IF APPLE HAS BEEN ADVISED OF THE POSSIBILITY OF SUCH DAMAGE.
Copyright (C) 2013 Apple Inc. All Rights Reserved.
CocoaAsyncSocket
Thus, the library is dual licensed, and one is allowed to choose which license they would like to use.
- Public Domain
- Software License Agreement (BSD License):
Copyright (c) 2017, Deusty, LLC All rights reserved.
Redistribution and use of this software in source and binary forms, with or without modification, are permitted provided that the following conditions are met:
-
Redistributions of source code must retain the above copyright notice, this list of conditions and the following disclaimer.
-
Neither the name of Deusty LLC nor the names of its contributors may be used to endorse or promote products derived from this software without specific prior written permission of Deusty LLC.
THIS SOFTWARE IS PROVIDED BY THE COPYRIGHT HOLDERS AND CONTRIBUTORS “AS IS” AND ANY EXPRESS OR IMPLIED WARRANTIES, INCLUDING, BUT NOT LIMITED TO, THE IMPLIED WARRANTIES OF MERCHANTABILITY AND FITNESS FOR A PARTICULAR PURPOSE ARE DISCLAIMED. IN NO EVENT SHALL THE COPYRIGHT OWNER OR CONTRIBUTORS BE LIABLE FOR ANY DIRECT, INDIRECT, INCIDENTAL, SPECIAL, EXEMPLARY, OR CONSEQUENTIAL DAMAGES (INCLUDING, BUT NOT LIMITED TO, PROCUREMENT OF SUBSTITUTE GOODS OR SERVICES; LOSS OF USE, DATA, OR PROFITS; OR BUSINESS INTERRUPTION) HOWEVER CAUSED AND ON ANY THEORY OF LIABILITY, WHETHER IN CONTRACT, STRICT LIABILITY, OR TORT (INCLUDING NEGLIGENCE OR OTHERWISE) ARISING IN ANY WAY OUT OF THE USE OF THIS SOFTWARE, EVEN IF ADVISED OF THE POSSIBILITY OF SUCH DAMAGE.
CocoaLumberJack
BSD 3-Clause License
Copyright (c) 2010-2022, Deusty, LLC All rights reserved.
Redistribution and use in source and binary forms, with or without modification, are permitted provided that the following conditions are met:
-
Redistributions of source code must retain the above copyright notice, this list of conditions and the following disclaimer.
-
Redistributions in binary form must reproduce the above copyright notice, this list of conditions and the following disclaimer in the documentation and/or other materials provided with the distribution.
-
Neither the name of Deusty nor the names of its contributors may be used to endorse or promote products derived from this software without specific prior written permission of Deusty, LLC.
THIS SOFTWARE IS PROVIDED BY THE COPYRIGHT HOLDERS AND CONTRIBUTORS “AS IS” AND ANY EXPRESS OR IMPLIED WARRANTIES, INCLUDING, BUT NOT LIMITED TO, THE IMPLIED WARRANTIES OF MERCHANTABILITY AND FITNESS FOR A PARTICULAR PURPOSE ARE DISCLAIMED. IN NO EVENT SHALL THE COPYRIGHT HOLDER OR CONTRIBUTORS BE LIABLE FOR ANY DIRECT, INDIRECT, INCIDENTAL, SPECIAL, EXEMPLARY, OR CONSEQUENTIAL DAMAGES (INCLUDING, BUT NOT LIMITED TO, PROCUREMENT OF SUBSTITUTE GOODS OR SERVICES; LOSS OF USE, DATA, OR PROFITS; OR BUSINESS INTERRUPTION) HOWEVER CAUSED AND ON ANY THEORY OF LIABILITY, WHETHER IN CONTRACT, STRICT LIABILITY, OR TORT (INCLUDING NEGLIGENCE OR OTHERWISE) ARISING IN ANY WAY OUT OF THE USE OF THIS SOFTWARE, EVEN IF ADVISED OF THE POSSIBILITY OF SUCH DAMAGE.
OCFWebServer
Copyright (c) 2013, Christian Kienle (Objective-Cloud.com) All rights reserved.
Original Copyright/Credits:
Copyright (c) 2012-2013, Pierre-Olivier Latour All rights reserved.
Redistribution and use in source and binary forms, with or without modification, are permitted provided that the following conditions are met: * Redistributions of source code must retain the above copyright notice, this list of conditions and the following disclaimer. * Redistributions in binary form must reproduce the above copyright notice, this list of conditions and the following disclaimer in the documentation and/or other materials provided with the distribution. * Neither the name of the organization nor the names of its contributors may be used to endorse or promote products derived from this software without specific prior written permission.
THIS SOFTWARE IS PROVIDED BY THE COPYRIGHT HOLDERS AND CONTRIBUTORS “AS IS” AND
ANY EXPRESS OR IMPLIED WARRANTIES, INCLUDING, BUT NOT LIMITED TO, THE IMPLIED
WARRANTIES OF MERCHANTABILITY AND FITNESS FOR A PARTICULAR PURPOSE ARE
DISCLAIMED. IN NO EVENT SHALL
PeerTalk
Copyright (c) 2012 Rasmus Andersson http://rsms.me/
Permission is hereby granted, free of charge, to any person obtaining a copy of this software and associated documentation files (the “Software”), to deal in the Software without restriction, including without limitation the rights to use, copy, modify, merge, publish, distribute, sublicense, and/or sell copies of the Software, and to permit persons to whom the Software is furnished to do so, subject to the following conditions:
The above copyright notice and this permission notice shall be included in all copies or substantial portions of the Software.
THE SOFTWARE IS PROVIDED “AS IS”, WITHOUT WARRANTY OF ANY KIND, EXPRESS OR IMPLIED, INCLUDING BUT NOT LIMITED TO THE WARRANTIES OF MERCHANTABILITY, FITNESS FOR A PARTICULAR PURPOSE AND NONINFRINGEMENT. IN NO EVENT SHALL THE AUTHORS OR COPYRIGHT HOLDERS BE LIABLE FOR ANY CLAIM, DAMAGES OR OTHER LIABILITY, WHETHER IN AN ACTION OF CONTRACT, TORT OR OTHERWISE, ARISING FROM, OUT OF OR IN CONNECTION WITH THE SOFTWARE OR THE USE OR OTHER DEALINGS IN THE SOFTWARE.
SocketRocket
BSD License
For SocketRocket software
Copyright (c) 2016-present, Facebook, Inc. All rights reserved.
Redistribution and use in source and binary forms, with or without modification, are permitted provided that the following conditions are met:
-
Redistributions of source code must retain the above copyright notice, this list of conditions and the following disclaimer.
-
Redistributions in binary form must reproduce the above copyright notice, this list of conditions and the following disclaimer in the documentation and/or other materials provided with the distribution.
-
Neither the name Facebook nor the names of its contributors may be used to endorse or promote products derived from this software without specific prior written permission.
THIS SOFTWARE IS PROVIDED BY THE COPYRIGHT HOLDERS AND CONTRIBUTORS “AS IS” AND ANY EXPRESS OR IMPLIED WARRANTIES, INCLUDING, BUT NOT LIMITED TO, THE IMPLIED WARRANTIES OF MERCHANTABILITY AND FITNESS FOR A PARTICULAR PURPOSE ARE DISCLAIMED. IN NO EVENT SHALL THE COPYRIGHT HOLDER OR CONTRIBUTORS BE LIABLE FOR ANY DIRECT, INDIRECT, INCIDENTAL, SPECIAL, EXEMPLARY, OR CONSEQUENTIAL DAMAGES (INCLUDING, BUT NOT LIMITED TO, PROCUREMENT OF SUBSTITUTE GOODS OR SERVICES; LOSS OF USE, DATA, OR PROFITS; OR BUSINESS INTERRUPTION) HOWEVER CAUSED AND ON ANY THEORY OF LIABILITY, WHETHER IN CONTRACT, STRICT LIABILITY, OR TORT (INCLUDING NEGLIGENCE OR OTHERWISE) ARISING IN ANY WAY OUT OF THE USE OF THIS SOFTWARE, EVEN IF ADVISED OF THE POSSIBILITY OF SUCH DAMAGE.
Sparkle
Copyright (c) 2006-2013 Andy Matuschak. Copyright (c) 2009-2013 Elgato Systems GmbH. Copyright (c) 2011-2014 Kornel Lesiński. Copyright (c) 2015-2017 Mayur Pawashe. Copyright (c) 2014 C.W. Betts. Copyright (c) 2014 Petroules Corporation. Copyright (c) 2014 Big Nerd Ranch. All rights reserved.
Permission is hereby granted, free of charge, to any person obtaining a copy of this software and associated documentation files (the “Software”), to deal in the Software without restriction, including without limitation the rights to use, copy, modify, merge, publish, distribute, sublicense, and/or sell copies of the Software, and to permit persons to whom the Software is furnished to do so, subject to the following conditions:
The above copyright notice and this permission notice shall be included in all copies or substantial portions of the Software.
THE SOFTWARE IS PROVIDED “AS IS”, WITHOUT WARRANTY OF ANY KIND, EXPRESS OR IMPLIED, INCLUDING BUT NOT LIMITED TO THE WARRANTIES OF MERCHANTABILITY, FITNESS FOR A PARTICULAR PURPOSE AND NONINFRINGEMENT. IN NO EVENT SHALL THE AUTHORS OR COPYRIGHT HOLDERS BE LIABLE FOR ANY CLAIM, DAMAGES OR OTHER LIABILITY, WHETHER IN AN ACTION OF CONTRACT, TORT OR OTHERWISE, ARISING FROM, OUT OF OR IN CONNECTION WITH THE SOFTWARE OR THE USE OR OTHER DEALINGS IN THE SOFTWARE.
EXTERNAL LICENSES
bspatch.c and bsdiff.c, from bsdiff 4.3 http://www.daemonology.net/bsdiff/: Copyright (c) 2003-2005 Colin Percival.
sais.c and sais.c, from sais-lite (2010/08/07): Copyright (c) 2008-2010 Yuta Mori.
SUDSAVerifier.m: Copyright (c) 2011 Mark Hamlin.
All rights reserved.
Redistribution and use in source and binary forms, with or without modification, are permitted providing that the following conditions are met:
- Redistributions of source code must retain the above copyright notice, this list of conditions and the following disclaimer.
- Redistributions in binary form must reproduce the above copyright notice, this list of conditions and the following disclaimer in the documentation and/or other materials provided with the distribution.
THIS SOFTWARE IS PROVIDED BY THE AUTHOR ``AS IS’’ AND ANY EXPRESS OR IMPLIED WARRANTIES, INCLUDING, BUT NOT LIMITED TO, THE IMPLIED WARRANTIES OF MERCHANTABILITY AND FITNESS FOR A PARTICULAR PURPOSE ARE DISCLAIMED. IN NO EVENT SHALL THE AUTHOR BE LIABLE FOR ANY DIRECT, INDIRECT, INCIDENTAL, SPECIAL, EXEMPLARY, OR CONSEQUENTIAL DAMAGES (INCLUDING, BUT NOT LIMITED TO, PROCUREMENT OF SUBSTITUTE GOODS OR SERVICES; LOSS OF USE, DATA, OR PROFITS; OR BUSINESS INTERRUPTION) HOWEVER CAUSED AND ON ANY THEORY OF LIABILITY, WHETHER IN CONTRACT, STRICT LIABILITY, OR TORT (INCLUDING NEGLIGENCE OR OTHERWISE) ARISING IN ANY WAY OUT OF THE USE OF THIS SOFTWARE, EVEN IF ADVISED OF THE POSSIBILITY OF SUCH DAMAGE.
SwiftNIO
Copyright 2017, 2018 The SwiftNIO Project
The SwiftNIO Project licenses this file to you under the Apache License, version 2.0 (the “License”); you may not use this file except in compliance with the License. You may obtain a copy of the License at:
https://www.apache.org/licenses/LICENSE-2.0
Unless required by applicable law or agreed to in writing, software distributed under the License is distributed on an “AS IS” BASIS, WITHOUT WARRANTIES OR CONDITIONS OF ANY KIND, either express or implied. See the License for the specific language governing permissions and limitations under the License.