QTAKE Monitor User Guide 5.0
About
QTAKE Monitor is the client-side application that connects to QTAKE Stream, QTAKE Sync (formerly QTAKE Server), QTAKE Cloud, and other software or hardware products from the QTAKE ecosystem. It provides multi-camera live monitoring, clip browsing with advanced metadata filters, synchronized playback of multiple clips, metadata collaboration, and more. In a film location or inside a studio, it uses a local wired or wireless network to connect to the stream source. However, it can also connect to QTAKE Cloud over the internet to provide the most advanced remote workflow solution accessible worldwide. QTAKE Monitor app is available for iPhone, iPad, Mac, and Apple TV.
Live Streaming
QTAKE uses a proprietary QLS protocol designed to provide secure, ultra-low latency audio, video, and metadata streaming. QTAKE Stream has less than two frames of latency on the local network and less than four frames of latency over a fast internet connection. Internet connection to live stream requires QTAKE Cloud Stream service.
Playback and Notes
QTAKE Sync (formerly QTAKE Server) provides independent clip playback and metadata editing using the QTAKE Monitor app for iOS and macOS over a local network or internet. Local networ access to clips and metadata requires a project uploaded to QTAKE Sync, and Internet access to clips and metadata requires QTAKE Cloud Sync service.
New in 5.0
This update brings a collection of innovative features tailored to meet the evolving industry needs.
The redesigned user interface provides a smoother, more intuitive workflow, ensuring that every interaction with the app feels seamless and efficient. With full support for Apple Vision Pro, we are stepping into the future of immersive technology, offering unparalleled monitoring capabilities for both 2D and VR content.
Additionally, this version introduces support for half-equirectangular VR content, opening new possibilities for creators working with cutting-edge virtual reality formats. The inclusion of Apple Vision Pro native support ensures a fully optimized experience on this groundbreaking device, delivering enhanced performance and precision.
Installation
Download the app from the Apple App Store on your selected device.
- QTAKE Monitor for iOS, iPadOS, macOS Catalina or later, and tvOS
iPad, iPhone, and Mac
The iOS and macOS versions of QTAKE Monitor are the most advanced ones. In addition to receiving up to 9 local or cloud streams, it provides access to QTAKE Sync (formerly QTAKE Server). This means you can independently browse and play recorded clips and edit rich clip metadata. QTAKE records proxy media on the fly, so remote playback in QTAKE Monitor is available only seconds after the camera cuts.
iOS and macOS System Requirements
Any iPhone, iPad, or iPod running iOS 13 or later.
Any Mac running macOS 10.15 or later.
Apple TV
QTAKE Monitor for tvOS currently only offers streaming and supports both local QTAKE Stream and QTAKE Cloud Stream. Independent playback via QTAKE Sync and QTAKE Cloud Sync is currently not supported.
tvOS System Requirements
Any 4th or later generation Apple TV running tvOS 13 or later.
Apple Vision Pro
With native support for Apple Vision Pro, QTAKE Monitor is designed to give you the best possible experience. By taking full advantage of this revolutionary device, you’ll enjoy optimized performance, seamless interactivity, and precise rendering, allowing you to fully immerse yourself in your workflow like never before.
visionOS System Requirements
Any
Windows, Linux, Android
The native QTAKE Monitor app is available only on Apple devices. The web interface is available for clients who wish to connect to QTAKE Cloud Stream from Windows, Linux, Android, or other platforms. See QTAKE Cloud for more info.
Configuration
Ports
In most cases, QTAKE Monitor requires no additional configuration for local network use. However, if you use QTAKE Monitor on a restrictive network, you may need to allow traffic on particular ports depending on the QTAKE Monitor functionality you want to use.
QTAKE Stream
To stream over the local network, enable traffic to and from the following ports on the QTAKE Video Assist System:
- TCP 7007 (v2.1 and earlier, removed in v2.2)
- TCP 8560 (v1.6.008 and later) or 7000 (v1.6.006 and earlier)
- UDP 8567
For QTAKE Cloud Stream, enable traffic for the following:
- api.qtake.cloud, TCP 443
- sync.qtake.cloud, TCP 8500
- stream.qtake.live, UDP 8550 – 8551
Never rely on any particular IP addresses these currently resolve to. The stream.qtake.live record is updated on each new deployment of QTAKE Cloud service instances, which may happen at any time. If you use it to configure your firewall, ensure it polls for changes every few minutes.
QTAKE Sync (formerly QTAKE Server)
To access independent playback over the local network, enable traffic to and from the following ports on the QTAKE Sync System:
- TCP 8500 – 8600
- TCP 44443
For QTAKE Cloud Sync, enable traffic for the following:
- api.qtake.cloud, TCP 443
- sync.qtake.cloud, TCP 8500 – 8501
- sync.qtake.cloud, TCP 443 and 44443
Feature Details
|
|
iOS
|
iPadOS
|
macOS
|
tvOS
|
Web
|
|---|---|---|---|---|---|
| OS Version Required | 13 | 13 | 10.15 | 13 | n/a 1 |
| QTAKE Stream | ● | ● | ● | ● | |
| QTAKE Cloud Stream | ● | ● | ● | ● | ● |
| Stream Forensic Watermarking | ● | ● | ● | ● | ● |
| Two-Factor Authentication | ● | ● | ● | ● | ● 2 |
| Push Notifications | ● | ● | ● | ||
| In-Transit Encryption Encryption | ● | ● | ● | ● | ● |
| End-to-End Encryption | ● | ● | ● | ● | |
| Maximum Simultaneous Streams | 9 | 9 | 9 | 9 | 9 |
| Local Talkback | ● | ● | ● | ||
| Cloud Talkback | ● | ● | ● | ● | |
| HEVC Streaming | ● | ● | ● | ● | |
| VR Support | ● | ● | ● | ||
| Device Orientation-Controlled VR | ● | ● | |||
| Mask, DVE | ● | ● | ● | ||
| Independent Playback | ● | ● | ● | ||
| Clip Metadata | ● | ● | ● | ● | ● |
| Full Metadata Access | ● | ● | ● | ||
| Metadata Collaboration | ● | ● | ● | ||
| Drawing & Annotation | ● | ● | ● | ||
| User In-Out Ranges | ● | ● | ● | ||
| PDF Reports | ● | ● | ● | ||
| Remote Control of QTAKE | ● | ● | ● | ||
| QTAKE Sync Administration (formerly QTAKE Server) | ● | ● | ● | ||
| ScreenPort over Network | ● | ● | ● | ● | |
| ScreenPort over USB/Lightning | ● | ● | ● | ||
| Recording from ScreenPort | ● | ● | ● | ||
| Camera UI | ● | ● | ● | ||
| Download |

|
|
|||
2. Requires an Apple device with QTAKE Monitor installed to receive push notification.
User Account
Please note that a user account is essential for accessing the app’s features. Follow the instructions below to log in or to create your account and unlock a seamless local or remote monitoring journey with the QTAKE Monitor app.
App Login
Open the app and click the top-left button.
The password must meet security criteria. It must be at least eight characters long and contain at least 3 of the following: lowercase letters, uppercase letters, digits, and special characters.
|
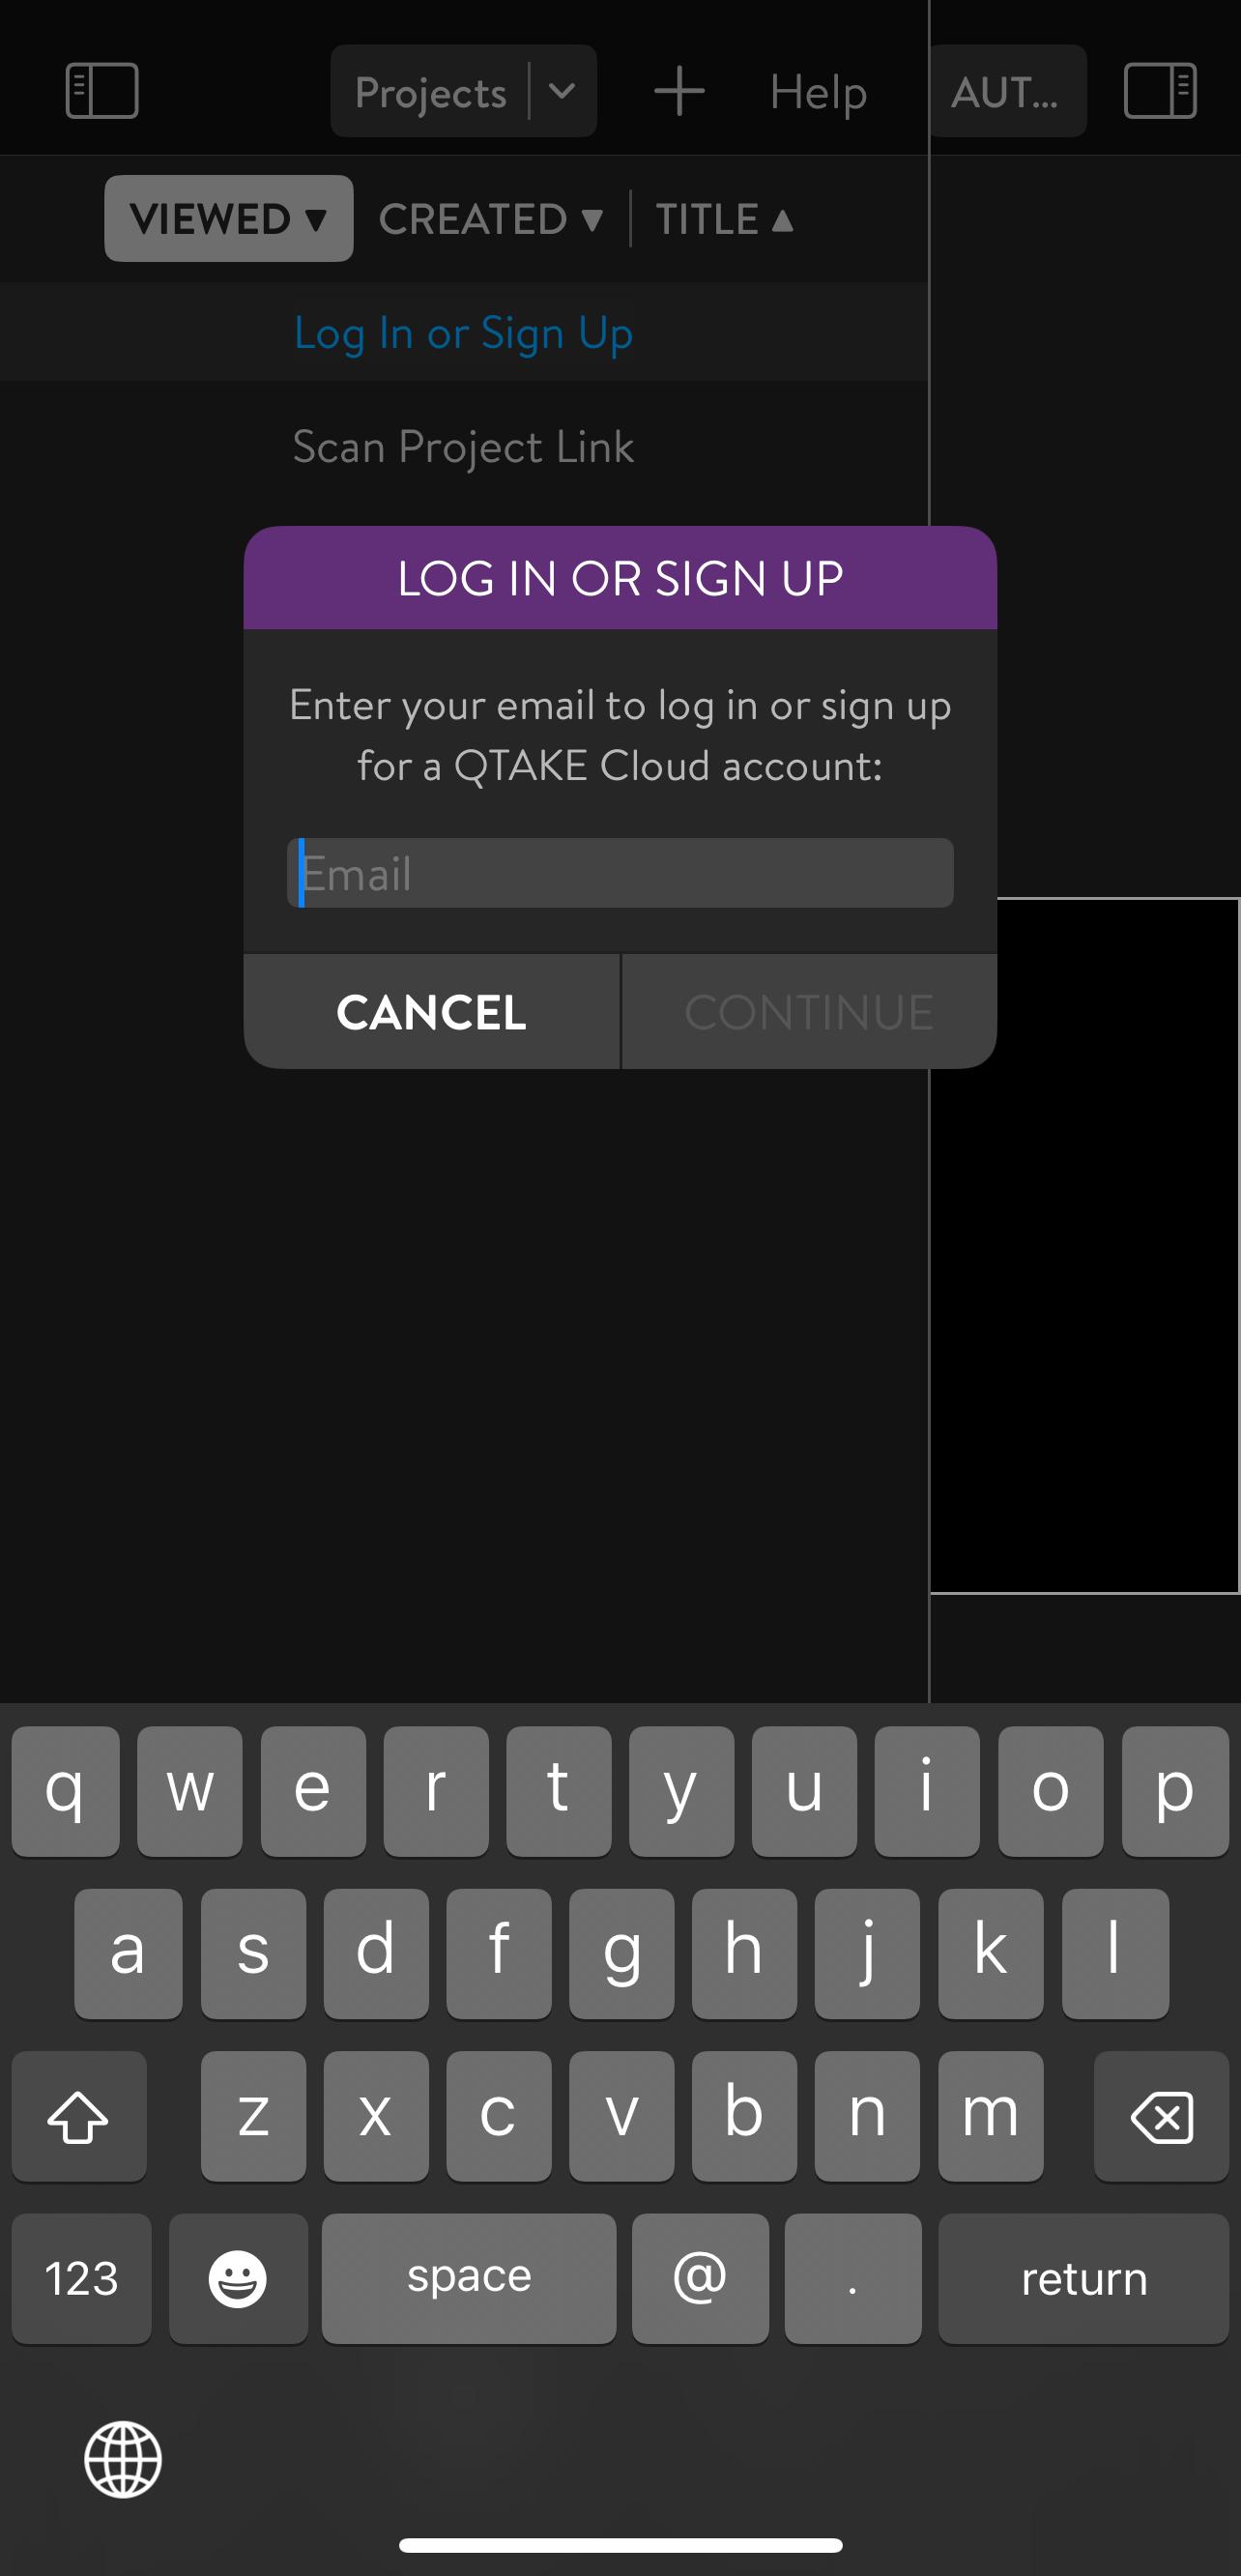
Click the LOG IN button in the PROJECTS window. Enter your EMAIL address and click LOG IN. If the email address is recognized and is associated with a QTAKE Cloud account, you will be asked to enter the password to Log in. |
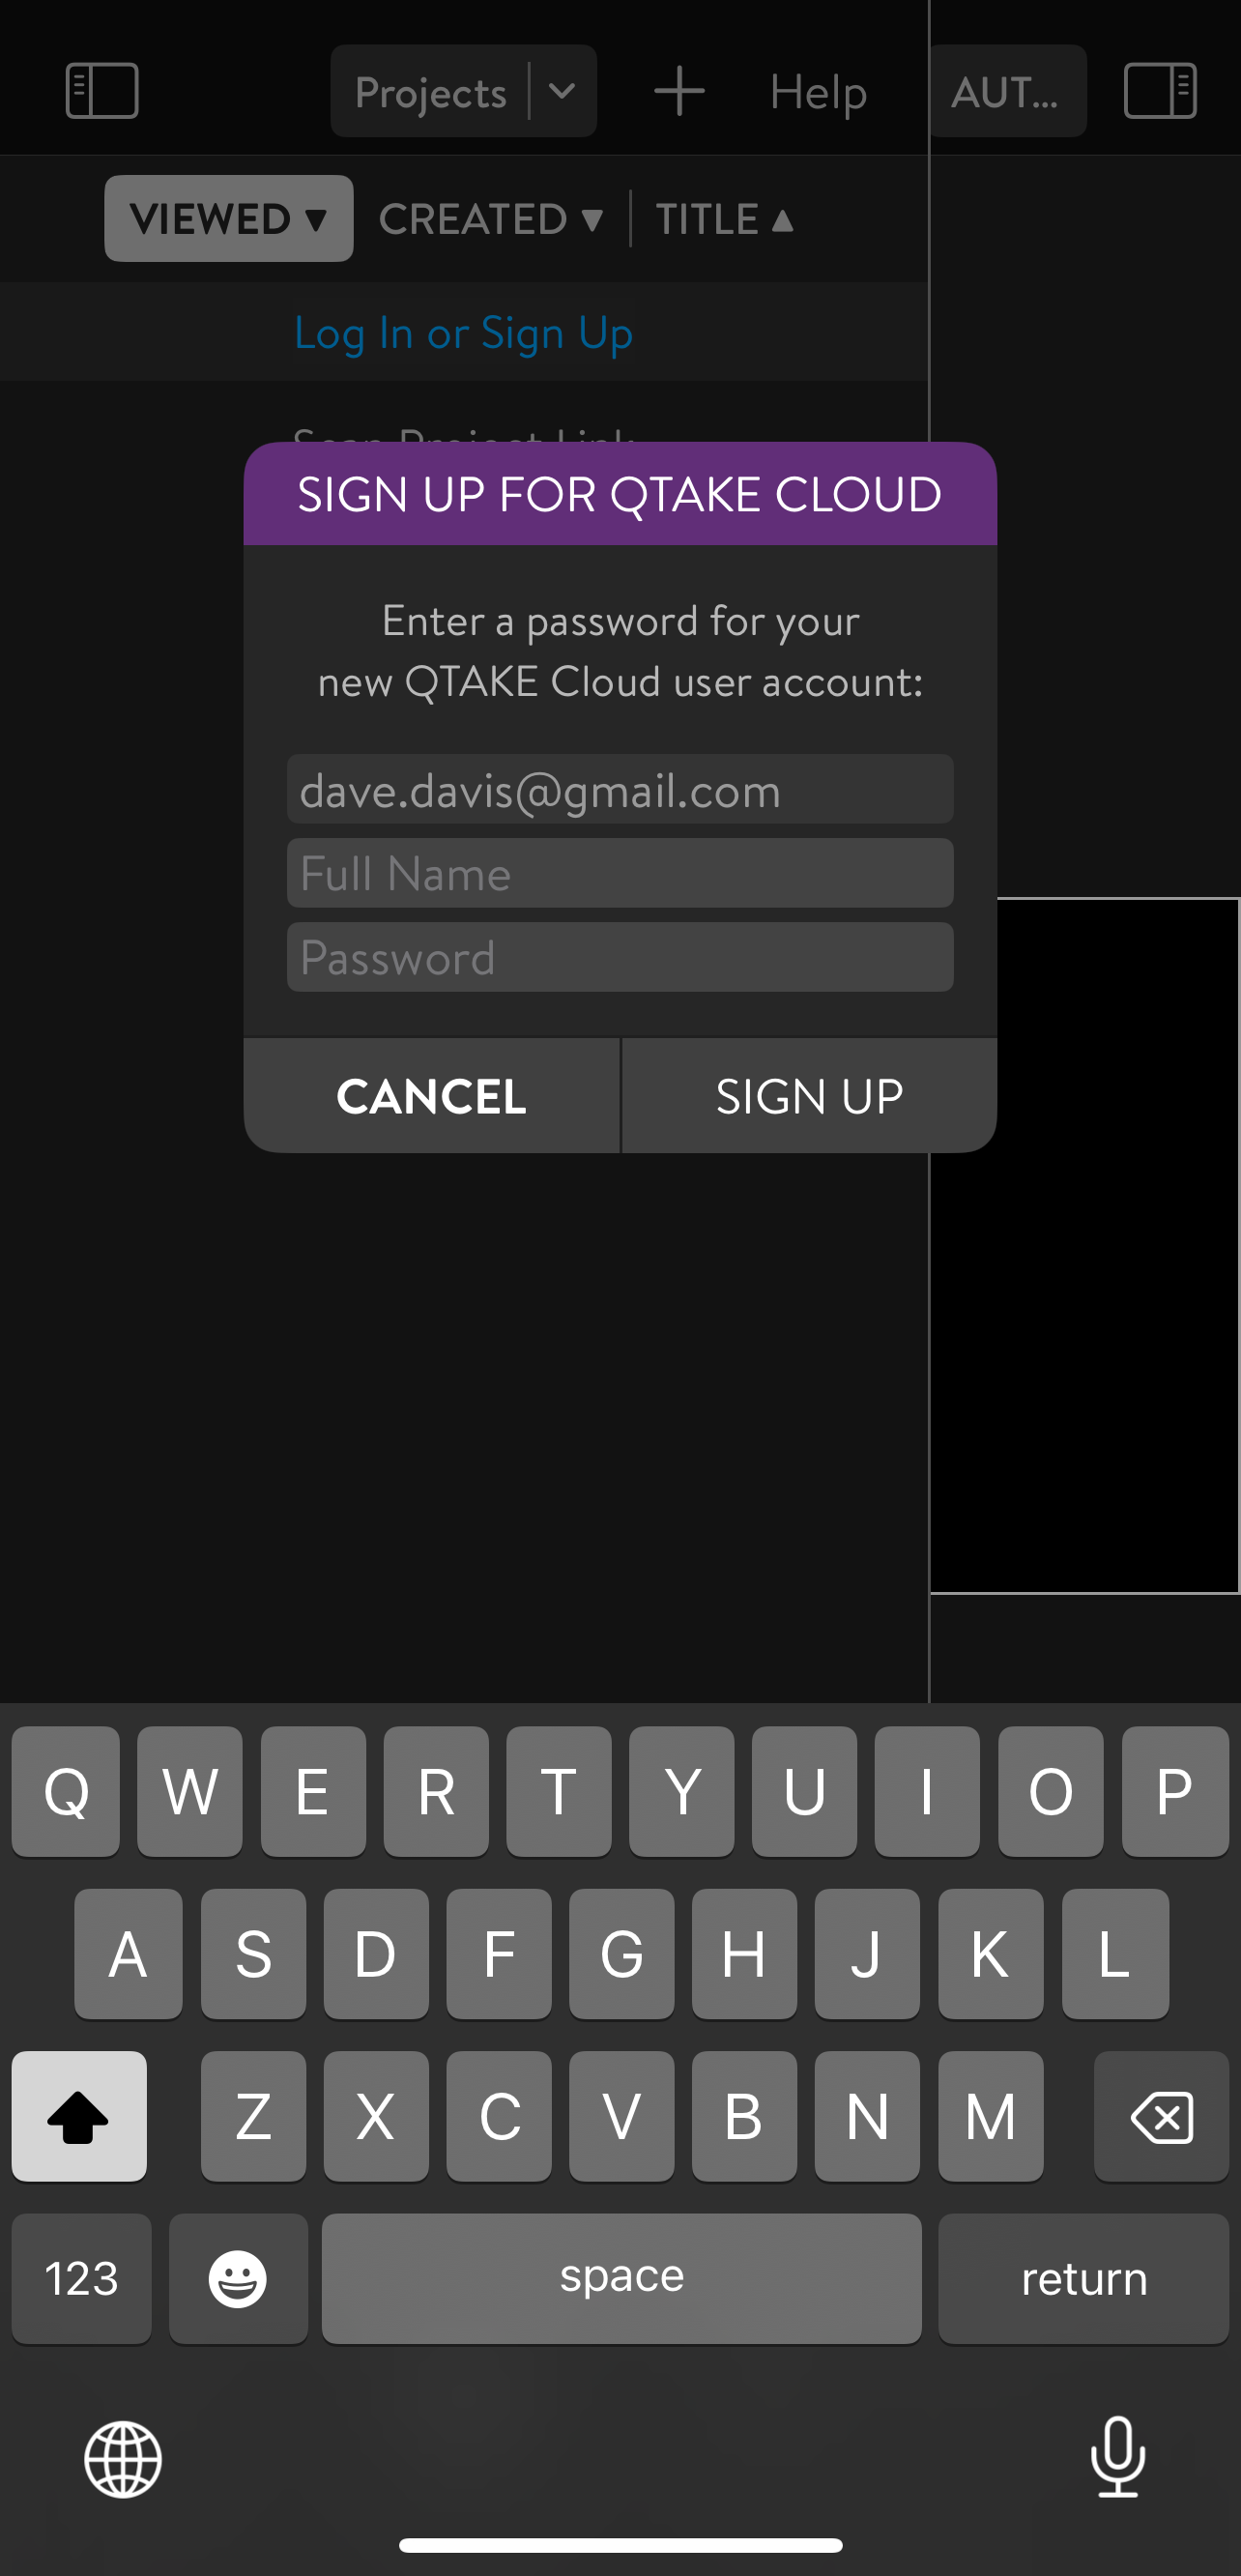
Otherwise, you will have to enter a PASSWORD for a new account. Optionally, enter your FULL NAME for your co-workers to recognize you. Click the SIGN UP button and wait for the activation email. |
|
|
Web Login
|
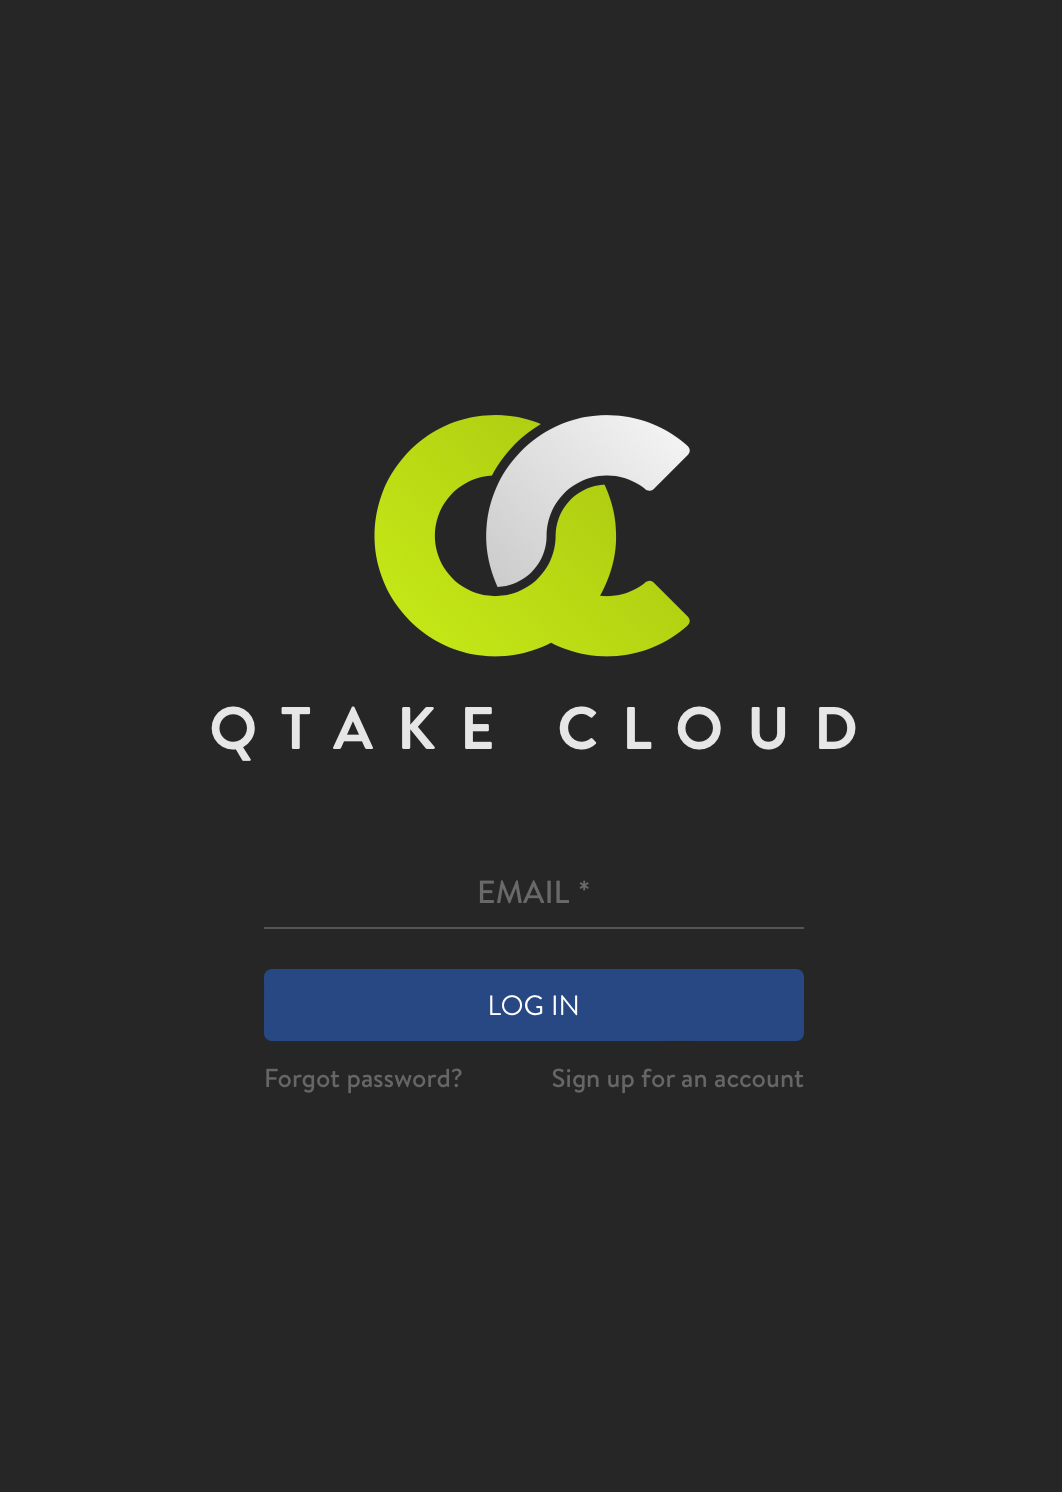
Alternatively, you can use the web interface to create your user account. Click the following link to open your web browser and load the QTAKE Cloud login page. Note that only existing users can use the initial page. If you haven't registered for a QTAKE Cloud account yet, click the Sign up for an account? link. It will load the Sign Up page. |
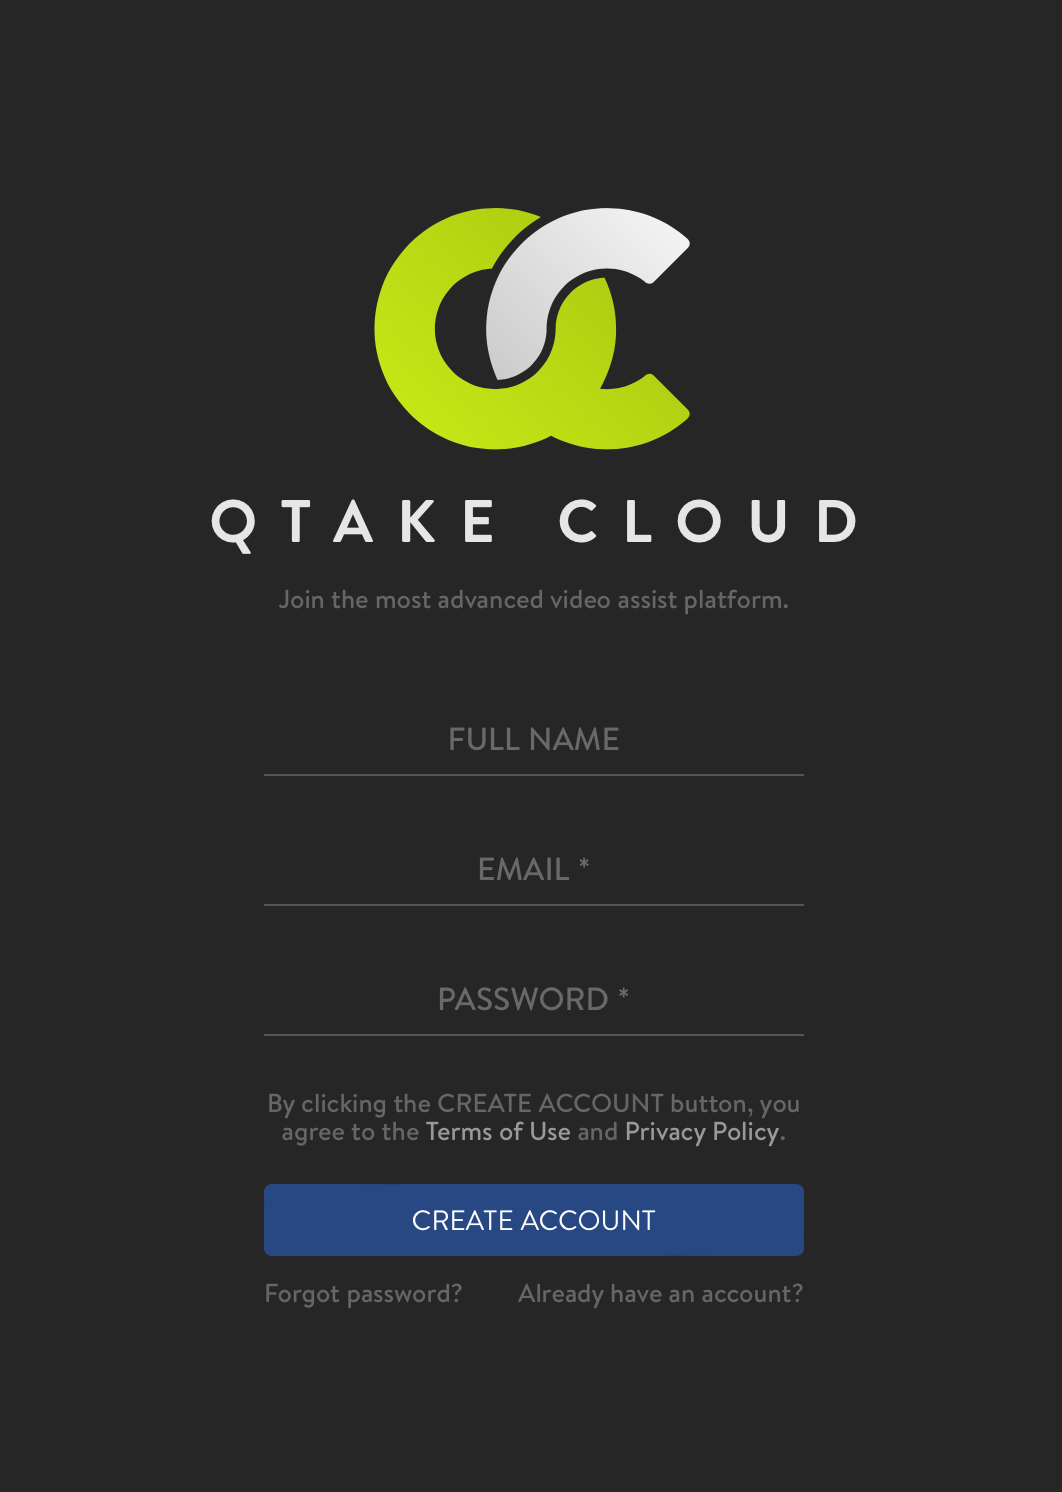
Enter your EMAIL and a strong PASSWORD. Optionally enter your FULL NAME to allow your co-workers to recognize you. After entering all required information, click the CREATE ACCOUNT button and await the activation email. |
|
|
Account Activation
After creating an account in the QTAKE Monitor app or using the QTAKE Cloud website, you will receive an activation email to confirm your email address. Click the link contained in the activation email to finalize your QTAKE Cloud account registration.
Two-Factor Authentication
To provide a higher level of security, your QTAKE Cloud Account can be protected using two-factor authentication (2FA/TFA).
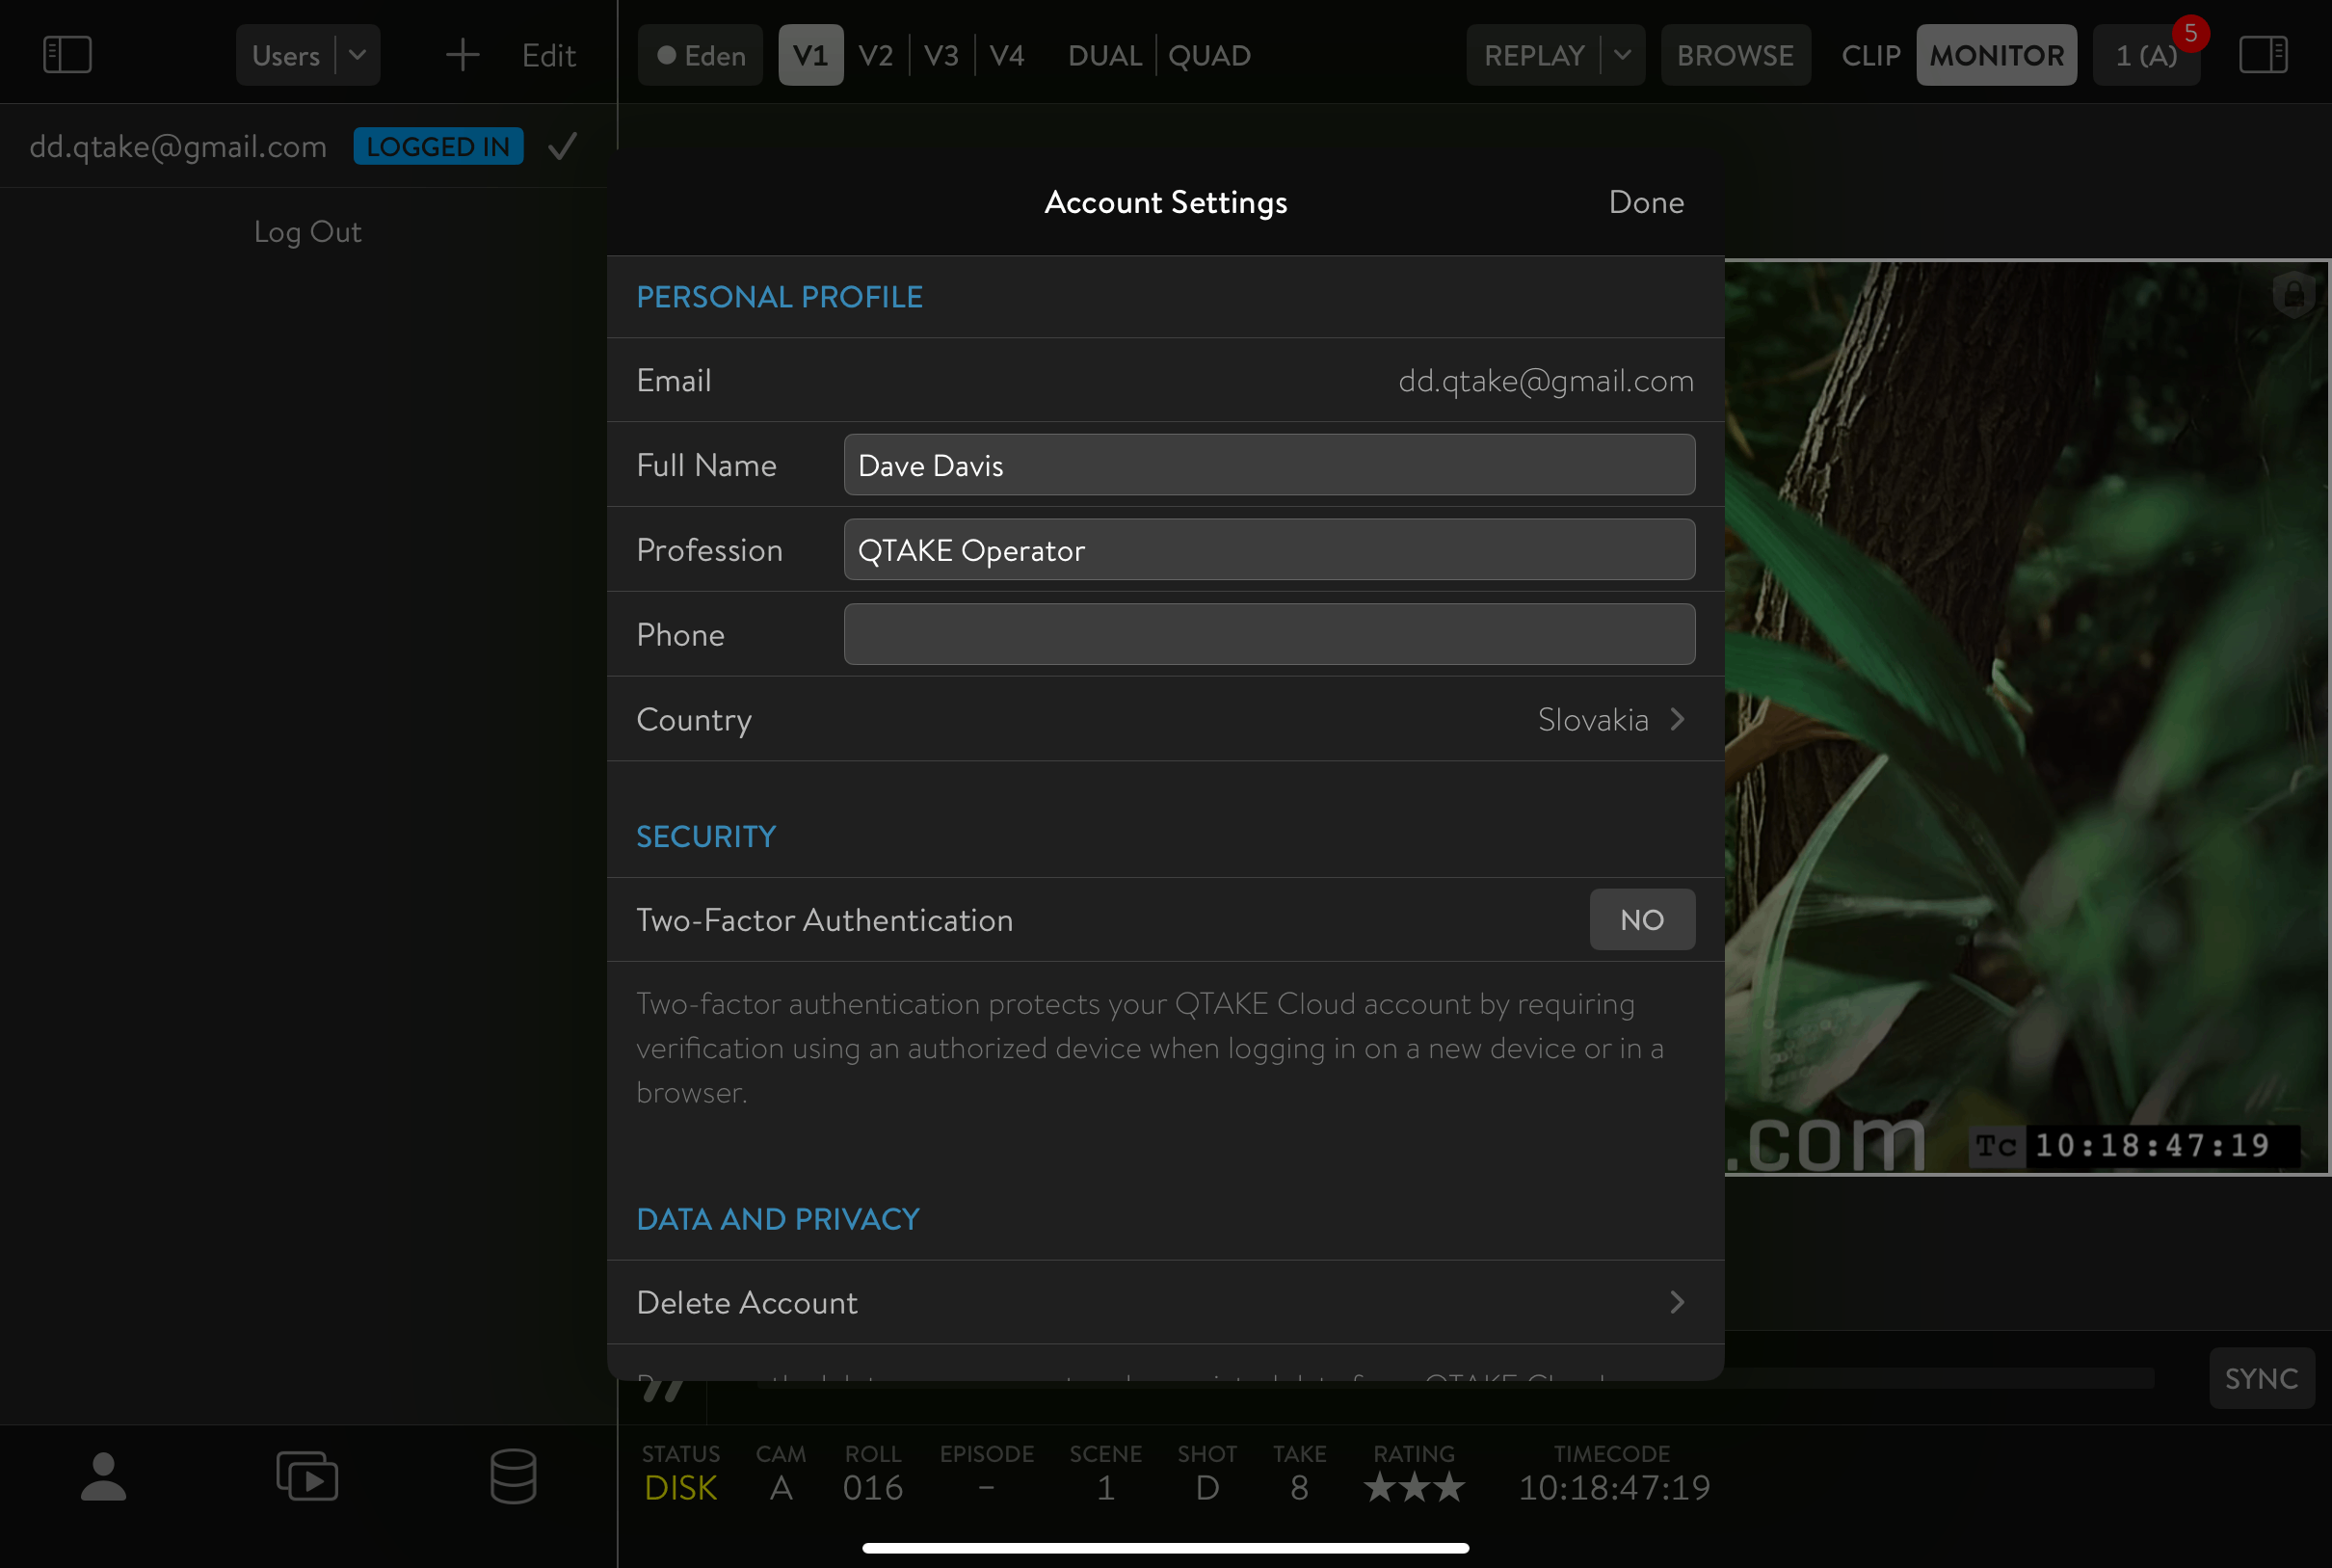
Click the OPEN PROJECT button, switch to the USERS list, and swipe left on the user to reveal ACCOUNT SETTINGS.
Turn on TWO-FACTOR AUTHENTICATION and allow push notifications.
You can authorize multiple devices for TFA and use account settings to manage them.
Authorizing Additional Devices
Authorized devices receive push notifications with verification codes when logging in to your account. You can authorize multiple devices at the same time. To authorize an additional device,
- Open the Users section in QTAKE Monitor (located to the left of the Projects tab) on an already-authorized device.
- Swipe to the left, over your email in the list, and choose Account Settings.
- You will be prompted for your account password.
- Find your device in the list of logged-in devices and select it.
- Click Authorize.
Removing Account
If you want to remove your user account from the list of users, you can do so by tapping the Edit button in the top left corner of the window and then tapping the red minus button next to your user account. It will reveal the Forget button which will remove your account from the list. Please note this will only remove the account from the current device, not from QTAKE Cloud.
Deleting Account
If you wish to permanently delete your QTAKE Cloud Account, you can do so in the Users tab of QTAKE Monitor. Either tap Edit, then the red minus button next to your user account, or swipe to the left over the account line. Both will reveal an Account Settings button, which opens a window with an account deletion option among QTAKE Monitor settings.
Login and Account Access Problems
Use this section if you cannot log in to your QTAKE Cloud account, do not receive a verification code, no longer have access to an authorized device, or are locked out of your account.
These troubleshooting steps are intended for users who already have a QTAKE Cloud account. Do not create a new account to resolve a login problem with an existing account.
First, determine which situation applies:
- You see a message about too many failed login attempts. This is a QTAKE Cloud Login lockout, not a Two-Factor Authentication issue. Check the email address associated with your QTAKE Cloud account and follow the instructions described in Too Many Failed Login Attempts.
- You know your password, but you are missing the verification code. Verification codes are delivered to authorized devices running QTAKE Monitor. If you still have an authorized iPhone, iPad, or Mac with QTAKE Monitor installed and logged in, use that device to manage Two-Factor Authentication or authorize another device.
- You no longer have any authorized devices. Use the account recovery procedure with your Account Recovery Key.
- You see a device token expired login error. Check the device date and time settings as described in Login Failed - Device token expired.
- You cannot recover access because the Account Recovery Key is missing. Check the inbox and spam or junk folder of the email address associated with your QTAKE Cloud account for a file named Account Recovery Key. If the file is not available, contact support.
For managing Two-Factor Authentication on an authorized device, see Two-Factor Authentication.
For authorizing another iPhone, iPad, or Mac, see Authorizing Additional Devices.
For users who no longer have access to any previously authorized devices, see Recovering Account Access.
For login failures caused by device time settings, see Login Failed - Device token expired.
Too Many Failed Login Attempts
If there are 5 failed login attempts, access to the QTAKE Cloud account is blocked for security reasons. This can happen when signing in to any QTAKE Cloud-connected application or web service, because QTAKE Pro, QTAKE Monitor, QTAKE Sync, QTAKE Rental Shop, CLOUD STREAM, and QTAKE Cloud web services use the same QTAKE Cloud Login system.
This procedure is for an existing QTAKE Cloud account that has been blocked after failed login attempts. Do not create a new account to resolve this issue.
When this happens, check the email address associated with your QTAKE Cloud account. You should receive an email with instructions to regain access.
The email contains two actions:
- RESET PASSWORD — Opens a web page where you can immediately set a new password for your QTAKE Cloud account.
- REACTIVATE ACCOUNT — Reactivates your account while keeping the original password.
- If QTAKE Monitor is installed on the device, this action may open the QTAKE Monitor app. Otherwise, it opens QTAKE Cloud in a web browser, signs you in automatically, and restores access to the account.
If you do not see the email, check the spam or junk folder of the email address associated with your QTAKE Cloud account.
Recovering Account Access With Two-Factor Authentication
This procedure is intended only for users who no longer have access to any of their previously authorized devices.
- Locate your Account Recovery Key: Search the email inbox associated with your QTAKE ID for the recovery key file sent during your initial account setup.
- Import the Key: Open the recovery key file on your new device and select Copy to QTAKE Monitor.
- Reset 2FA: Enter your account password. You can then disable the old Two-Factor Authentication and re-authorize your current device.
- Optionally, review the list of authorized devices below and remove any devices you no longer have access to.
Note: If you still have access to an authorized device, manage your 2FA via Account Settings in the Users list instead.
Login Failed - Device token expired
If you encounter this error message, check the Date & Time settings on your iOS or macOS device and make sure Set Automatically is enabled. This setting is vital for a successful authentication process.
Depending on what device you use, you will find the setting in a different location.
- iOS – check Settings –> General –> Date & Time
- macOS 13 Ventura and newer – check System Settings –> General –> Date & Time
- macOS 12 Monterey and earlier – check System Preferences –> Date & Time
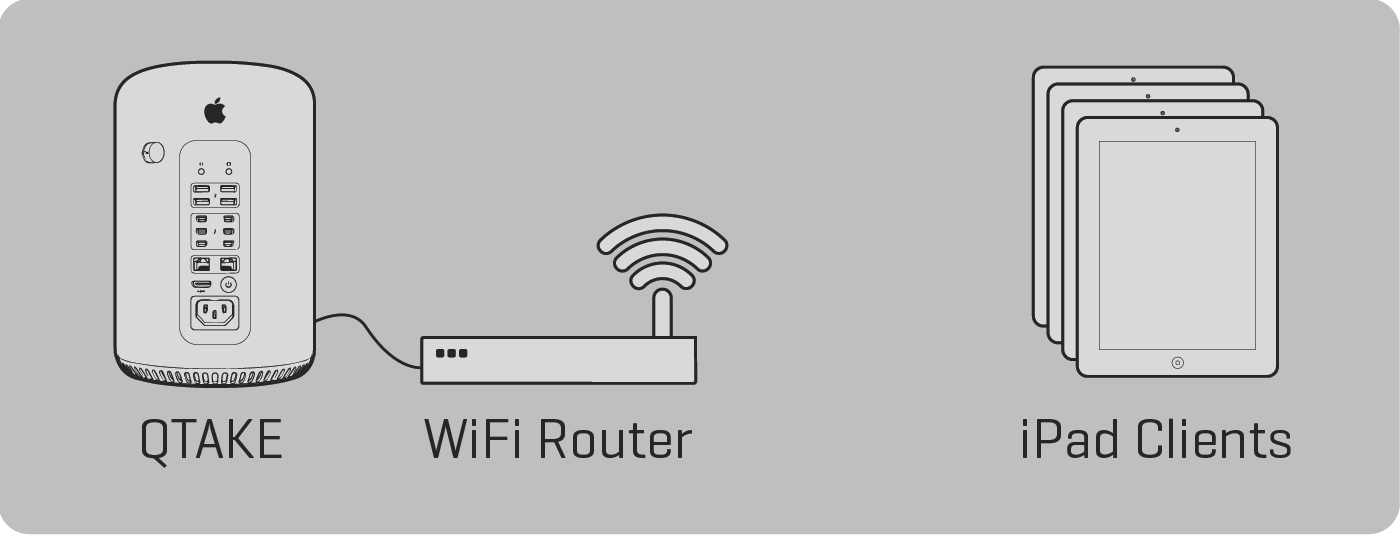
Local Streaming Instructions
To start a local stream, establish a network connection between the streaming device and the device running QTAKE Monitor. A standard Wi-Fi router will do the job. You can use existing studio infrastructure too, but we recommend using a dedicated Wi-Fi network.
Enable Stream in QTAKE
Launch QTAKE and create a new project or load an existing one.
To enable remote discovery via Bonjour, enable STREAM in QTAKE.
Click the STREAM button in the bottom row of the interface to display the toolbar.
Now click the STREAM button.
See STREAM Menu for more information.
Connecting to Local Stream
For streaming, QTAKE employs proprietary QLS (QTAKE Live Stream) protocol.
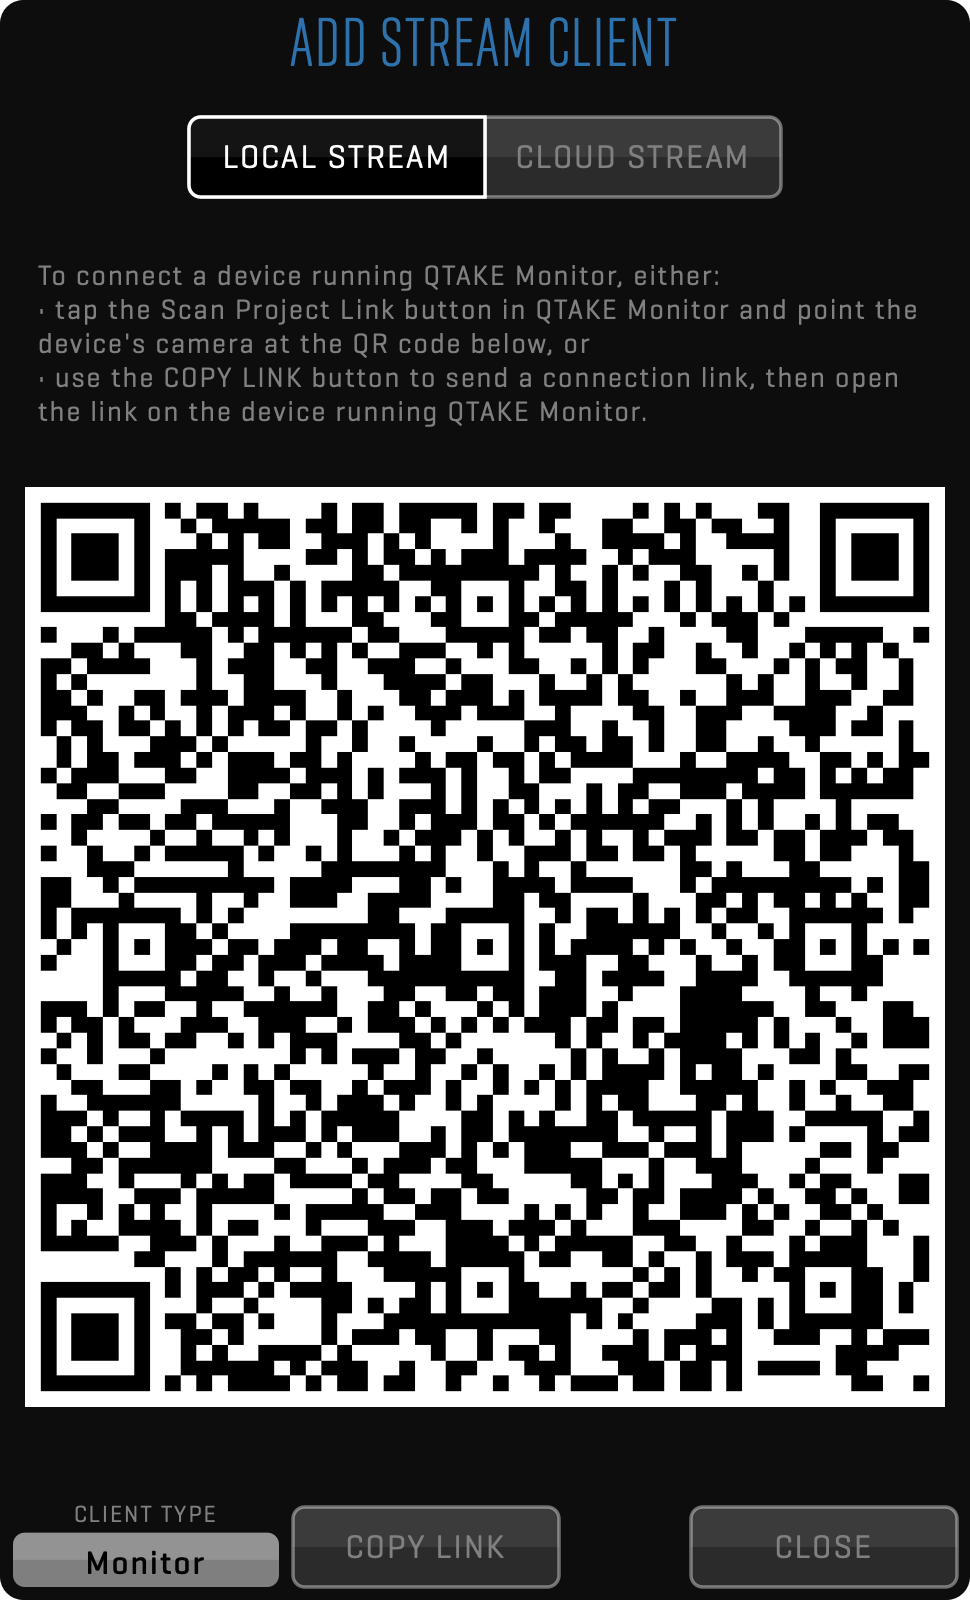
Starting with QTAKE Pro 2.2, for a client to connect to the local stream, the client has to select TAP TO CONNECT on the Open Project page of the QTAKE Monitor app. Alternatively, the client can use the Scan Project Link button to scan the QR code. Both of these actions will establish a secure local connection to QTAKE, adding it to QTAKE Monitor’s Servers tab (the third tab in this dialog window).

|

|
Scan QR Code in QTAKE Monitor
QTAKE Monitor application uses Bonjour network discovery to find QTAKE projects on the local network. To enable streaming between the QTAKE Monitor and the streaming device connect both devices to the same Local Area Network.
Launch QTAKE Monitor on the iPad, and a window listing available QTAKE projects will appear. If you see no projects in the list or you do not see the desired project, click the SCAN PROJECT LINK button.
|
Ask QTAKE operator for a QR code. |
Use the Scan Project Link option in Open Project. |
|
|
Once you scan the QR code, the project name will appear in the list. Tap on the project name to connect. QTAKE Monitor will display two Views and a “Waiting for approval…” message.
Approve the connection from QTAKE
When QTAKE Monitor attempts to connect to QTAKE, one of the sixteen buttons in the STREAM toolbar will become active, displaying the name of the device attempting to connect.
You can approve the connection by clicking on the button.
It will initiate streaming to the QTAKE Monitor application.

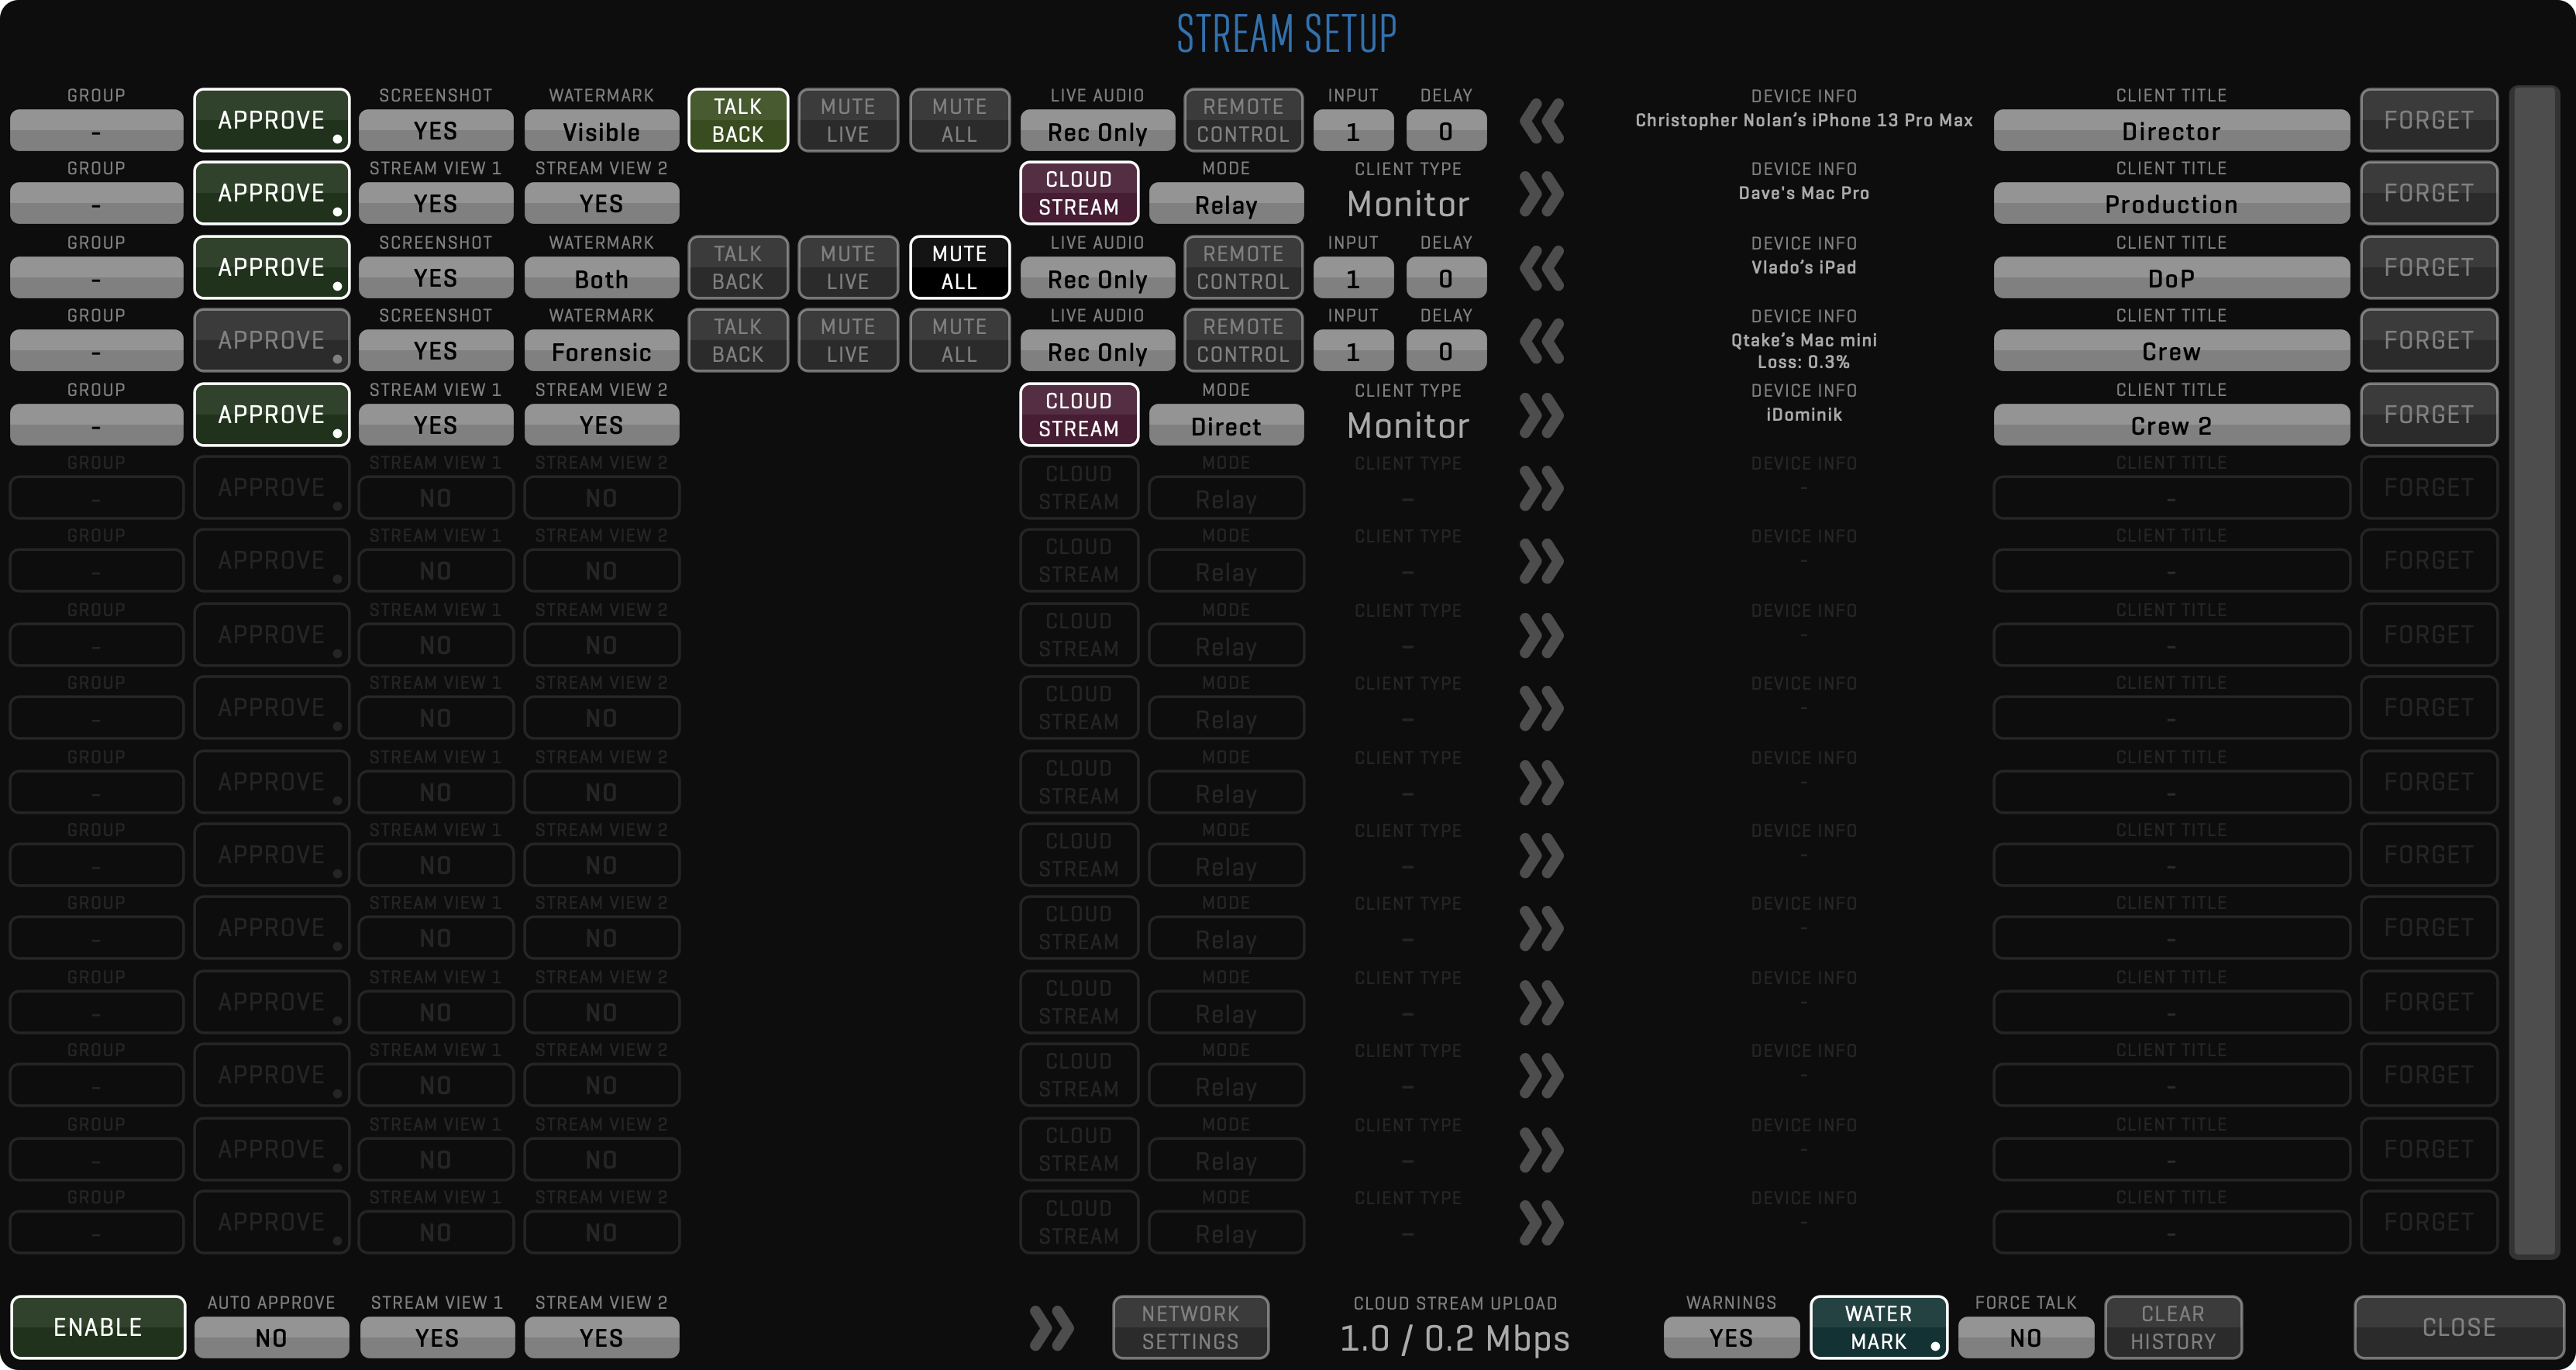
Long-clicking the STREAM button brings up the STREAM SETUP window.
Here, you can get an overview of the clients connected to QTAKE Stream.
This window also allows you to enable TALKBACK from one of the connected clients and also set a CLIENT TITLE that will appear in the STREAM toolbar.
The FORGET button allows you to manually disconnect a client to make room for other clients to connect.
Note that an active client will try to reconnect even after being disconnected.
Talkback
When you enable TALKBACK, the client will see a TALK button in the QTAKE Monitor app (bottom right of the interface).
Then a QTAKE Monitor client can talk back to the QTAKE operator.
Only one client at a time can have talkback enabled.
Talkback can also be enabled directly from the STREAM toolbar by long-clicking the corresponding client button.
The button will appear brighter, and “Talk” will be added to the label to indicate that TALKBACK is enabled.
See the TALKBACK section for more information on setting up TALKBACK in QTAKE.
You can control the name of the machine running QTAKE as it appears in the app by going to System Preferences - Sharing and changing the Computer Name field.
Cloud Streaming Instructions
QTAKE provides remote streaming over the internet in case clients need to connect to the QTAKE stream from a remote location. It is called CLOUD STREAM because it uses QTAKE Cloud to provide a secure connection between a computer running QTAKE and a client device running QTAKE Monitor.
Enable Cloud Stream in QTAKE
On the QTAKE side, cloud streaming works the same way as local streaming, with a few exceptions:
- QTAKE computer has to be connected to the internet.
- QTAKE operator has to be logged in to QTAKE Cloud. See more in the QTAKE Cloud Login section.
- QTAKE operator’s Cloud Account has to have stream data. See more in the Cloud Stream Data section.
- QTAKE operator needs to invite QTAKE Monitor client. See more in the Cloud Stream section.
- After the client connects, a prompt in QTAKE will appear asking to enable cloud stream for this client.
Open Cloud Stream Link using QTAKE Monitor
Clients need to take the following steps to receive the Cloud stream:
- Device running QTAKE Monitor has to be connected to the internet.
- QTAKE Monitor user has to be logged in to QTAKE Cloud.
- Client needs to open an email from the QTAKE operator and click the link.
- QTAKE Monitor will open and load the project.
- After the QTAKE operator approves a connection, streaming will start automatically.
Open Cloud Stream Project on Apple TV
After logging into QTAKE Monitor for Apple TV, active projects associated with your QTAKE Cloud Account will automatically appear in the app. If there is no active stream from QTAKE at that time, the project will not appear.
UI
QTAKE Monitor supports up to nine Views. These, mirror the Views of the connected QTAKE system in their default, automatically patched state.
MAIN SCREEN in QTAKE Monitor consists of the top bar, View area, sidebars, and toolbars.
The 5.0 version’s redesigned user interface streamlines your workflow with a fresh look and enhanced functionality. The right sidebar now consolidates key function buttons like Metadata, Admin Options, and FX, which were previously located in the lower-right corner, offering a more intuitive layout. In the left sidebar, you’ll find Settings, Project Options, and the new Messaging section in one place, making navigation more efficient. These updates are just the beginning of the many improvements designed to elevate your experience.
Zoomable Scrolling Sliders for Precise Input
The Redesigned Scrolling Sliders give you greater control and accuracy when adjusting values. These sliders dynamically adapt to your zoom level — expanding when zoomed in for finer adjustments and collapsing when zoomed out to save space. Intuitive gestures make interaction seamless:
- tap and hold + swipe up to zoom in,
- tap and hold + swipe down to zoom out,
- classic two-finger spread/pinch for zoom control,
- tap and slide left/right to scroll effortlessly.
Need even more precision? Double-tap the value next to the slider to enter it manually.
Top Bar
The top bar of the main screen is always visible to allow access to essential functions. The only exception is a full-screen mode, which you can access by reverse pinching the View. On smaller displays in Portrait orientation, which may not provide enough space, the top bar controls are collapsed into icons.


Left Sidebar
The redesigned UI includes new sidebars on the Top Bar. The Left sidebar groups application-level options, the new Messages feature, and application settings into three sections.
- Connect
- Users - Lists all previously logged-in QTAKE users and marks currently logged-in users. You may add a new user by tapping the plus button, remove users via the Edit button, change the user password, or access Account settings by sliding a user name left. You need to be logged-in to access any project.
- Projects - Lists all previously opened projects and Project names of available QTAKE LIVE streams on the connected local network. You can create a new project by tapping the plus button, access the HELP screen, Scan project link, or delete a project’s local copy by sliding left a project name.
- Servers - Lists all current and previous connections to QTAKE Sync (formerly QTAKE Server) and QTAKE.
- Messages
- Inbox - Lists all received messages grouped by Project name.
- Sent - Lists all sent messages grouped by Project name.
- App
- Settings - Lets you access and edit application settings.
OPEN PROJECT
The button next to the Left sidebar shows the title of the opened project. This button provides new message notification by showing red circle with a number of new messages.
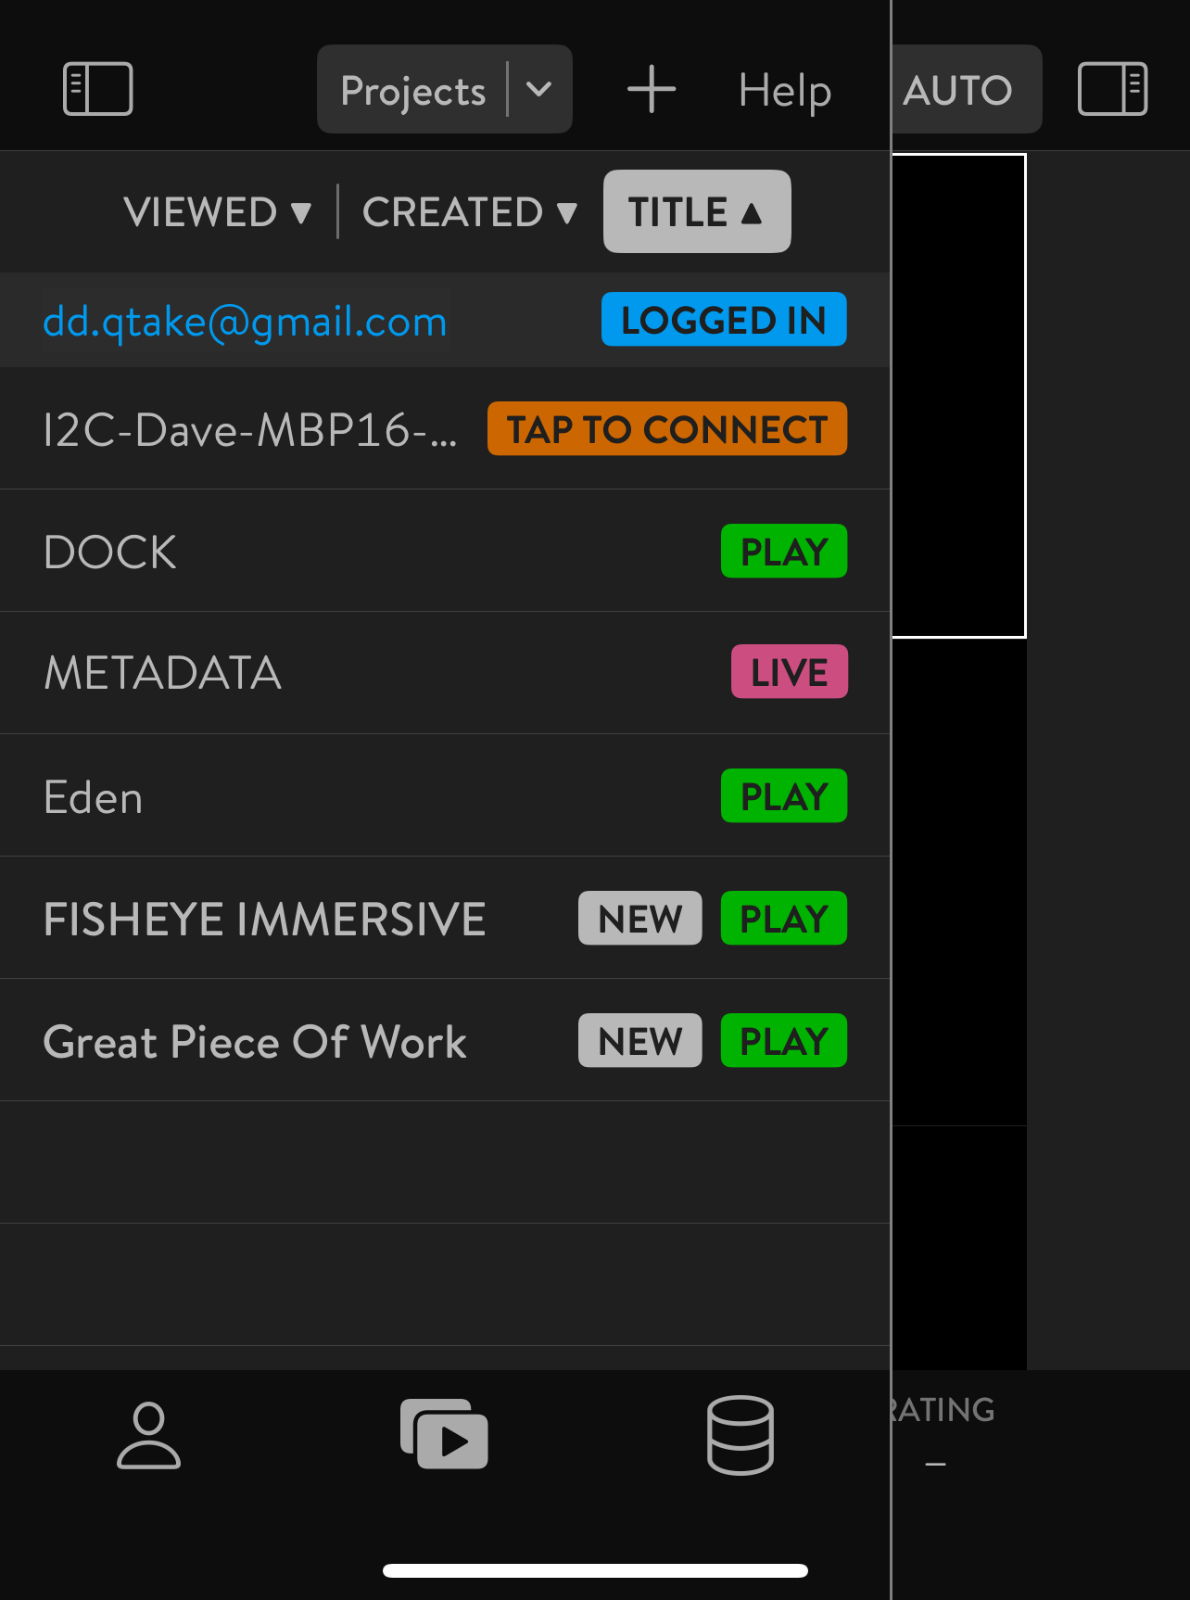
Tap this button to open the PROJECTS section of the Left sidebar with the list of available projects. Each project has a name on the left side and a label on the right. Tap the project to initiate a connection to QTAKE.
- Orange LIVE label means the project is available for local network streaming.
- Pink LIVE label is displayed when the project is available for Cloud streaming over the internet.
- Green PLAY label marks the project available for clip playback and metadata editing.
- Gray PLAY label shows that the server is offline, but local playback is available, or your user has not been approved by QTAKE Sync (formerly QTAKE Server).
- Gray OFFLINE label means that the server is offline.
HELP SCREEN
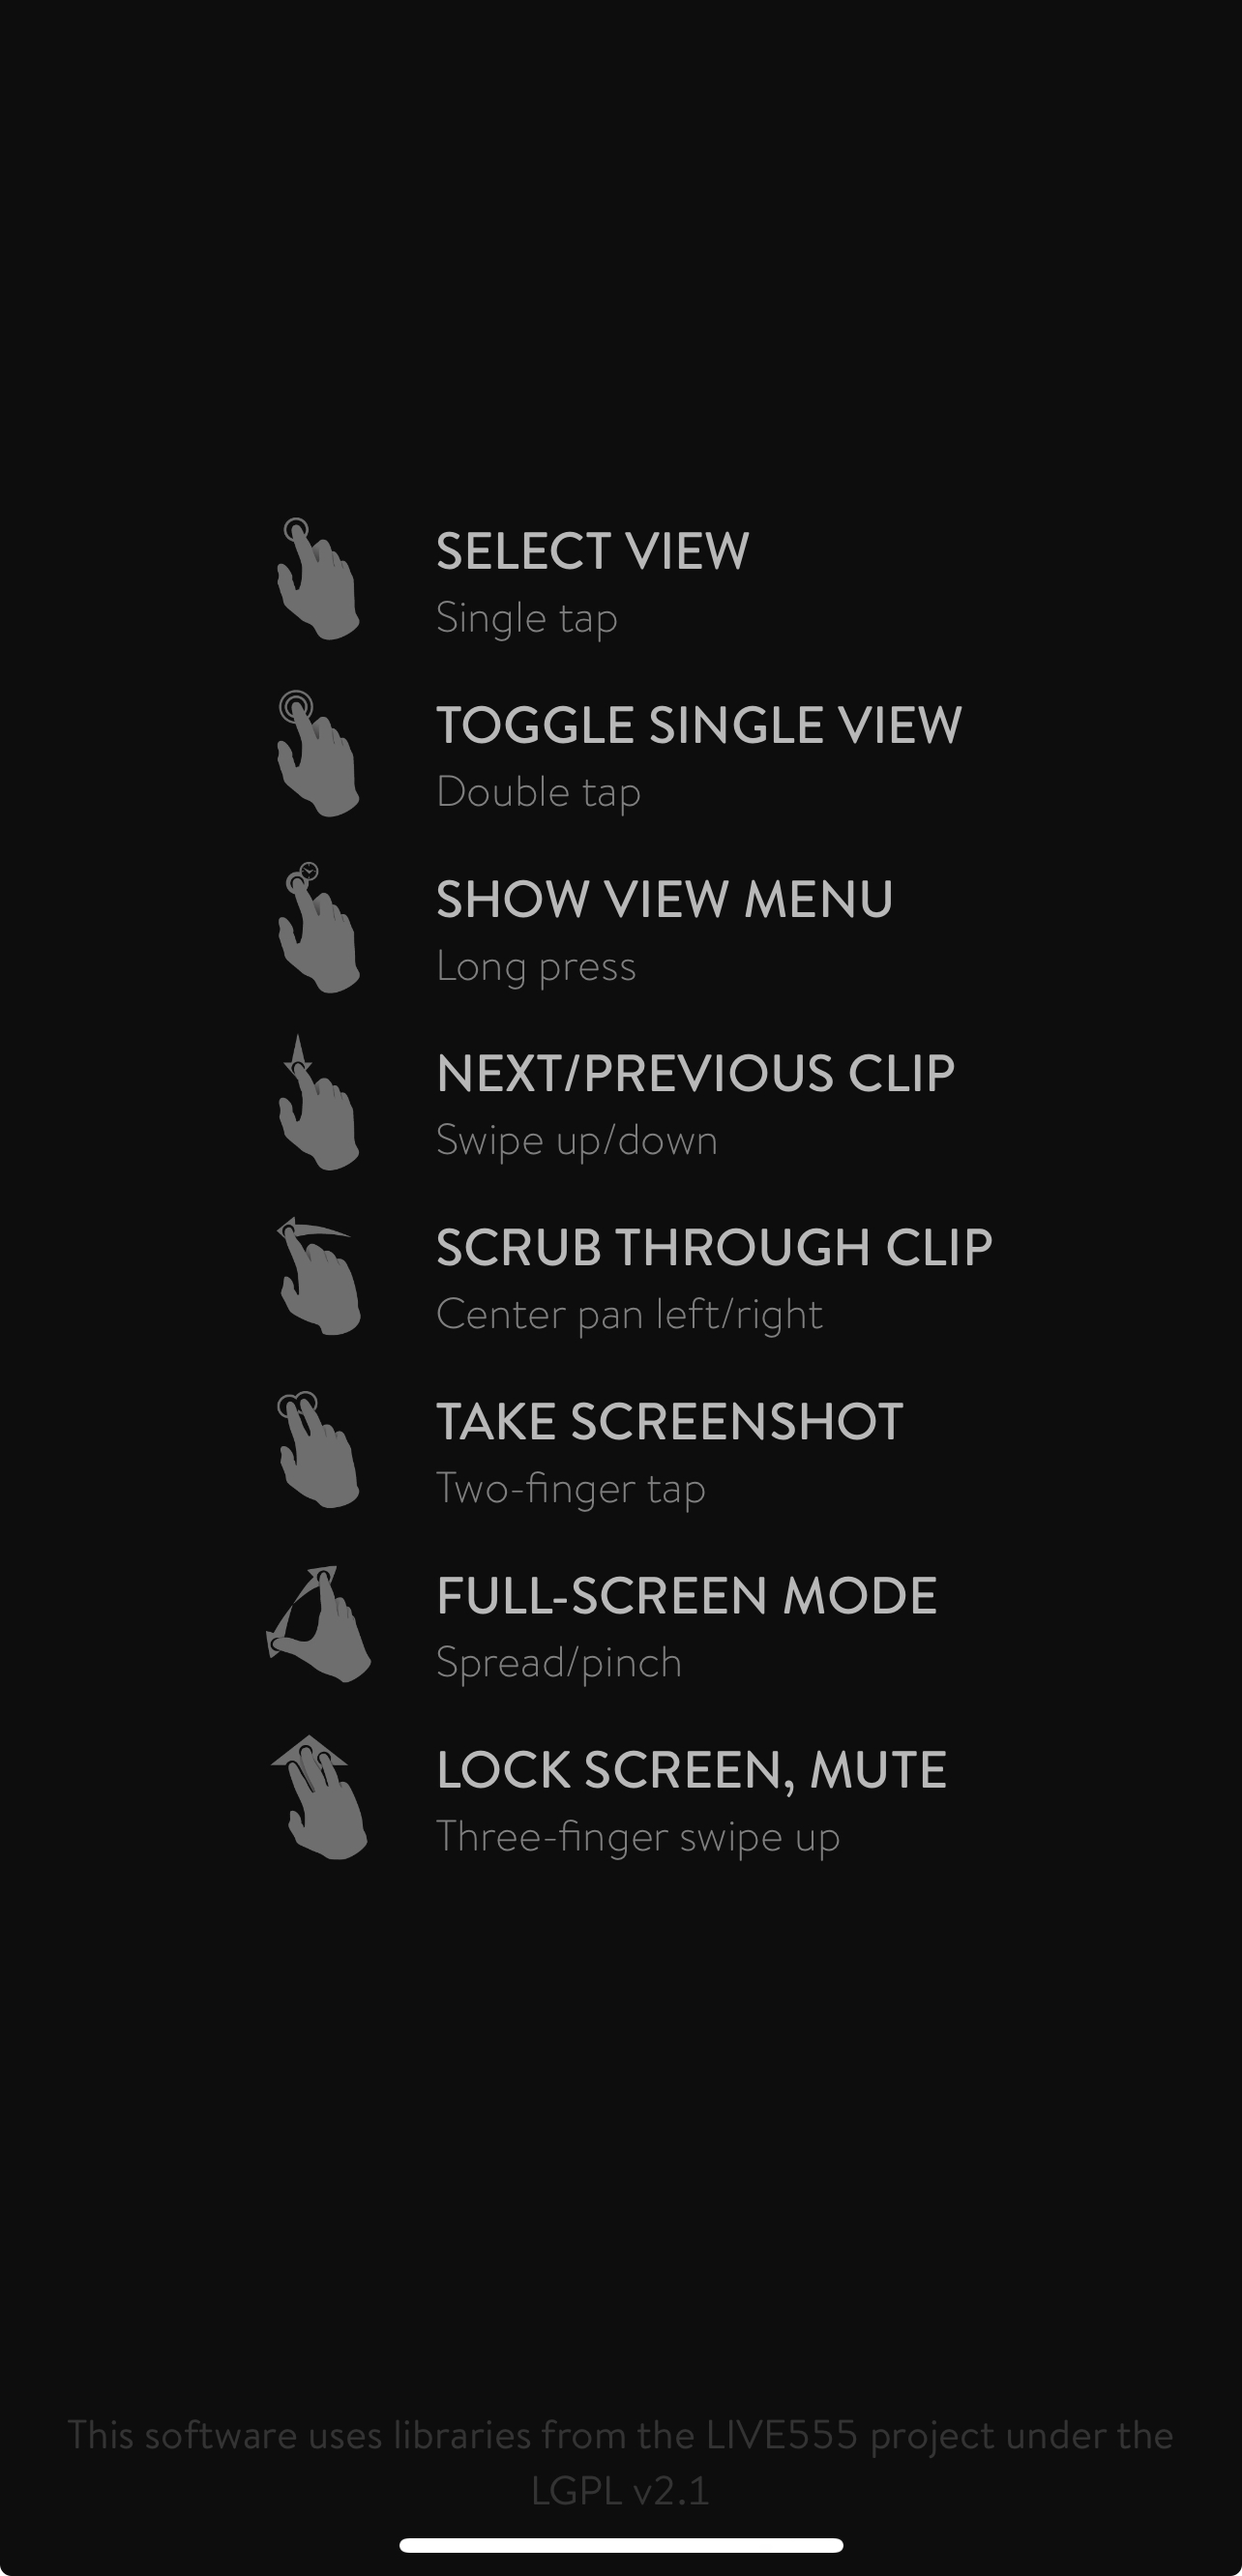
Tap the HELP button in the Projects section of the Left sidebar to reveal touch controls.
- Tapping a View will make the View active. QTAKE Monitor will only play audio from the active View.
- Double tapping on either View will toggle between the DUAL/QUAD and SINGLE View.
- Long-pressing any View will show VIEW MENU.
- Swiping up or down will switch to the previous or next clip.
- Panning left or right will scrub the clip to the beginning or end.
- Swiping down with three fingers will pause that View.
- Swiping up using three fingers will lock the screen, mute the audio, or access settings.
- A reverse pinch will bring a View into fullscreen mode.
- Two-finger tap will take a screenshot.
To take screenshots of all Views, use Three-finger tap.
SET ACTIVE VIEW
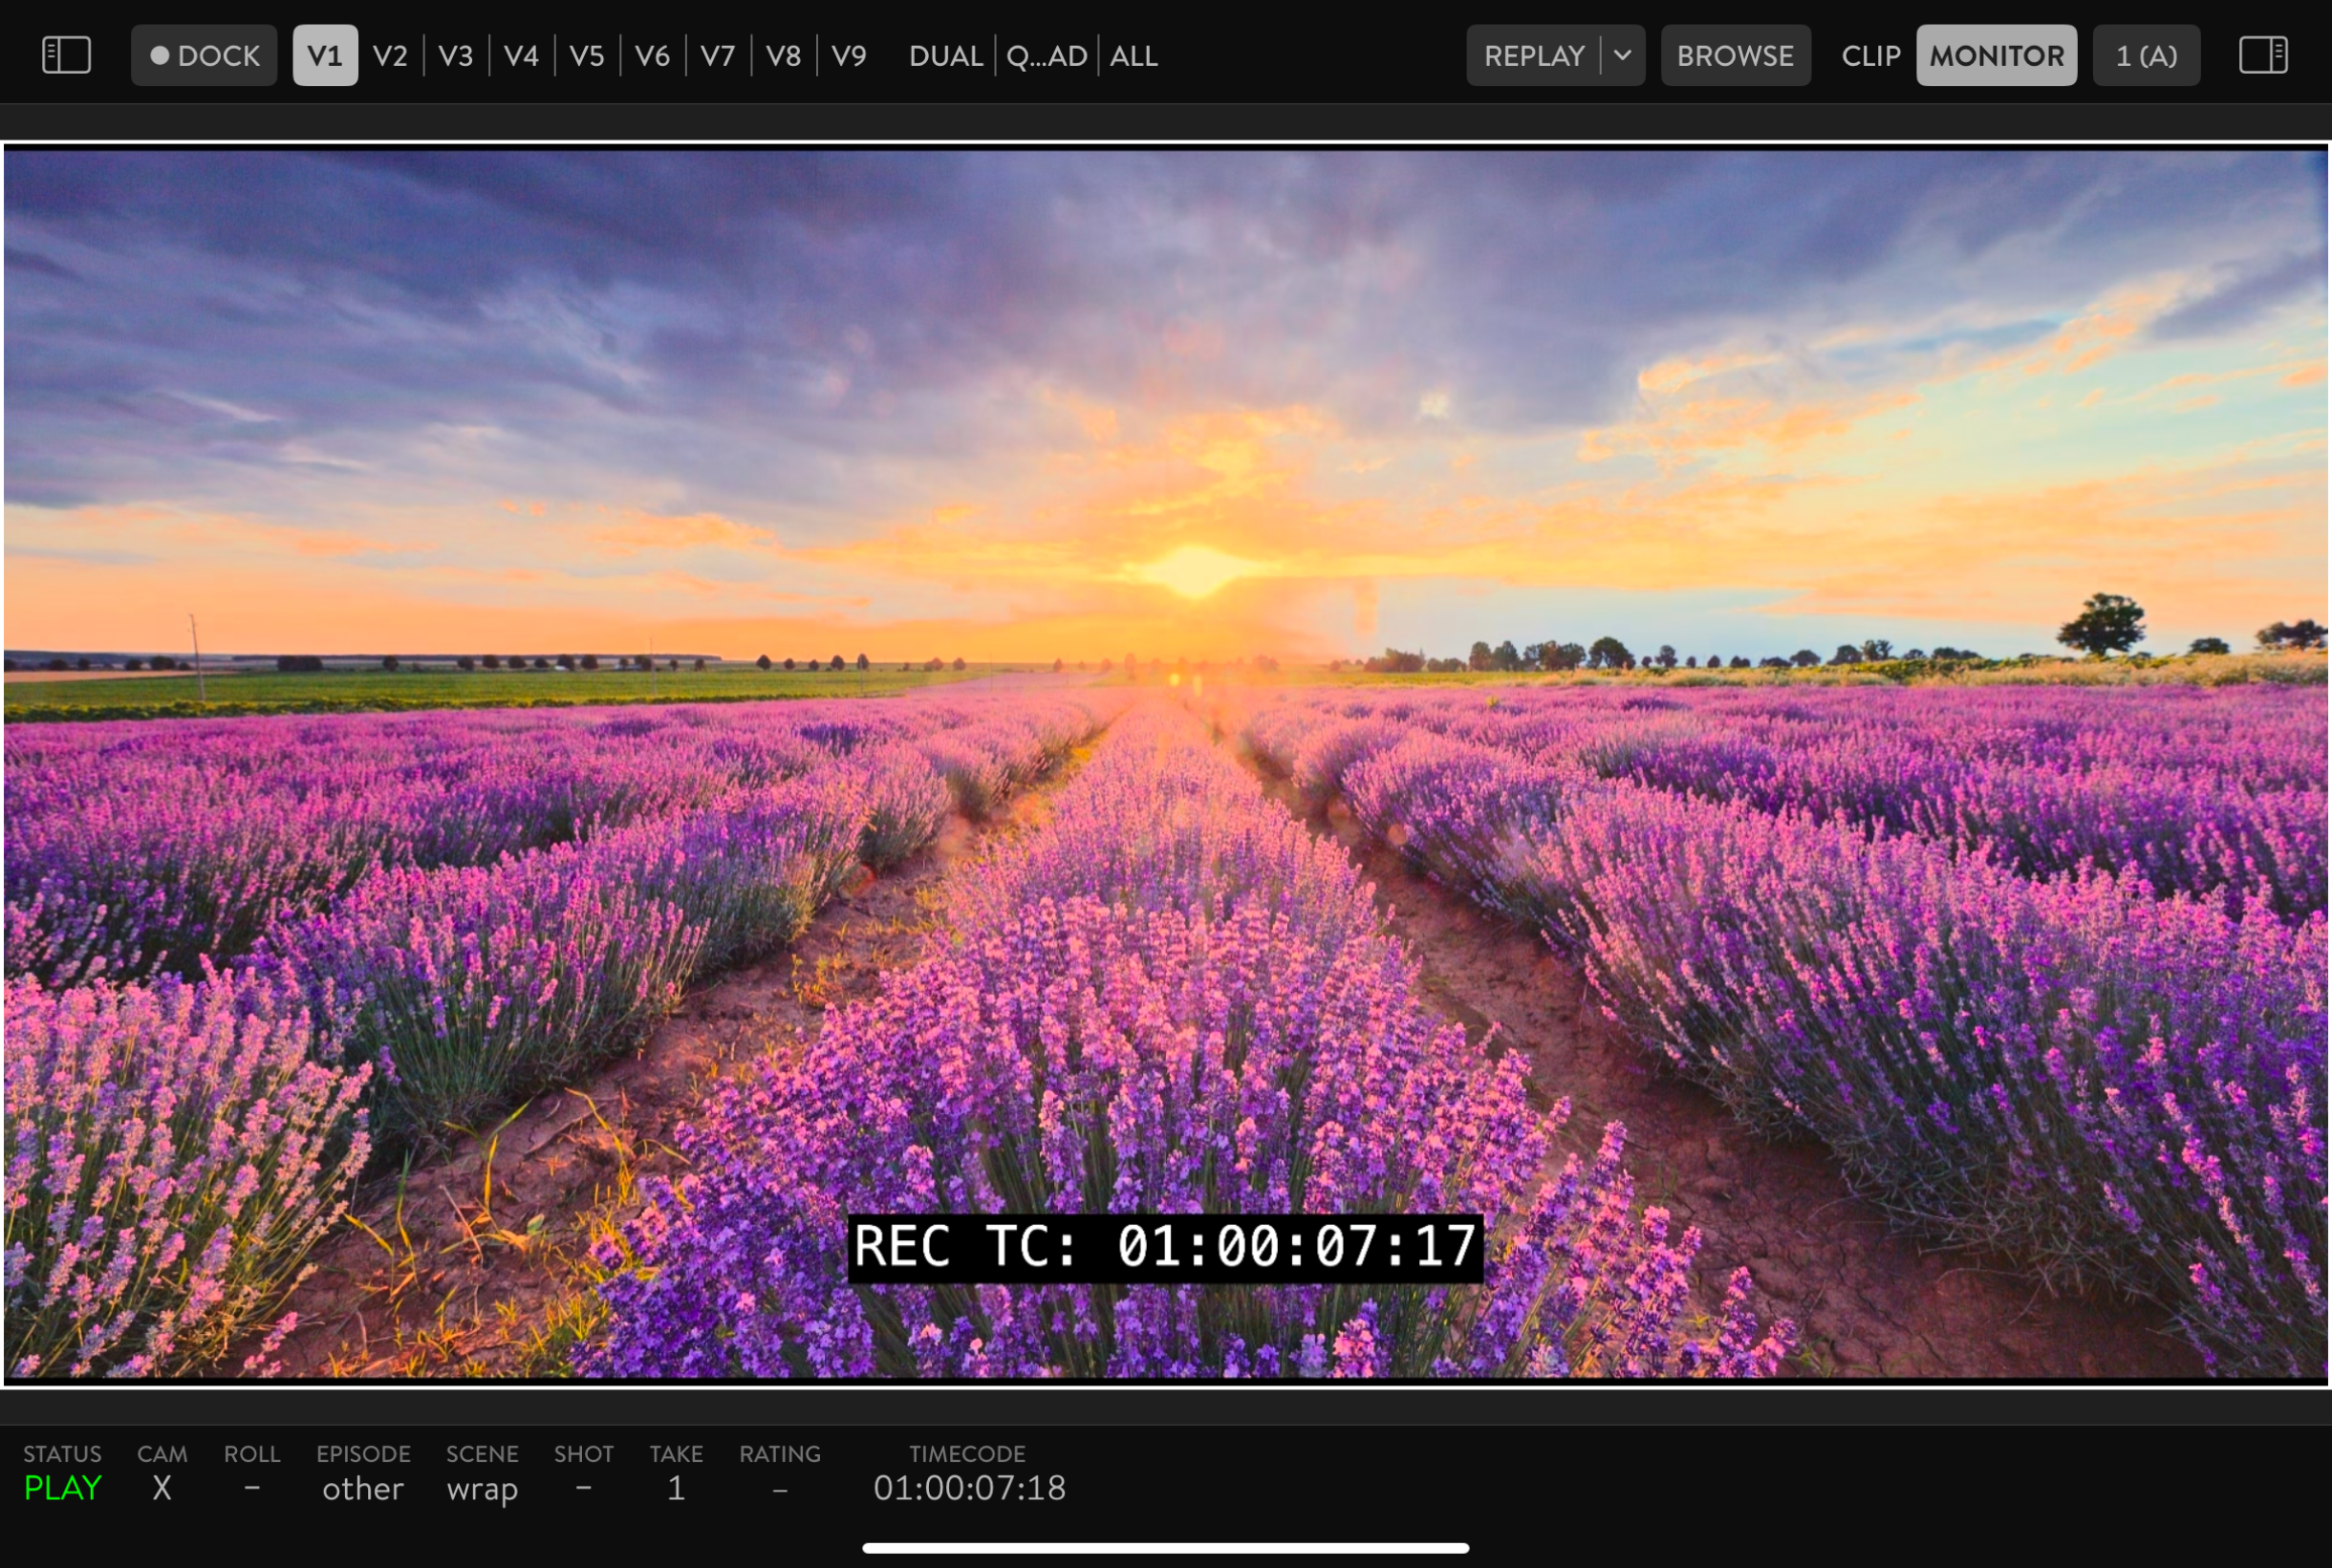
Next to the Project button, you will see a button with V1, V2, V3, V4 segments. Use this control to switch the active View. The active View has a white outline. When QTAKE is recording, the outline will change color to red. QTAKE Monitor will only play audio from the active View.
Main layout allows for up to nine Views. In settings, you may choose how many Views you want to have active. Number of segments V buttons also depends on this setting.
QTAKE Monitor 5.0 and higher allow Permanent Single View mode. In settings you need to choose 1 for Number of View.
VIEW LAYOUT
Long-press this button to switch between DUAL VIEW and QUAD VIEW mode. To switch to a single-view mode, double-tap the desired View.
REPLAY
Utilize this button to promptly access the last recorded take. Tap the arrow on the right of the REPLAY button to show RECENTLY SHOT and RECENTLY PLAYED clips, and tap any of them to load that into active View.
BROWSE
To enter the Browser screen, tap the designated button.
If the BROWSE button is not visible, it may be due to your user not being approved by the QTAKE Sync (formerly QTAKE Server) or lacking an assigned user role.
This discrepancy needs resolution by the QTAKE Sync administrator.
For a quick toggle between FULL SCREEN and VERTICAL SPLIT browser modes, perform a long-press action on the BROWSE button.

LIVE
Use this button to load LIVE clips. The live clip is the clip that the camera is currently shooting. As soon as the camera cuts, a new live clip is created. Tap this button to edit the current take, shot, or scene metadata.
CLIP | MONITOR
The next button in the top bar is the CLIP | MONITOR segmented button.
CLIP MODE
In the CLIP mode, the QTAKE Monitor user controls playback. Users can decide which clip to load and review. This mode also gives users access to shared metadata for each clip based on access permissions. Use this mode when you want to review takes independently of Video Village or when you want to edit notes.
MONITOR MODE
In the MONITOR mode, QTAKE Operator controls playback. It is a standard video village style of centralized control where QTAKE Monitor users passively monitor video assist feeds. Use this mode to remotely watch the QTAKE stream.
SELECT VIEW SOURCE
The last button in the top bar is the SOURCE selector for each View. There can be various sources available based on project type and access permissions. When the number of active streams changes, a red badge with the number of available streams appears on top of this button.
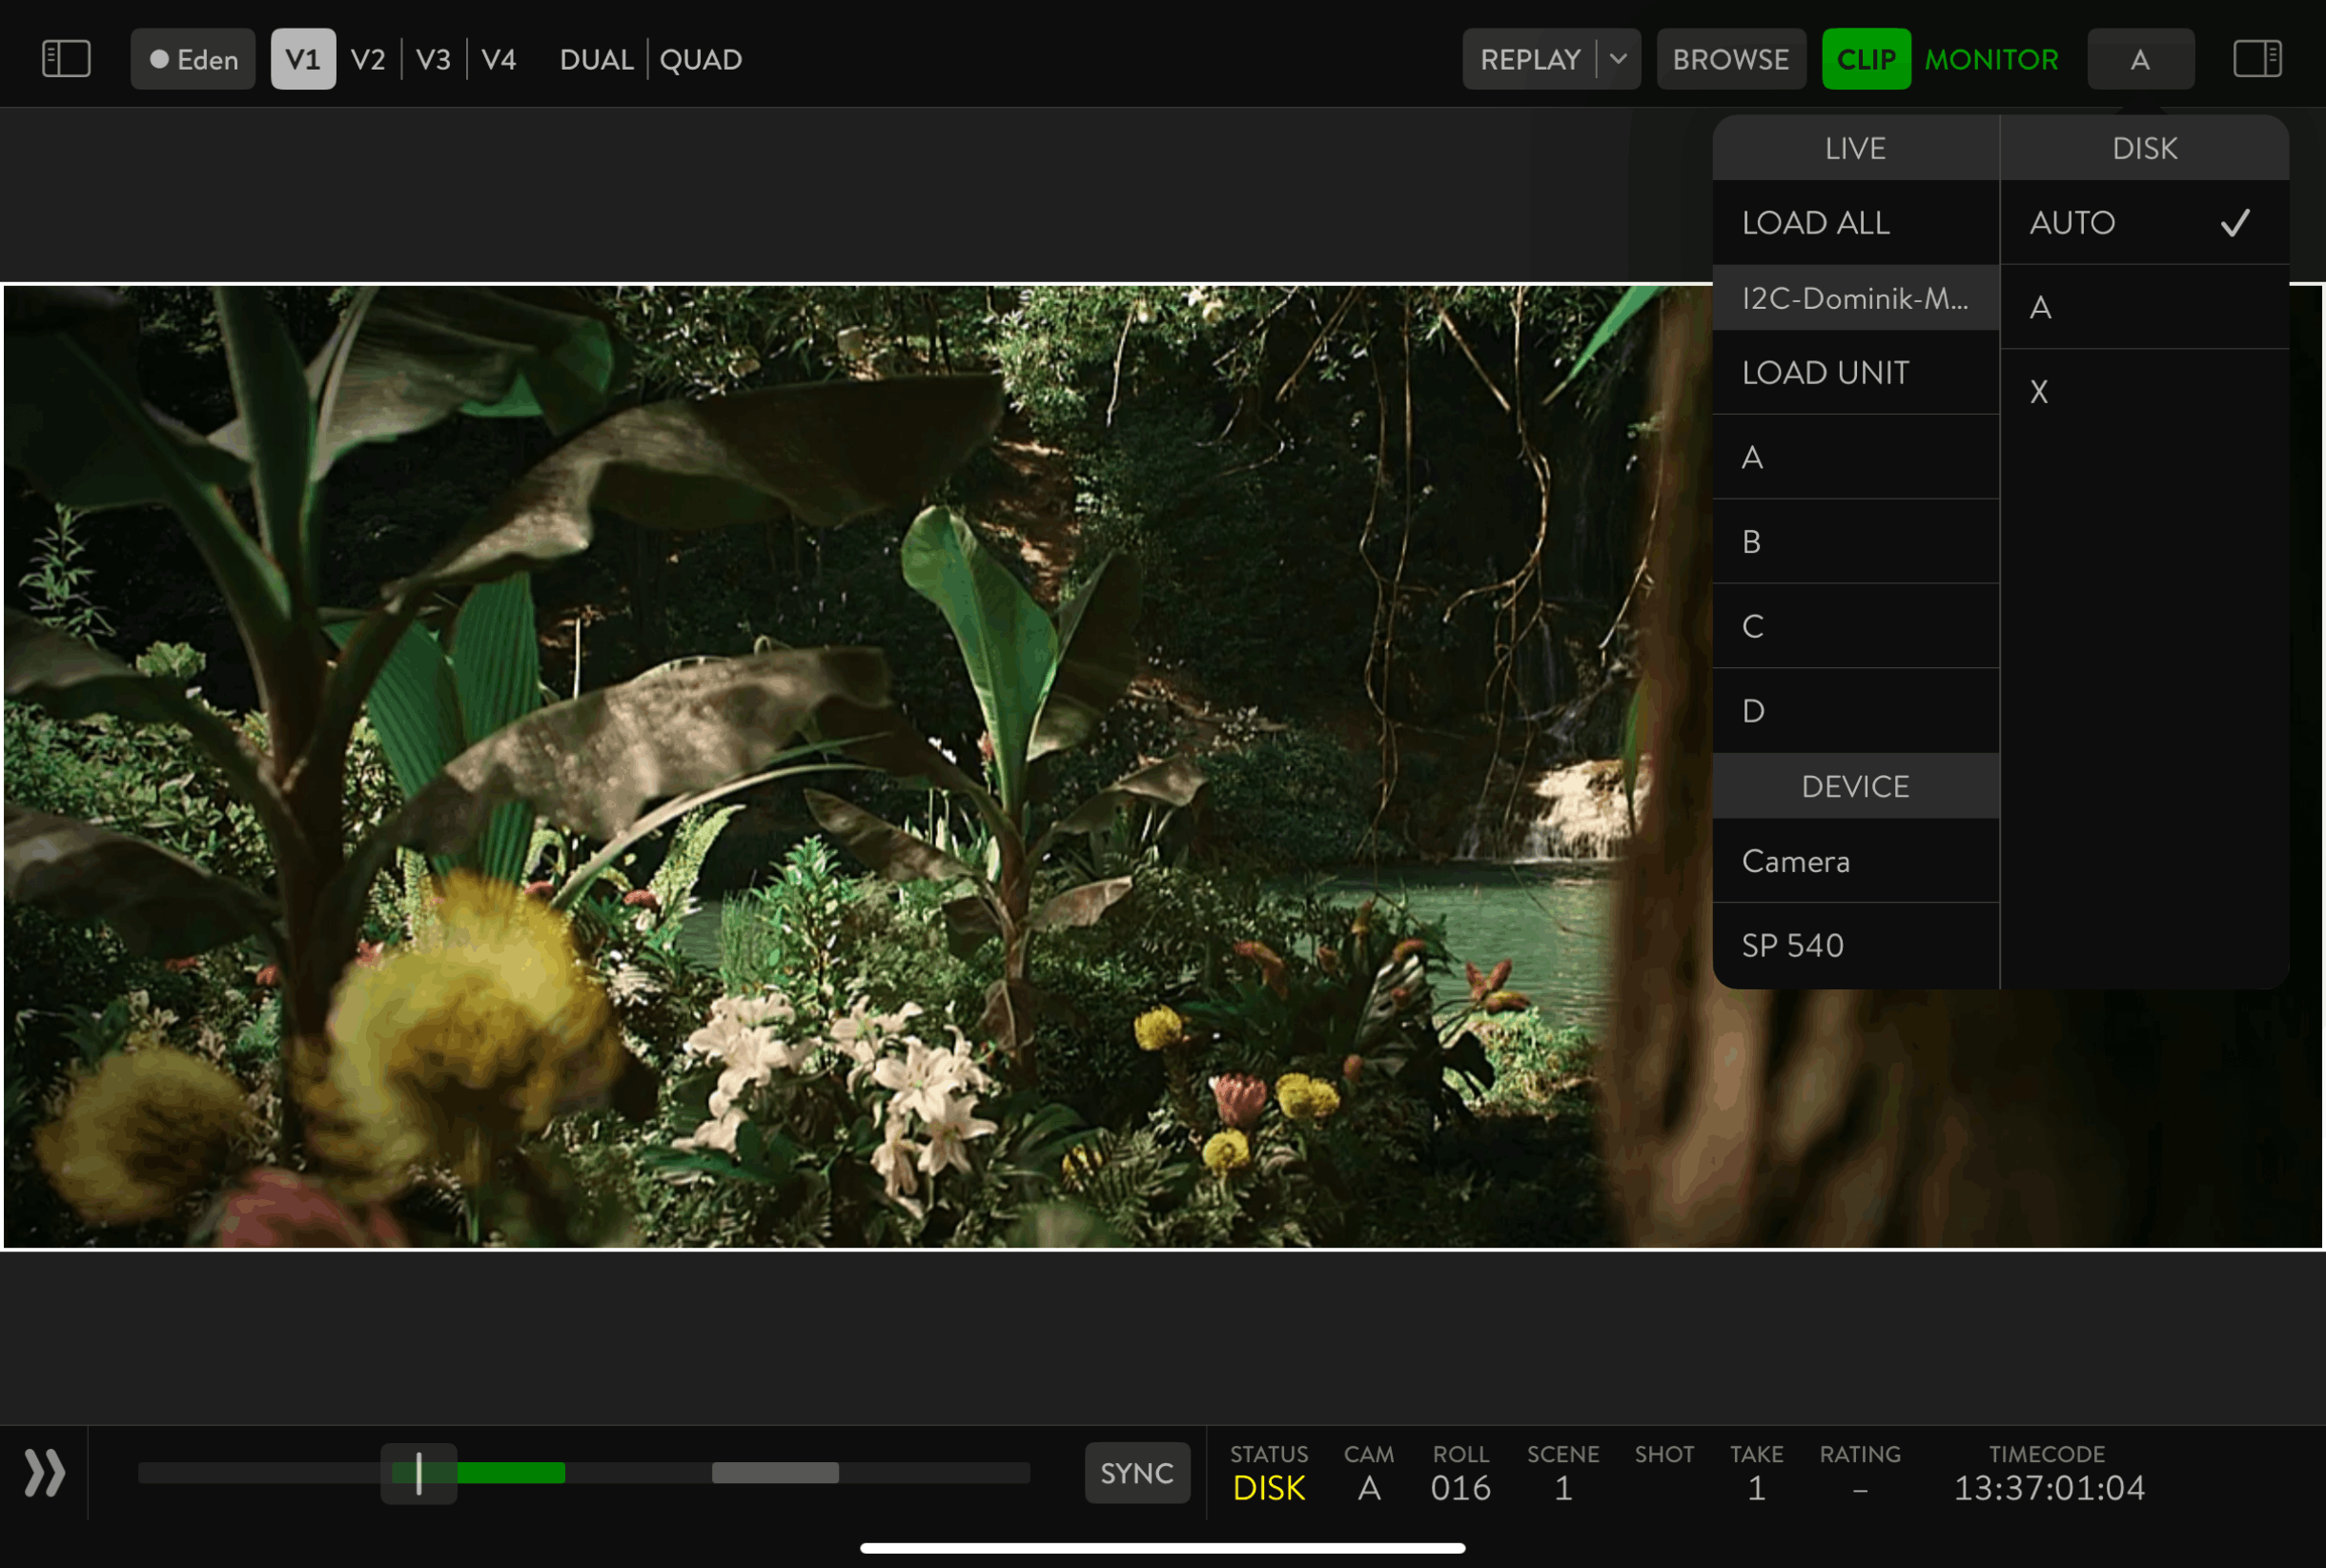
LIVE
The LIVE section will show available live-stream sources. Usually, there is a separate stream available for each camera.
DEVICE
The DEVICE section will show available devices, such as internal cameras or ScreenPort SDI devices, considering the user is approved to record or import clips.
DISK
The DISK section will show camera letters of recorded clips available for playback. Setting each View to a different camera letter lets you easily navigate multi-camera projects.
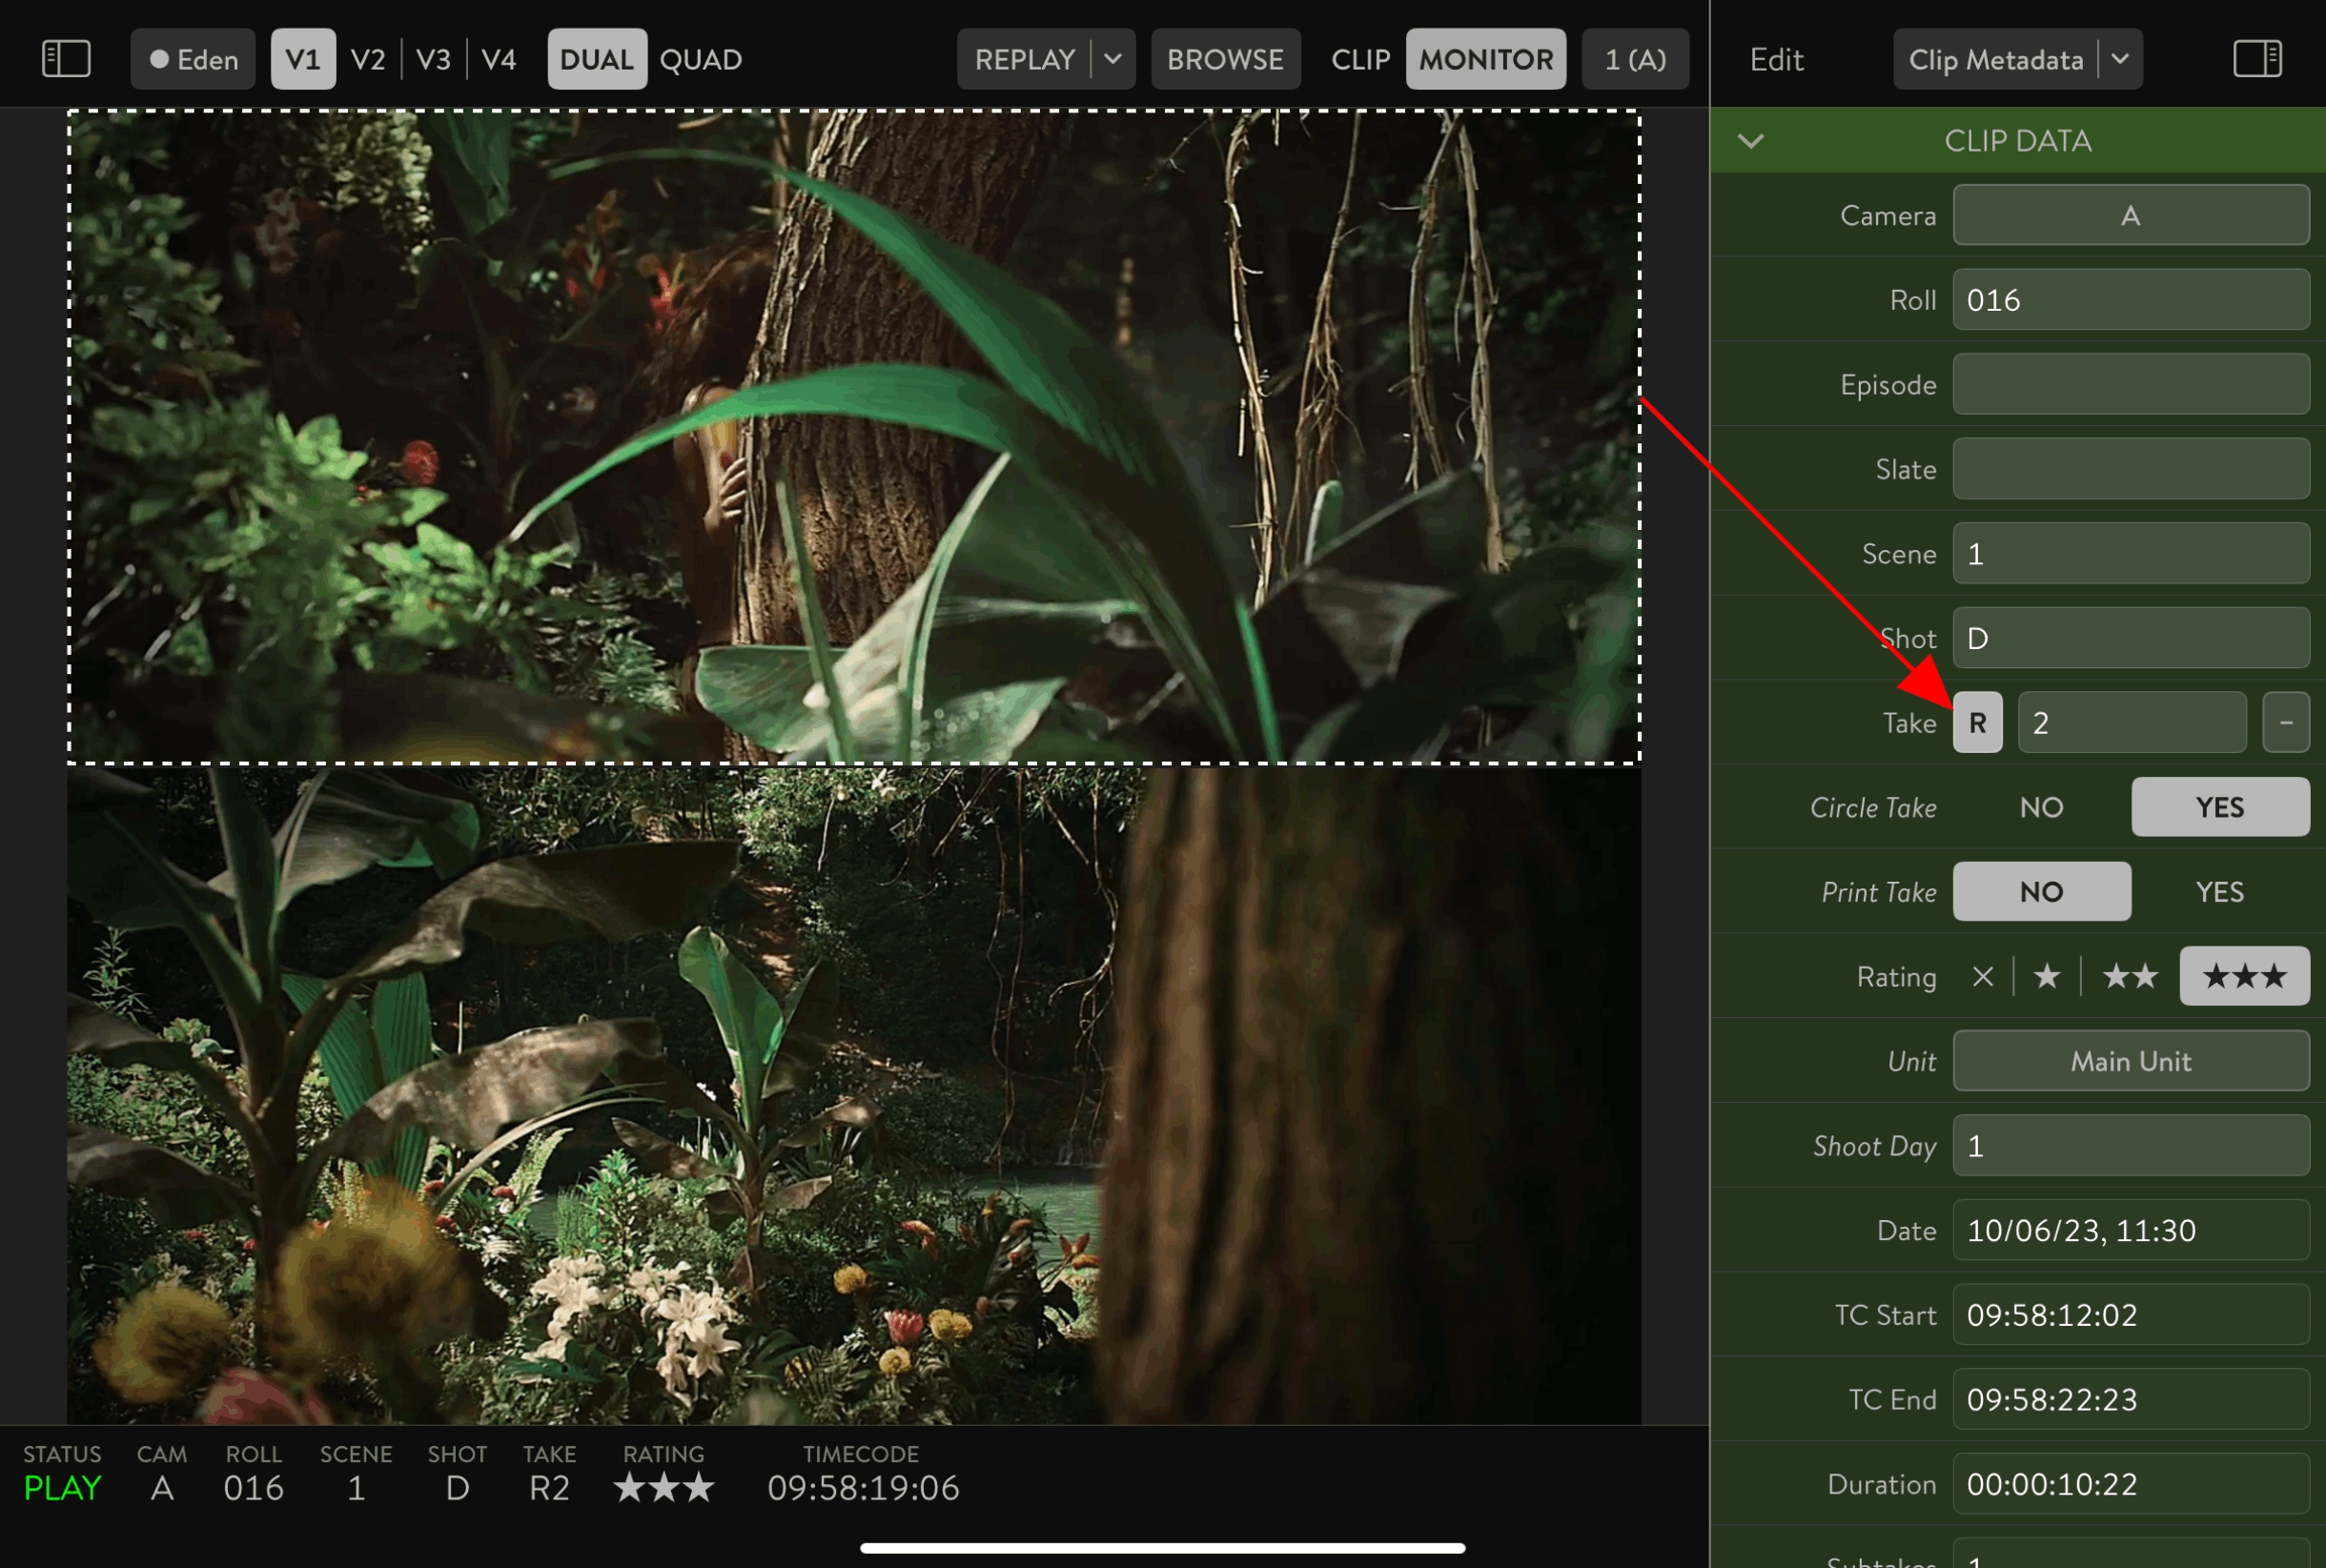
REHEARSAL
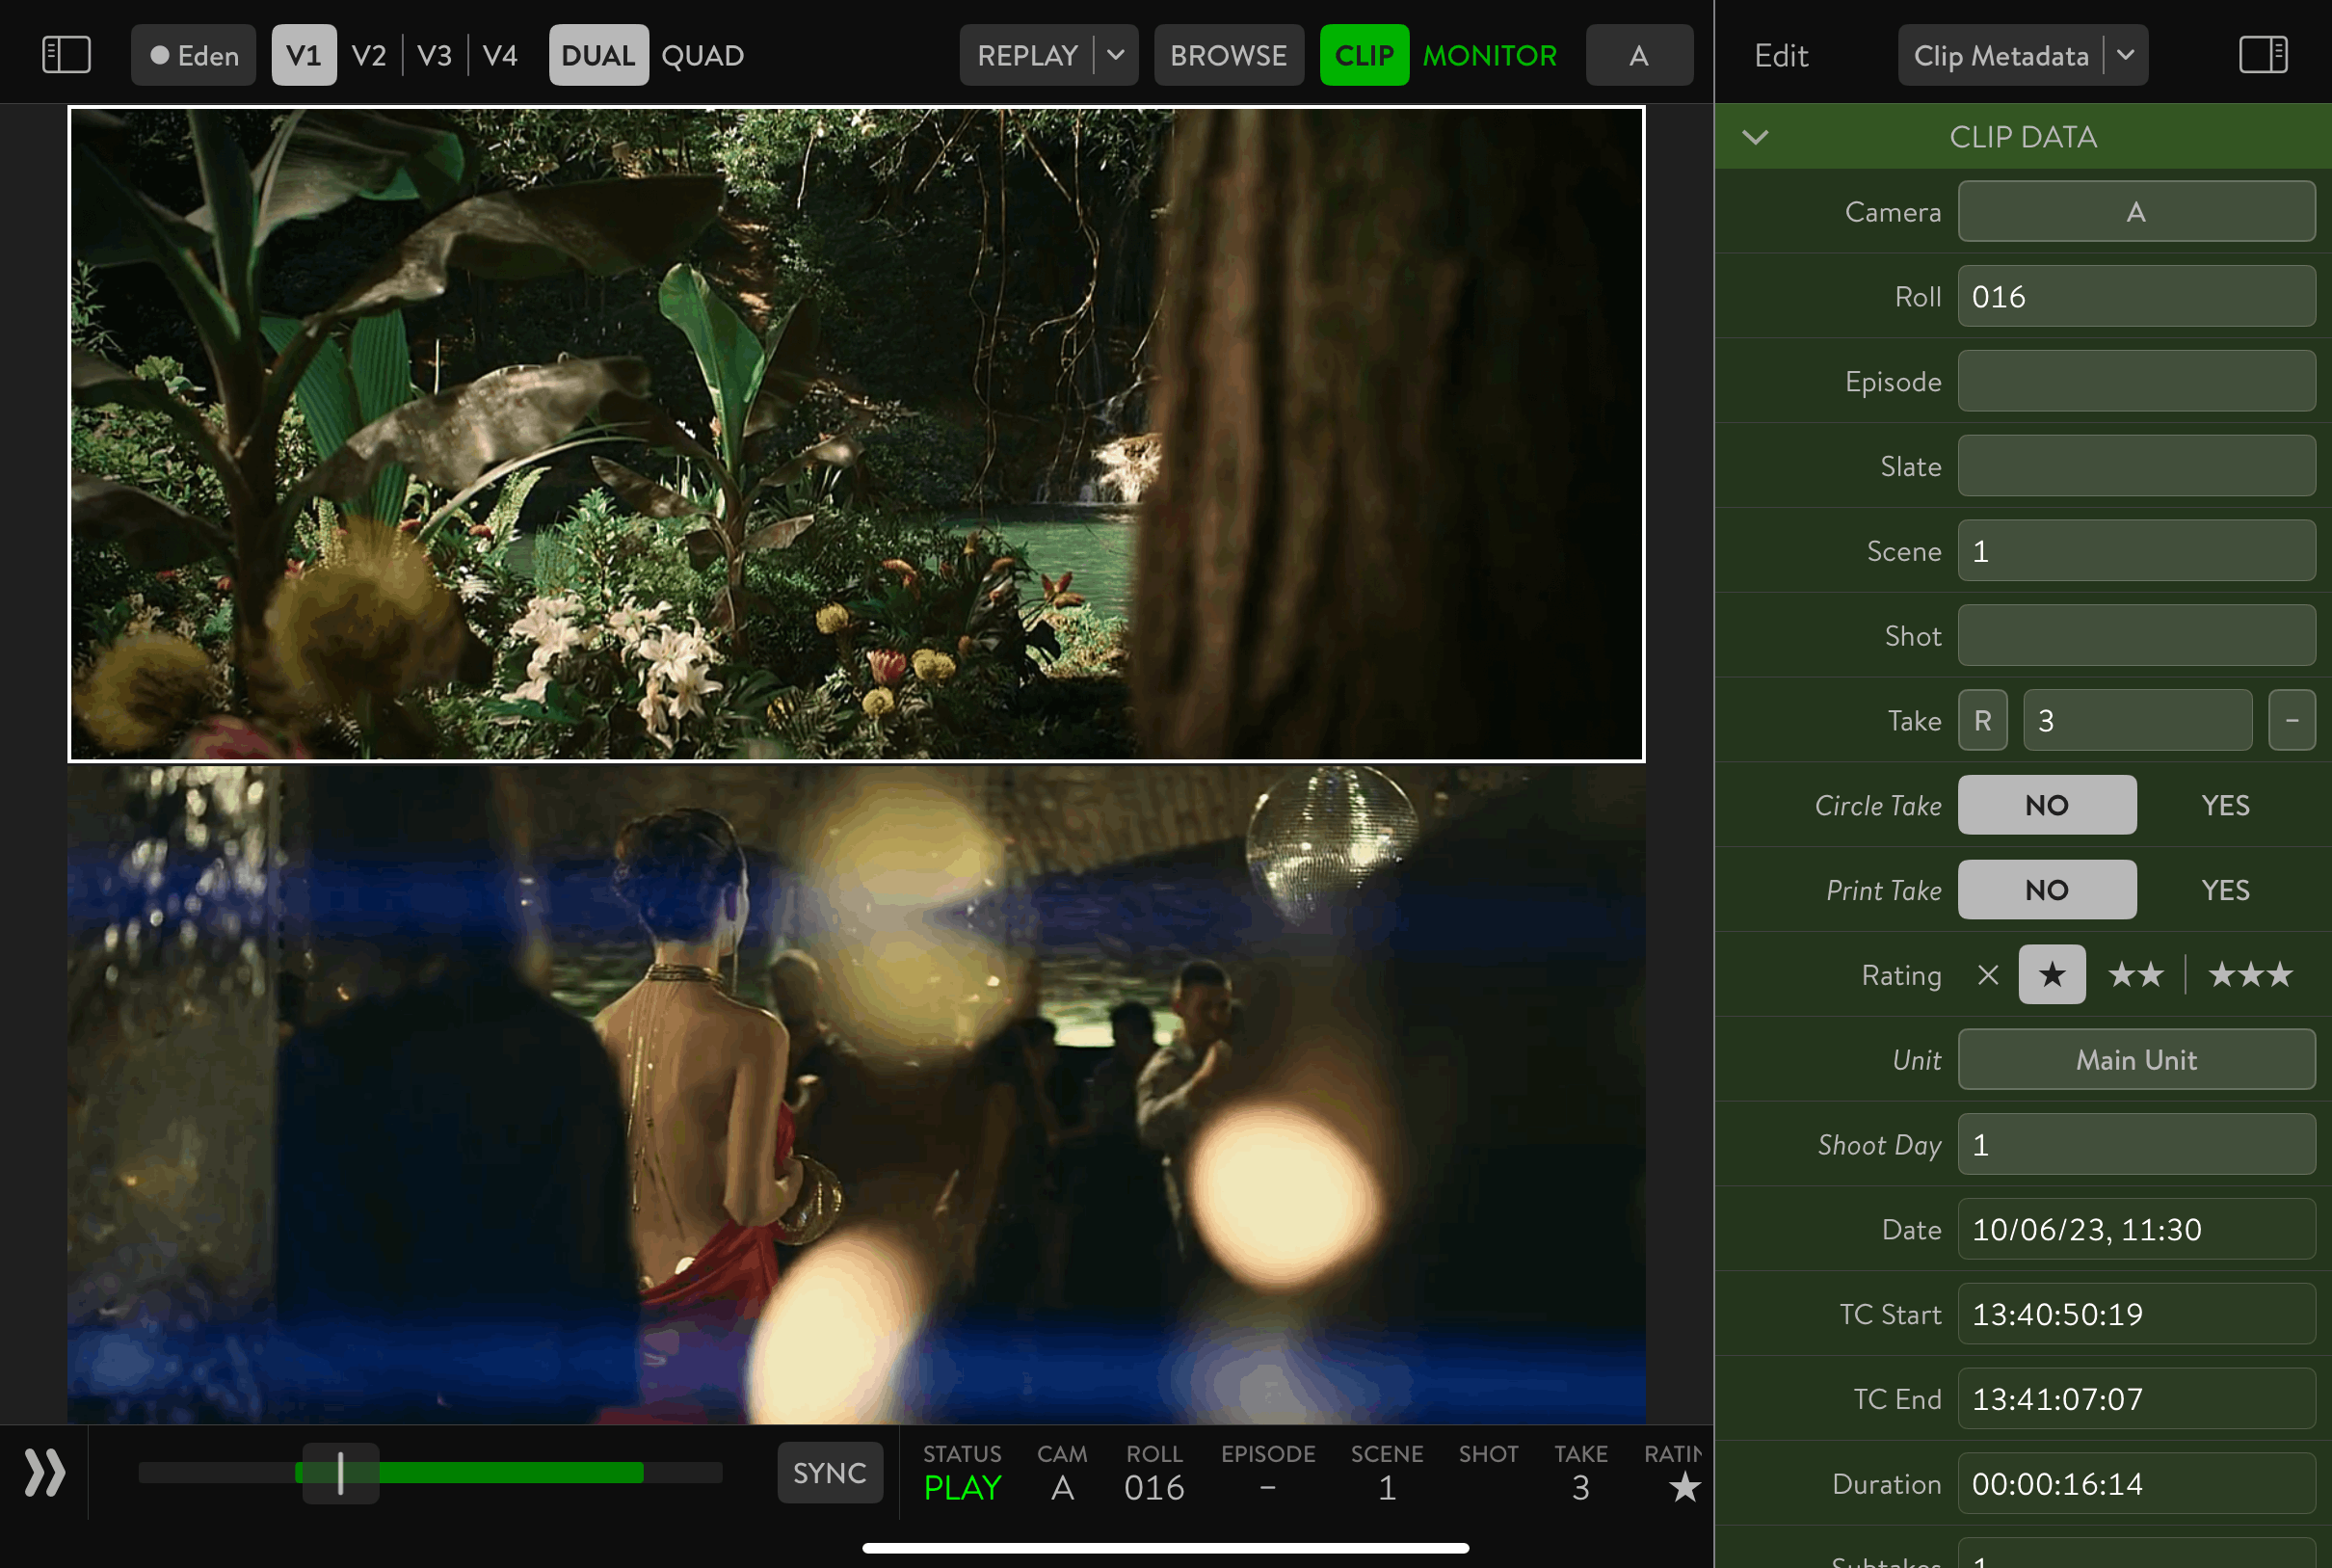
If the CLIP is marked as REHEARSAL in TAKE metadata, the View outline in the View area changes from a solid outline to a dashed outline. QTAKE operator can change this metadata attribute in QTAKE SHOOT ROOM –> CLIP toolbar –> TAKE or QTAKE Monitor user can change it by clicking R in the CLIP metadata TAKE section, considering the user has appropriate permissions granted by the QTAKE Sync administrator (formerly QTAKE Server).
Right Sidebar
Use the top-right button to show sidebar controls. It is a multi-purpose area, and you can switch it between various modes depending on the project type and access permissions.
If any of the options below are not displayed, this could be because your user has not been approved by the QTAKE Sync administrator (formerly QTAKE Server) or the user has no User role assigned.
- Metadata
- Clip Metadata
- Project Metadata
- In-Out Ranges
- Script
- Admin
- Users
- Roles
- Watermark
- Remote Control
- Stream
- Stream Clients
- Stream Settings
- Stream Watermark
- Input
- Camera
- ScreenPort
- View
- FX - Lists all available FXes
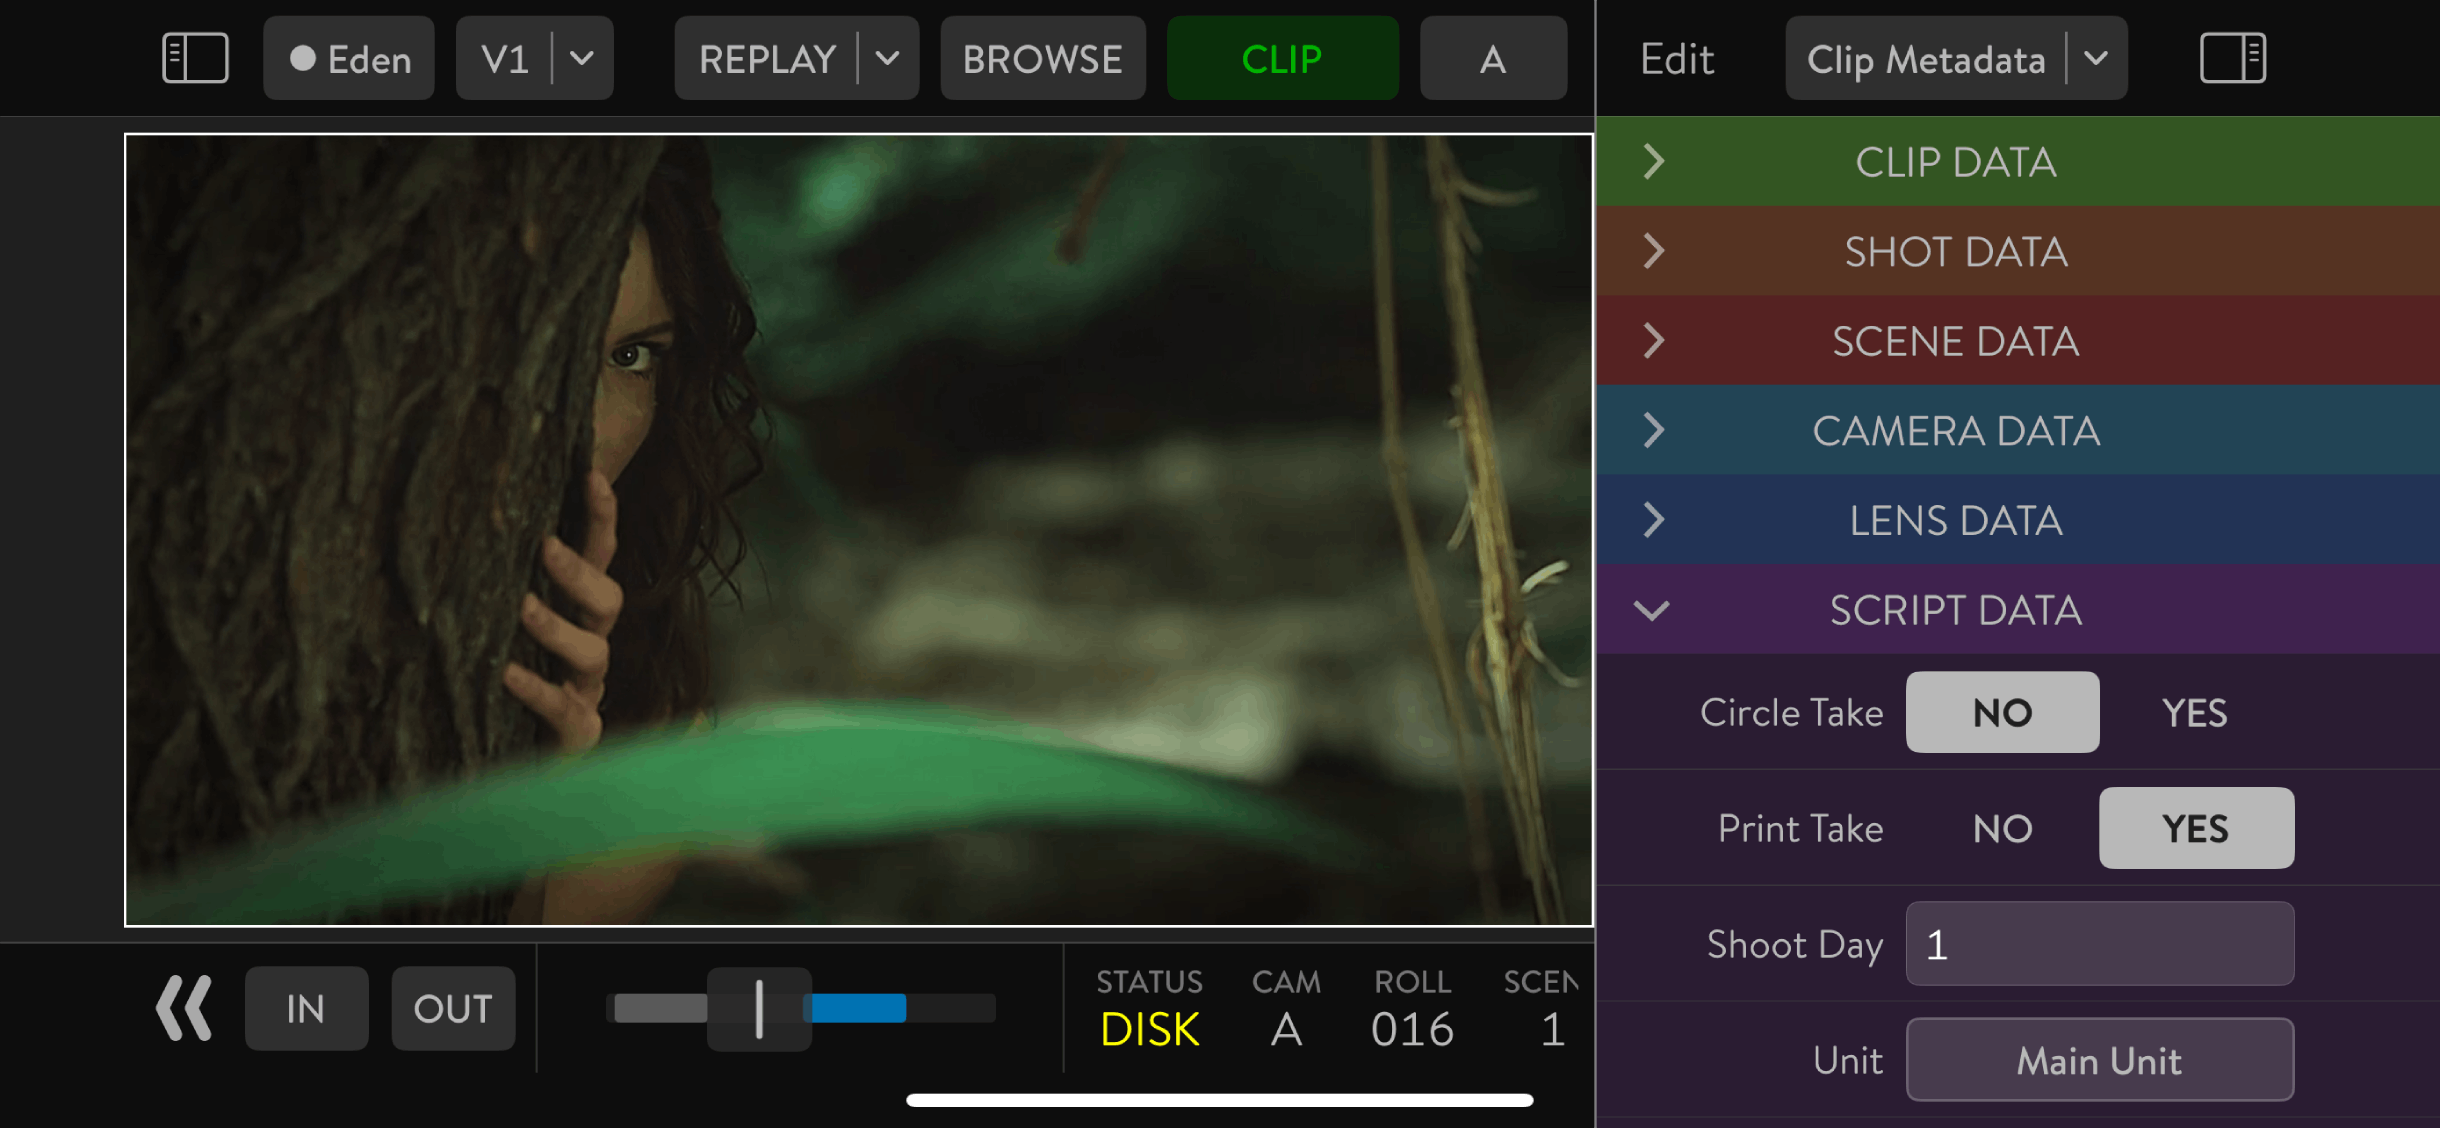
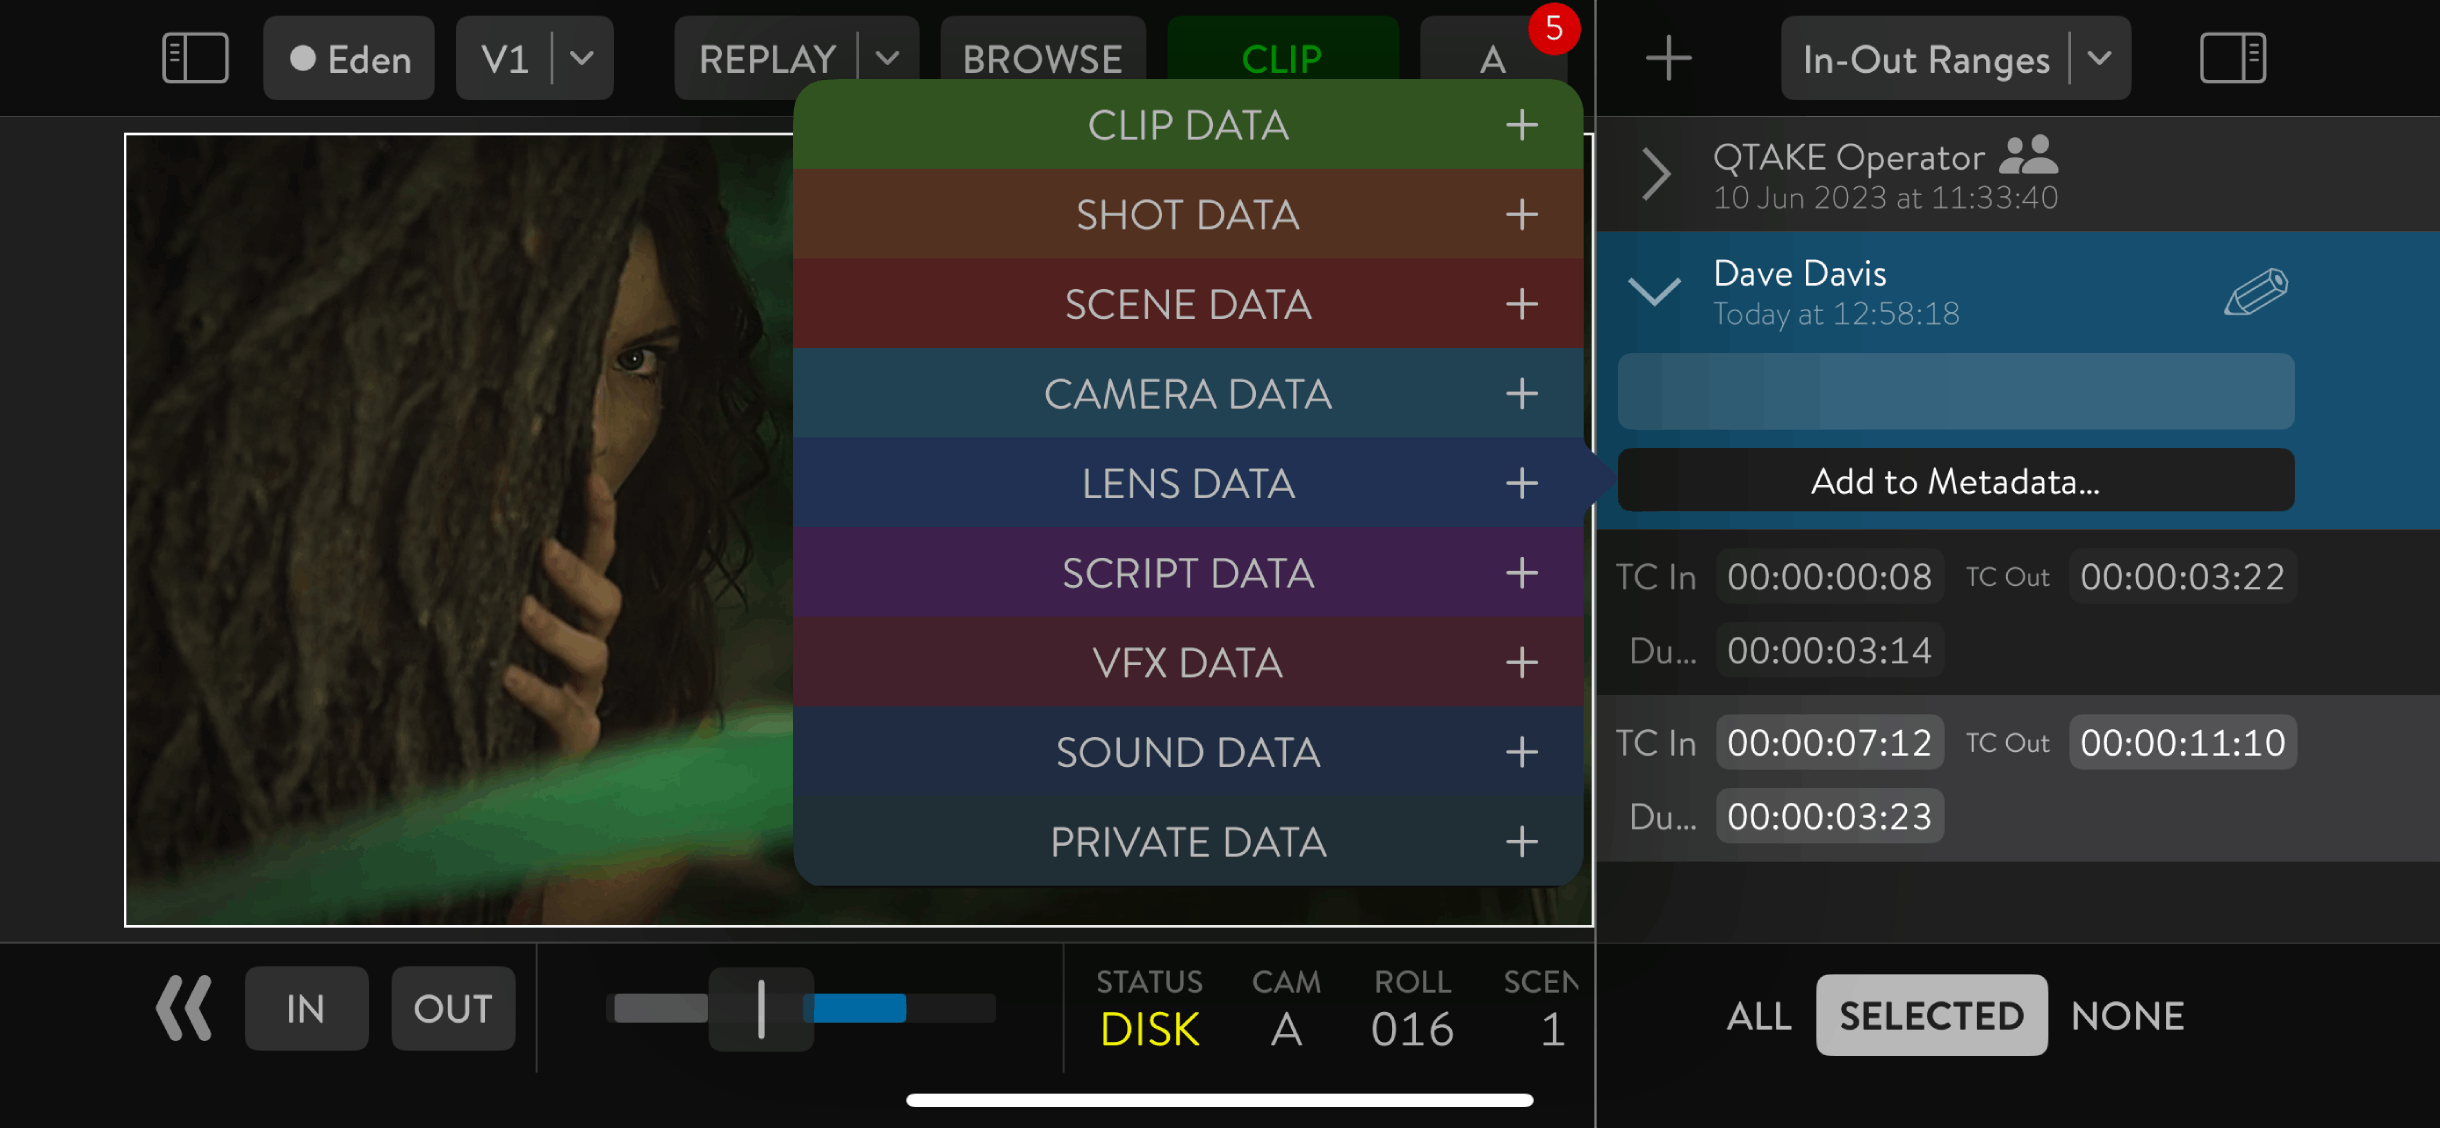
METADATA
The section shows metadata for the active clip or project. Each metadata group uses a different color to make the navigation easier. Access permissions are based on metadata groups. You can have Read, Write, Add, and Remove field permission for each group based on your user role. If you need to edit metadata for multiple clips simultaneously, select clips in the split browser and use the same sidebar option to edit values.
IN-OUT
The IN-OUT sidebar shows in-out ranges for the active clip. Ranges marked by QTAKE Operator are using green color. User ranges are blue. Users can mark a unique range and annotate it with text or a drawing.
ADMIN
If the QTAKE Monitor logged-in user assigned Role has Allow Admin Access privileges granted, the ADMIN sidebar will become available. Use this sidebar to manage clients and devices, assign and edit roles, and edit watermark settings the same way as the QTAKE Sync (formerly QTAKE Server) administrator can. ADMIN sidebar provides three tabs - Users, Roles, and Watermark located at the lower section of the sidebar represented by icons. Each tab provides the same QTAKE Cloud project settings adjustable via the QTAKE Sync app.
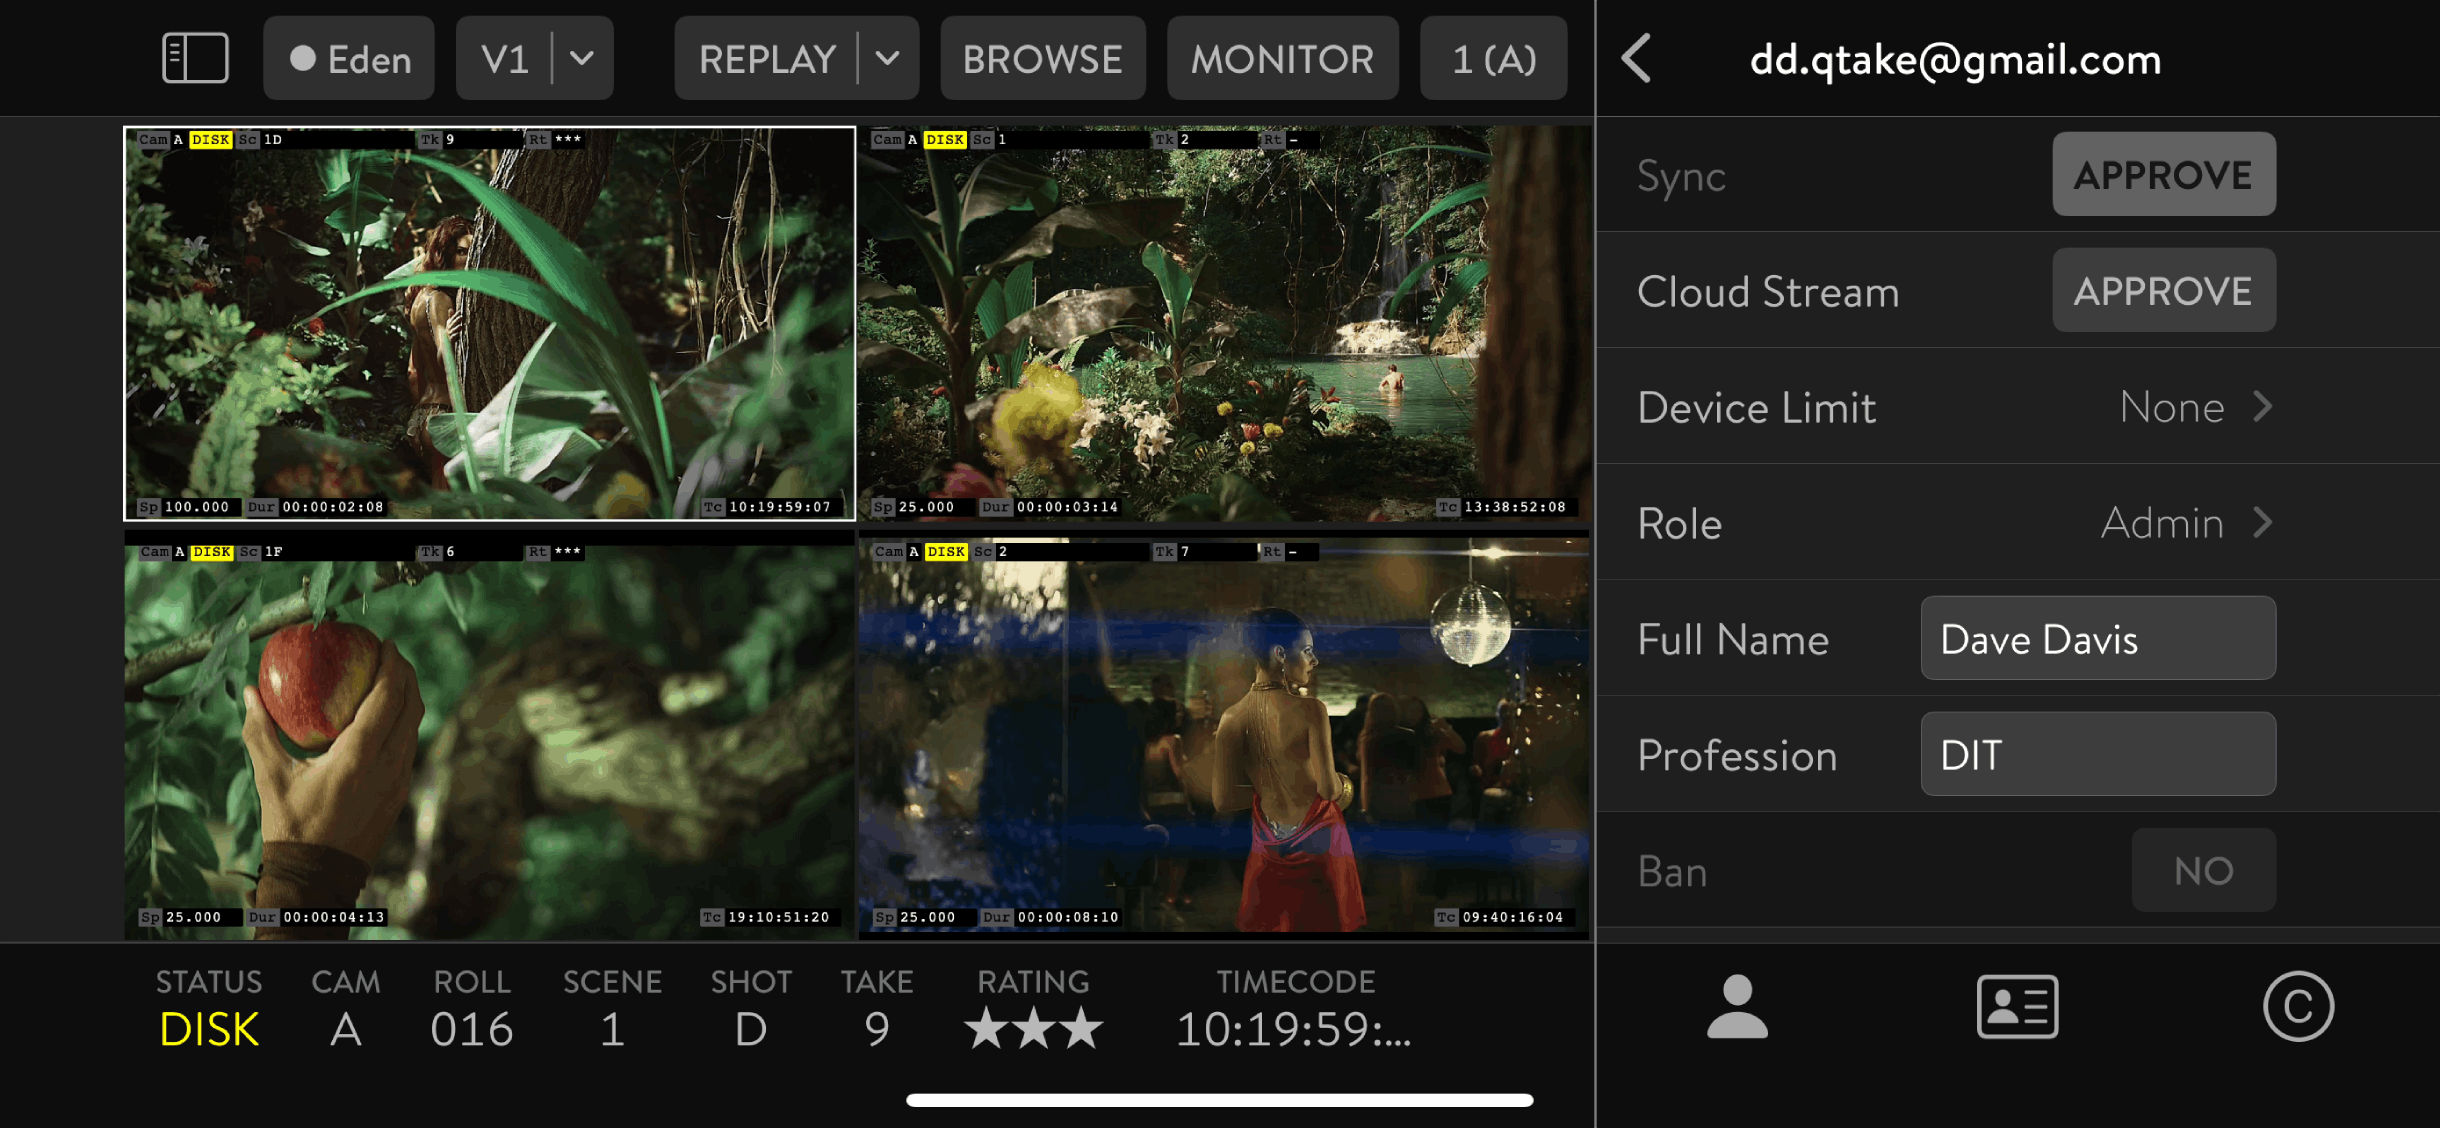
Users
Provides the list of all invited clients with email addresses on the left, and assigned Roles on the right. By taping the client line, additional options will pop up.
- Approve for Cloud Stream
- Device Limit - Defines how many devices with the same account logged in can access the Cloud Stream originating from the QTAKE Monitor device setting this preference.
Options are None, One, Two, or Three. - Assigned Role
- Set Full Name
- Set Profession
- Ban the user
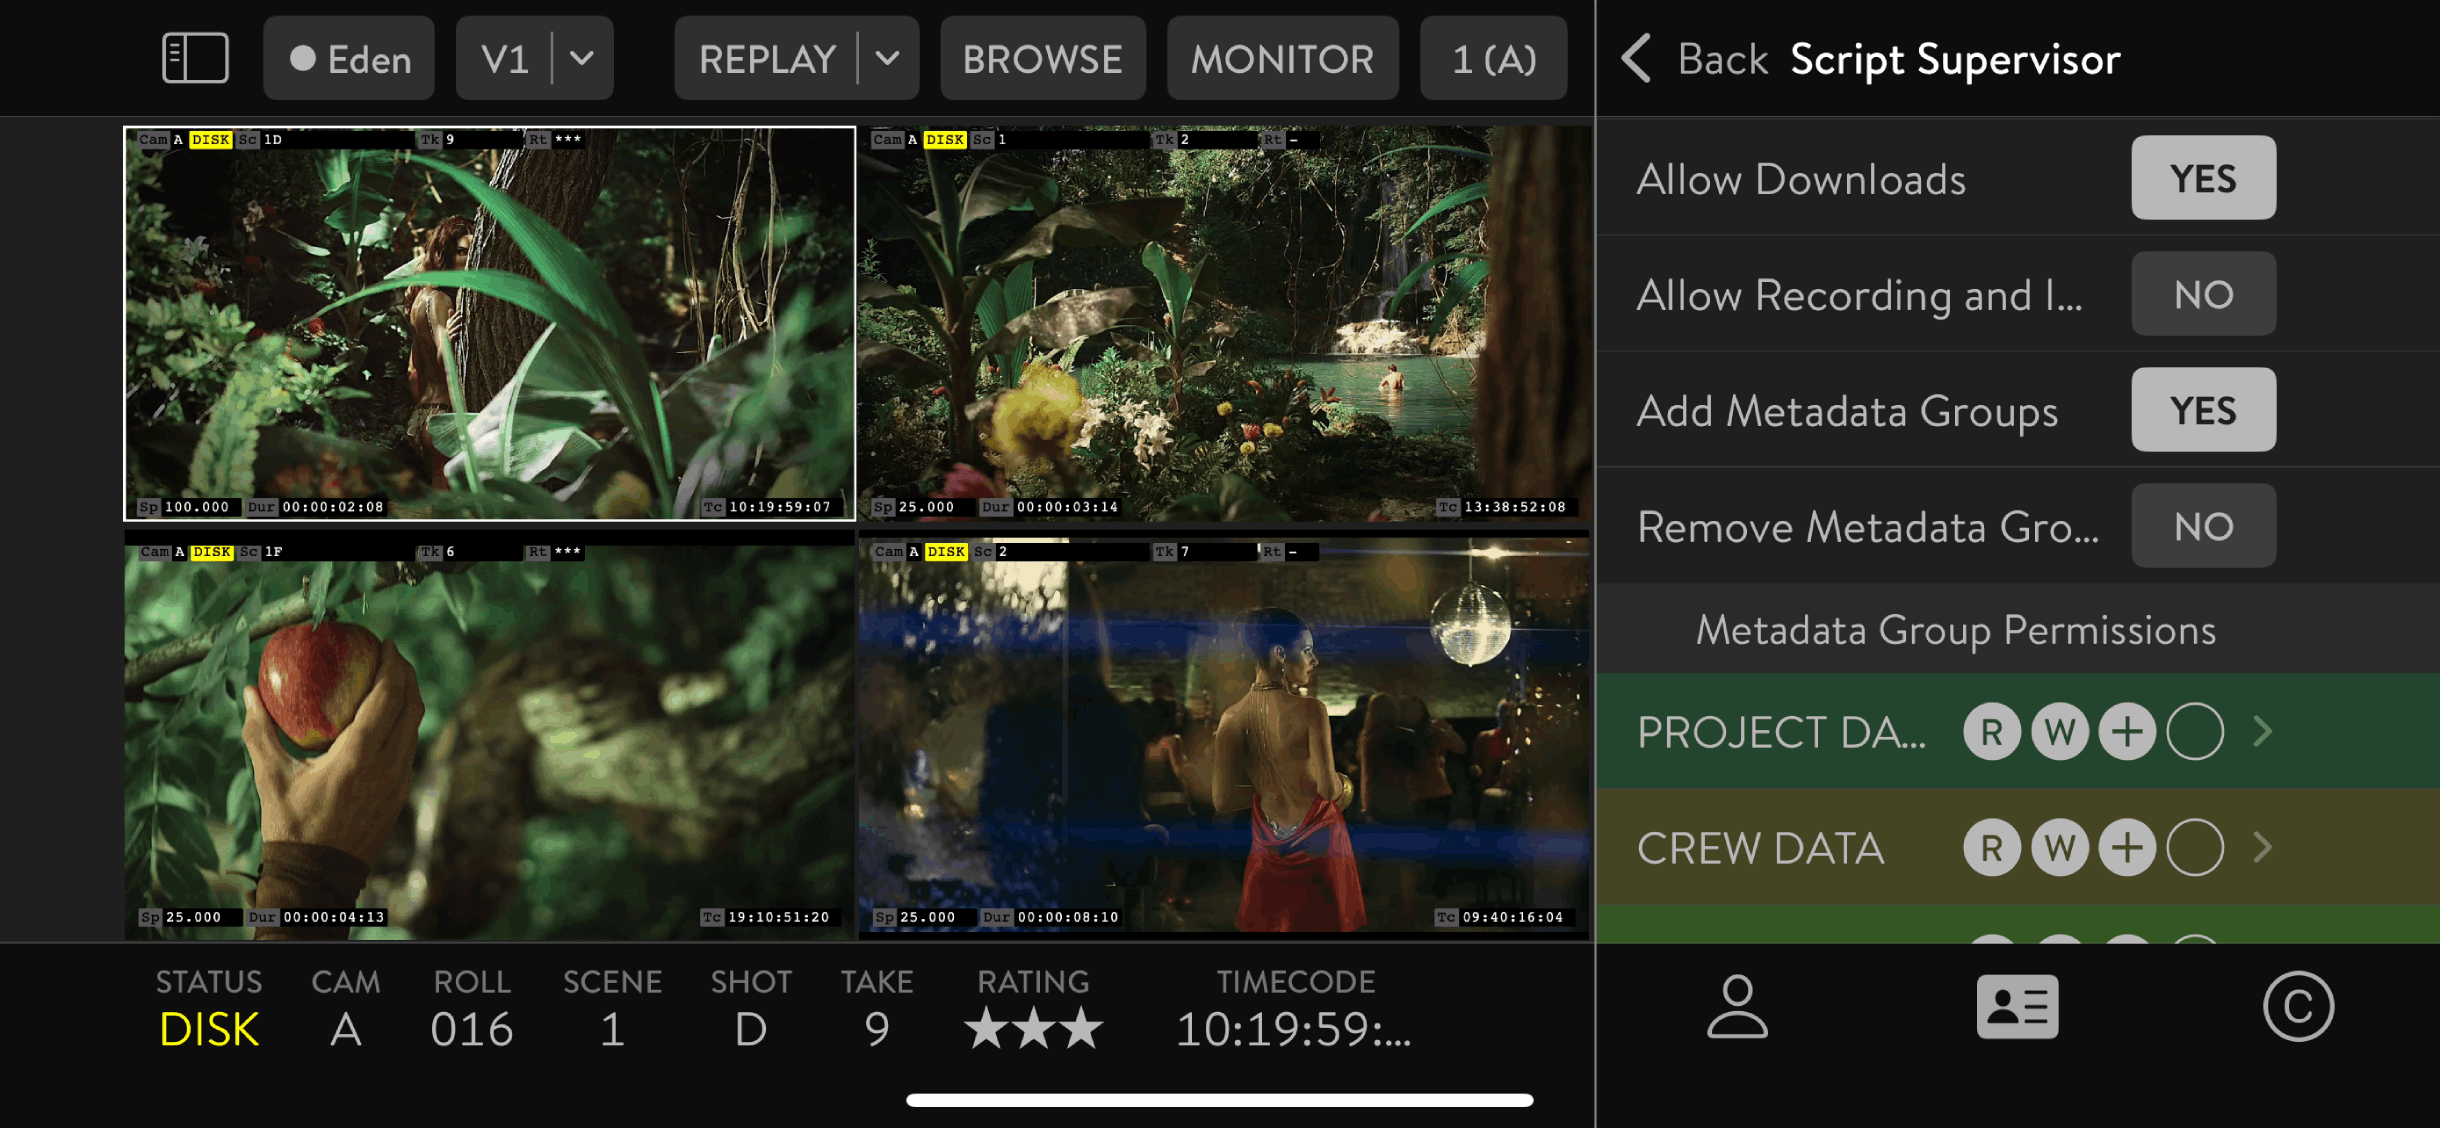
Roles
The Roles tab lists by default pre-defined Roles that cannot be deleted, only edited. To edit the list, tap the Edit button. You can add a new custom Role or remove any custom Role. Pre-defined roles are protected and cannot be removed.
By tapping a Role line, you will enter Role-specific permissions, and you can edit them.
- Require Connection
- No – Connection to QTAKE Cloud or local QTAKE Sync (formerly QTAKE Server) is not required.
- Any Server – Connection to QTAKE Cloud or a local QTAKE Sync is required.
- Local Server – Connection to a local QTAKE Sync is required.
- Require Passcode – Client devices must be protected by a passcode or password to use the app.
- Allow Admin Access – Grants permission to access the ADMIN menu from the QTAKE Monitor sidebar.
- Allow Screenshots – Grants permission to take screenshots of views. If a Role does not have this permission, it also affects system-level screenshots and screen recording – the views will be blacked out.
- Watermark – Watermark configuration.
- Allow Downloads – Allow clip downloads and caching into internal app storage.
- Allow Recording and Import
- Add Metadata Groups – Allows creating custom metadata groups.
- Remove Metadata Groups – Allows removing custom metadata groups.
Below the permissions, you will see the list of default metadata groups and currently granted permissions for that group. Tap a group name to manage permissions for the Metadata group. You may grant permission to Read, Write, Add Fields (add custom Metadata items within the group), Remove Fields (remove custom Metadata items within the group), and assign color to the group.
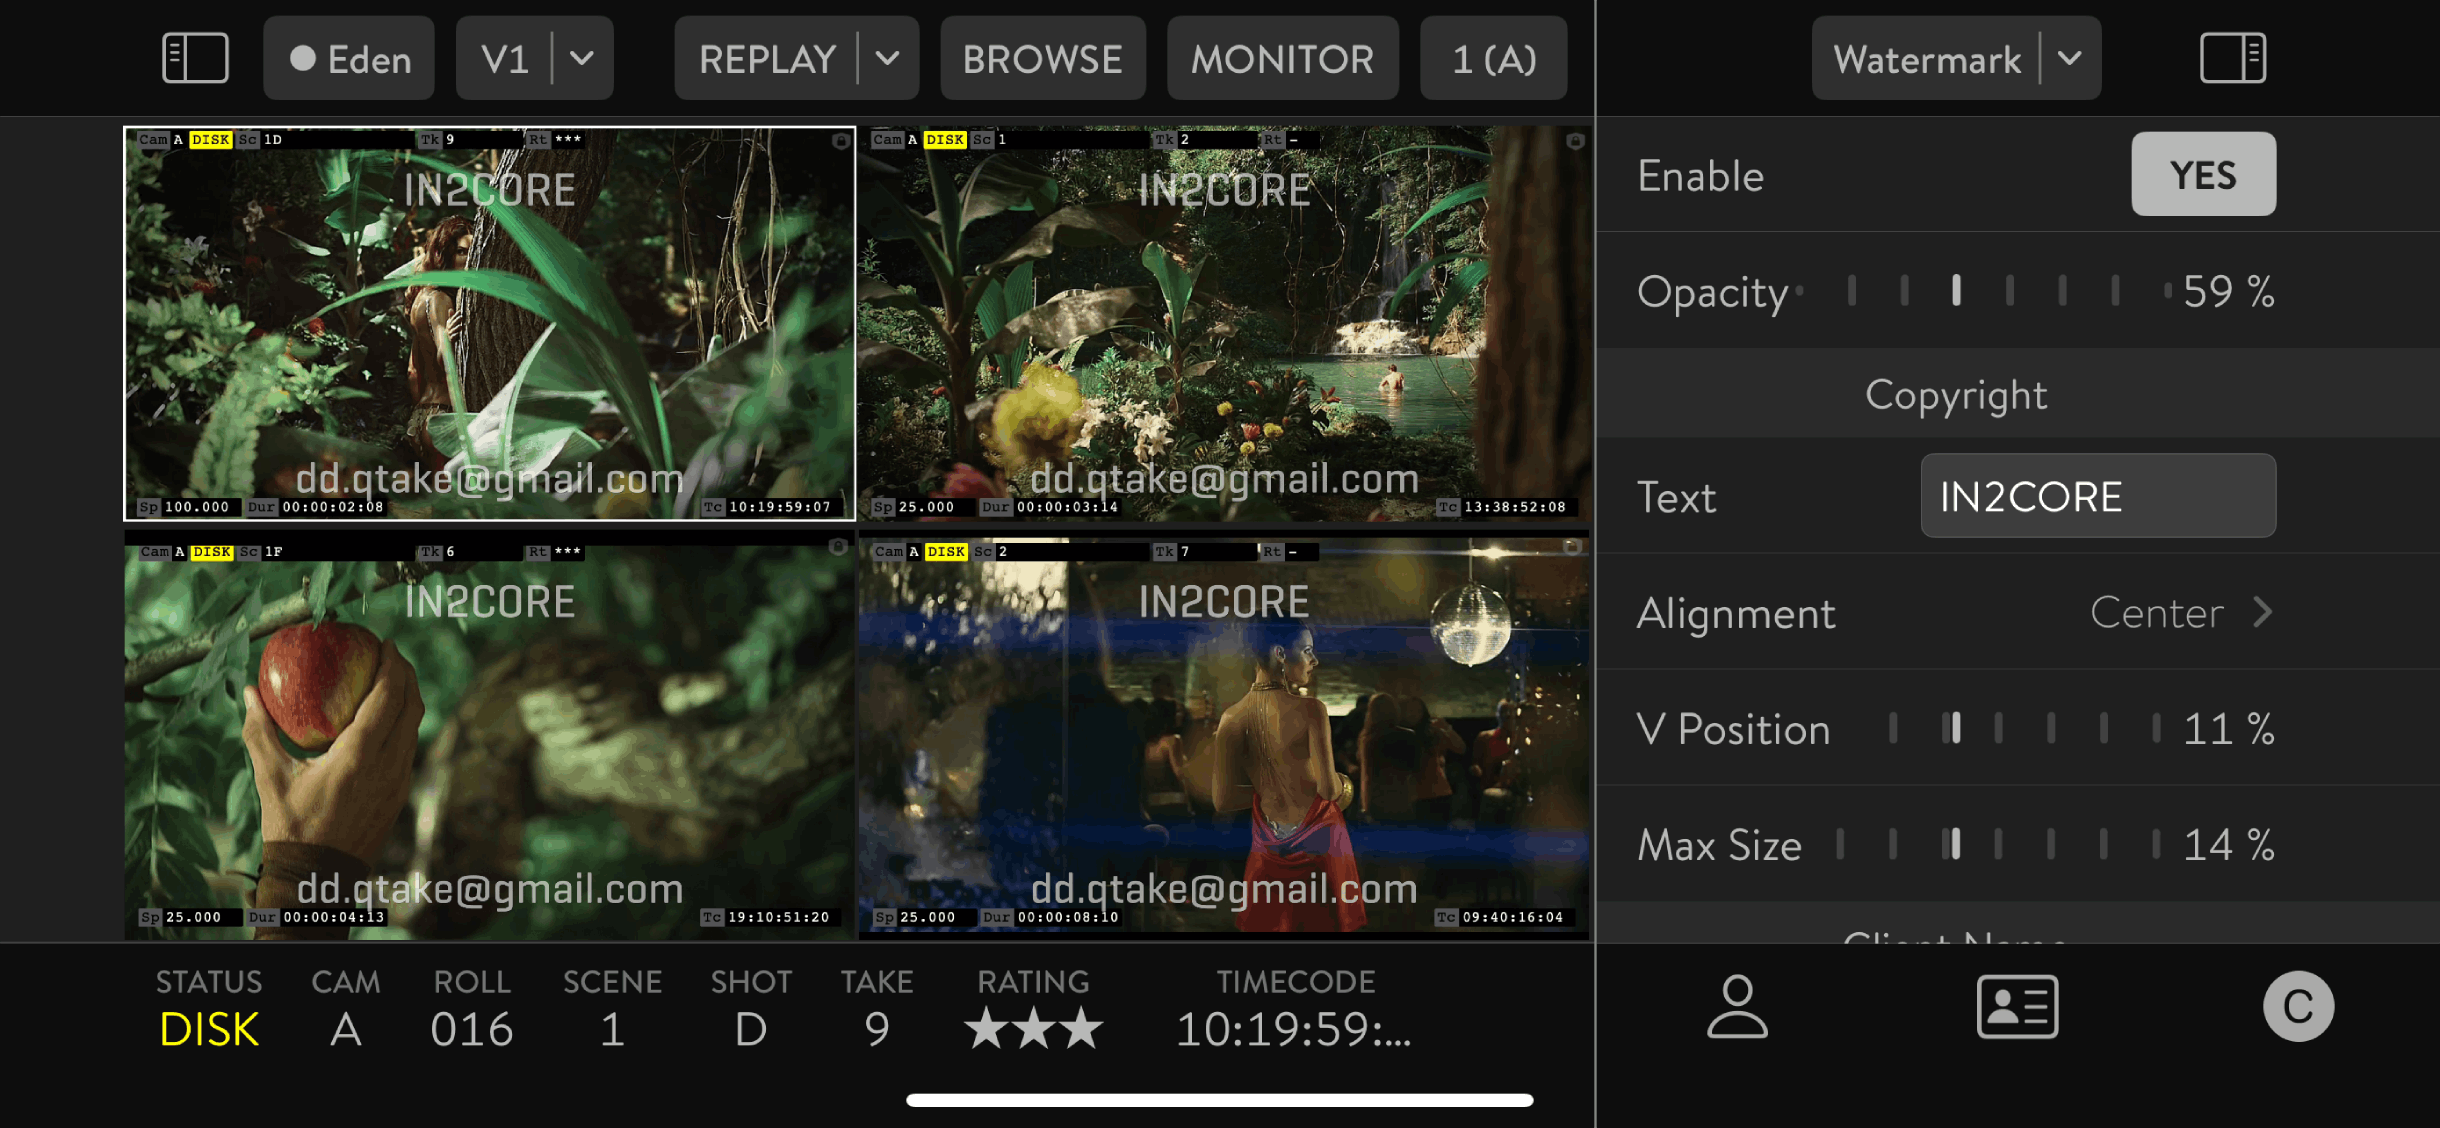
Watermark
By tapping the Enable button, you will activate the QTAKE Stream watermark.
You can adjust Opacity, Text, Alignment, Vertical Position, and Max Size.
Additionally, you can adjust the Client’s name Alignment, Vertical Position, and Max Size.
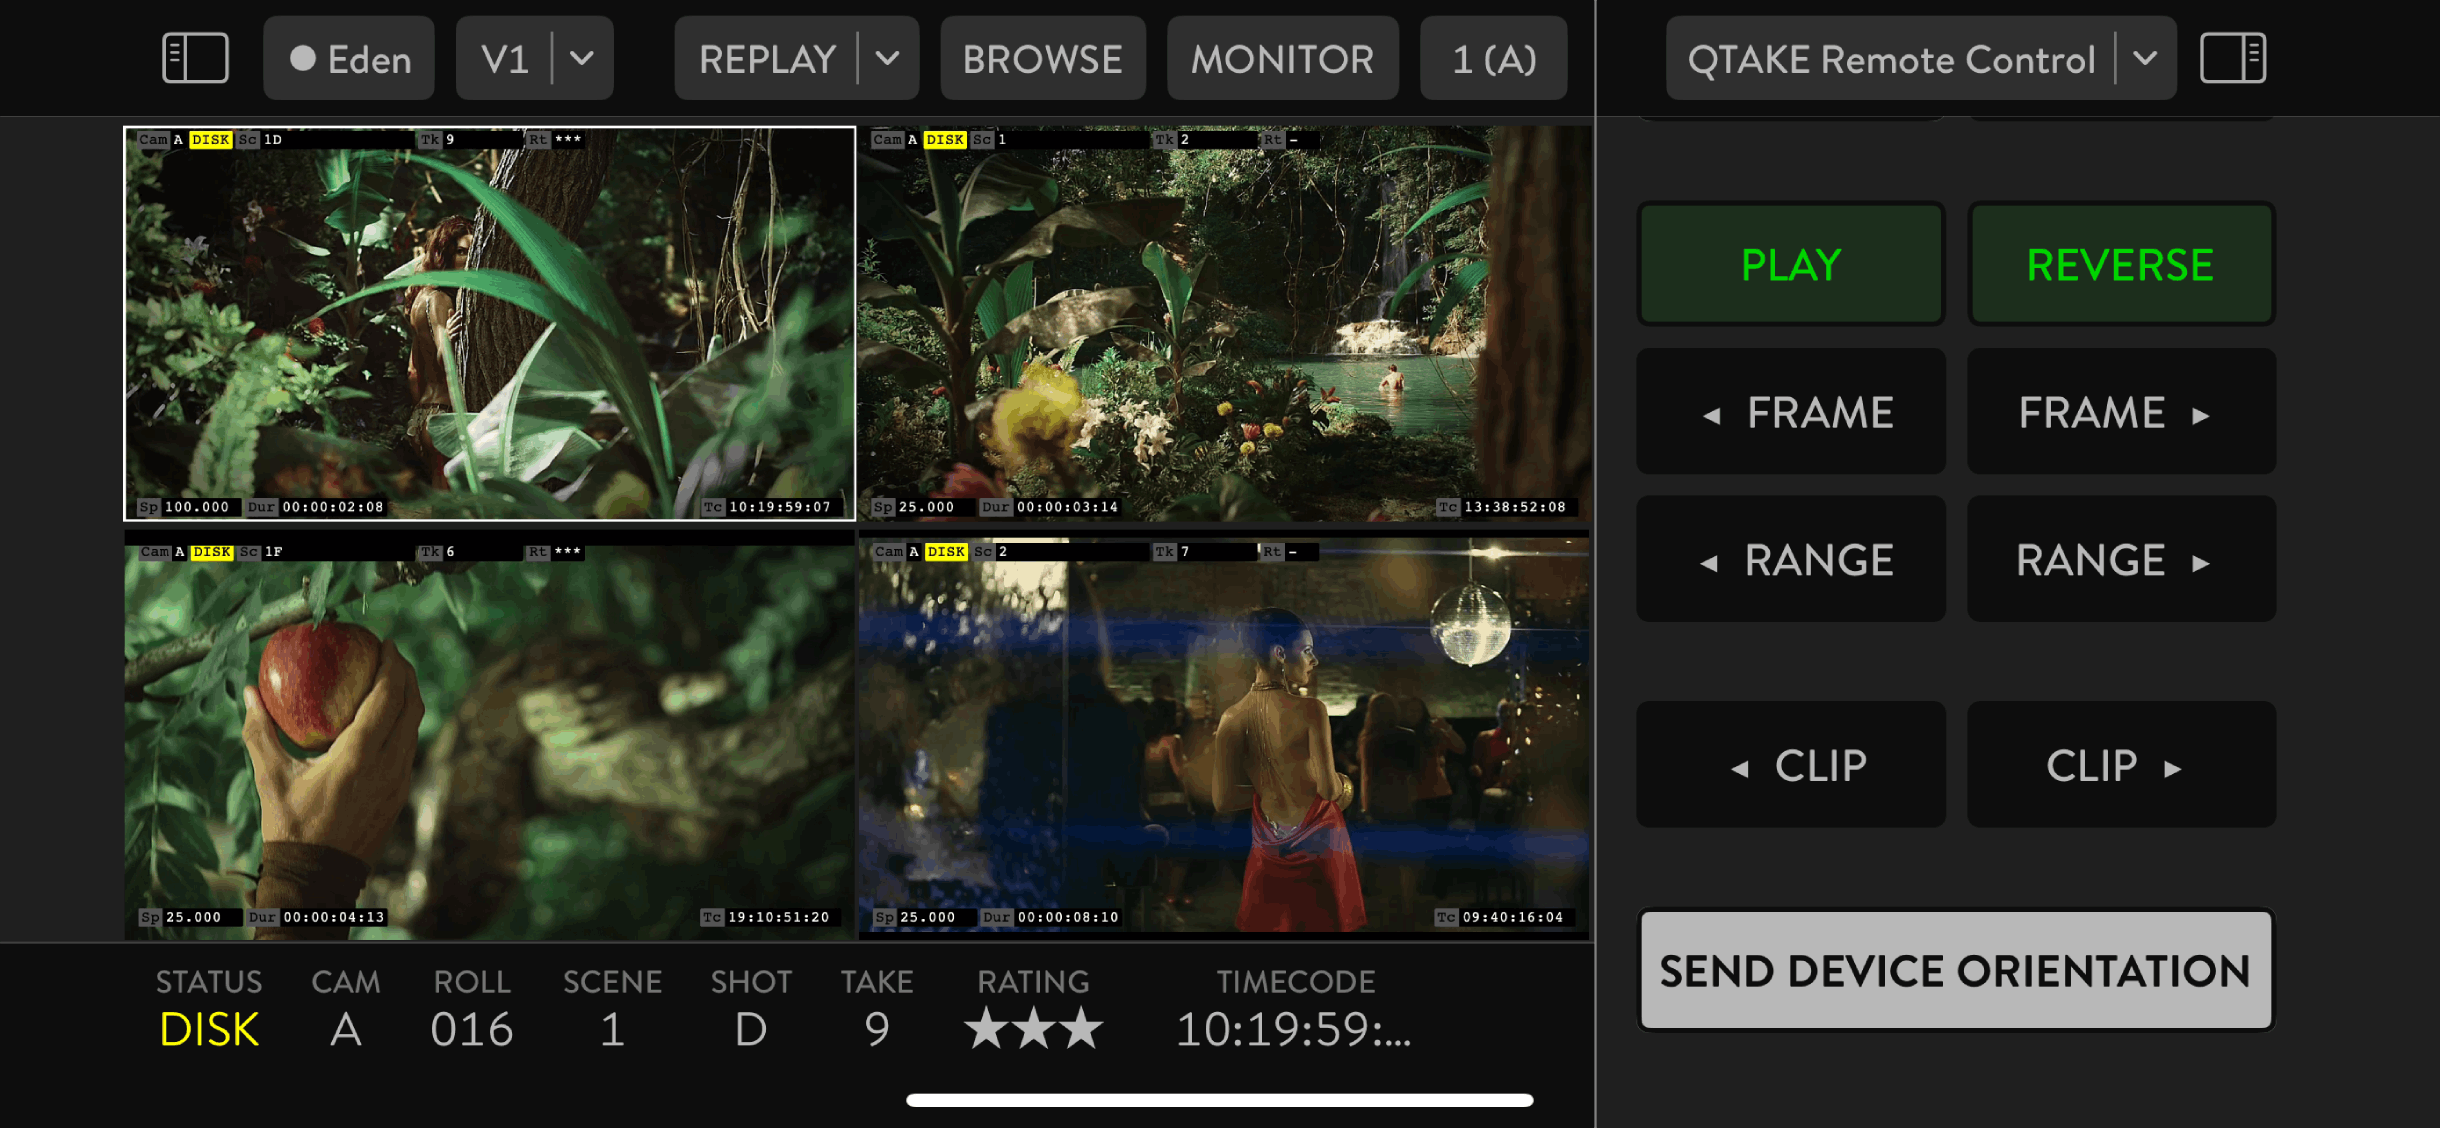
Remote Control
In case you want to control QTAKE using an iOS device or another Mac, you can use QTAKE Monitor sidebar called QTAKE Remote Control. This sidebar provides basic functions, such as switching between LIVE and DISK modes, recording and playback commands. Additionally, there is a SEND DEVICE ORIENTATION button, which is used with VR VIEW effect in QTAKE as an affordable motion tracking system. QTAKE Monitor will use the orientation sensors of your iOS device to track the rotation of the device and send this data over the network in real-time to position a virtual camera in QTAKE.
The Remote Control sidebar is available in both MONITOR and CLIP modes. However, in CLIP mode, the currently loaded clip must be a clip created by the QTAKE system you are trying to control. Note that when not viewing the stream, you will not see the result of the commands you invoke. To send remote control commands and see the result in your view, use MONITOR mode.
STREAM
You can turn QTAKE Monitor into a streaming device as it features the stream into QTAKE Cloud option STREAM sidebar provides three tabs - Stream Clients, Stream Settings, and Watermark located at the lower section of the sidebar, represented by icons.
Note that the QTAKE Monitor logged-in user must have Allow Streaming privileges granted for his assigned Role to have the STREAM option in the sidebar.
Stream Clients
This tab has the global Enable Stream button, which activates the QTAKE Monitor Cloud Stream function.
The majority of the tab space takes the list of clients.
Each line represents one invited client.
You can Approve clients by tapping the empty circle at the beginning of the client line.
By tapping the ticked circle, you will disapprove the client.
Tap the client name to enter client-specific options:
- Approve for Cloud Stream
- Device Limit - Defines how many devices with the same account logged in can access the Cloud Stream originating from the QTAKE Monitor device setting this preference.
Options are None, One, Two, or Three. - Assigned Role
- Set Full Name
- Set Profession
- Ban the user
There is a plus button at the top left corner of the sidebar.
Tap on it to invite clients.
You will be asked to enter a client’s email address.
The Done button, located at the top right corner, will hide the sidebar.
If the client’s email address is not a registered QTAKE account, a client will have the option to register.
Stream Settings
This tab features the global Enable button, which activates the QTAKE Monitor Cloud Stream function.
QTAKE Monitor can stream a maximum of two Views at the same time. Depending on the app’s Number of Views setting, you will see all available Views listed. Set the Views you want to stream to YES.
Additionally, you can
- Allow Stream Passthrough
- Set the Maximum Size of the stream
- Set Bit Rate
The status section provides general Cloud Stream information:
- Last Updated
- Data Usage current QTAKE Credits consumption
- Data remaining QTAKE Credits remaining balance
Watermark
On top of Admin watermark settings, you can adjust the watermark from this sidebar option as well.
INPUT
On top of QTAKE and QTAKE Cloud stream, QTAKE Monitor can ingest input from your device camera or ScreenPort connected to the same Local Area Network or via USB. Select the View you want to display the stream in and tap the SELECT VIEW SOURCE button. Under the DEVICE section, you will see available Camera and SP followed by the last three digits of a serial number. Once you load an input device stream into View, the INPUT button will be displayed in the sidebar.
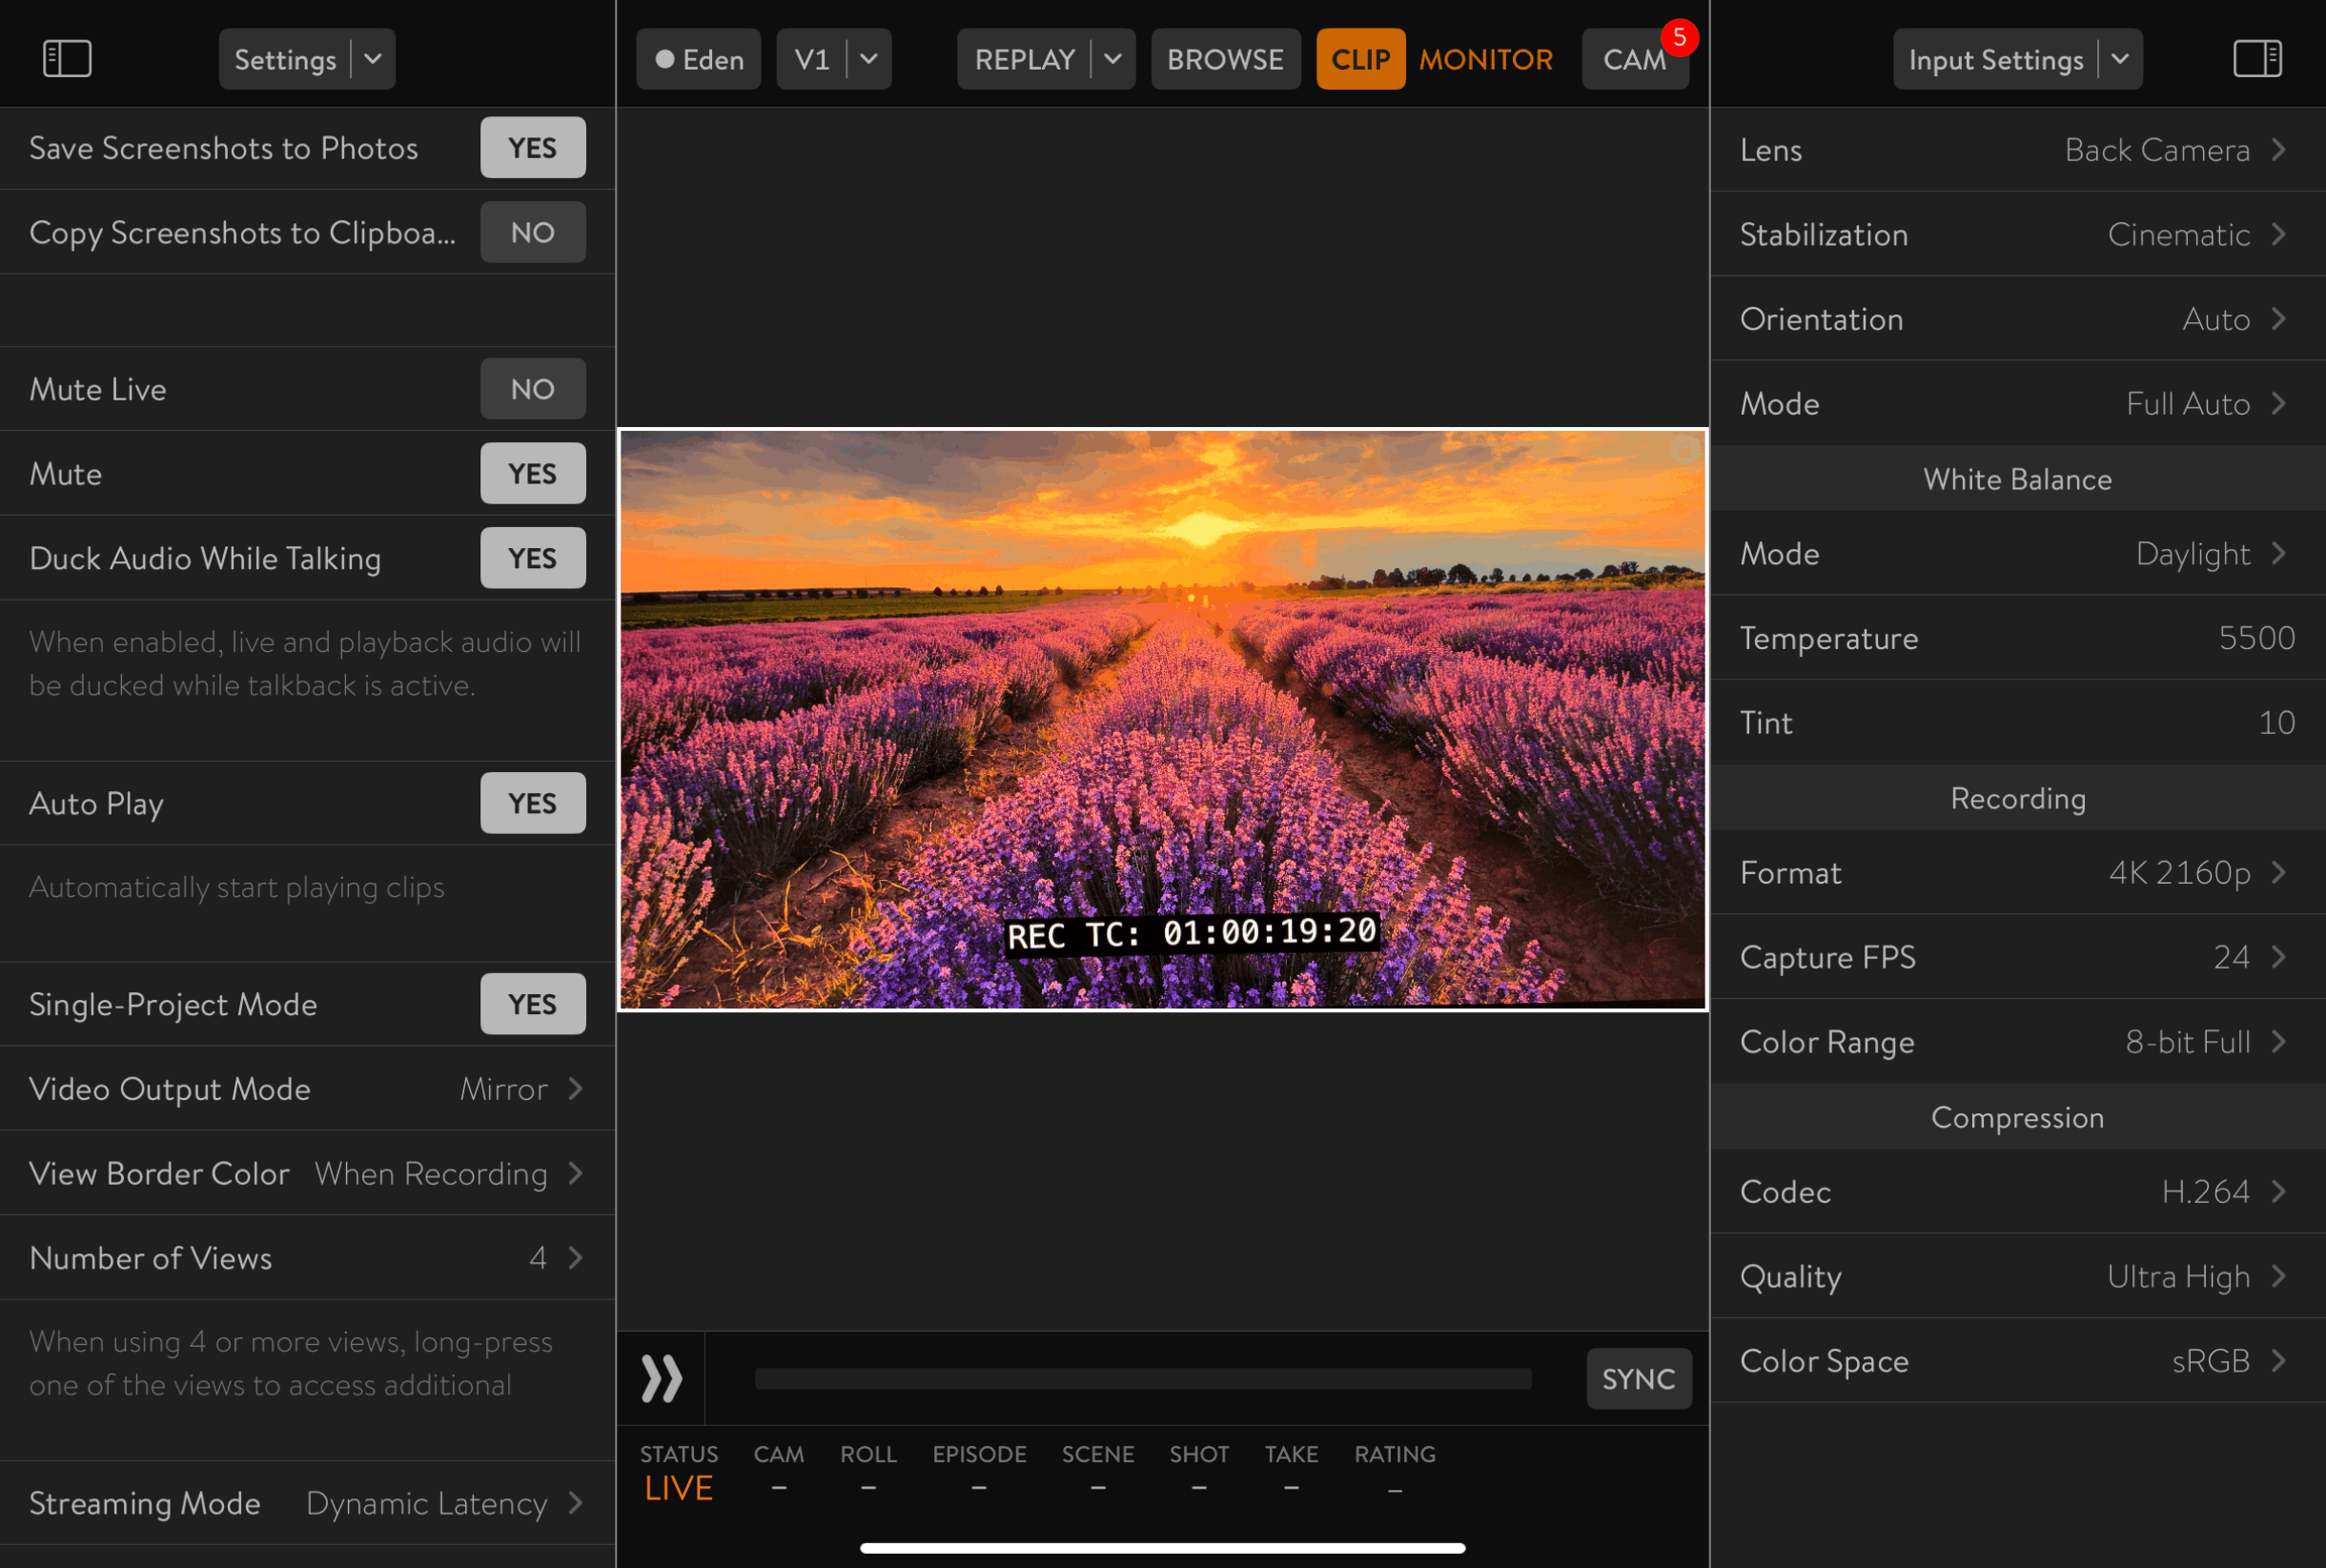
Camera
Camera input options include Camera options, White Balance options, Recording options, and Compression options.
For more details on camera settings, see the Camera UI section.
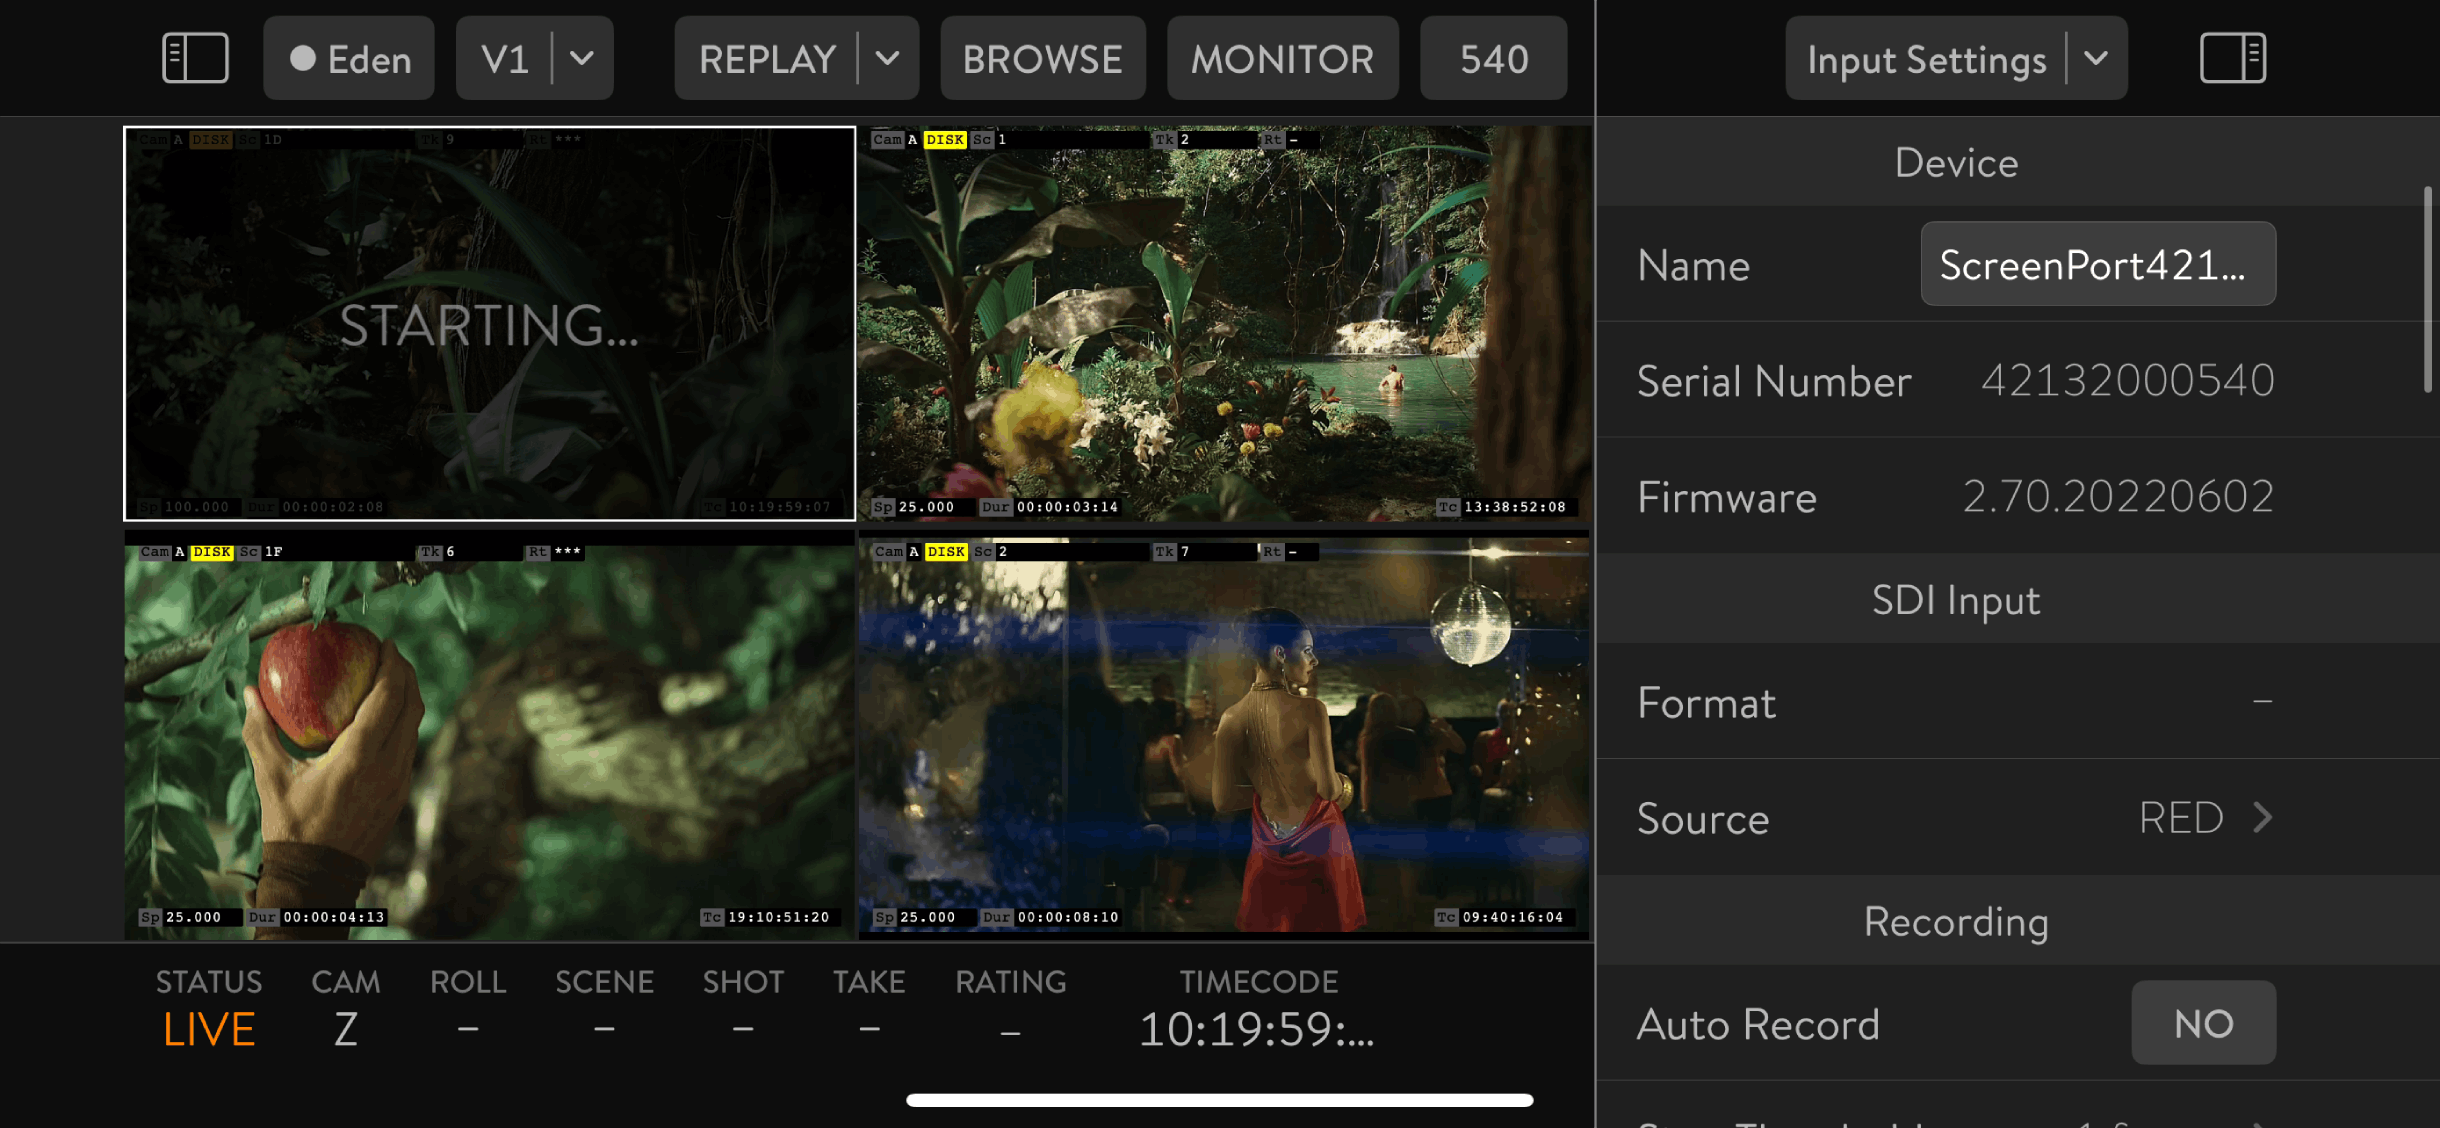
ScreenPort & MetaCoder
When a ScreenPort or MetaCoder is connected to the same Local Area Network as your iOS or macOS device running the QTAKE Monitor app or connected via USB, you will have the option to ingest ScreenPort stream into a View. The INPUT sidebar options will have all ScreenPort control options like the ScreenPort app.
- Device
- Name - Device name
- Serial Number - Device serial number
- Firmware - Device firmware version
- SDI Input
- Format - Detected input video format
- Source - Define the video input camera model for correct SDI data reading
- Auto
- ARRI Alexa
- RED
- Sony F55
- Sony F65
- Canon
- Panasonic
- Other
- Recording
- Auto Record - This option enables auto-recording based on the REC flag received via SDI metadata. Make sure to set the SDI Input Source
- Stop Threshold - Set this to the number of frames by which you wish to delay the recording stop. It can add robustness in bad signal conditions
- 0 - 5 frames
- Video
- Codec
- H.264
- HEVC
- Mode
- CBR
- VBR
- Bit Rate
- Codec
- Audio
- Input
- SDI embedded audio
- Audio In connector
- Codec
- LPCM
- Opus
- Bit Rate
- Input
- IP Address
- Ethernet
- Automatic - received from a DHCP server
- Manual - manually set static IP address
- Access Point mode - can serve up to 8 clients
- Ethernet
- Wi-Fi - You can enable Wi-Fi connection. If enabled, you will see a list of available Wi-Fi networks
- Access Point - You can enable AccessPoint mode. If enabled, ScreenPort serves as a DHCP server for up to 8 Wi-Fi-Connected. You can set:
- SSID
- Security - None, WPA, WPA2, WPA/WPA2
- Mode - 2.4 GHz, 5 GHz
- Channel - Wi-Fi channel
- Country
- Address Range - IP address range
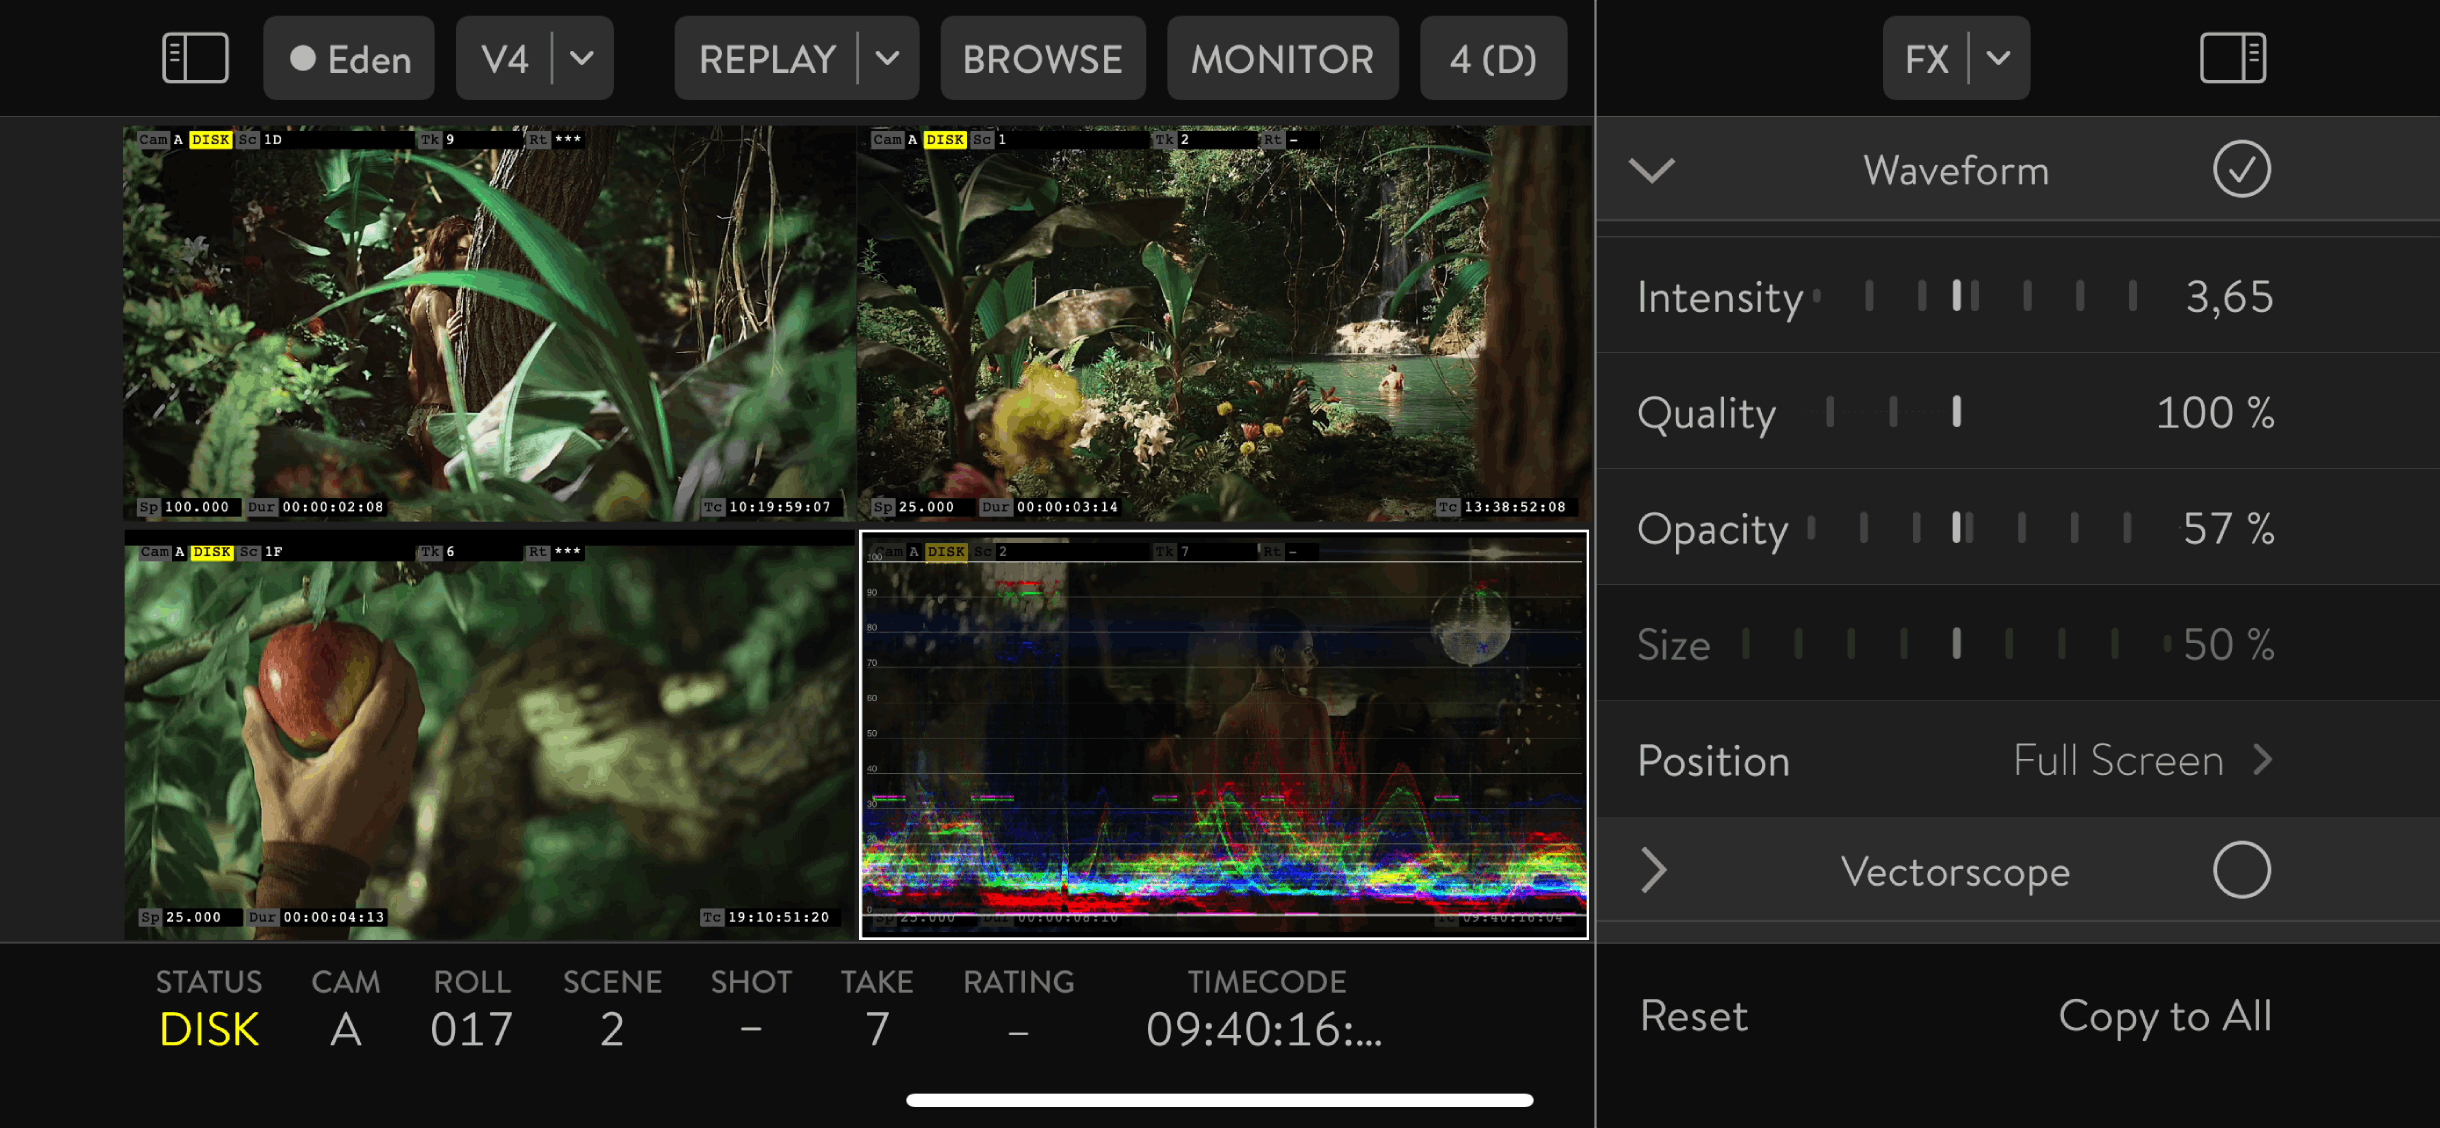
FX
The FX sidebar serves as a control center for applying View effects.
When you apply an effect to a View, a checkmark appears next to the effect title, indicating its activation.
To manage the effect settings, you can expand or hide them by clicking the arrow located on the left side of the effect title.
Available View effects:
- Scope category – You can only apply one scope effect on a view at the same time.
Applying an additional SCOPE effect on a View will automatically disable the previously applied one, leaving only one actively applied.
- Waveform
- Vectorscope
- Histogram
- False Color
- Focus Peaking
- Transform
- Mask
- VR
Waveform
Waveform mode is a versatile tool used to analyze video levels. Each column of the source image is represented by the column of the waveform image. The value of each pixel is represented by the row of the waveform image. Dark pixels will show at the bottom, and bright ones will occupy the top of the scope’s image.
The following modes are available:
- Luma
- Chroma
- YCbCr Parade
- Red
- Green
- Blue
- RGB Overlay
- RGB Parade
On top of modes, you can adjust waveform Intensity, Quality, Opacity (depending on selected Position), Size, and Position.
VECTORSCOPE
Vectorscope mode puts each pixel into a circle, where the distance from the center represents saturation, and the angle represents hue. ZOOM value is available to scale up the vectorscope image.
You can adjust vectorscope Intensity, Quality, Opacity, Size, and Position.
HISTOGRAM
The histogram accumulates pixels to reveal the distribution of values. The following options are available:
- Red
- Green
- Blue
- RGB Overlay
- RGB Parade
On top of modes, you can adjust histogram Intensity, Opacity (depending on selected Position), Size, and Position.
FALSE COLOR
False color mode helps you identify underexposed and overexposed areas as well as helps the cameraman correctly light and expose skin tones. You can customize the values for the UNDER, MID LOW, MID HIGH, and OVER zones individually.
FOCUS PEAKING
You can use Focus Peaking to detect and emphasize sharp edges in the image. It helps identify areas in or out of focus. The scope’s image can be superimposed on the original color or monochromatic image using the COLOR field.
TRANSFORM
Transform is used to apply simple 2D effects, such as zoom, anamorphic, position, orientation, flip, and flop.
MASK
The MASK effect is used to mark the region of interest and dim the outside area. You can also use a specified rectangle to crop the image using the CROP TO MASK tool.
VR
Converts video with equirectangular projection to video with rectilinear projection. It allows you to watch and playback VR 360 video. PAN and TILT let you adjust the virtual camera orientation. The FOV value sets the field of view or the “focal length” of the virtual camera.
Views
Views display video. QTAKE Monitor supports up to 9 Views. Each View can display a live stream or a recorded clip. Use the top-right SOURCE button to select the source for each View. HELP SCREEN section describes basic touch controls for Views.
PLAYBACK CONTROLS
Playback controls in QTAKE Monitor are invisible to avoid obstructing the image. Tap in the middle of a View to reveal them.
- PLAY PAUSE command is located in the bottom center of the image.
- PREVIOUS FRAME command is located in the bottom-left corner of the image.
- NEXT FRAME command is located in the bottom-right corner of the image.
- GO TO IN MARK command is located in the top-left corner of the image.
- GO TO OUT MARK command is located in the top-right corner of the image.
- SCRUB command uses the middle part of the image from left to right edge.
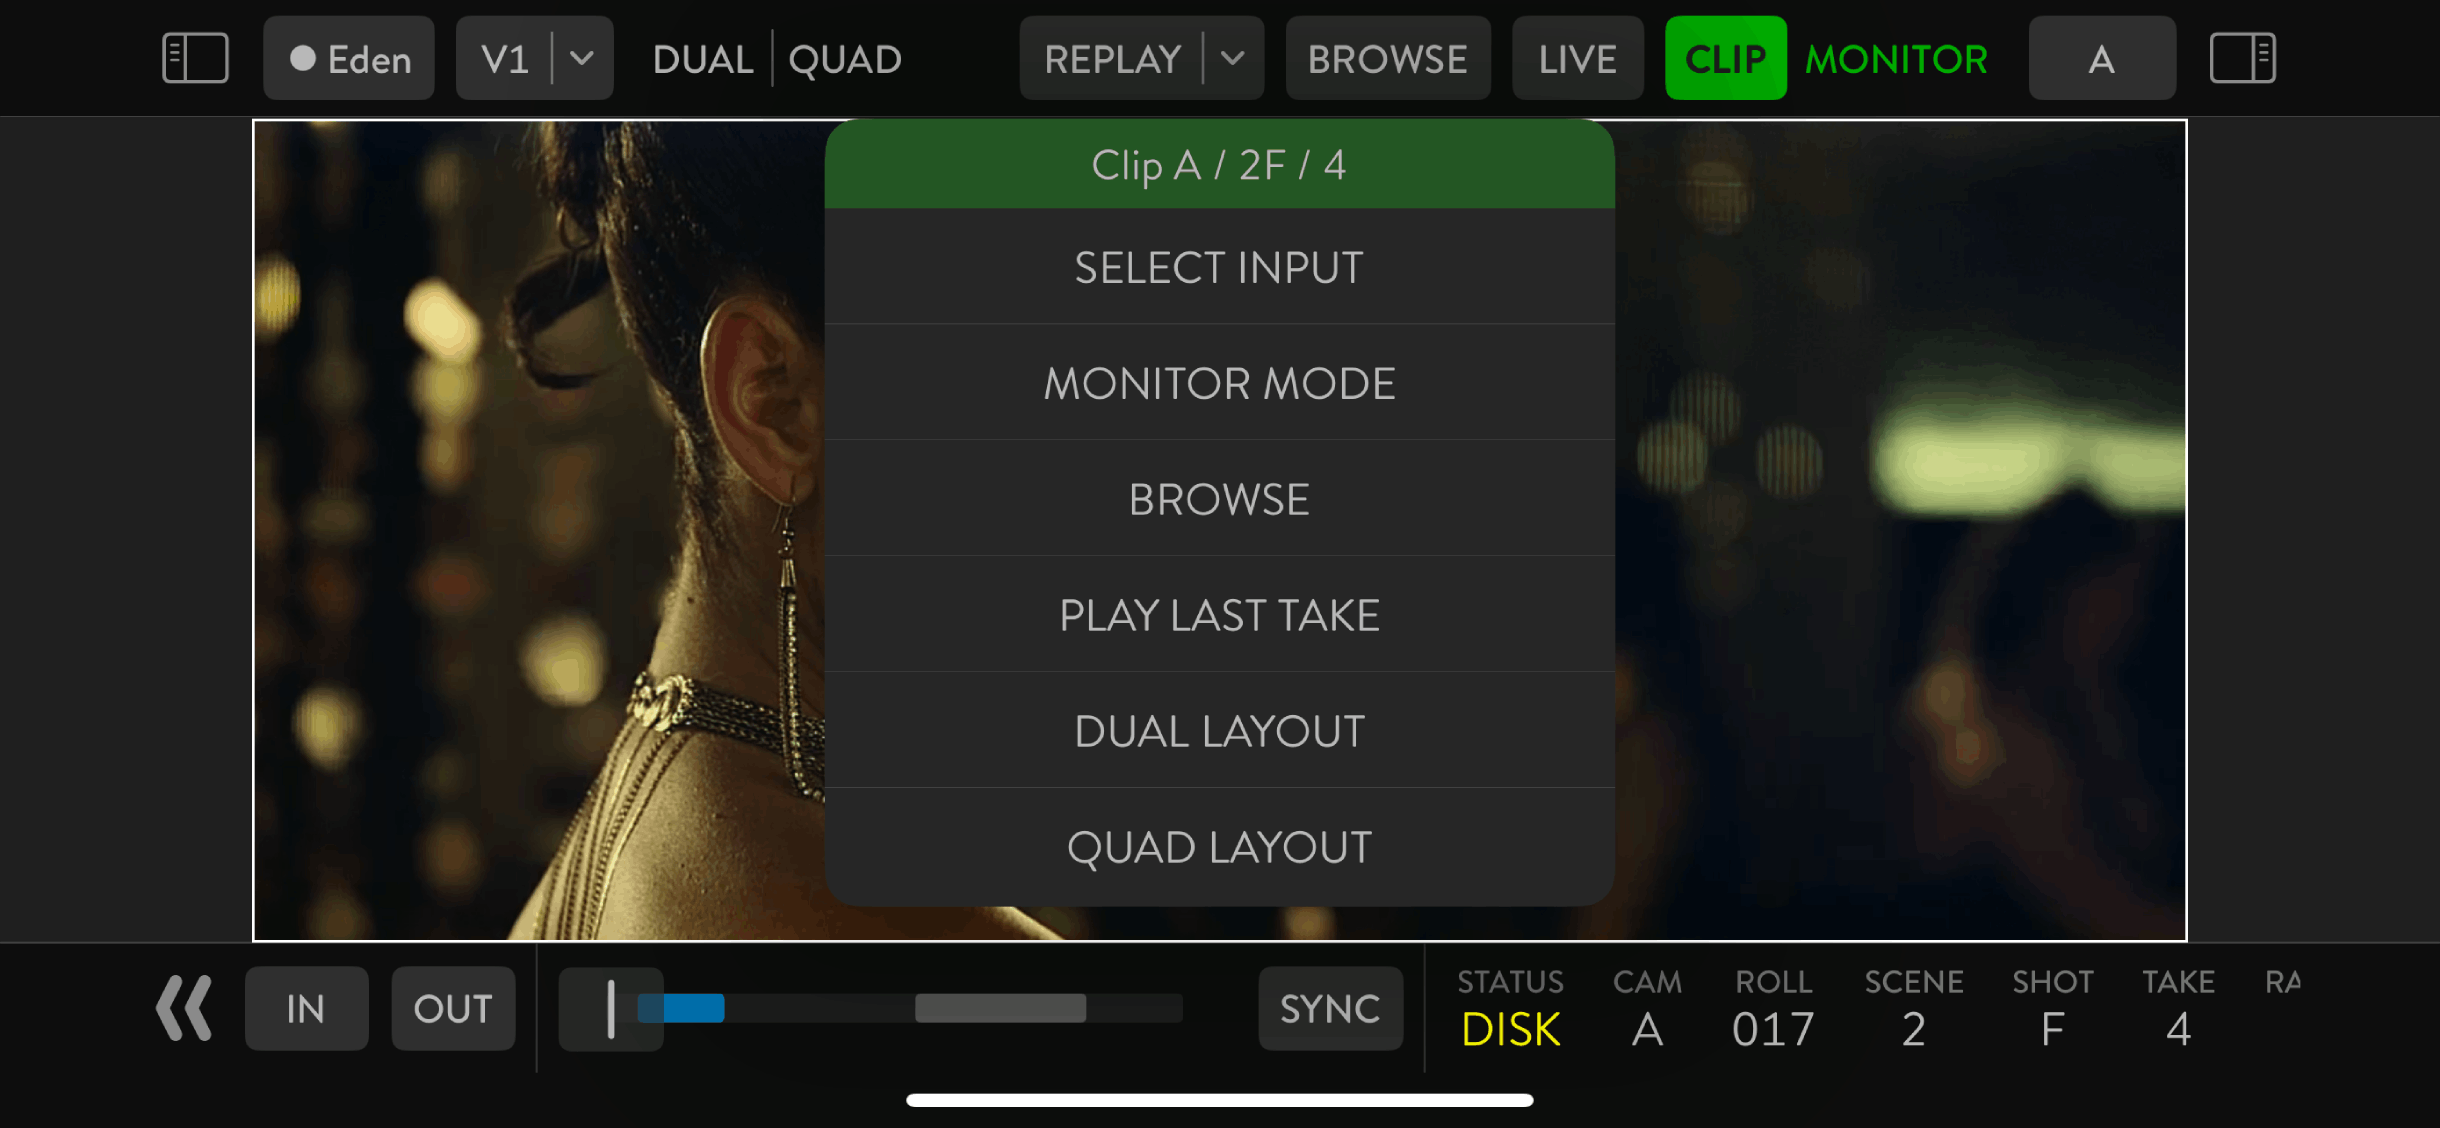
VIEW MENU
Long press any View to access VIEW MENU. This menu provides quick access to VIEW LAYOUT, CLIP OR MONITOR mode, BROWSE screen, and playback of the last recorded take.
HDR
QTAKE Monitor supports High Dynamic Range video in both live stream and playback modes. For best results, please set the Rendering to Deep Color (16-bit) in the Settings.
Screenshot and screen-recording prevention
When high-level content protection is required, QTAKE Operator can turn off Screenshot permission for both live stream and playback modes. It will prevent system-level screenshots, screen recordings, and in-app screenshot functionality.
FORENSIC WATERMARK
The forensic watermark utilizes NAGRA NexGuard forensic watermarking and is also known as an “invisible” watermark. It is a pivotal security feature that adds an imperceptible yet robust identifier to your QTAKE assets.
Fine-tuned to be imperceptible for the best user experience, the forensic watermark is robust enough to withstand manipulation in case of a leak. Forensic watermarking seamlessly integrates with your workflows, providing an additional protection layer for your pre-release content in QTAKE during its creation.
QTAKE Monitor version 4.6.0 and higher and QTAKE Pro 2.2 and higher with FORENSIC license module are required.
If you enable the Forensic watermark for a client without the module or the client uses an earlier QTAKE Monitor version, the specific stream will be disabled until the FORENSIC license is activated or the option is disabled.
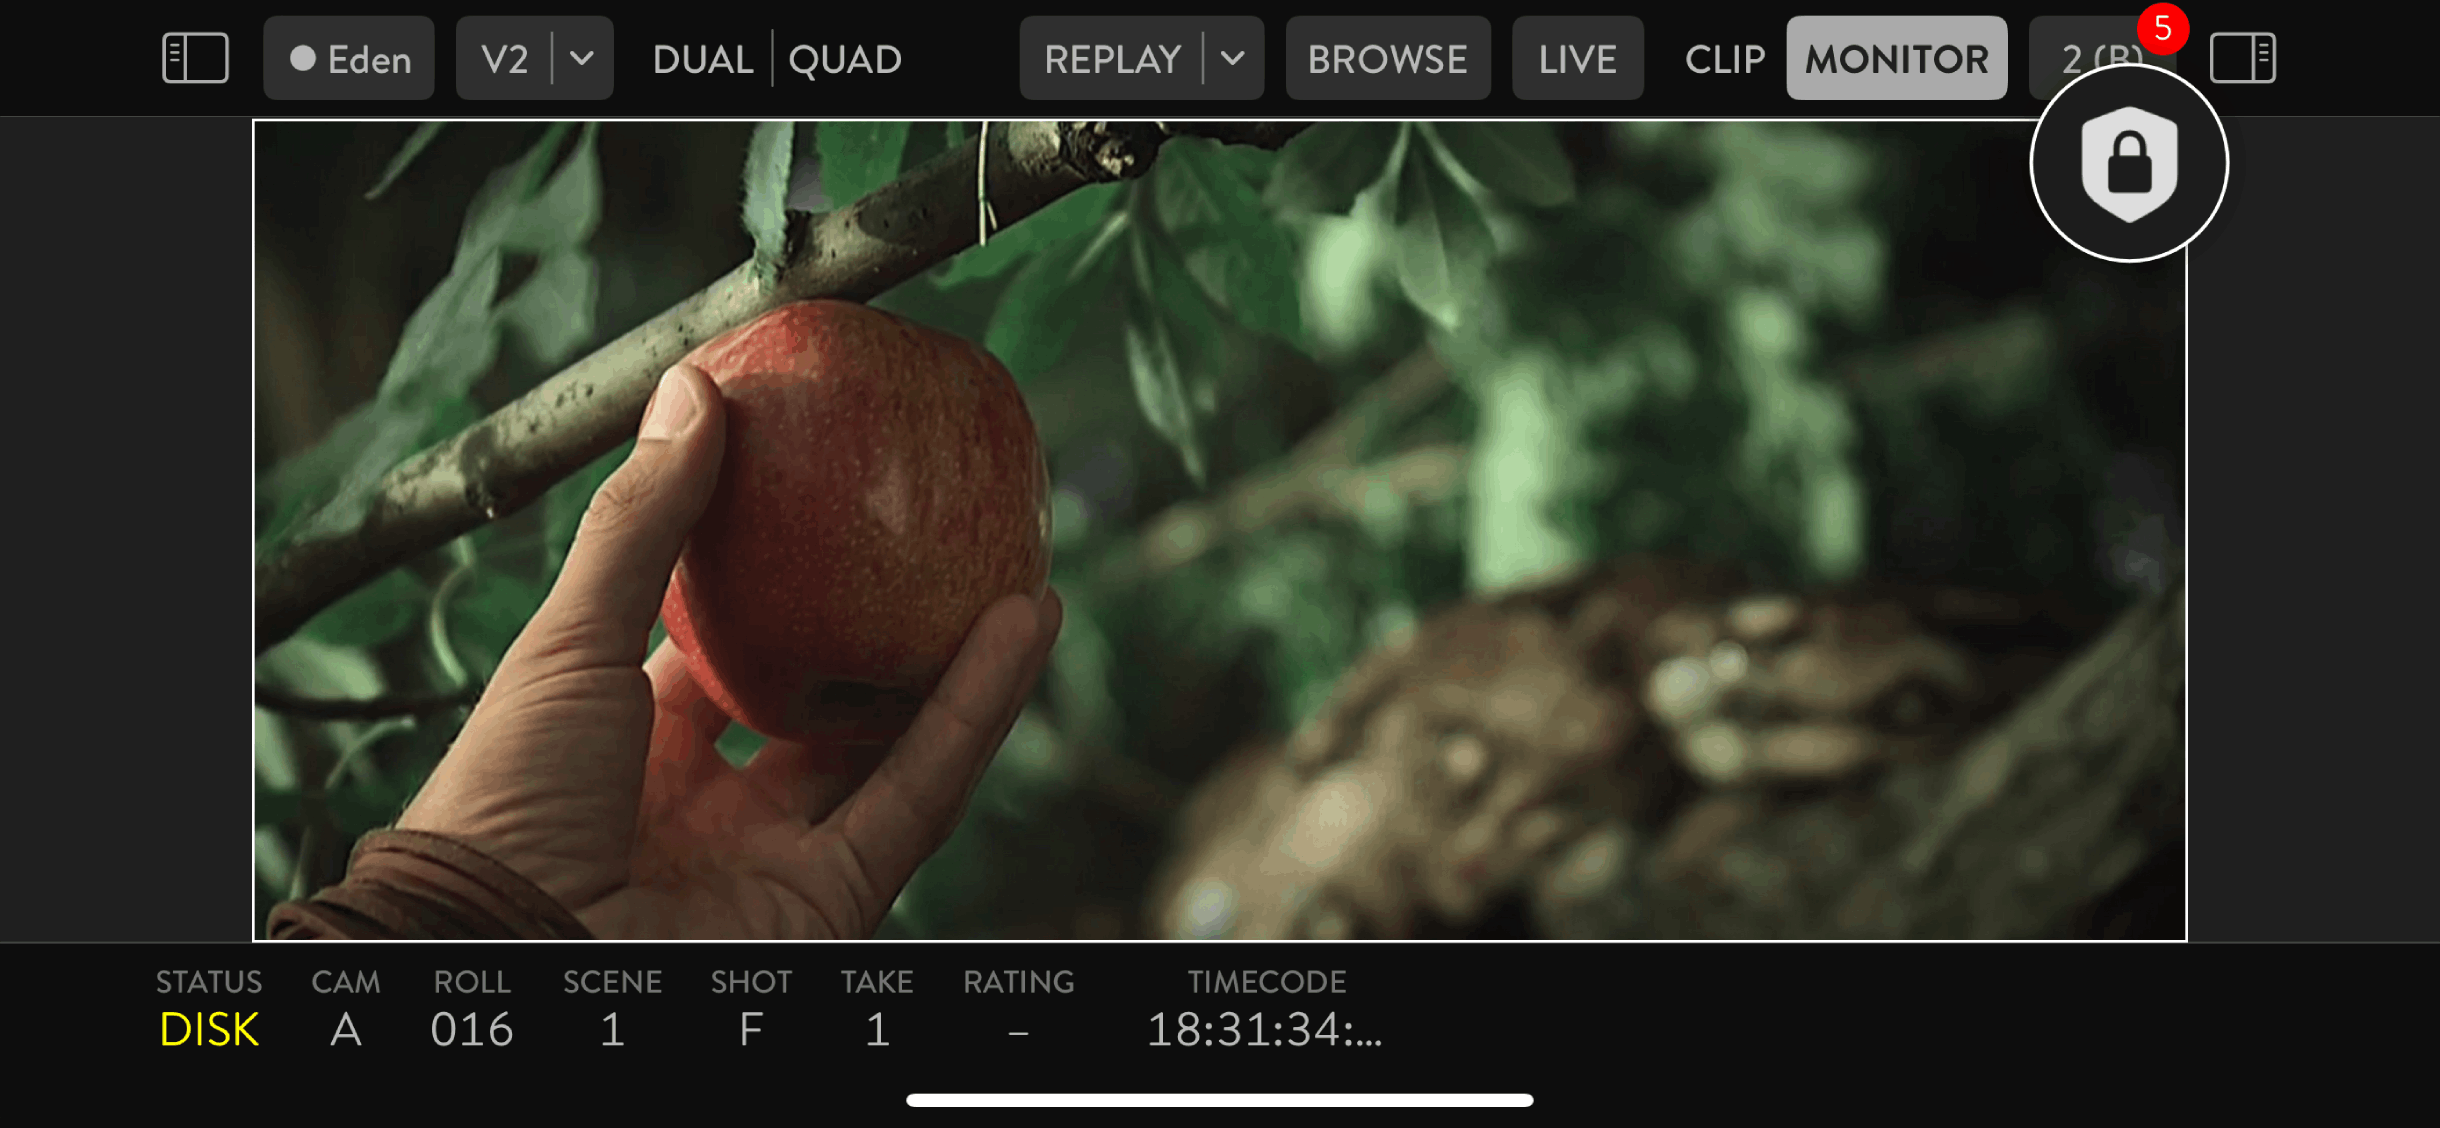
When QTAKE enables the Forensic watermark, a small lock icon will appear in the top right corner of the client-side View. This icon serves as an indication that the Forensic watermark feature is actively applied to the content.
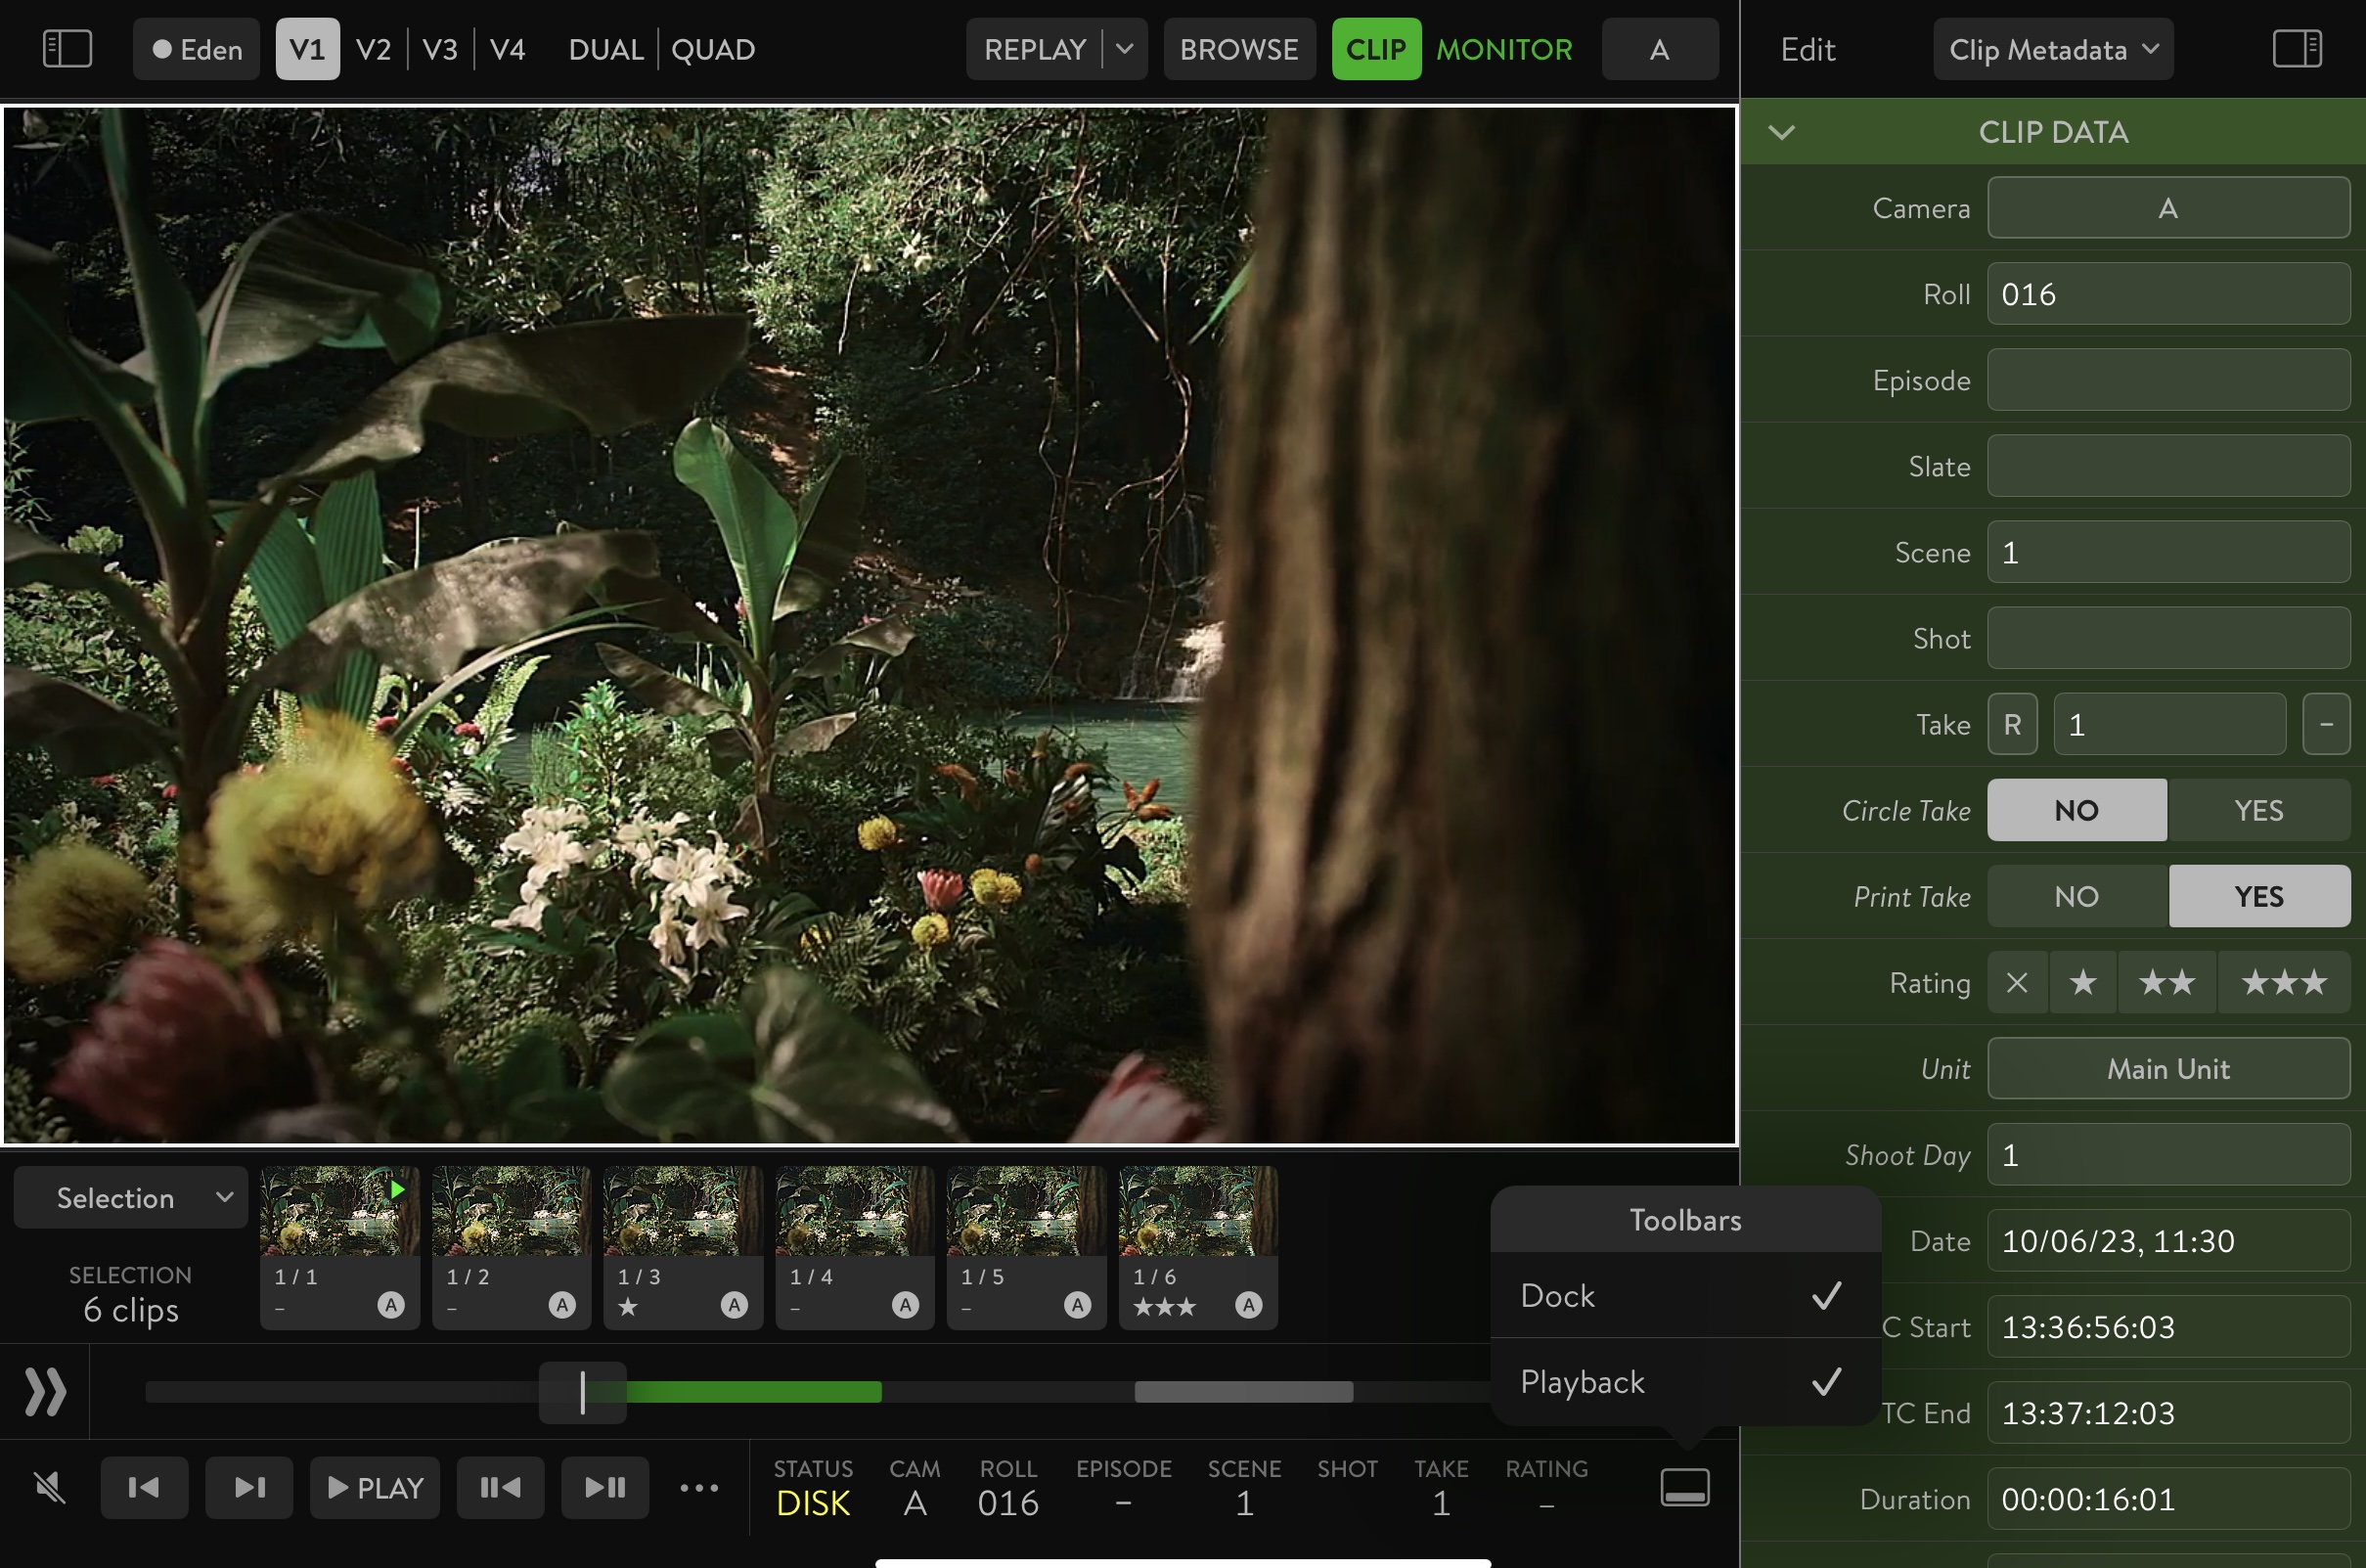
Toolbars
The bottom-right button allows you to activate and deactivate Dock and Playback toolbars.
Dock
The DOCK toolbar allows you to quickly access clips without entering the BROWSER. Clicking on any populated slot in this scrollable toolbar will load the clip into the active View.
The toolbar’s selector allows you to choose between:
- Selection - The content of the Selection Dock is unique for each View. To select clips for the Dock, open the Browser, use the Select option, and after selecting clips, use the Action button and PLAY option. If you won’t choose clips for playback but load a single clip instead, the Selection Dock will automatically load clips of the whole Shot.
- Bin - Use the BIN picker to select an active Bin or Smart Bin, which will be used to populate slots. If you want to create a new Bin or a new Smart Bin or adjust the current one, open the BROWSER and click the EDIT button from the BROWSER’s left sidebar. The EDIT button allows you to remove items, and the PLUS button adds items.
Loading a clip from the Dock automatically switches to CLIP mode if you are MONITORing a LIVE stream.

Playback
The PLAYBACK control buttons are active only in CLIP mode. When MONITORing, buttons are grayed out.
Playback control buttons:
- MARK - Jump to the previous IN point
- MARK - Jump to the next OUT point
- PLAY / PAUSE
- FRAME - Go to the previous frame
- FRAME - Go to the next frame
Apart from Playback control buttons, there are:
- MUTE button
- 3 Dots button - providing additional settings
- Play Sync - Enable / Disable Play Sync for all Views in CLIP mode
- Play Full Range - When active, In-OUT ranges are ignored and the whole clip is played
- Audio Settings - More audio settings
- More Settings - Takes you to the Left sidebar and activates the app’s Settings
The Audio Settings option provides additional control over the audio:
- AUDIO CONTROL
- Mute - Mutes playback audio
- Mute Live - Mutes LIVE audio
- SOURCE VIEWS
- Live - Defines Live audio source - either from Active / all Visible / All Views
- Playback - Defines Playback audio source - either from Active / all Visible / All Views
- AUDIO SETTINGS
- Mute Status In Views - Shows Mute Indication pictogram in the lower-right corner of Views if Mute is active

Camera UI
When you select an internal camera via Source selector, you can pinch-zoom the View to enter the full-screen dedicated CAMERA UI, which provides camera status and controls.
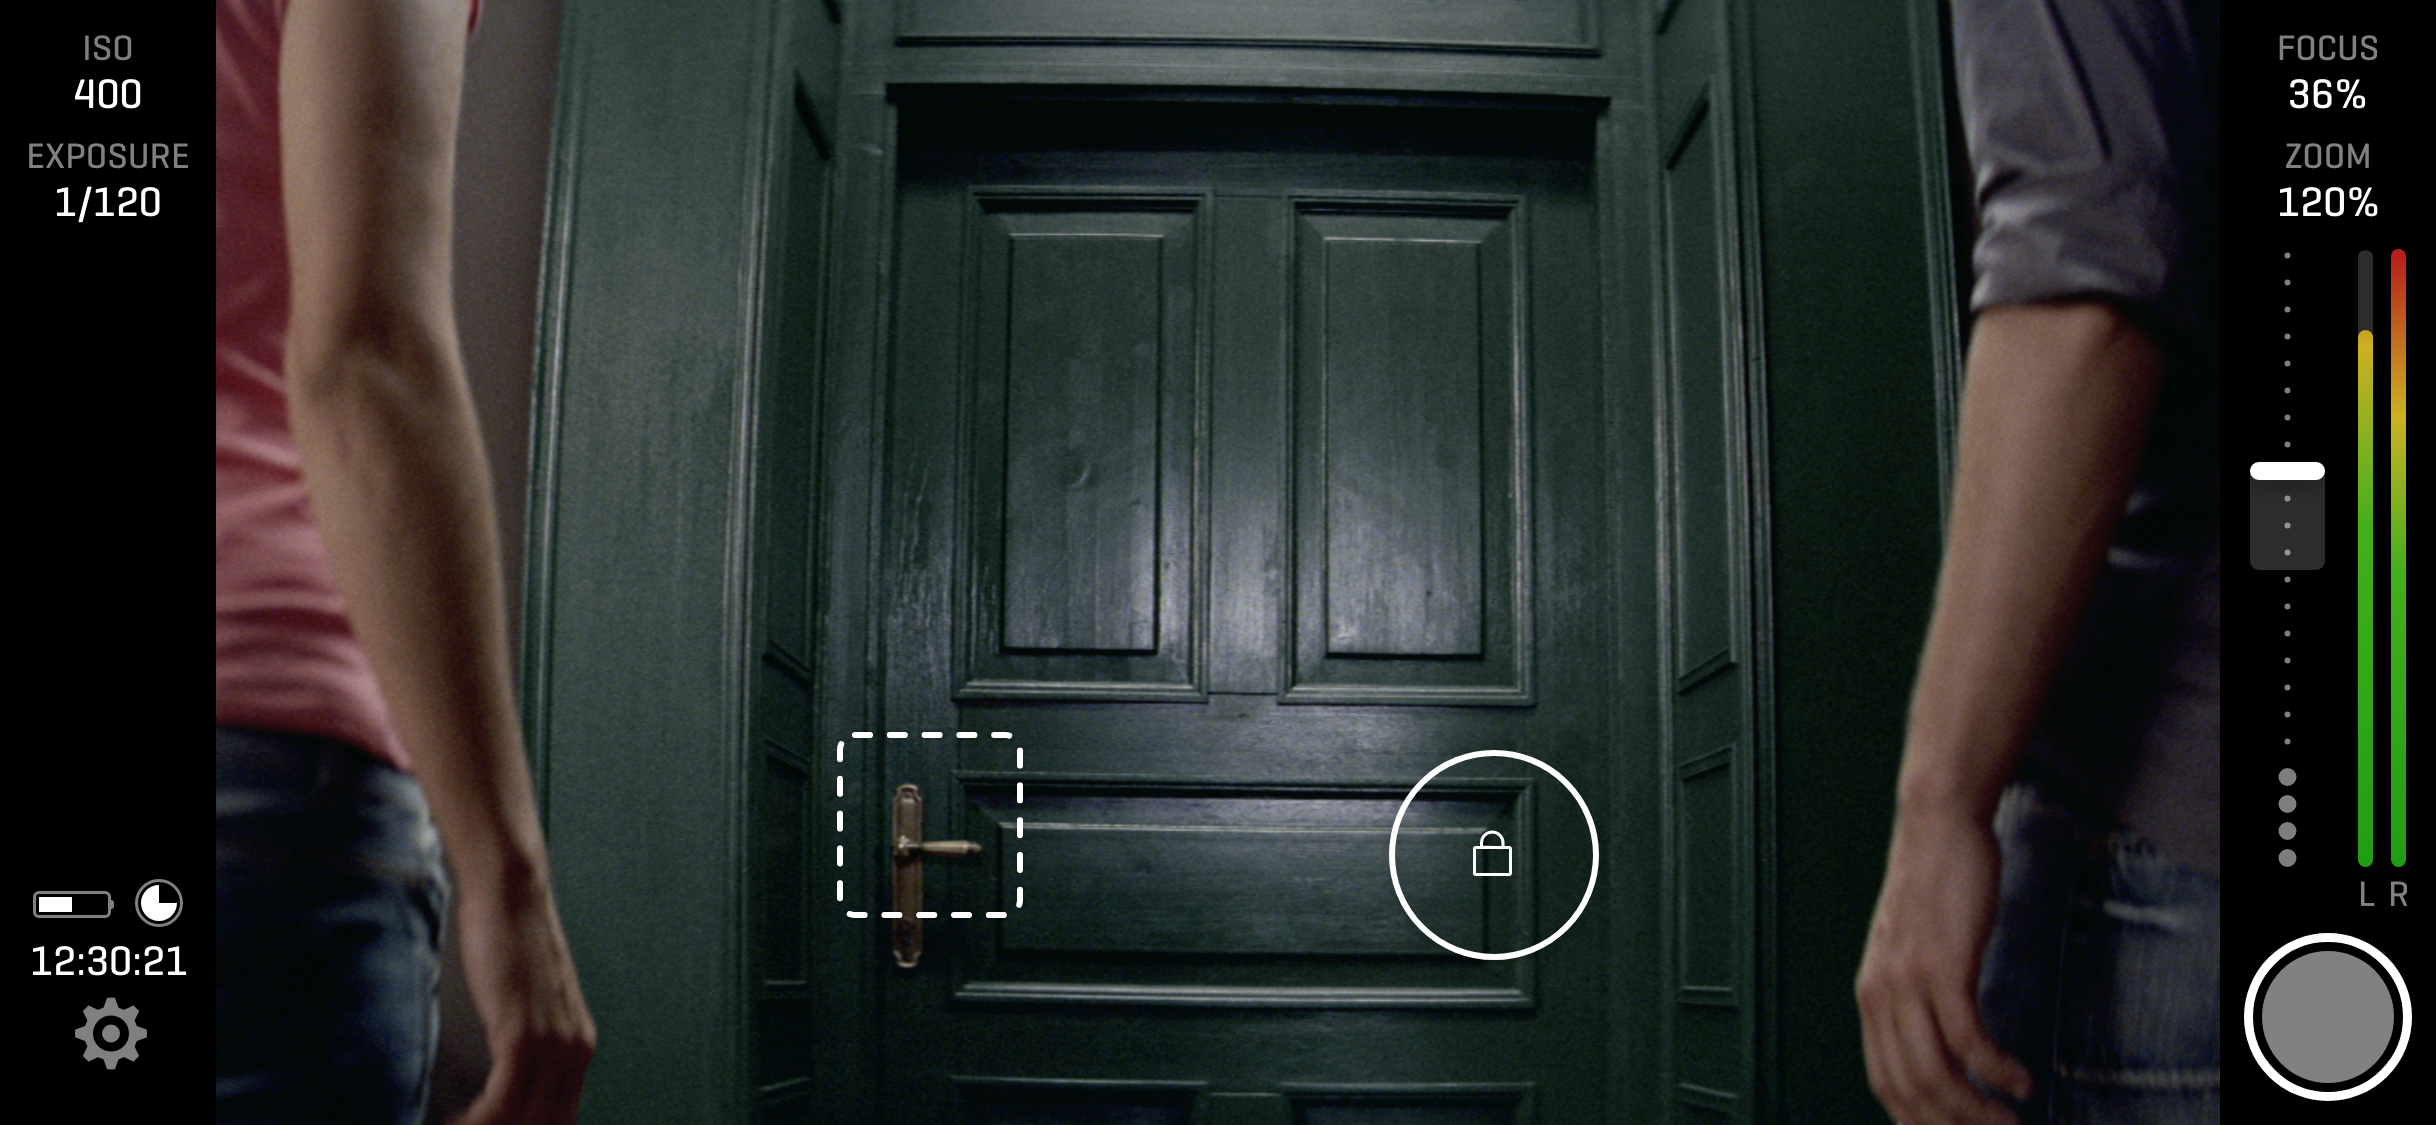
Focus And Iris
The focus distance and iris (exposure) are controlled via on-screen controls. The rounded rectangle represents FOCUS, while the circle represents IRIS. When set to automatic mode, both controls are drawn using dashed lines and will continuously adjust their parameters according to the captured content. If you want to prevent automatic change, a single tap will switch them to the LOCKED state, represented by the solid line and lock icon.
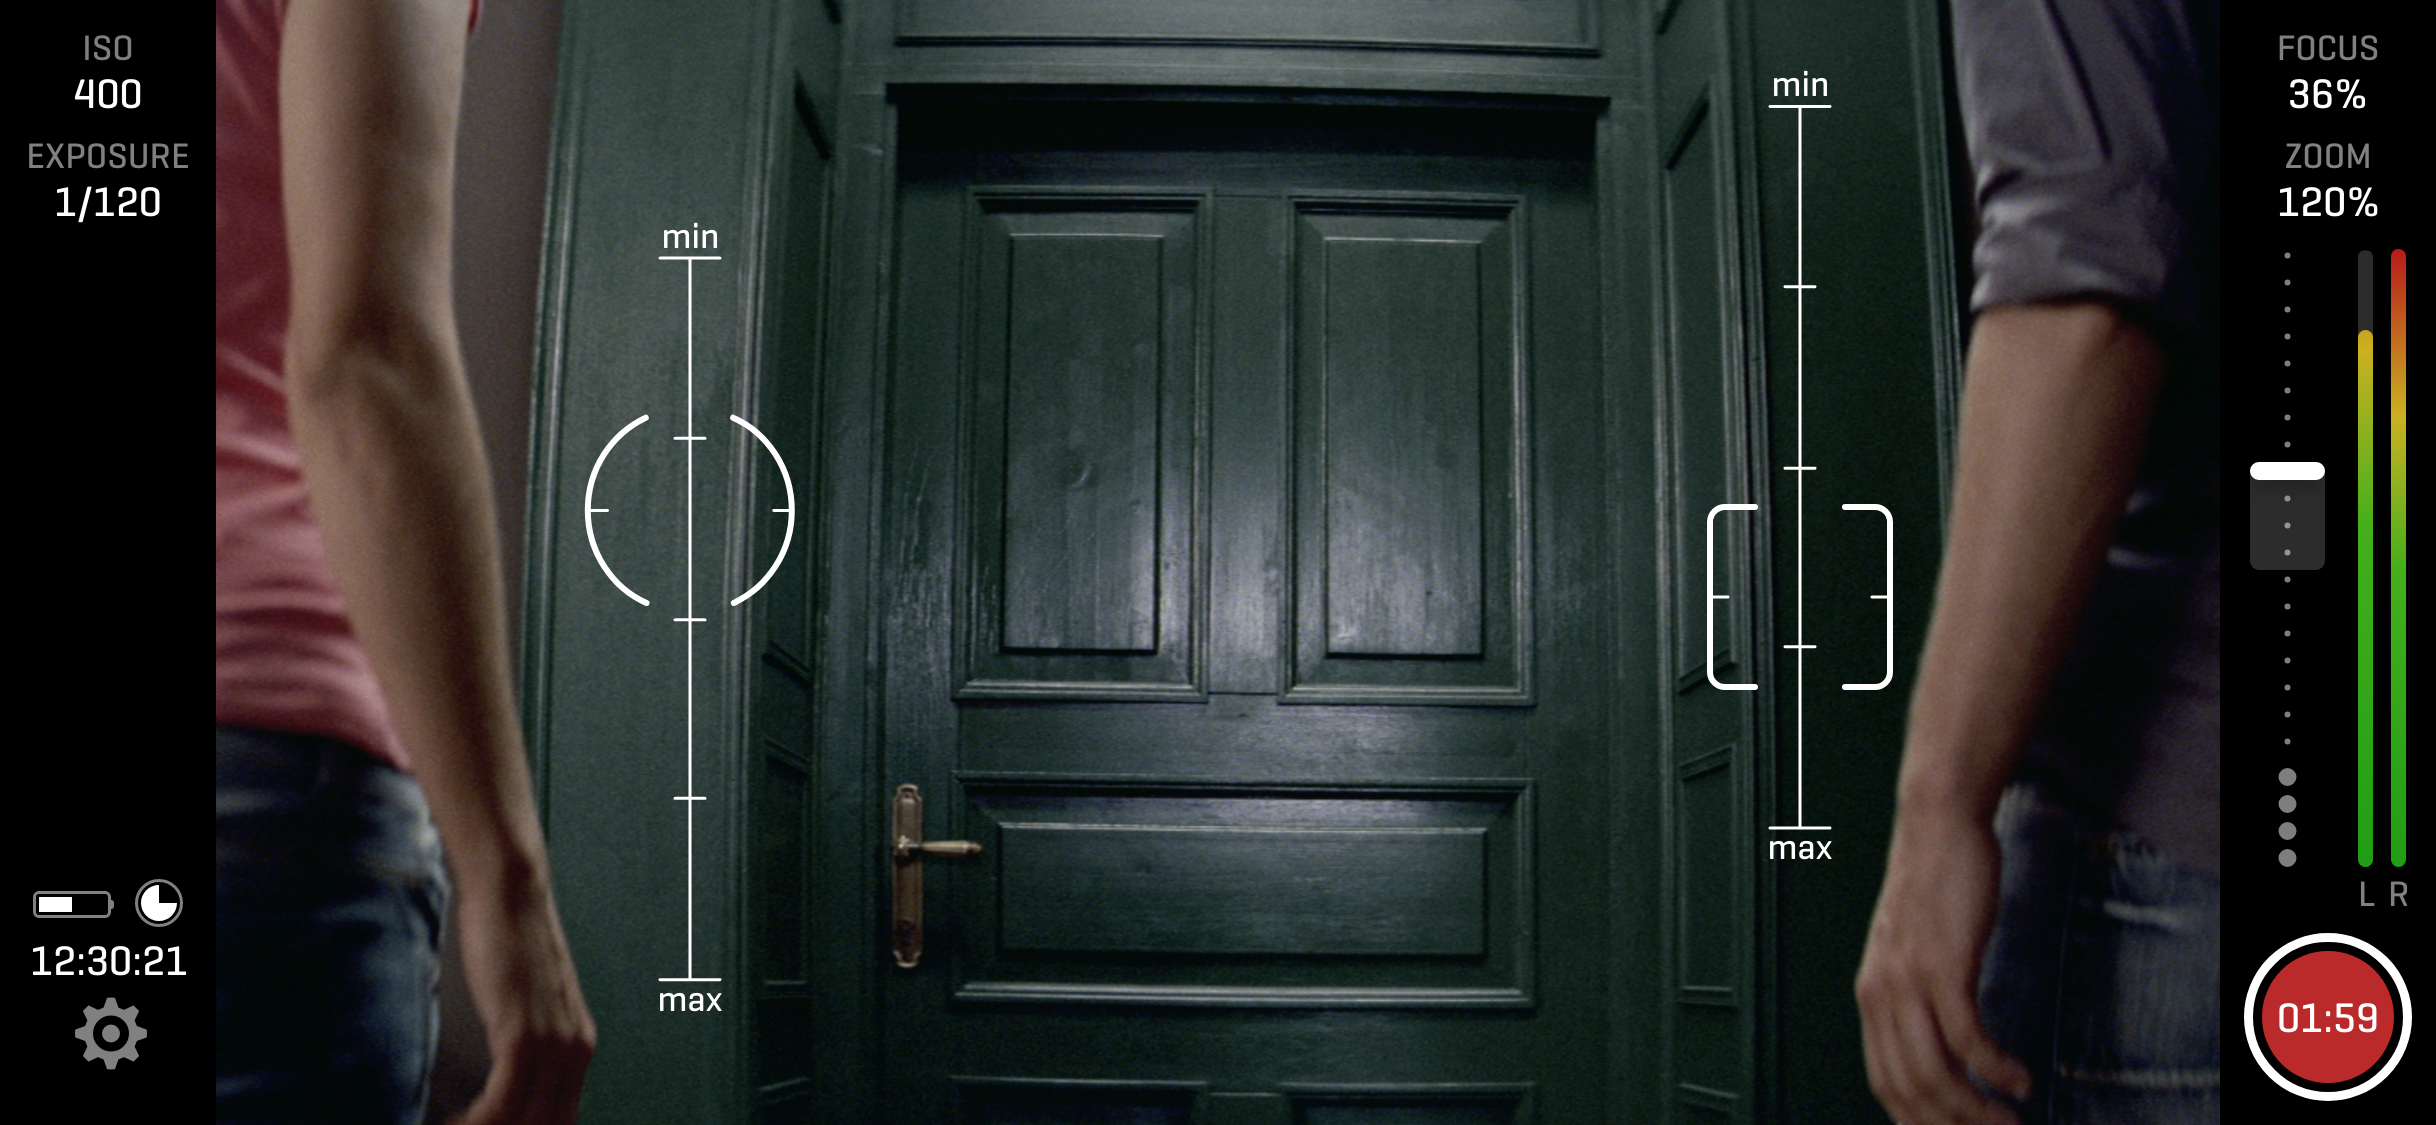
Manual Controls
Activate manual mode for both focus distance and iris settings with a double-tap gesture. In manual mode, manipulate each control by dragging its represented vertical line upward or downward to adjust the value. This direct manipulation allows precise control over these parameters, enhancing focus and iris accuracy.
Record
The rounded button located in the bottom right corner starts and stops a camera recording. When recording, it will change color to red and display the duration of the current recording.
Zoom
Use the Zoom bar to adjust the angle of view. Pulling the knob on this bar will simulate the change of the focal length to make objects appear closer or to see more of the surrounding. The further you drag the knob from the center of the bar, the faster this change will be performed. Note that this control is scaling the image digitally since the cameras on iOS devices have a fixed focal length.
Audio Peak Meters
The intensity of captured audio is measured continuously using audio peak meters. Currently, there is no option to control audio input levels within the QTAKE Monitor app.
Camera Settings
The gear icon in the bottom left corner allows you to access camera settings.
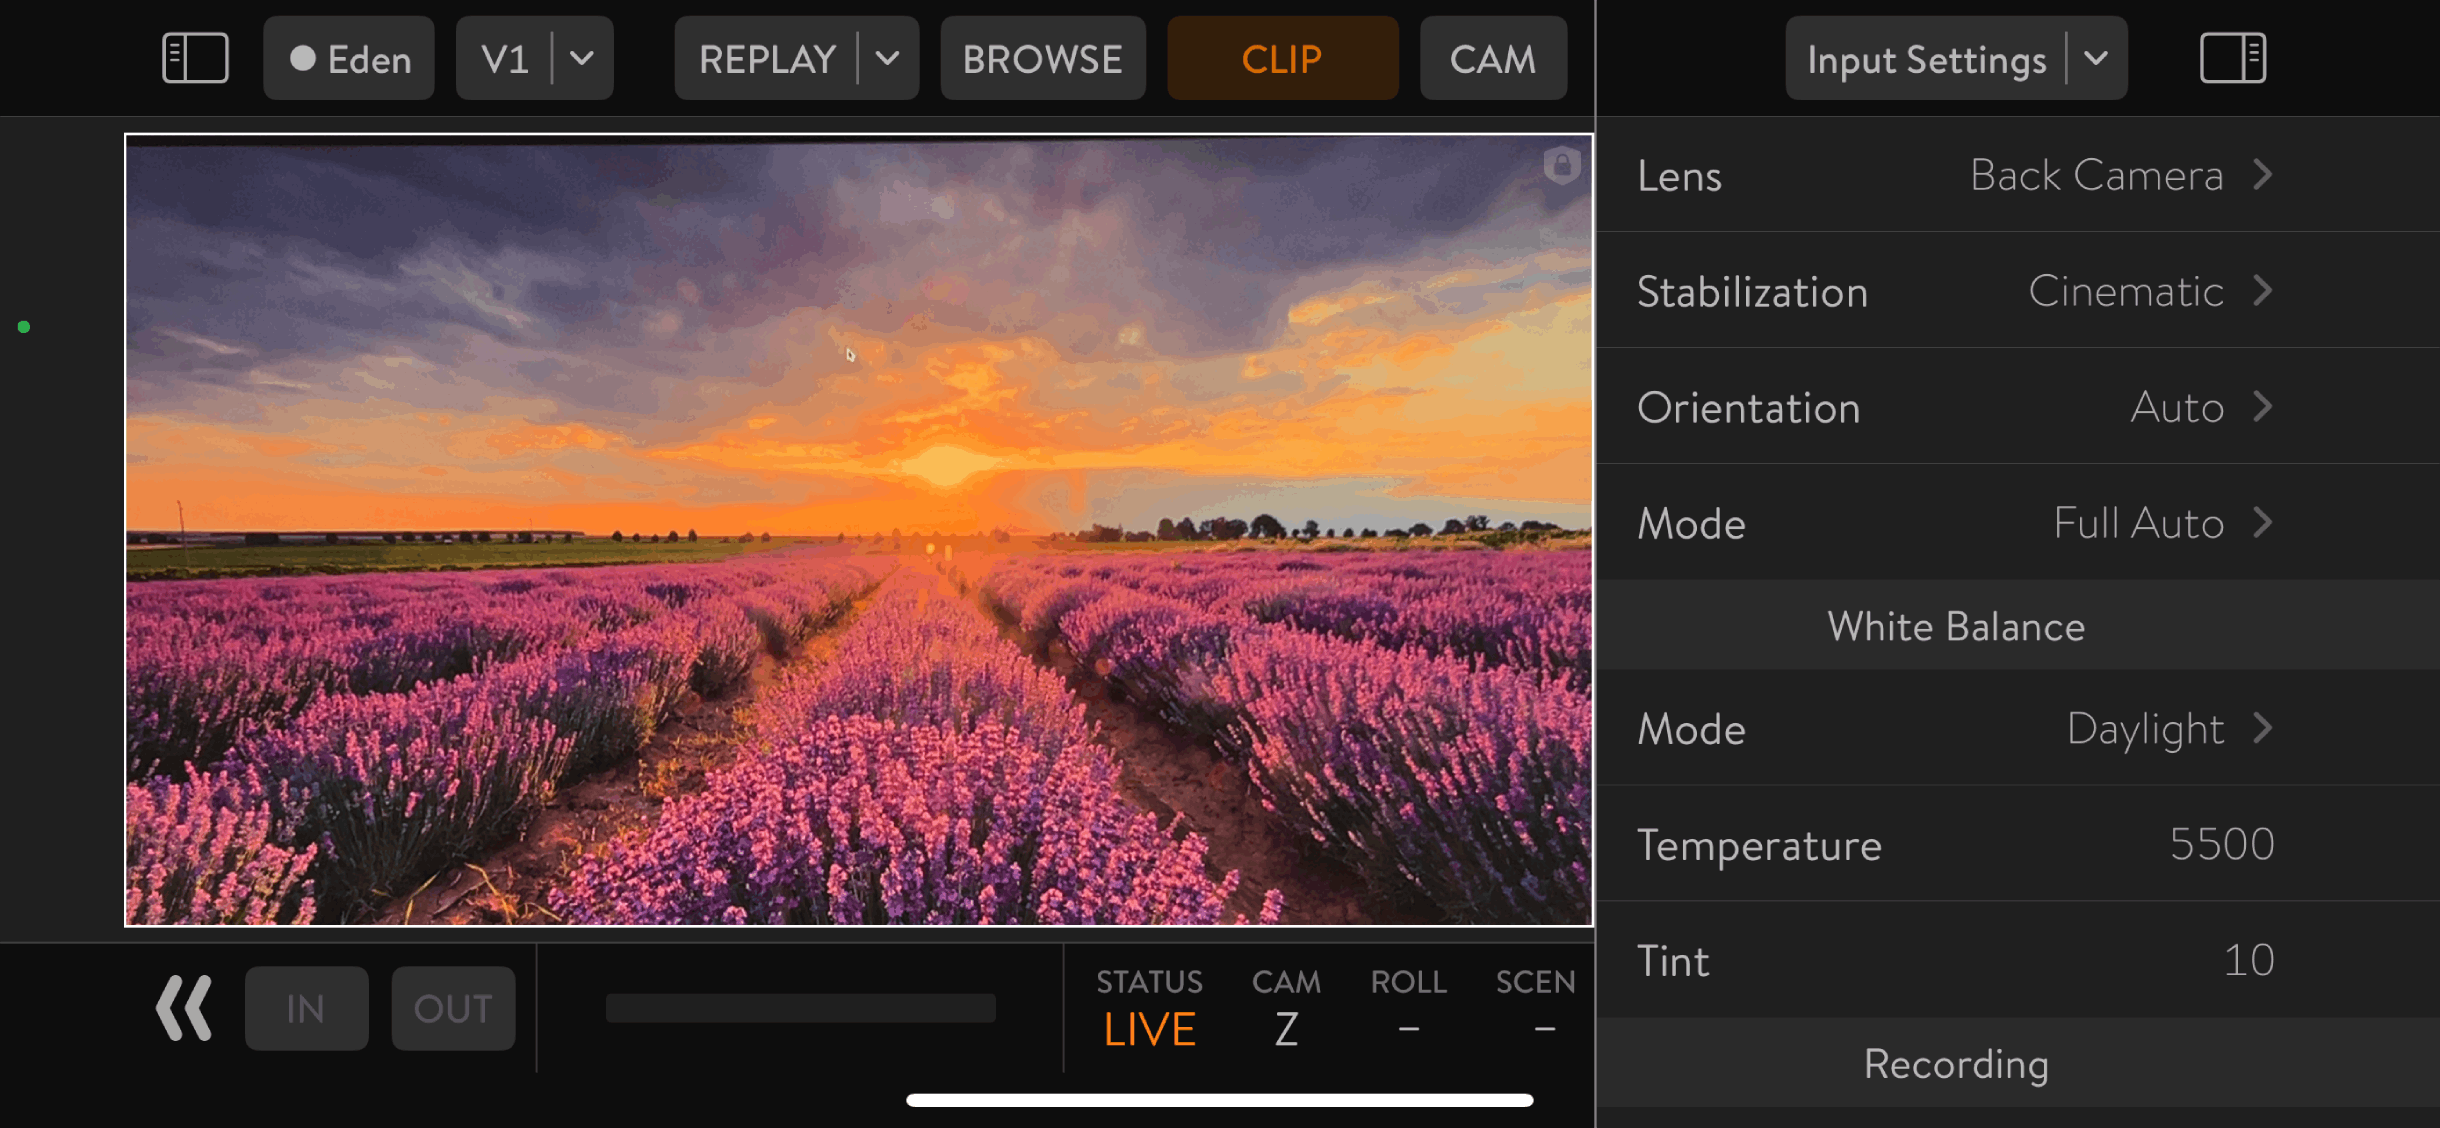
Camera
The first section of the camera settings provides the following parameters:
- LENS - selection of a specific camera on your iOS device
- STABILIZATION - stabilization modes
- ORIENTATION - landscape or portrait orientation
- MODE - automatic and manual modes for focus and iris
White Balance
This section provides access to COLOR TEMPERATURE and TINT parameters via multiple presets available in the MODE selector.
Recording
This section provides control over these parameters:
- FORMAT - selection of SD, HD, and 4K resolutions
- CAPTURE FPS - selection of predefined frequencies (frames per second)
- COLOR RANGE - full range or video range encoding
Compression
Within this section, you can select the CODEC, which encodes captured video using predefined QUALITY presets. Additionally, the COLOR SPACE parameter provides a selection of available color spaces for customization.
Recording
Even though the QTAKE Monitor app’s primary function is local and remote monitoring, it allows you to record any INPUT loaded in a View. Recording of the LIVE QTAKE stream is not allowed.
Recorded clips are stored in the internal app storage, which is not accessible from iOS Files. Because of that, connection to QTAKE Sync (formerly QTAKE Server) or Cloud project is crucial if you plan to collaborate on the project or export the clips out of the app.
Recommended Workflow
Since QTAKE Monitor local storage is not accessible from iOS Files, the only export options are QTAKE Sync (formerly QTAKE Server) and QTAKE Cloud. QTAKE Monitor local project cannot be directly uploaded to QTAKE Sync or Cloud, a QTAKE Sync project has to be created first and opened in the QTAKE Monitor app.
- Create a new QTAKE Sync project
- Go to the Projects tab of the QTAKE Sync application
- In the bottom left corner, click the ‘+’ plus button
- Alternatively, you can
- Depending on users logged in QTAKE Sync and QTAKE Monitor apps
- If the same user is logged in to both applications, skip this step
- Share the project link with the QTAKE monitor user or
- Invite the QTAKE Monitor user via the Users tab -> Invite Users button
- Open the project
- Select the preferred View you want to record an Input signal.
- Using the SELECT VIEW SOURCE button, select the input device you want to record
Settings
Various aspects of QTAKE Monitor functionality can be adjusted using the SETTINGS page. You can access Settings using a three-finger swipe up.
Access the app’s settings on iOS devices through the Settings app. Scroll down to find the QTAKE Monitor app. On top of iOS Permissions, all settings are accessible from here.
- Save Screenshots to Photos - Screenshots will be saved to the Photos Library.
- Save Screenshots to Folder - Available on macOS only.
- Screenshot Folder - Designates folder for saving screenshots.
- Screenshot Folder Structure - This lets you customize the screenshot folder structure.
- Copy Screenshots to Clipboard
- Mute Live - Mutes live signal audio.
- Mute - Mutes playback audio.
- Duck Audio While Talking - While talkback is active, live and playback audio is ducked.
- Auto Play - Automatically starts playback when you load a clip into View.
- Single-Project Mode - Turning off this setting enables loading different projects into each view.
- Video Output Mode - Sets output mode to an external monitor using cable or Apple AirPlay
- View Border Color - You can choose from 3 options. Never, When Recording, When Live or Recording
- Number of Views - Supports up to 9 Views.
- Streaming Mode
- Low Latency - Prioritizes latency over smooth streaming.
- Dynamic Latency - Automatically adjusts the video delay based on network conditions to achieve smooth streaming with the lowest latency.
- Static Latency - Uses a static delay of 300 ms (local streaming) or 600 ms (cloud streaming).
- Stream Packet Mode - This preference controls packet reordering and retransmission of lost stream packets.
- No Correction
- Order Correction
- Low Loss Correction
- High Loss Correction
- Enable Bonjour - Use Bonjour to discover QTAKE systems on a local network.
- Rendering
- Standard 8-bit
- Deep Color 16-bit
- Maximum Render Size - Limiting the render size can improve performance and affect streaming output. Actual render size depends on the input.
- 540
- 720
- 1080
- 1440
- 2160
- Unlimited
- Apply Display Calibration LUT - To install calibration LUT, first select a “.cube” file and choose open in QTAKE Monitor.
- Show Screen Locked Message - If you enable this preference, you will get a Screen locked message in views as a reminder when attempting to control the app while the screen is locked.
- Show Number of Available Streams - The Red badge on the view input selection button will display the number of available streams if enabled.
- Show LIVE Button - Enable to display the LIVE button in the top bar when CLIP mode is active.
- Show Diagnostic Messages
- Show Performance Graph - The performance graph will be displayed in Views to monitor performance.
When the QTAKE operator disables screenshots for a particular client in the Stream setup window it affects iOS/macOS screenshots. The content of the Views is black with this setting.