QTAKE LITE USER GUIDE 1.6
ABOUT
QTAKE is the most advanced software designed and developed for video assist and DIT professionals. It logs, captures, plays, edits, and processes digital cinema camera’s video output and RAW recording. The main purpose of any video assist system is to provide immediate playback for the crew, but QTAKE goes far beyond that. It provides a unique database, customizable to fit any project, real-time image processing up to 8K resolution, multi-camera support, on-set color grading, live editing, and much more.
The ability to capture metadata from the camera and other on-set devices makes QTAKE an essential part of the workflow that fills the gap between production and postproduction. VFX supervisors around the world rely on QTAKE to perform real-time on-set compositing with support for motion control and motion-tracking systems, GPI triggering, and CGI integration. QTAKE offers unique stereoscopy support with industry-standard 3D output in live or playback mode and various 3D alignment modes using PLUS 3D View.
After the magazine is ejected from the camera, you can import RAW files into QTAKE and match them to video recordings to preserve all metadata and on-set color grading. QTAKE then provides the fastest and most effortless dailies export and sharing. In addition to impressive video assist and DIT software, QTAKE ecosystem includes QTAKE Server and QTAKE Monitor applications that provide unmatched on-set, and cloud-based collaboration using low-latency streaming, independent playback, and metadata editing.
Thank you for taking your on-set video services to a new level.
As of early 2024, QTAKE no longer receives bug-fix support. Given the escalating demands for software and hardware, QTAKE Pro has become our primary platform, granting exclusive access to new features and improvements. Bug-fix support was available until the end of 2023. To facilitate the transition, the Pro for Pro offer presents a unique upgrade opportunity for permanent license holders.
For more information, please contact our support team.
SOFTWARE VERSIONS AND MODULES
QTAKE LITE is a self-contained, entry-level, dual-channel recorder software built on the same technology as QTAKE. The full QTAKE software consists of several modules allowing you to pick and choose the feature set required for their environment and type of jobs. You can add modules at a later date to expand the functionality of their software.
NEW IN 1.6
Most of the new functionality in QTAKE version 1.6 is dedicated to streaming. QTAKE Stream was designed specifically for professional filmmakers and gained worldwide praise for its ultra-low latency, frame-based metadata support, and studio-grade security. Now we are taking it to a new level with the following features:
- QTAKE Live
- Dolby Vision®
- Web Stream
- Moxion Stream
- Input Devices
- QTAKE 4Kx4
- ALE Import Templates
- MetaCoder Audio Mode
- HEVC With Alpha
NEW IN 1.5
Most of the functionality in QTAKE version 1.5 is geared toward the DIT workflow providing a new processing engine and future-proof database design compatible with QTAKE Cloud. The most exciting new features are listed below:
- Single Application
- Automatic Updates
- Storage Structure
- ACES Color System
- RAW File Support
- Import Clip Matcher
- PIPELINE Image Processing
- Auto Export
- LIST Sidebar
- META Sidebar
- ALE Metadata
- Live Camera iPhone Tracking
- Film Grain FX
- Color Chart FX
- LUT Mixer FX
SOFTWARE REQUIREMENTS
The change log for the latest release of QTAKE can be found here. The following requirements may differ if you run an older version of a newer beta build.
QTAKE requires macOS 10.14.6 or newer, and is compatible up to 14.7.1 macOS Sonoma.
Recommended AJA video cards driver version is 16.2 or newer. Avoid using UFC firmware on cards that support it. The recommended driver version of the Blackmagic Design video card is 12.1 or newer. Recommended Deltacast video cards driver version is 6.18 or newer. The required dongle driver version is 8.31 you can download it here.
Upgrading from QTAKE 1.5
It is safe and seamless to upgrade from QTAKE version 1.5 to 1.6 since there have been no changes in database structure or media storage. Updating your QTAKE on every official release is strongly recommended to keep it compatible with QTAKE Cloud.
Upgrading from QTAKE 1.4
When upgrading from QTAKE version 1.4, note that the database will migrate to a new model (910a to 921) during the first start of QTAKE 1.5. Migration is a safe process that preserves all users and projects.
Old database will be backed up to /Applications/QTAKE/Data/Previous Versions subfolder, before the migration process. If you need to use old QTAKE 1.4 again (not recommended), move all files from this subfolder one level up (into /Applications/QTAKE/Data).
Single Application
Unlike QTAKE 1.4, where each version (HDx1, HDx2, HDx4, …) was a different application bundle (executable), QTAKE 1.5 is a single app. Switching between single, dual, four, and eight cameras and 4K mode is now done inside the application. Long-click the QUIT button to open the version dialog:
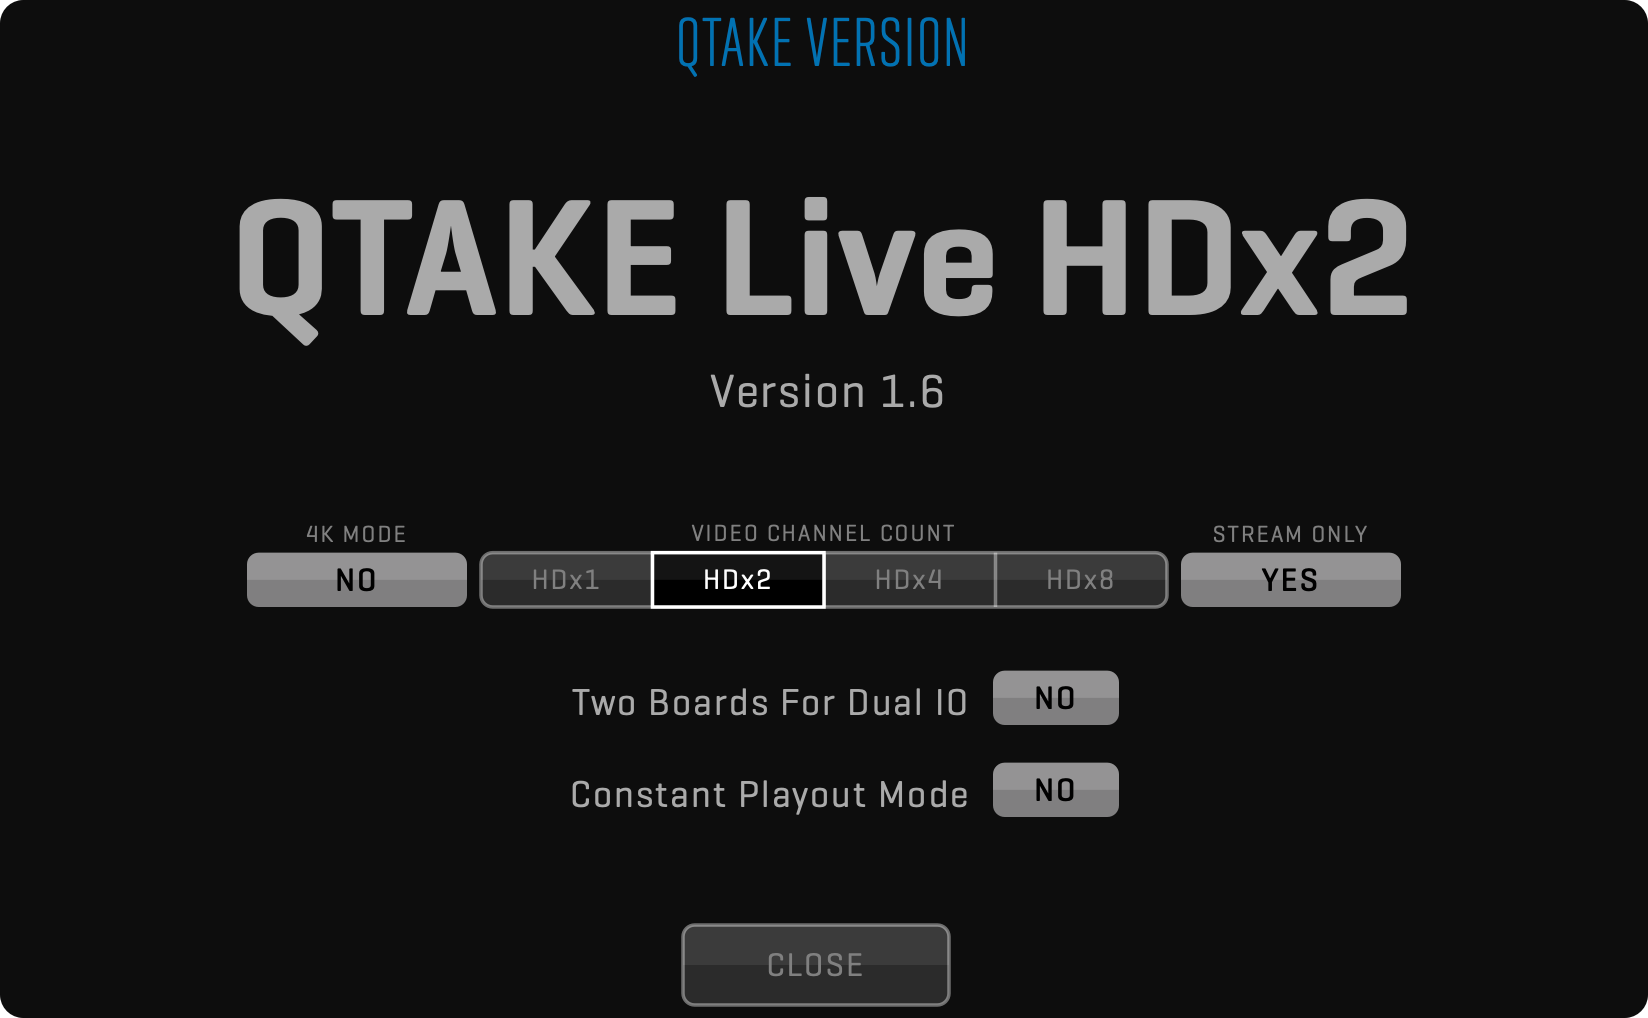
After selecting the required version, click the CLOSE button to restart QTAKE application using the new configuration. In addition to the number of cameras and 4K mode, two preferences are dependent on the version selected:
Two Boards For Dual IO = YES
Constant Playout Mode = YES
You can find more details about these preferences in the Simultaneous SDI Input & Output section.
QTAKE Live
Version dialog contains the STREAM ONLY option that turns QTAKE software into QTAKE Live mode. In this mode, recording, playback, editing, compositing, and all other video-assist-related features are turned off. QTAKE Live is designed to offer a simplified interface and more affordable licensing for productions that require only local or cloud streaming.
See QTAKE Live Modules and Common Modules sections to see what licenses are available for QTAKE Live.
Automatic Updates
On each start, QTAKE will check if a new update is available and will notify you with a red badge inside the STATUS BAR. Click the status bar to open the notifications list.
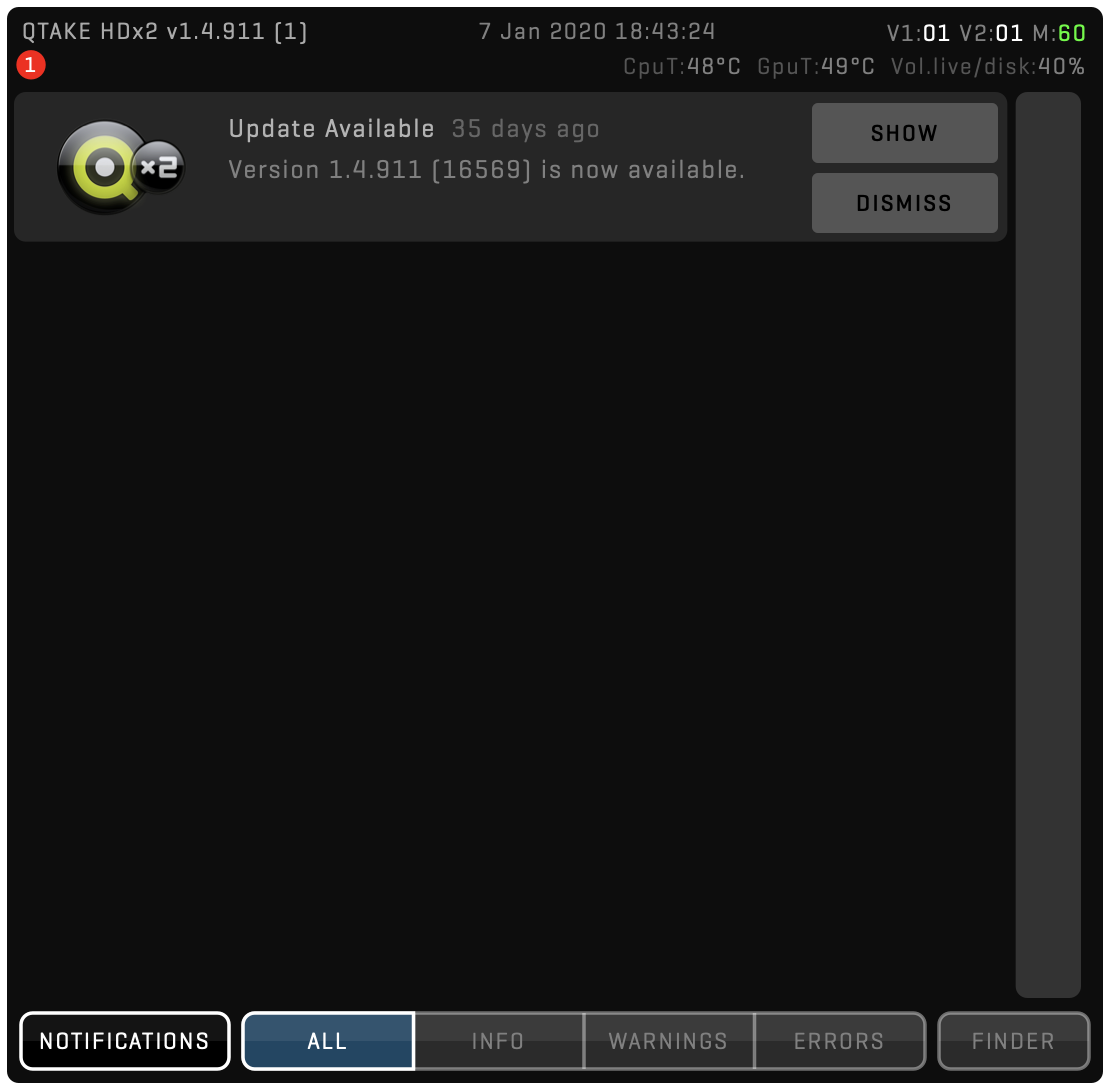
Here you can dismiss the notification or show the update. If you decide to proceed, a dialog with UPDATE details will pop up:
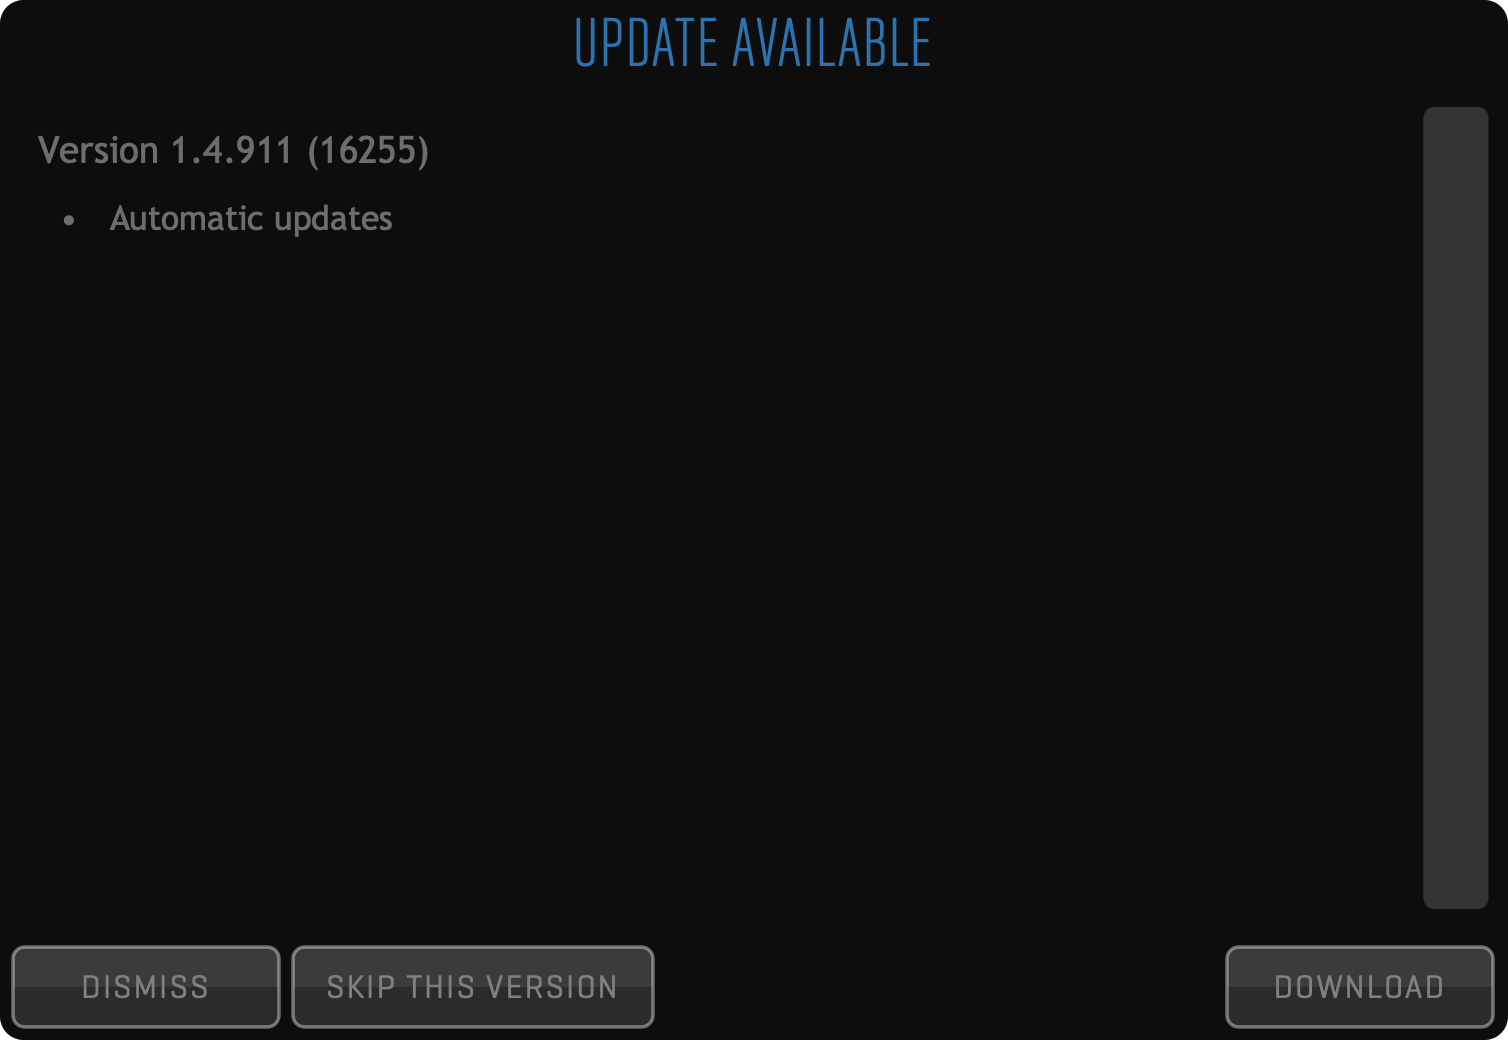
Based on the update notes you can decide to proceed with the download or skip the new version. It is always recommended to keep your app up-to-date.
NETWORK REQUIREMENTS
Networking has become a significant part of the video assist and DIT profession. Whether you are connecting multiple QTAKE systems to provide master/slave control, or streaming video to on-set and remote clients, or just connecting external devices to your computer, a network connection is inevitable.
BANDWIDTH
Required network bandwidth depends on the use case. The most demanding functionality is video streaming, which can average around 3-4Mbps per client per camera for high-quality HD feeds. A single access point can handle around 10 wireless streaming clients, so you should scale your network accordingly. Use a Wi-Fi scanner and manually select radio channels to avoid dropped network packets caused by interference. When possible, use an ethernet cable instead of wireless connectivity.
PORTS
In most cases, no additional configuration is necessary to use QTAKE on your network. However, users on restrictive networks may need to allow traffic on specific ports depending on the QTAKE functionality they want to use.
QTAKE STREAM
To stream over the local network, enable traffic to and from the following ports on the QTAKE Video Assist System:
- TCP 7007
- TCP 8560 (v1.6.008 and later) or 7000 (v1.6.006 and earlier)
- UDP 8567 – 8570
For QTAKE Cloud Stream, enable traffic for the following:
- api.qtake.cloud, TCP 443
- sync.qtake.cloud, TCP 8500
- stream.qtake.live, UDP 8550 – 8551
Do not rely on any particular IP address these currently resolve to. The stream.qtake.live record is updated on each new deployment of QTAKE Cloud service instances, which may happen at any time. If you use it to configure your firewall, ensure it polls for changes every few minutes.
QTAKE SYNC
To access independent playback over the local network, enable traffic to and from the following ports on the QTAKE Server System:
- TCP 8500 – 8600
- TCP 44443
For QTAKE Cloud Sync, enable traffic for the following:
- api.qtake.cloud, TCP 443
- sync.qtake.cloud, TCP 8500 – 8501, 443 and 44443
SECURITY NOTICE
USE OF LEGACY SOFTWARE
The use of legacy software is strongly discouraged, particularly in environments with security, data integrity, or compliance requirements. Although some components may remain technically compatible, legacy software such as QTAKE 1.6 lacks critical controls to ensure data consistency and prevent undetected transfer errors.
Moreover, legacy software no longer receives security updates and has not been validated against recent security assessments. Known issues affecting database consistency and synchronization remain unresolved. For security-focused workflows, use of the currently maintained applications, such as QTAKE Pro and QTAKE Sync, is strongly recommended.
HARDWARE
The basic configuration of a working QTAKE system consists of a computer, a video capture card for input (and optionally output), storage for the recorded and imported media, a GPU output device, and optionally external audio device. Recording, processing, and outputting multi-channel HD and 4K video is taxing these components, and some older computers will work with standard playback requirements. Adding image processing, compositing, or higher-quality codecs could result in dropped frames if the system is not up to the task.
QTAKE LITE works with a multitude of Apple Mac computers, video cards, and audio devices. Listed below is a recommended hardware configuration for the LITE version of QTAKE.
QTAKE LITE
QTAKE LITE is a lightweight, dual-camera version of QTAKE. It can run on less powerful hardware because it lacks advanced image processing, proxy recording, and other CPU and GPU-intensive features.
CPU
Intel quad-core i7 or M1
RAM
8GB memory or more
GPU
AMD Radeon Pro 5300 or similar
MEDIA STORAGE (recommended read/write speed of 150 MB/s)
External USB 3 or Thunderbolt Drive
VIDEO CARD I/O
Two 1-channel or one 2-channel video card.
In case of live processing, either two full duplex or two 2-channel cards are required.
ANALOG AUDIO IO
Focusrite Scarlett 2i2 (or any other external audio card with Core Audio driver)
GPU OUT
The LITE version is designed to be a simple but powerful 2-channel recorder. It uses the video card to output either processed or unprocessed video. Advanced GPU output is only available in regular QTAKE versions.
VIDEO CARDS
Following SDI video cards are natively supported in QTAKE. Additionally, QTAKE can capture video coming from NDI®, RTSP (Teradek Cube), QLS (QTAKE Live Stream), or video cards supported by the macOS system, such as USB-3 connected Teradek Bolt Receiver.
SDI Inputs/Outputs |
Full-duplex Channels |
SDI Passthrough |
SDI Format |
HDMI Inputs/Outputs |
4K Support |
Independent Inputs |
Independent Outputs |
ARRI/Sony Record Flag |
ARRI/Sony/Canon Metadata |
Timecode |
Interface |
|
|---|---|---|---|---|---|---|---|---|---|---|---|---|
| AJA Corvid 88 | 8 | 4 | ●1 | 3G | 0/0 | ● | ● | ● | ● | ● | PCIe | |
| AJA Corvid 44 | 4 | 2 | ●1 | 3G | 0/0 | ● | ● | ● | ● | ● | PCIe | |
| AJA Corvid 44 12G | 4 | 2 | ●1 | 12G | 0/0 | ● | ● | ● | ● | ● | PCIe | |
| AJA T-Tap Pro | 0/1 | n/a | n/a | 12G | 0/1 | ● | n/a | n/a | n/a | n/a | ● | TB3 |
| AJA Io 4K | 4 | 2 | ●1 | 3G | 1/1 | ● | ● | ● | ● | ● | TB | |
| AJA Io 4K Plus | 4 | 2 | ●1 | 12G | 1/1 | ● | ● | ● | ● | ● | TB3 | |
| AJA Io X3 | 4 | 2 | ●1 | 3G | 1/1 | ● | ● | ● | ● | TB3 | ||
| AJA Kona 5 | 4 | 2 | ●1 | 12G | 0/1 | ● | ● | ● | ● | ● | PCIe | |
| AJA Kona 4 | 4 | 2 | ●1 | 3G | 0/1 | ● | ● | ● | ● | ● | PCIe | |
| BMD Decklink Duo | 2/2 | 1 | ●2 | HD | 0/0 | ● | ● | ●6 | ●7 | PCIe | ||
| BMD Decklink Duo 2 | 2/2 | 2 | ●3 | 3G | 0/0 | ● | ● | ●6 | ●7 | PCIe | ||
| BMD Decklink Quad | 4/4 | 2 | ●2 | HD | 0/0 | ● | ● | ●6 | ●7 | PCIe | ||
| BMD Decklink Quad 2 | 4/4 | 4 | ●3 | 3G | 0/0 | ● | ● | ●6 | ●7 | PCIe | ||
| BMD Decklink 8K Pro | 4 | 2 | ●2 | 12G | 0/0 | ● | ● | ● | ●6 | ●7 | PCIe | |
| BMD UltraStudio Recorder 3G | 1/0 | n/a | n/a | 3G | 1/0 | n/a | n/a | ●6 | ●7 | TB3 | ||
| BMD UltraStudio Monitor 3G | 0/1 | n/a | n/a | 3G | 0/1 | n/a | n/a | n/a | n/a | ●7 | TB3 | |
| BMD UltraStudio HD Mini | 1/1 | 1 | ●2 | 3G | 0/0 | ● | ● | ●6 | ●7 | TB3 | ||
| BMD UltraStudio 4K Mini | 1/1 | 1 | ●2 | 12G | 0/0 | ● | ● | ● | ●6 | ●7 | TB3 | |
| Deltacast 12G-elp-h 40 | 4/0 | 0 | n/a | 12G | 0/0 | ● | ● | n/a | ● | ● | ● | PCIe |
| Deltacast 12G-elp-h 4c | 4/4 | 4 | n/a | 12G | 0/0 | ● | ● | ● | ● | ● | ● | PCIe |
| Deltacast 12G-elp 4c | 4 | 4 | n/a | 12G | 0/0 | ● | ● | ● | ● | ● | ● | PCIe |
| Deltacast 12G-e-h 2i1c | 4/4 | 4 | n/a | 3G | 0/0 | ● | ● | ● | ● | ● | ● | PCIe |
| Deltacast 3G-elp-d 8c | 8 | 4 | n/a | 3G | 0/0 | ● | ● | ● | ● | ● | ● | PCIe |
| Deltacast 3G-elp-d 4c | 4 | 2 | n/a | 3G | 0/0 | ● | ● | ● | ● | ● | ● | PCIe |
| Deltacast 3G-elp 40 | 4/0 | 0 | n/a | 3G | 0/0 | ● | ● | n/a | ● | ● | ● | PCIe |
| Deltacast 3G-elp-d 22 | 2/2 | 2 | n/a | 3G | 0/0 | ● | ● | ● | ● | ● | PCIe | |
| IN2CORE ScreenPort SDI | 1/0 | n/a | n/a | 3G | 0/0 | n/a | n/a | ● | ● | ● | USB |
- Multi-channel SDI Passthrough requires frame-synced inputs.
- Not possible to mute SDI passthrough audio.
- Passthrough video has 2 frames of delay.
- Input formats are limited to the same clock family.
- Only ARRI Metadata and only with the camera set to output PsF.
- Only available in 10bit mode.
- Does not support VITC1 timecode.
- Bus-powered device, no loopback TB port.
What if I use more than one video card?
The information in the table is only valid as a comparison between single cards. QTAKE can use multiple video cards to allow for up to 4 inputs and outputs.
Output
The term “output” in this chart only refers to SDI output from the video card. GPU output from QOD+ is independent of video card outputs.
QTAKE RENTAL SHOP
You can rent modules for QTAKE or entire QTAKE bundles via QTAKE Rental Shop. You must create a QTAKE shop account and register one or more DONGLE IDs or COMPUTER IDs to rent modules. Once you register an ID on your account, you can rent modules via QTAKE shop and add additional features and functionality to your QTAKE package with a few simple clicks.
You can also create a QTAKE Shop account and register your dongle or computer directly from QTAKE. See the LICENSE section for more information.
To create a shop account, register machines and rent modules visit: QTAKE Shop
For instructions on how to use the shop, see: INSTRUCTIONS
QTAKE CREDITS
Unlike other QTAKE functionality, which requires a license file with specific modules, QTAKE Cloud Stream service uses consumable CREDITS. See more info in the Cloud Stream section.
INSTALLATION
QTAKE will present an End User License Agreement on the first start. It will also create a folder called QTAKE in the system drive /Applications folder and also these subfolders:
- /Applications/QTAKE
- /CDL (contains CDL color corrections, only created when you save a CDL correction)
- /Certificate (contains SSL certificate that ensures secure communication between QTAKE and QTAKE Monitor)
- /Data (contains database files)
- /Backup (QTAKE creates a backup every 20 hours and keeps a total of 5 backups)
- /Defaults (contains QTAKE project default settings)
- /Docs (contains QTAKE User Guide)
- /FxPresets (This folder contains all the CLIP FX PRESETS that you have saved)
- /GPI (contains GPI settings)
- /Keyboard (contains keyboard shortcuts)
- /Layout (contains GUI layouts)
- /License (contains your QTAKE license files)
- /Log (contains the Qtake_Log.txt file)
- /ApplicationLogs (contains log message output from QTAKE)
- /CrashReport (temporary storage for crash reports)
- /Logo (place an image file named Logo.png here to create a custom NO VIDEO INPUT screen)
- /LutDevices (contains configuration settings for LUT devices)
- /Luts (copy your .cube LUTs to this folder)
- /Prefs (contains editable initialization preferences)
- /Projects (contains Project folders with thumbnails)
- /Tangent (contains configuration files for Tangent Devices, in case you have configured one)
- /Videohub (contains videohub settings)
MacOS user account
QTAKE should be used only from one system account. Using multiple accounts will cause file permissions problems. Instead of creating multiple system accounts, you should create QTAKE users.
QTAKE Preferences
This user guide shows Preferences (PREFS) in MAGENTA. You can change PREFERENCES by editing your QTAKE_Prefs file or changing their value in the PREFERENCES menu. See the PREFERENCES section for more details.
BEFORE YOU START
For performance reasons, make sure to UNCHECK the following features in macOS System Preferences:
- Energy Saver - Put hard disk(s) to sleep when possible
- Energy Saver - Automatic graphics switching
- It is also recommended to set the Computer sleep and Monitor sleep to NEVER and disable any screen saver. Turn off the Spotlight indexing service for your media drives in System Preferences by putting the hard drive into the Privacy section.
DON’T SET SYSTEM AUDIO INPUT OR OUTPUT TO AJA DEVICE!
QTAKE is using AJA devices directly. Allowing the system to send audio to the AJA device can lead to corrupted audio output.
We recommend using static refresh rate of 60Hz on GUI or External monitors to prevent unexpected screen flashing. Variable refresh rate or Apple’s ProMotion is not recommended as it can create excessive screen refresh or black frames.
Workflow
Originally designed as a feature-rich video assist tool, QTAKE now goes way beyond its roots. It offers complete on-set workflow, from recording camera output to exporting RAW-based dailies. Using a single tool for all these tasks saves a lot of time because there is no need to export, import, and convert projects between various 3rd party apps.
For example, you can apply the same look to RAW files you used during live monitoring. It simplifies rendering dailies to a single-click action.
INPUTS AND RECORDING
QTAKE can record video, audio, and metadata from various sources. It usually captures uncompressed signals using the SDI video card, encoding it to the efficient Apple ProRes codec and storing it in Apple QuickTime file format. See the PROJECT Menu section for more details about the Project setup.
Following is an overview of the recording features:
- Recording 8 camera feeds with up to 16 channels of audio
- Video, audio, and metadata mixed from different sources
- Adjustable delay for video, audio, and timecode
- Pulldown removal recording mode
- Manual or automatic record start and stop
- Setting multiple ranges during recording
- Thumbnail frame selection during recording
- Full-resolution screenshots
- Entering metadata during live monitoring or recording
- Automatic incrementation of the take number
- Capturing metadata from SDI signal or network interface
- Simultaneously recording processed PROXY media files
- Recording live composites if quick export is needed
For more details about recording, see the RECORD Menu section.
PLAYBACK
There are numerous playback options available in QTAKE to provide the best possible navigation through clips, which sometimes contain multiple takes recorded in a single run.
- Regular speed forward and reverse playback
- Variable speed forward and reverse playback
- Speed ramping with multiple keyframes
- Frame-by-frame and custom time skip function
- Jump to IN or OUT mark
- Jog and shuttle playback
- Time slider
- Multiple IN/OUT ranges with multiple groups
- Chapter markers with conversion to ranges
- Loop single range or all ranges
- Timecode or frame count display
- Slave playback with custom offset
- Synced playback with custom offset for each View
- GPI-triggered playback
For more details about playback see the PLAY Menu section.
PERSONAL PLAYBACK
Traditionally, the video assist operator has provided playback for the director. The big downside of this centralized playback concept is that all on-set monitors show the same clip. However, sometimes it is required to show a different clip to the producer, script supervisor, VFX supervisor, etc.
QTAKE SERVER application solves this problem by providing independent playback for any authorized crew member. You can access a QTAKE project through the QTAKE MONITOR app on personal portable devices such as iPhones and iPads. In addition to clip browsing and playback, crew members can enter metadata values independently of the QTAKE operator.
All data is automatically synchronized so you can share all information, while QTAKE SERVER will not allow duplicate value entries. For example, the script supervisor doesn’t need to enter lens info because it has already been entered by the assistant camera or extracted directly from the SDI camera feed.
OUTPUTS AND STREAMING
The most common output from QTAKE is over the SDI interface. You can achieve this using a video card output, or you can also use a dedicated QOD+ (QTAKE Output Device), which offers lower latency and more advanced output options, such as multi-view, stereoscopic output, etc. In addition to traditional SDI, you can use the NDI® interface, which provides high-quality output over standard network infrastructure. NDI input and output require STREAM module license.
WIRELESS STREAMING
One of the many powerful features of QTAKE is wireless streaming to iOS devices. Using a custom streaming protocol, QTAKE provides secure, ultra-low latency output of the processed image for up to 160 clients. Streaming can work over a local Wi-Fi network, but it can use QTAKE Cloud to establish a remote session over the Internet. See more details in the STREAM Menu section.
Dolby Vision®
Starting with version 1.6, QTAKE integrates support for the Dolby Vision set of technologies for HDR mastering and delivery, developed by Dolby Laboratories. One of the most important use cases this integration enables is remote color-grading. There are many cases when clients can not attend editing or color-grading session in person and can not rely on exported clips because of the slow turn-around. QTAKE offers a solution for interactive and effective remote grading thanks to its high-quality, low-latency streaming of Dolby Vision-enabled content. Current Dolby Vision functionality is included in the GRADE Module.
Setup
When starting a QTAKE project, you have to set HDR MODE to Dolby Vision® 2.9 or 4.0 using the project settings window.

Next, you need to set MASTERING and TARGET monitor from the available presets.

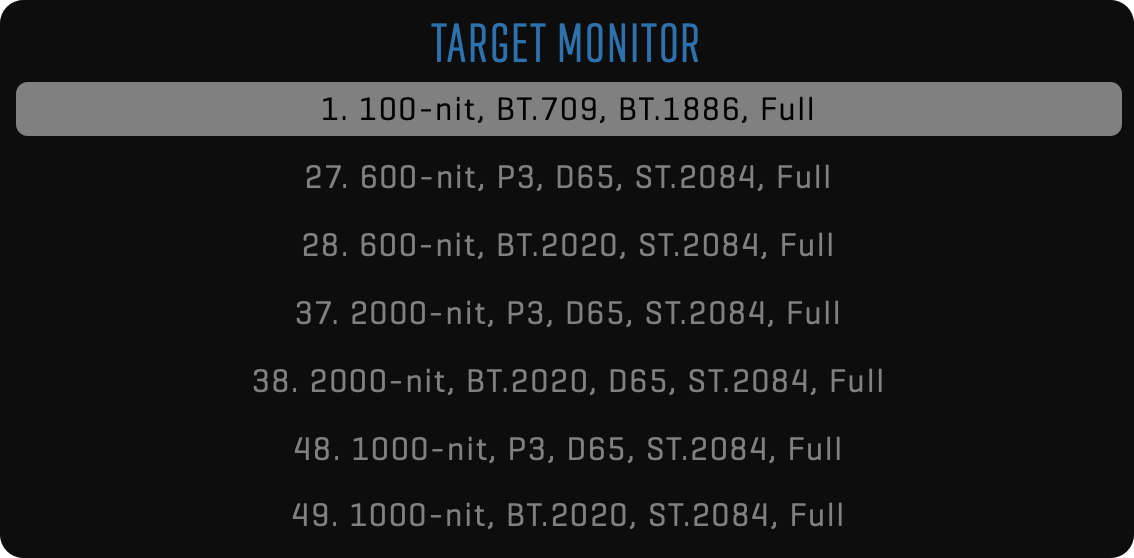
Alternatively, you can turn on the CUSTOM option to manually set values for PRIMARIES, WHITE POINT, MINIMUM LUMINANCE, and MAXIMUM LUMINANCE according to your monitor specification.
Input
If available, QTAKE will extract frame-based Dolby Vision® metadata when capturing live HDMI signal using a compatible video card. In the case of SDI, QTAKE will extract Dolby Vision metadata if the signal was generated by another QTAKE system. In addition to live input, QTAKE can also import video files with metadata contained in the external XML file.
Output
When using HDMI output, Dolby Vision® metadata is embedded into the signal using the “tunneling” method, compatible with Dolby Vision TV devices. Additionally, QTAKE can output Dolby Vision-enabled content over SDI output. In this case, metadata is embedded into the SDI signal to provide a connection to another QTAKE system. When remote monitoring is required, QTAKE will embed Dolby Vision metadata into QTAKE Cloud Stream. See more info in the Live Stream section below.
Realtime Analysis
When Dolby Vision® output is enabled and no metadata is detected in the input signal, QTAKE will automatically perform real-time Dolby Vision analysis. The result of this analysis is the L1 metadata, used to provide Dolby Vision enabled output to supported systems, such as Dolby Vision TV devices or another QTAKE system.
Live Stream
As mentioned, the most common use case empowered by Dolby Vision® support in QTAKE is the remote color grading or editing session. This setup requires two QTAKE systems:
SENDER - QTAKE System residing in the color-grading or editing suite, capturing color-graded Dolby Vision output and streaming it over the QTAKE Cloud.
RECEIVER - client-side QTAKE system responsible for receiving QTAKE Stream and providing output to Dolby Vision-enabled HDMI monitor or a TV device.

To enable Dolby Vision metadata in QTAKE Stream, open the STREAM SETUP (long click on Stream button in STREAM toolbar) window on the sender QTAKE system, click the double arrow (») next to NETWORK SETTINGS button to reveal HDR option for each stream and set it to DV® (Dolby Vision). On the receiver system, enable Dolby Vision output as described in the Dolby Vision output section.
Dolby, Dolby Vision, and the double-D symbol are registered trademarks of Dolby Laboratories Licensing Corporation.
METADATA
QTAKE is second to none when it comes to metadata. Projects and clips contain pre-defined metadata fields to store the most common information, but you can create additional custom metadata to fit any production type. Following is an overview of the metadata features:
- Fast metadata entry using choices and keywords
- Selection of the metadata source per field
- Metadata synchronization between cameras
- Automatic copy of value for Shot, Scene, or Episode
- Custom metadata fields with different value types
- Support for regional settings and units
- Access permissions using metadata groups
- Synchronization over local network or cloud
- Static and dynamic (frame-based) metadata support
See the META section for more details about metadata.
ALE
Avid Log Exchange is the most popular format for metadata exchange between 3rd party systems. QTAKE provides custom mapping for both the import and export of ALE files. You can find more details in the Import ALE and Export ALE sections.
RAW
New RAW module enables import, playback, and processing of RAW camera media. It is the highest quality media, comparable to analog negative stock. Usually, it is an uncompressed or slightly compressed read-out of the bayer sensor, which means it needs heavy-duty computing to transform it into a regular RGB image suitable for viewing. Each camera vendor has a different format and color science. QTAKE supports the following RAW file formats:
- ARRI RAW (.ari) and ARRI MXF (.mxf)
- SONY RAW and SONY X-OCN (.mxf)
- RED RAW (.r3d)
- CANON RAW MXF (.mxf)
- DMG (.dmg)
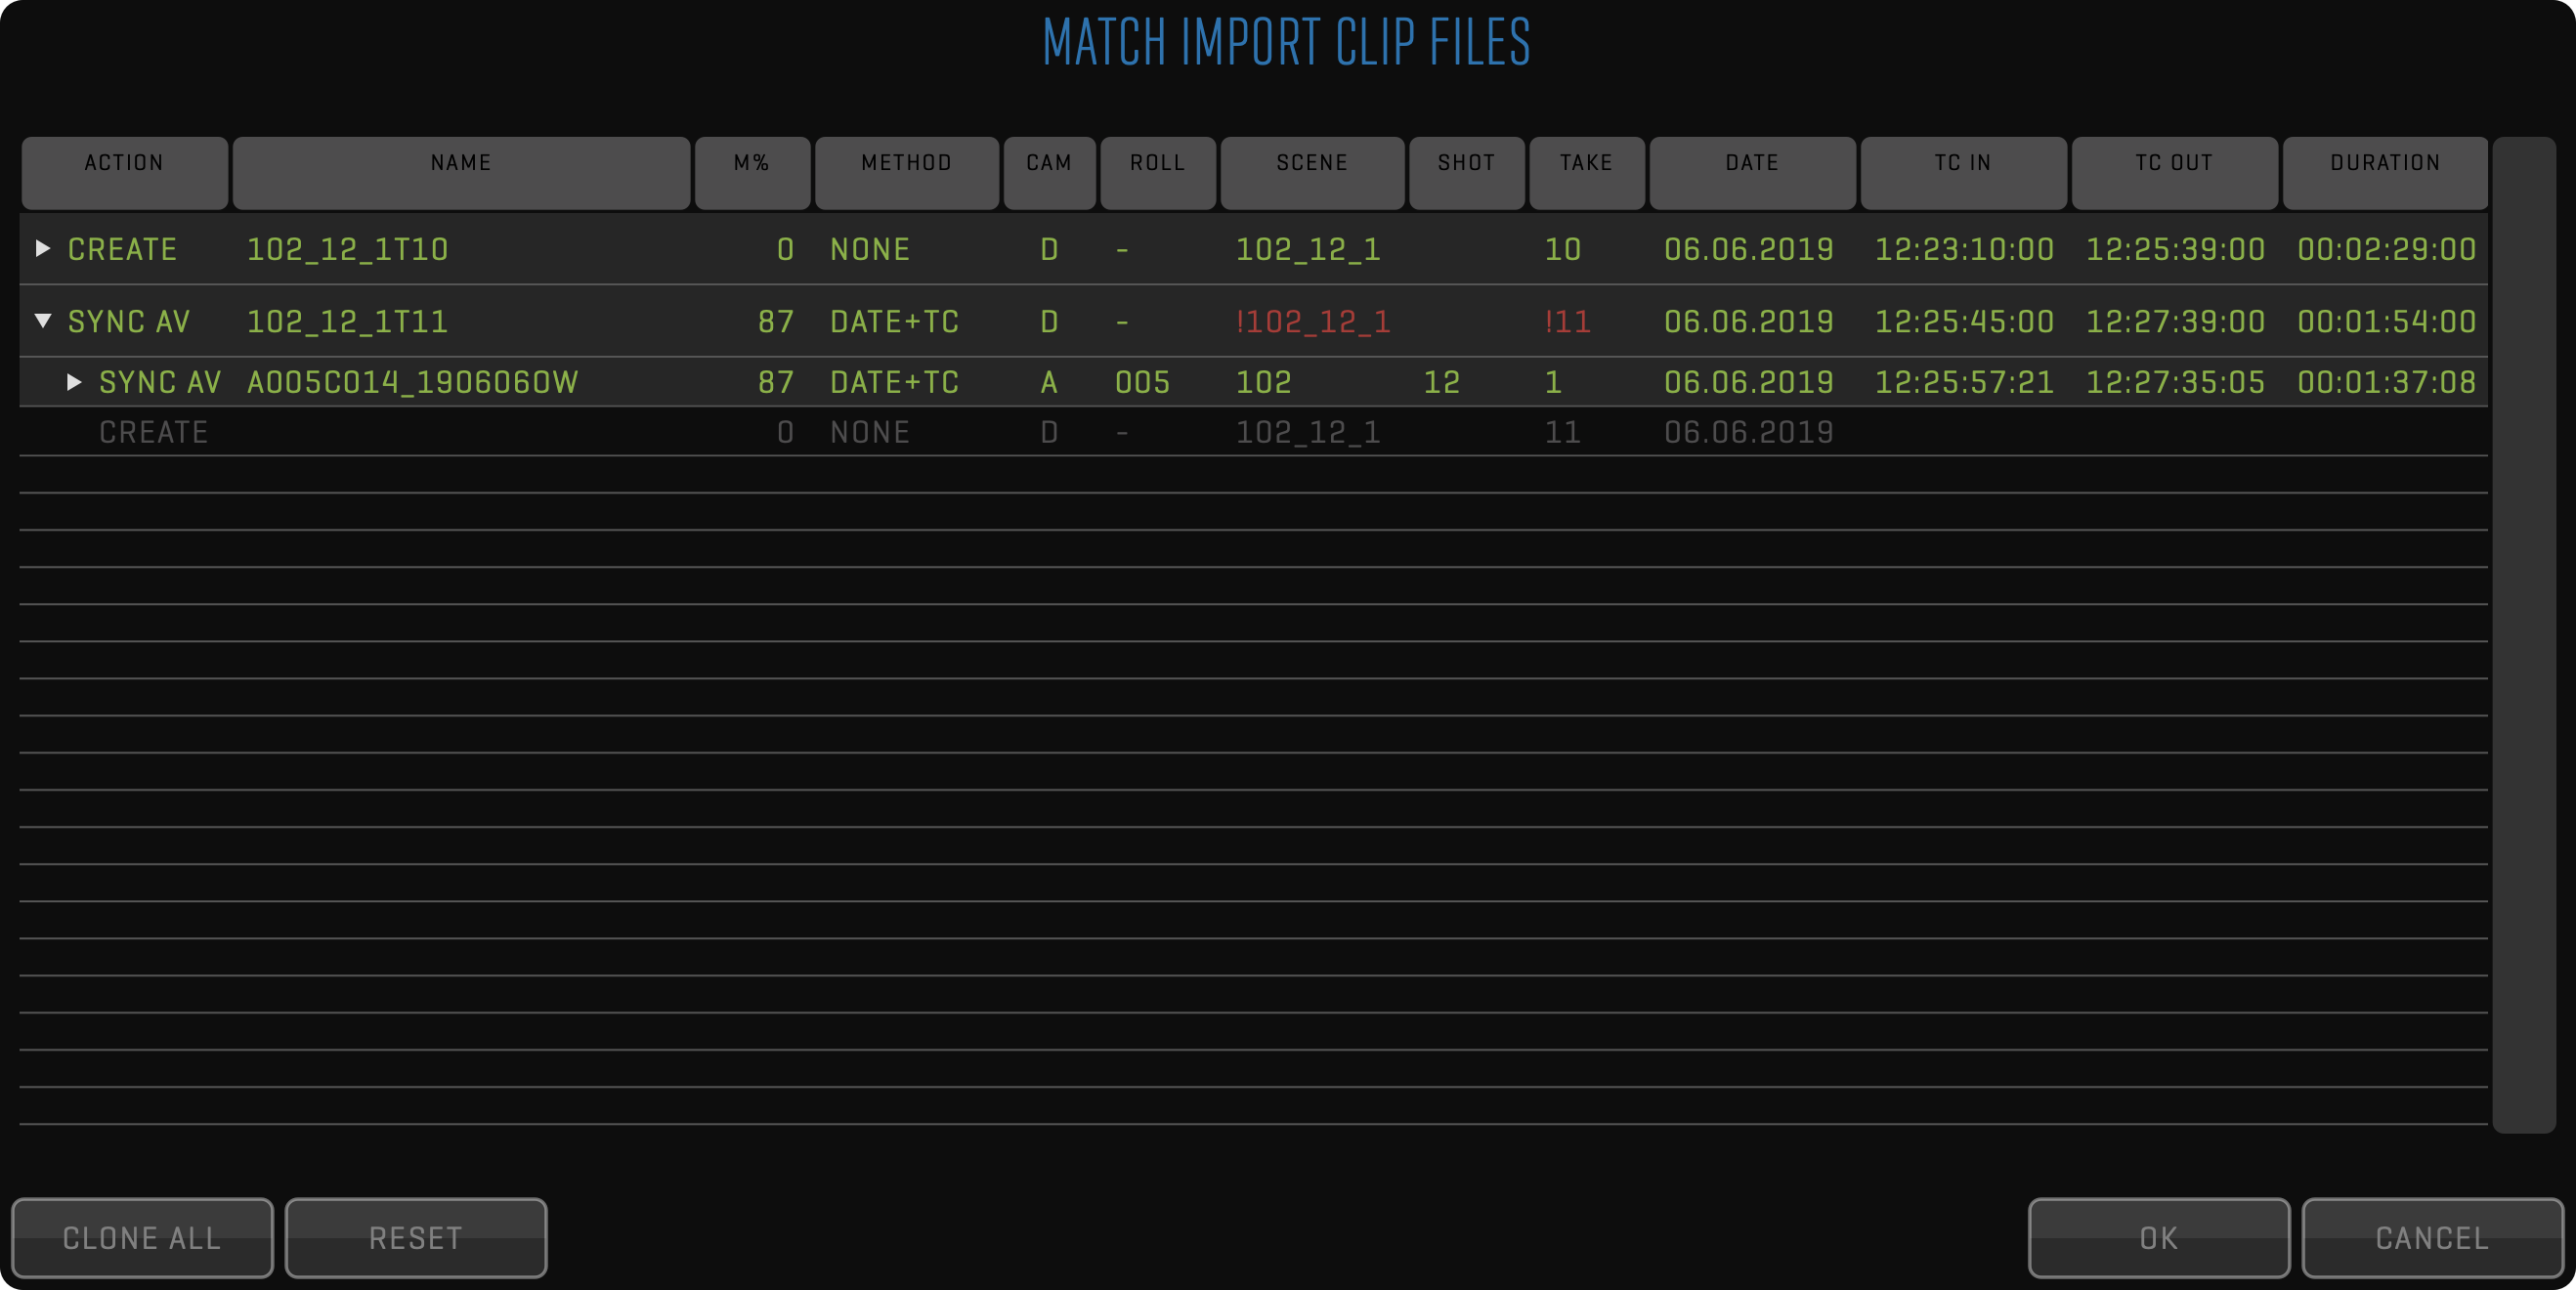
MATCHER
Since QTAKE is used to record camera output for video assist purposes, it contains all clips captured by the camera. However, the SDI interface used on most professional cameras limits the media resolution, frame rate, and color fidelity. To provide full-quality dailies, you can import original camera media.
After importing RAW camera media files, QTAKE tries to match them to existing clips to preserve all entered metadata, live grading, clip effects, sequences, etc. The best matching method is based on CMF (Camera Media Filename) because it is 100% accurate. If no CMF is recorded, timecode, date, and camera letter is used instead. If the result is not 100% accurate, QTAKE will show all hits and let you decide which clip new media should link to.
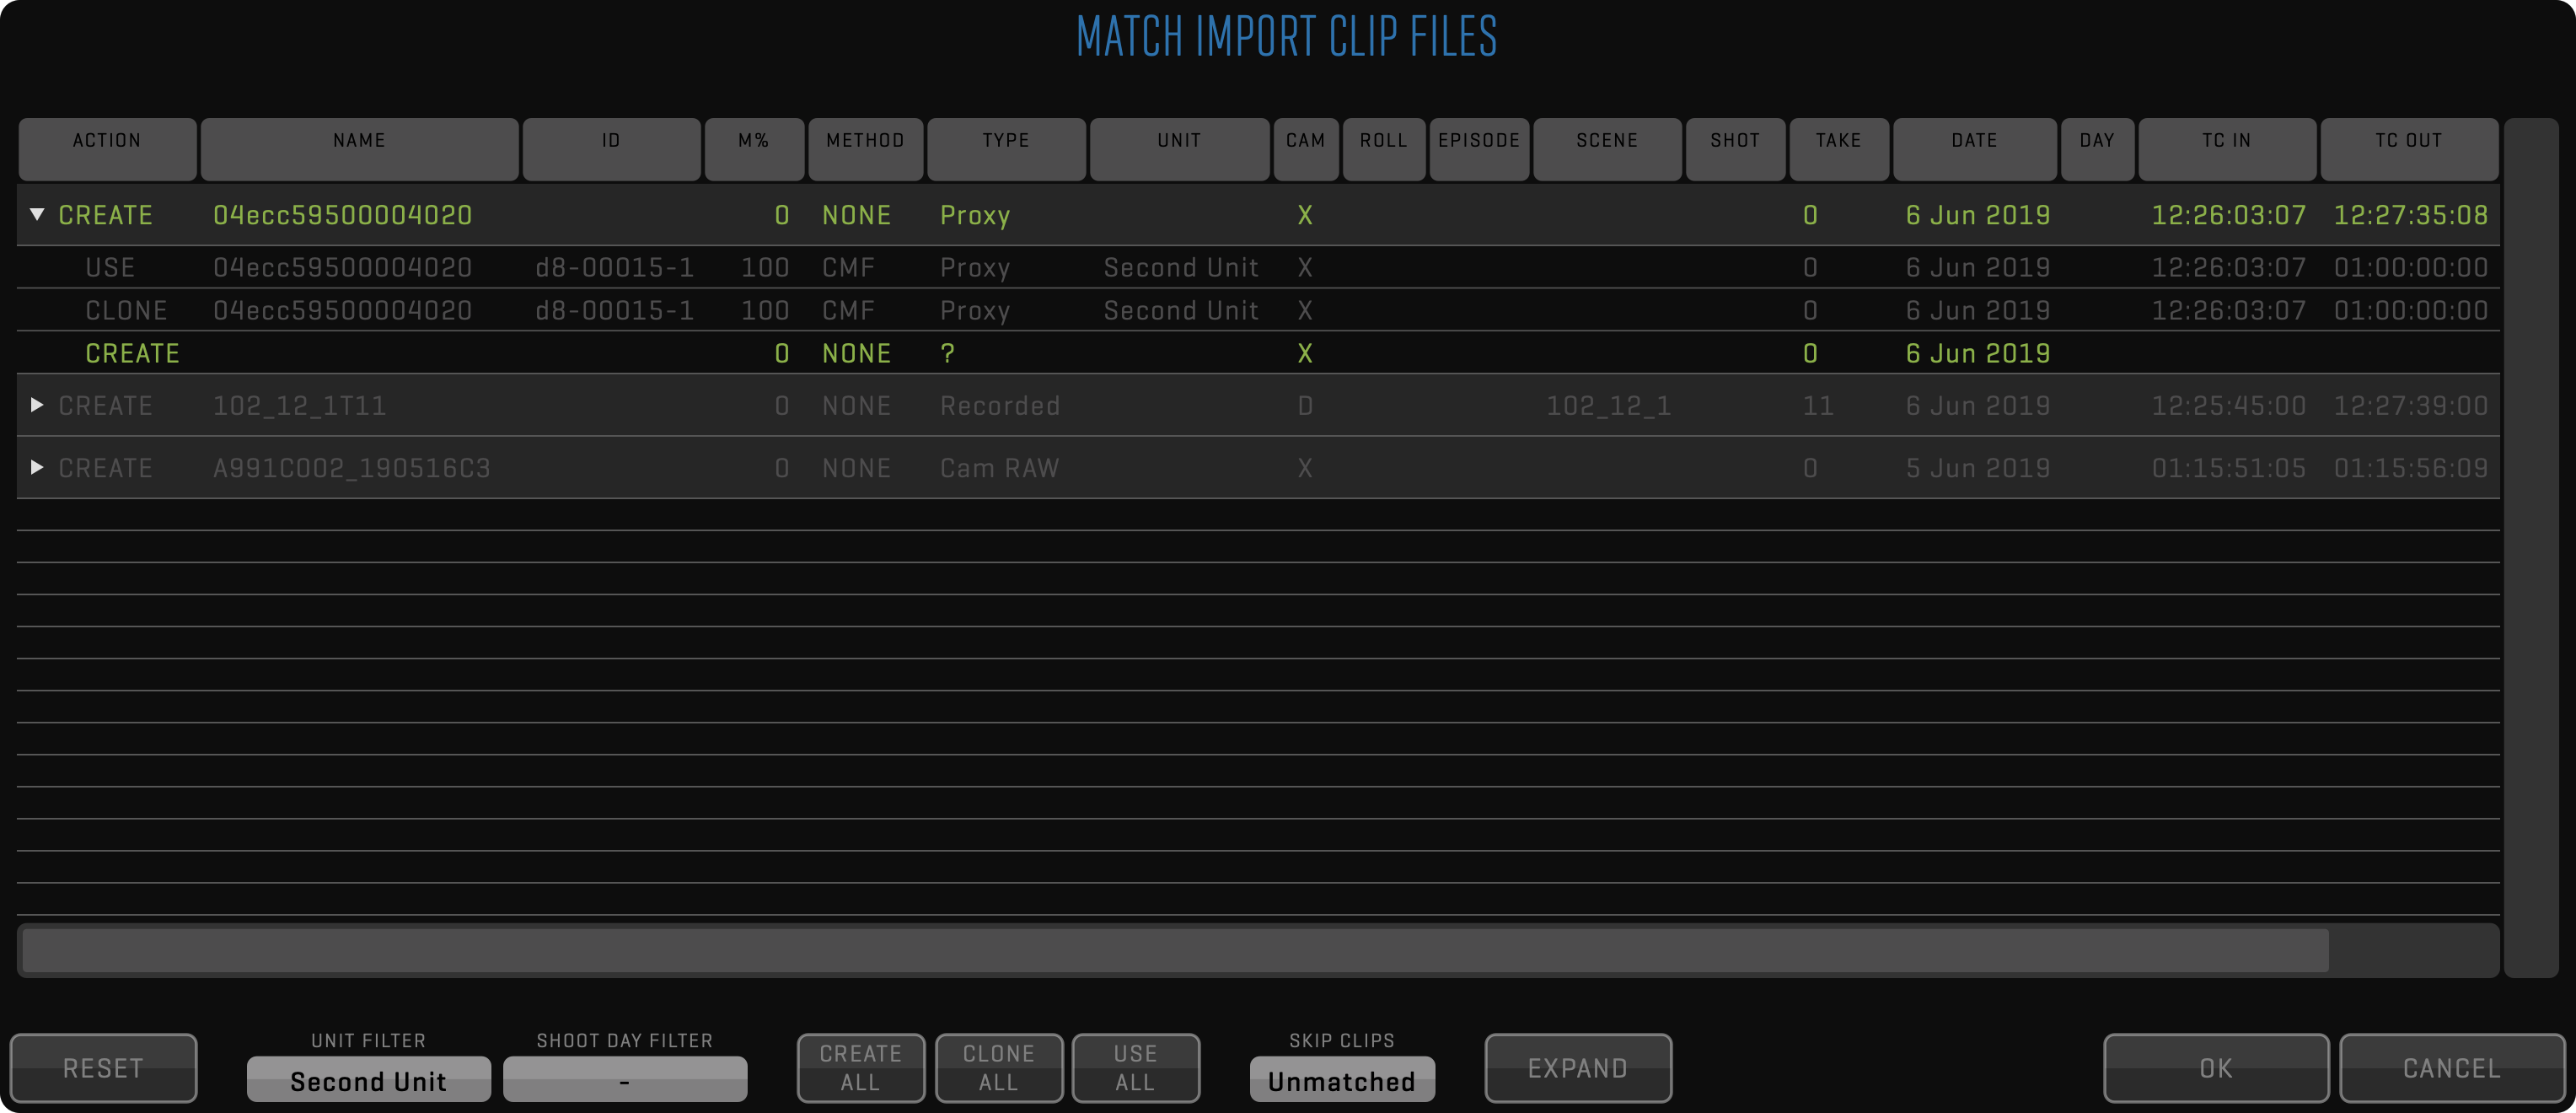
Each imported or linked file will be represented by one row in the matching table. Clicking the row will toggle its color. If the row is discolored, it will be skipped, and only colored files will be imported. You can expand each row to select the import method. There are 4 options available based on the result of the matching process:
- CREATE - media file will be imported and stored as a new clip
- USE - media file will be attached to existing matched clip as respective media type
- CLONE - media file will be imported and stored as a new clip, but QTAKE will clone existing matched clip metadata
- AV SYNC - new audio clip will be created, and audio media will be attached to matching video clips
In some cases, you may need to narrow down the number of clips that QTAKE is trying to match to avoid false matches. You can do this using UNIT and SHOOT DAY filters, which will match import only to clips from the specific unit or shoot day. Additionally, you can easily discard the import of the MATCHED or UNMATCHED clips using the SKIP filter.
REALTIME IMAGE PROCESSING
All image processing is executed in real-time, which means it can be used both for live feed and recorded clips. It is recommended to always record clean log image without LUTs or overlays applied. This non-destructive workflow will allow you to tweak any aspect of the final image at any time during the life cycle of each clip.
COLOR GRADING
Most professional cameras will record and output flat signal with a wide gamut color space to provide as much dynamic range as possible. For on-set monitoring, you can just apply a simple Log to Rec.709 conversion using pre-defined LUTs to provide a standard contrast image. But filmmakers often want to establish a specific look when preparing and lighting the scene.
QTAKE offers professional color correction tools. In addition to internal processing, QTAKE can send live color grading data to an external LUT box to provide zero-delay processing. For more details on color correction see COLOR CATEGORY section.
LIVE VFX COMPOSITING
QTAKE has a dedicated room for compositing. It uses two video channels to perform real-time dual-layer composite using Chroma Key, Luma Key, Wipe, and various blending modes. Each layer can have an unlimited number of effects, such as transformation, masking, color correction, blur, etc. If more layers are required, the composite can be rendered and used as a single layer while adding a new one. QTAKE has full control over the timing of each layer, so compositing can be used for stacking motion control passes. In addition to GPI triggering, there is a timecode chase feature called SLAVE PLAYBACK. This means that you can preview blending with a pre-recorded background even during the motion control browse move.
CGI
When the pre-recorded or pre-rendered background is not good enough, there is an option to import a 3D CGI scene. In combination with capturing motion control or motion tracking data, QTAKE can create a virtual 2D or stereoscopic camera to render a CGI background and composite it with a live or playback image. You can place a live layer at a certain 3D depth to have CGI elements appear in the foreground and background.
ON-SET EDITING
A simple built-in editor helps the director quickly check continuity. Fast trimming with all popular trimming types works both with precision frame-by-frame and view-drag modes. After switching back from the EDIT room, the sequence is accessible inside the SHOOT or COMPOSITE room as a regular clip.
AUTOMATED PIPELINE EXPORT
One of the most powerful features of QTAKE 1.5 is the new file export. After selecting clips in the LIST, click the FUNCTION button and choose the EXPORT TO FILE option.
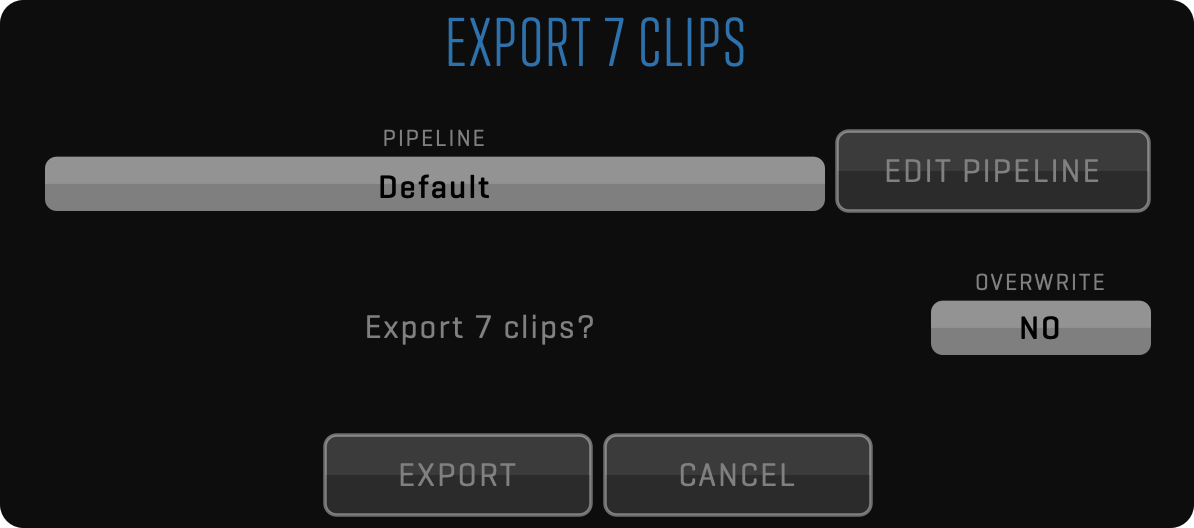
This simple dialog will open to let you select the export process using the PIPELINE. Click the EDIT PIPELINE button to customize it. Turn on the OVERWRITE option in case the same files were already exported and you wish to overwrite them.
PIPELINE
The essential tool that makes automatic export possible is the PIPELINE. It allows you to create a complex template that includes all stages of the process. Pipeline provides the most efficient way to export multiple deliverables because it supports branching. This means that parts of the process that are common to all deliverables are performed only once.
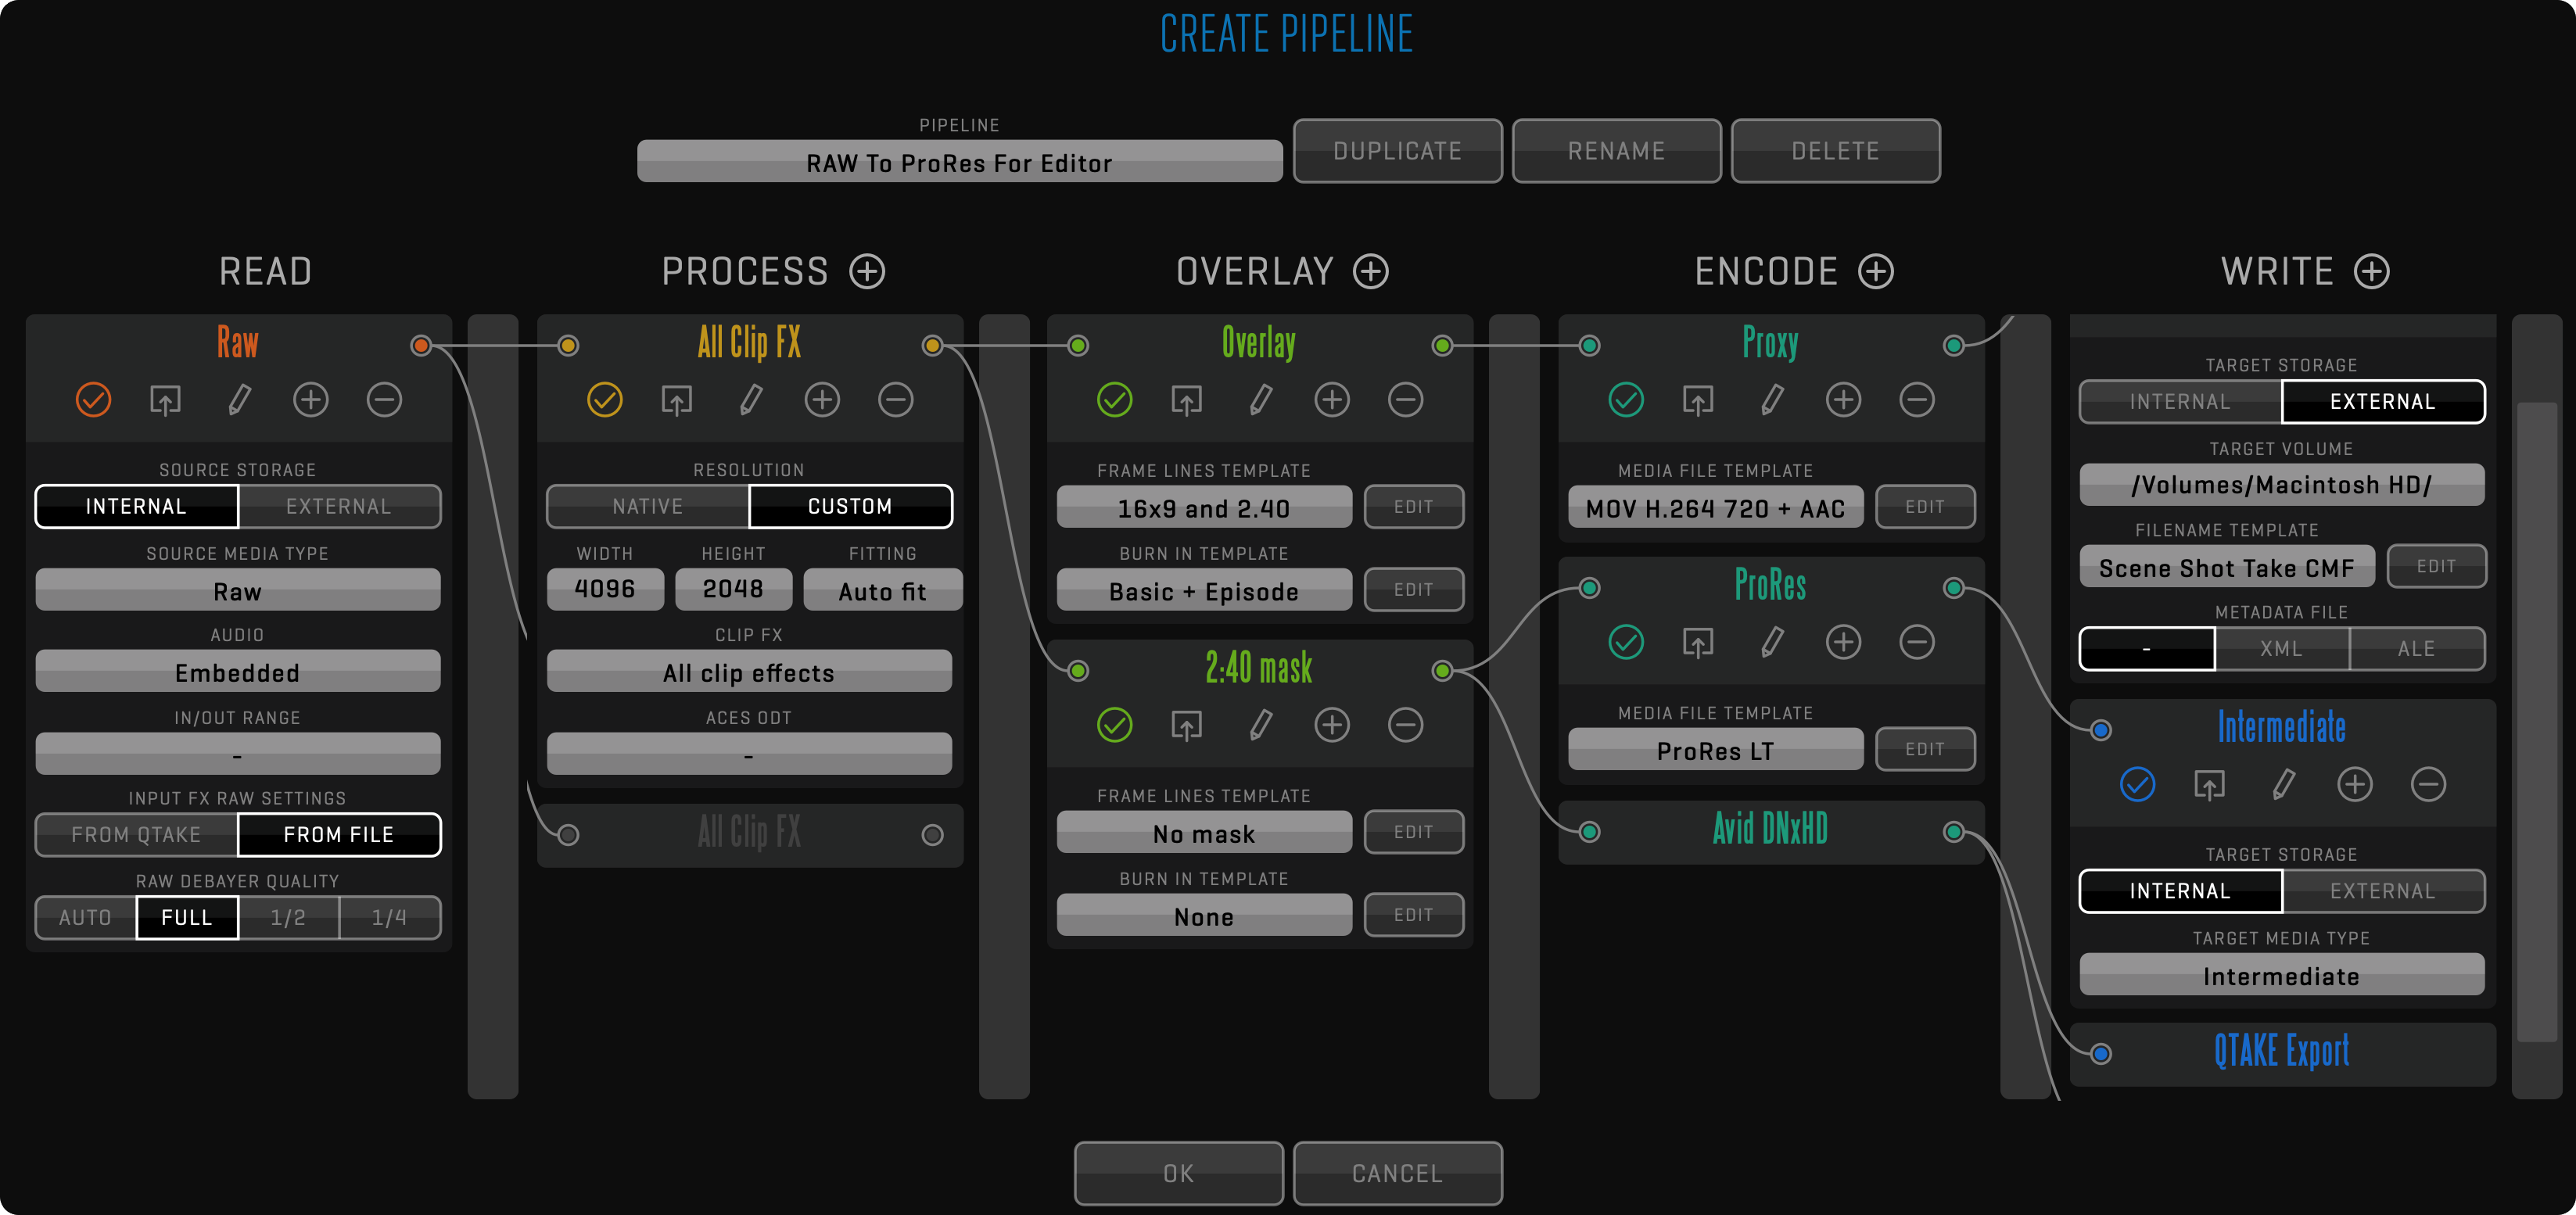
The PIPELINE is formed by creating and connecting nodes in five different columns, which represent stages of the export process.
READ
The READ node is used to specify the rendering source. Set the SOURCE MEDIA TYPE to define what type of media will be used to process selected clips. The AUDIO option is used to select if embedded or external audio should be used. IN/OUT RANGE defines if the whole clip duration is rendered or only part of it. In case of RAW media, you can select FILE-based or QTAKE-based INPUT FX RAW SETTINGS as well as RAW DEBAYER QUALITY. If set to AUTO, it will use quality settings from the playback interface. Read node can branch into multiple process nodes to speed up the rendering of multiple look versions.
PROCESS
Process node is used to apply CLIP FX and ACES ODT. You can choose to render selected clips with all effects stored for specified media type or only the LUT effect. ACES output transform contains all available options from the current ACES version. By default, the processing is done in the NATIVE resolution of the incoming frames, but you can select CUSTOM working resolution to automatically scale incoming frames to selected WIDTH and HEIGHT, using the selected FITTING method. Process nodes can branch into multiple overlay nodes to speed up the rendering of multiple deliverables using different overlays.
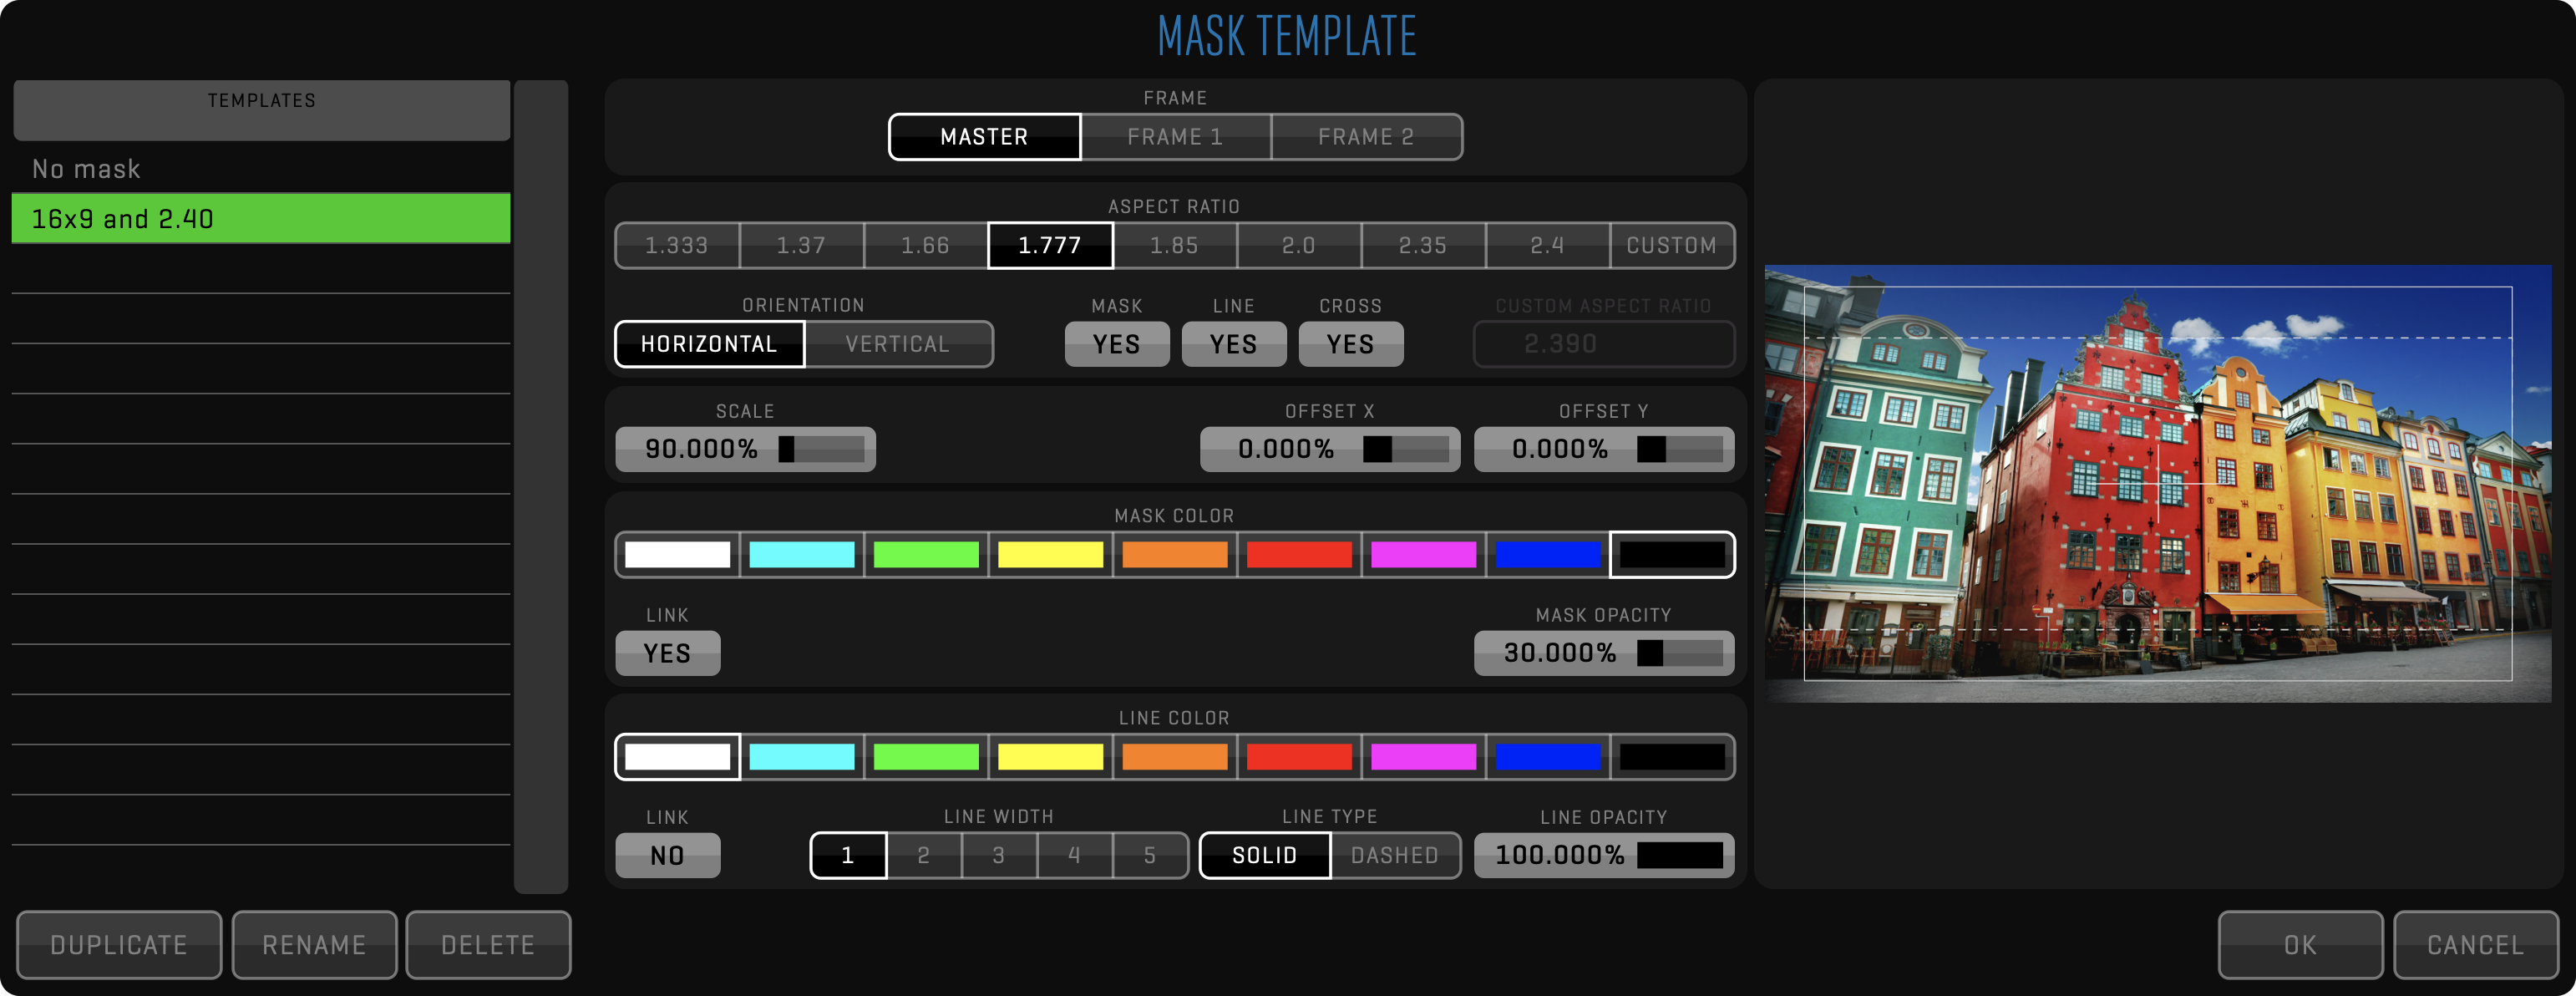
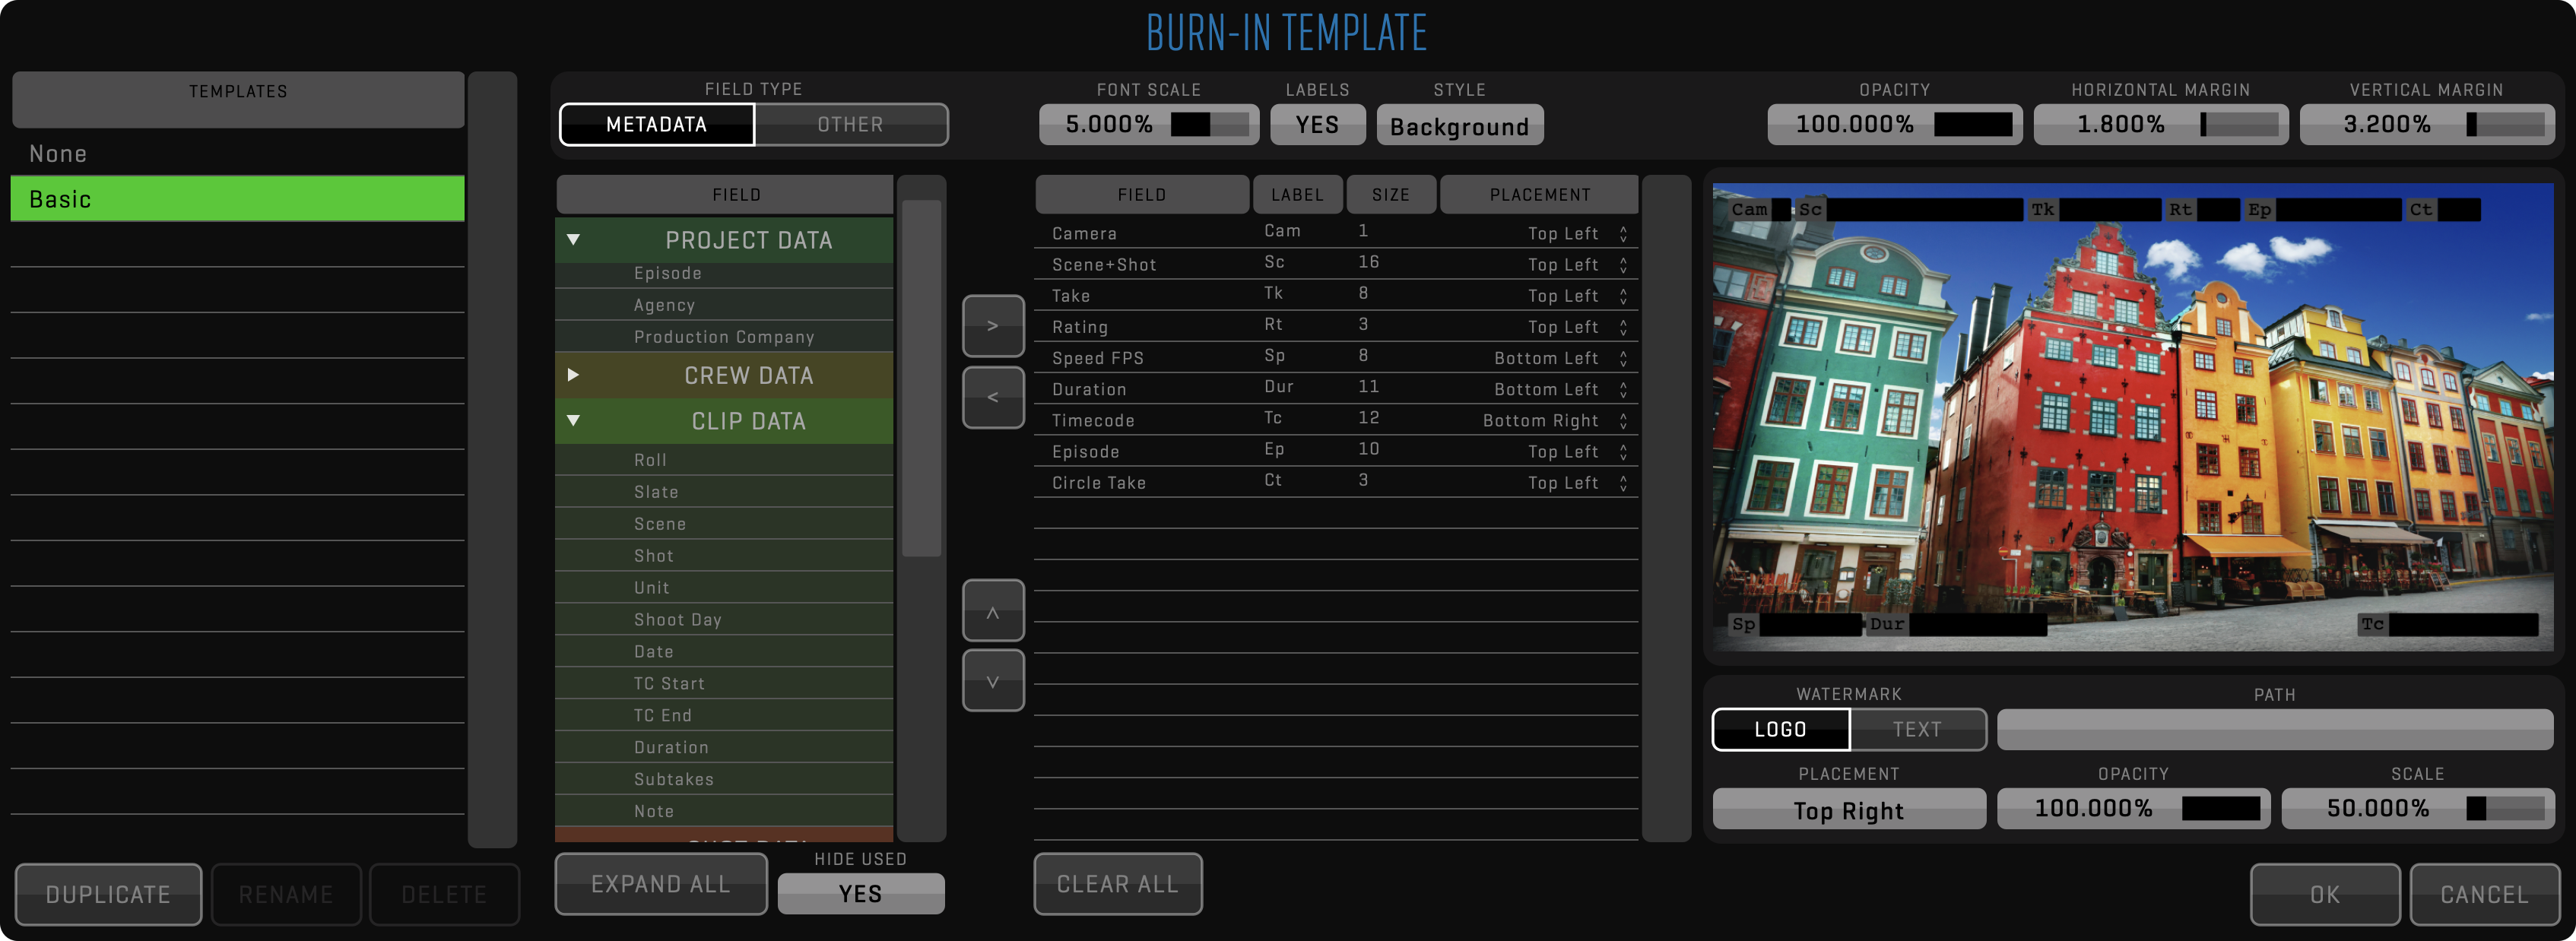
OVERLAY
The overlay node is used to apply FRAME LINES and BURN IN. Both of these functions are using templates, which can be customized by clicking the EDIT button. Overlay nodes can branch into multiple encode nodes to speed up exporting of multiple deliverables using different file formats and codecs.
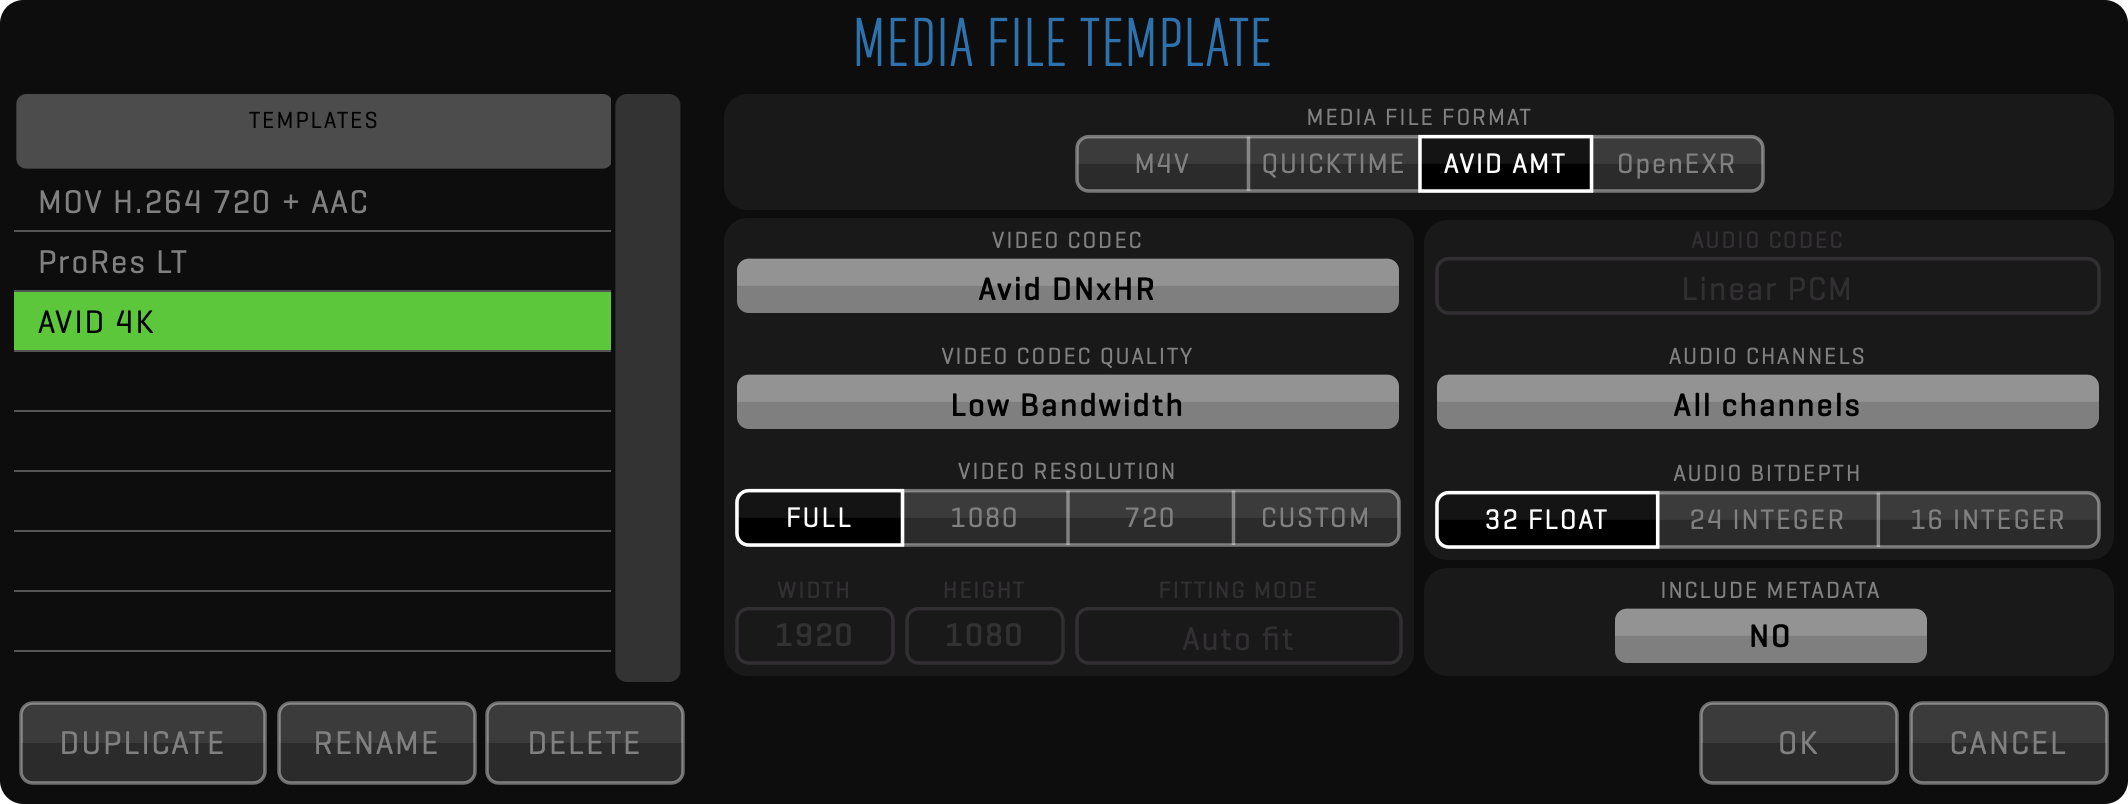
ENCODE
Encode node is used to specify the output file format using MEDIA FILE TEMPLATE. Click the EDIT button to create new templates. Encode nodes can branch into multiple write nodes to provide multiple file copies in a single pass.
WRITE
Write nodes are used to write the resulting file to TARGET STORAGE.
- INTERNAL
Media file will be attached to the source clip with specified TARGET MEDIA TYPE and will use internal storage, just as if it was recorded or imported. It is limited to full duration because each media type for the clip should have the same duration. You can export clip as Proxy, Intermediate and Proxy Transcoded media type.
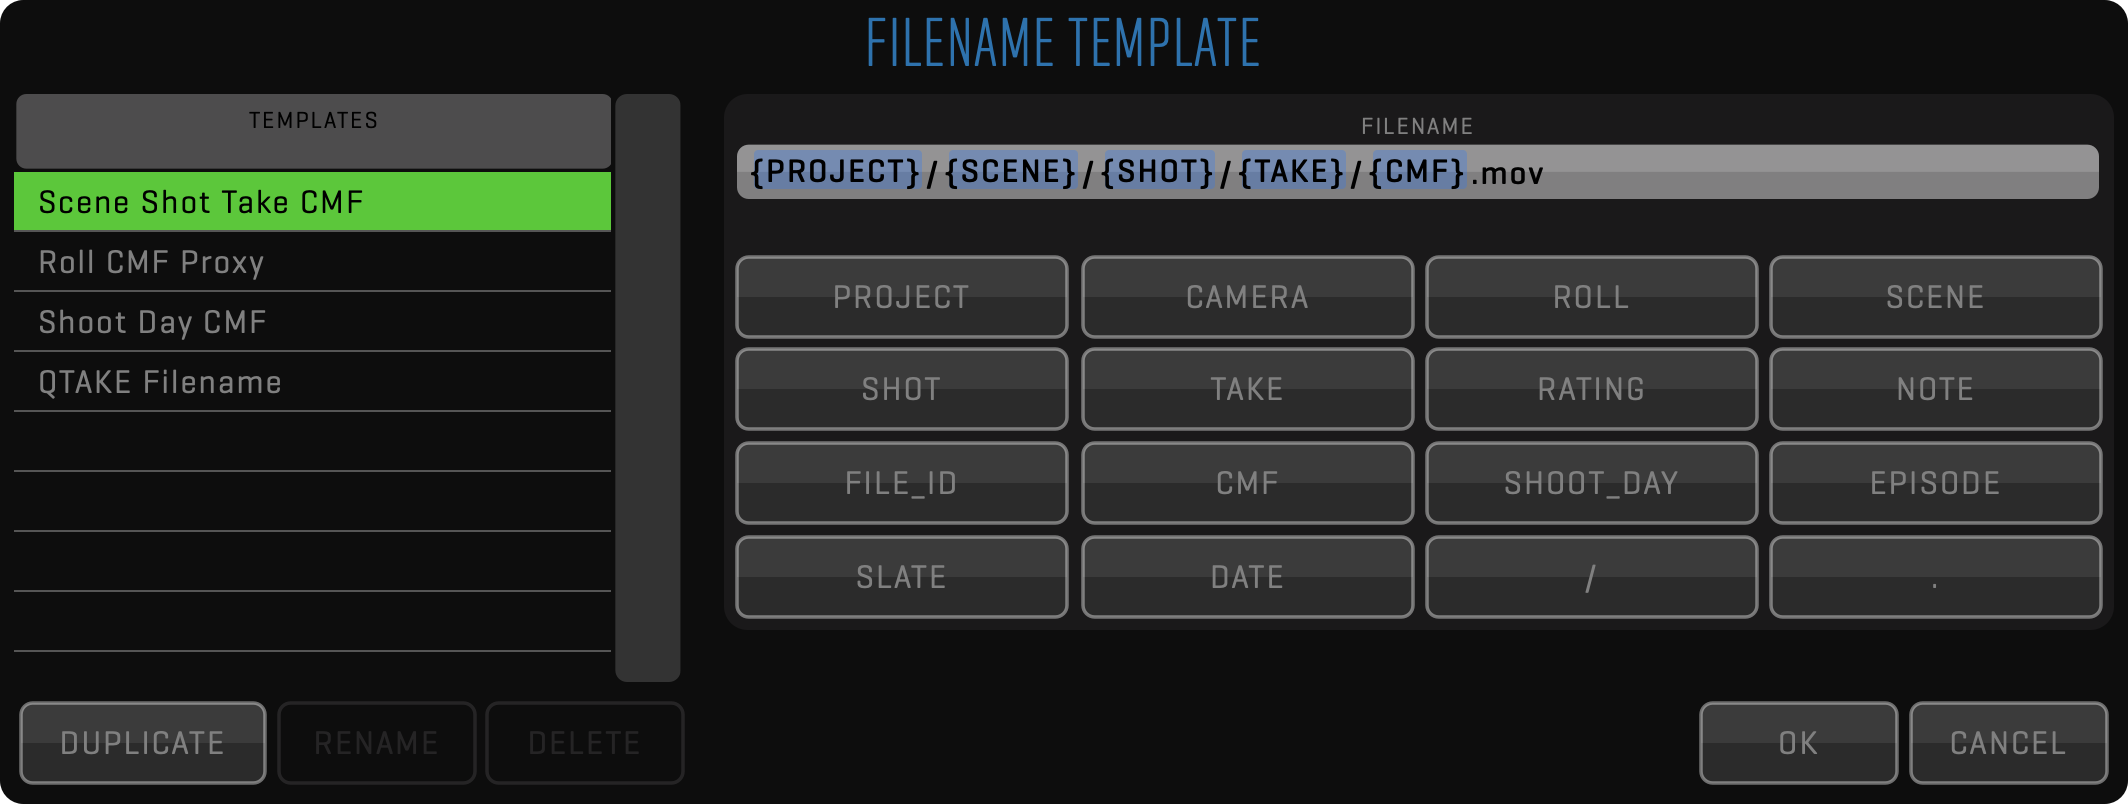
Note that one media type can store only one media file. If you are exporting a clip to INTERNAL storage and the clip already has a media file of the selected type, you have to use the OVERWRITE option. - EXTERNAL
Used when exporting to 3rd party systems, so clips can be rendered with any duration and written to any destination using a FILENAME TEMPLATE. The filename can be customized using different metadata values as well as static text. In addition to media, you can export metadata in XML or ALE format. While XML contains complete QTAKE metadata, ALE export can be customized using ALE Export Templates.
It is possible that, depending on the selected criteria, the FILENAME TEMPLATE could generate duplicate filenames for different clips. In this case, QTAKE won’t overwrite the files, but an incremented suffix will be added automatically at the end of each duplicated name.
Touchscreen UI
QTAKE is primarily designed for use with a touchscreen monitor. This provides you with a high level of interactivity, comfort, and speed. However, the software can be easily used with standard input peripherals, like a keyboard and mouse. Almost every control has its dedicated keyboard shortcut to make your work faster using the keyboard. While QTAKE allows you to customize these shortcuts this document will refer to the default values.
USER INTERFACE
The application does not use standard OS controls. We have designed custom, finger-sized controls to accommodate the touch nature of the UI as well as resolution independence.
BUTTON is a basic element of the UI. By pressing and releasing a button you activate a specific command. Some buttons have a secondary function, activated by a “long click” (hold the button pressed for 1 second). Buttons that contain secondary function are marked by a little dot in their lower right corner.
SEGMENTED BUTTON is a set of buttons used to select one out of two or more options. By selecting one segment of this button you automatically deselect a previously selected option.
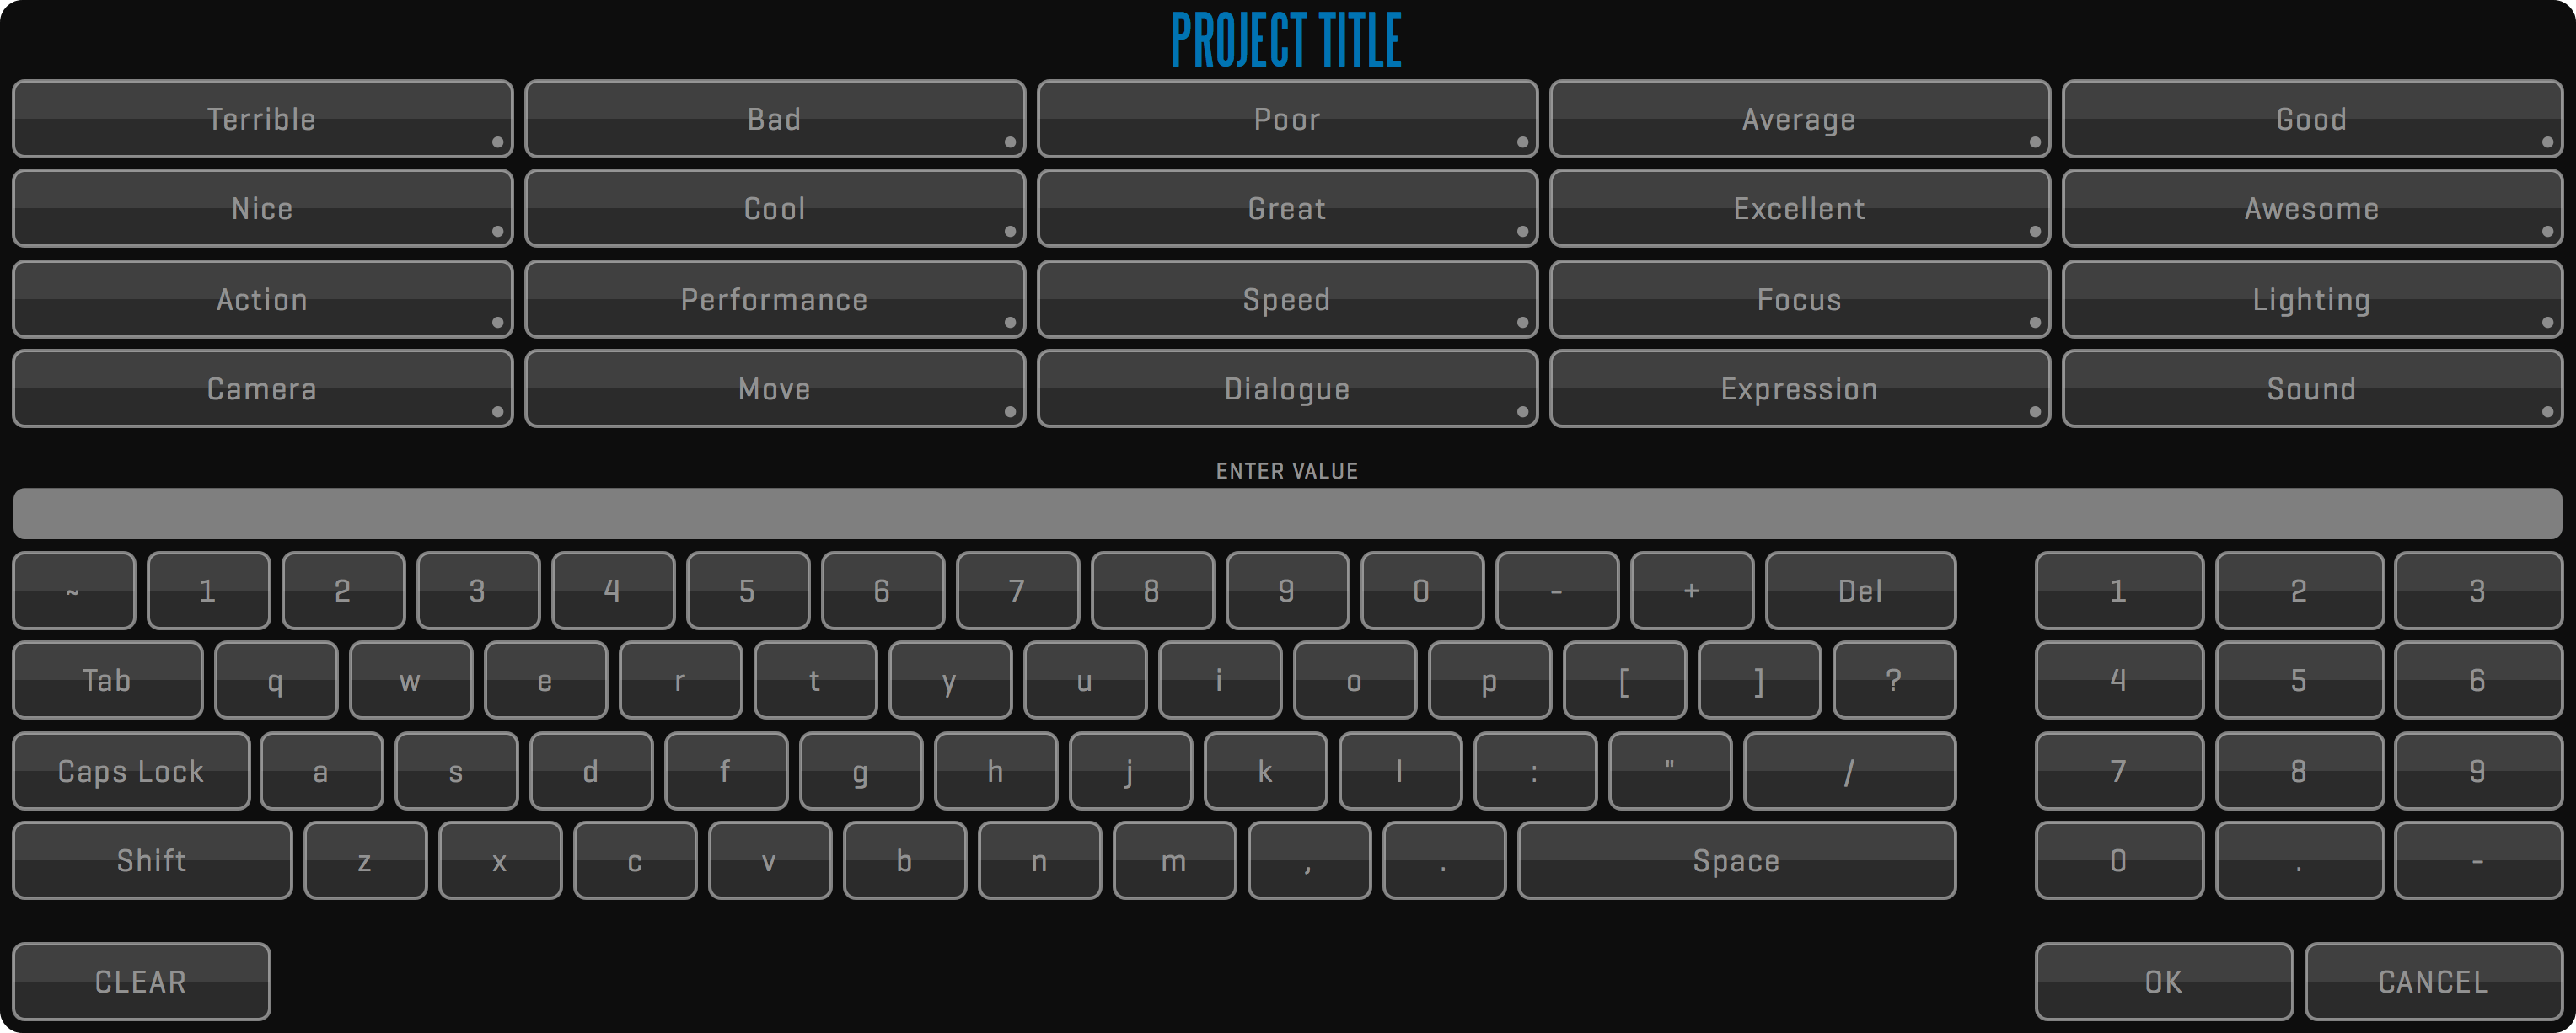
INPUT FIELD is used to enter numeric or alphanumeric values for various data fields. By pressing this button you invoke the on-screen keyboard used to enter characters in the touch-screen application. Note that you can also use a physical keyboard to enter values. Some input fields act as toggle switches where each click cycles through the available options.

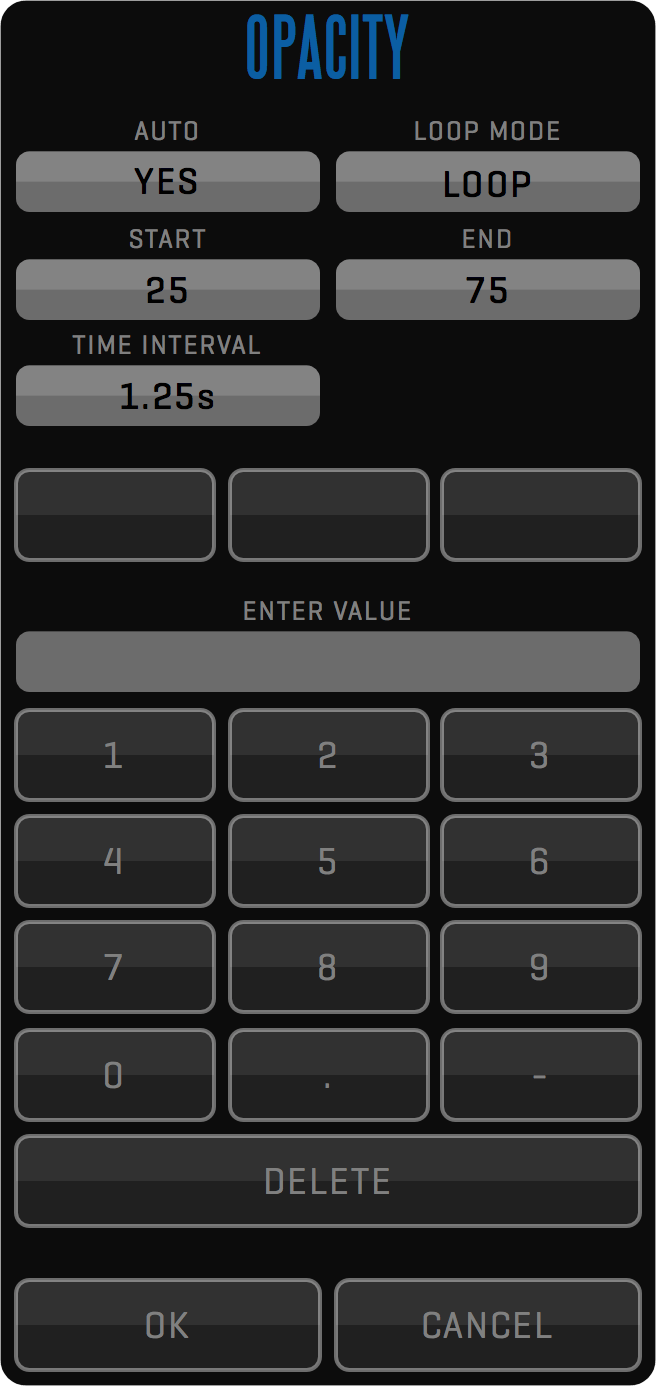
SLIDER is a special-purpose control used to adjust numeric values. Dragging the slider knob to the left side decrements the value. By dragging to the right side you increment the value. The filled area of the slider bar indicates where the selected value falls within the range of values. Most sliders also have an associated input field next to it that lets you enter an exact value.

Some sliders can be set into AUTO mode. In auto mode, the slider will transition between the START and END values with no interaction necessary. To enable auto mode click on the associated input field and toggle AUTO to YES. In case the SHOW KEYBOARD preference (FILE room -> OPTIONS -> double arrow (»)) is set to NO, the dot in the top left corner of associated input field will be missing and you will have to click on the input field name to be able to set AUTO mode. Alternatively, double-click the slider to start auto mode without entering the on-screen keyboard. The LOOP MODE changes how the slider moves and it can be set to LOOP (from start to end), PONG(from start to end, then back to start), and A/B (alternates between start and end values). TIME INTERVAL sets the interval between transitions.
User interface controls are disabled (greyed out) for the commands that can not be executed in the current context.
ENHANCED INPUT FIELD is used to enter numerical values. The button has three separate functions. By pressing the buttons left side (where the value is displayed) you invoke an on-screen keyboard similar to a regular input field. By long-clicking the left side of the button you reset the field to its default value. And finally, by pressing and holding the right side of the button you invoke a RADIAL SLIDER that lets you input values by moving the cursor or your finger around its center. The radial slider lets you return to the previous value by moving the cursor or your finger to its center.
LABEL is used to display various states/values of the system. By clicking on some labels you can cycle through various display options.

TOOLBAR is a set of buttons grouped to form a complex function, like PLAYBACK. Sometimes it features a double arrow (») icon to provide access to 2nd set of controls.

MENU BUTTONS are used to toggle the display of toolbars. They can be locked to disallow accidental clicks.

User interface uses 4 horizontal blocks by default, which provides good readability even on smaller MacBook Pro screens. You can resize UI to up to 7 blocks to accommodate bigger or wider screens using GUI_Screen_Blocks_Count preference.
CUSTOM UI LAYOUT
By pressing a MENU button you enable or disable the corresponding toolbar. The button will change its background color from grey to green. If you press the MENU button again you will hide its toolbar. You can arrange toolbars for each room simply by displaying them in the correct order.
Toolbars always appear from left to right. If you hide any toolbar, all other boxes are moved to fill the gap. There is an arrow on top of each Menu title that indicates if the toolbar will appear in the upper or lower zone. You can toggle the arrow direction with a long-click on the MENU button.
You can prevent Menu Boxes from accidentally hiding by pressing the LOCK button.
Each ROOM in the application can have its own layout. The orange LAYOUT button allows you to save and recall up to eight different layouts. Click the LAYOUT button to reveal the current layout and the eight slots where you can store layouts, by default named LAYOUT 1 - LAYOUT 8. The currently selected layout is highlighted in orange. The first, - (dash) layout, will become active when you modify a saved layout. To store the current layout long-click one of the slots, now you can rename your layout and save it. On the right side of the bar, you can CLEAR or RESET the currently configured layout to the default state of the current room.

Fast keyboard access to layouts
You can bind keyboard shortcuts to your layouts for quick access (default shortcuts Alt+1-8)
VISUAL KEYBOARDS
Visual keyboards are used for data input. They are displayed by pressing the data input fields. Above the input field, there is a set of keyword buttons containing commonly used values, words, or phrases. These buttons can be customized by entering the desired phrase in the input field and long-clicking on the button you wish to change. When using a physical keyboard you can disable visual keyboards by turning off the SHOW KEYBOARD setting. You still have access to keywords by right-clicking on the field you are editing.
KEYBOARD SHORTCUTS
Hotkeys (or keyboard shortcuts) in QTAKE are configurable and saved per user allowing each user to customize their work environment. Reveal hotkeys for each control element by pressing the Fn key on your keyboard. While holding this key each command TITLE is temporarily replaced by its keyboard shortcut representation.
If you click a button while holding down your Fn key a popup window will appear that lets you define a new keyboard shortcut for that button. In this window you also can CLEAR (remove any existing shortcut from that button), RESET (set default shortcut for that button) / RESET ALL (set default shortcuts for all buttons).
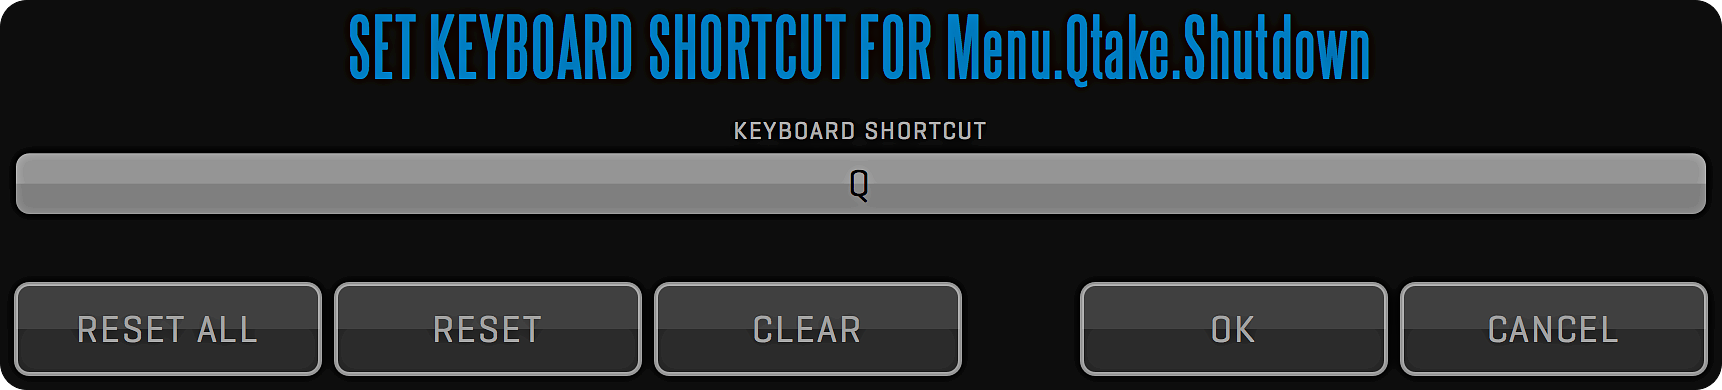
Keyboard shortcuts context
Keyboard shortcuts have to be unique for each button in each room because all rooms make up a single context. Exceptions are windows that appear on top of the standard UI. Windows are modal and therefore allow the hotkeys from the main context to be re-used.
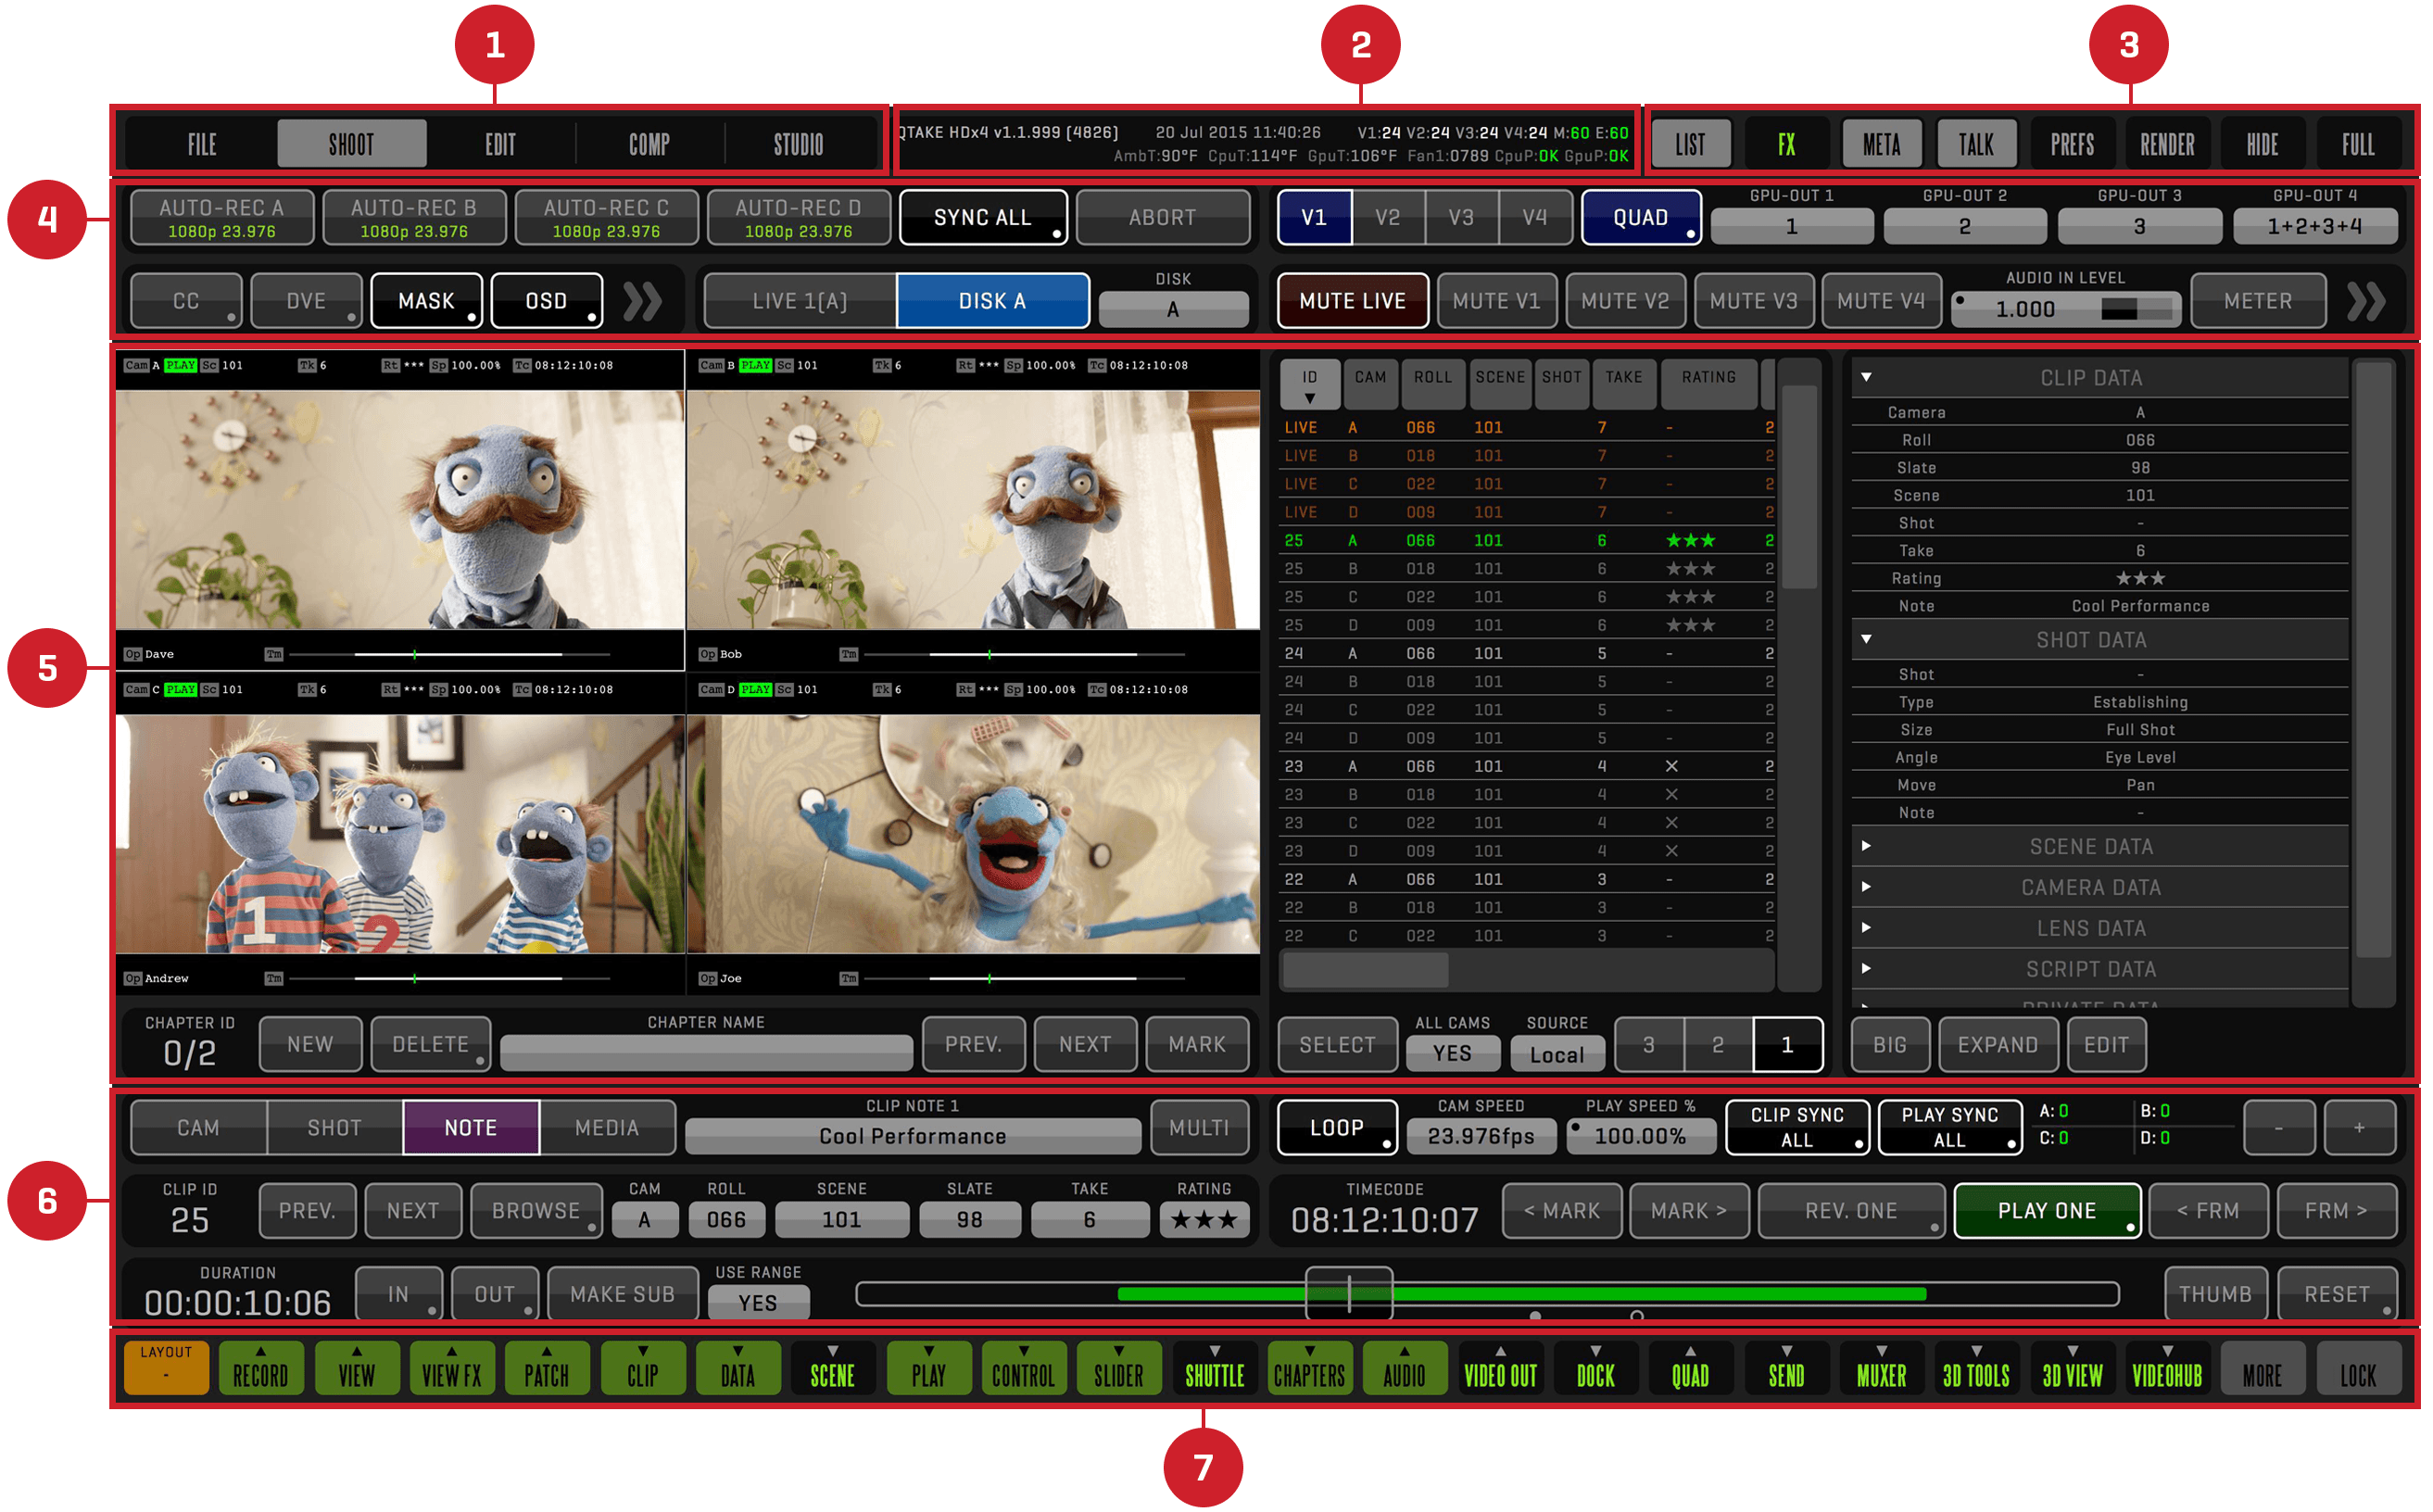
SCREEN ZONES
Screen area is divided into seven zones.
-
ROOM BUTTONS ZONE
This is the zone where you choose what part of the application (ROOM) you want to work in. -
STATUS BAR ZONE
System status and log messages are displayed in this zone. -
SPECIAL BUTTONS ZONE
This zone contains the most commonly used commands, such as toggling the display of sidebars or hiding the application. -
UPPER TOOLBARS ZONE
This is the zone where toolbars appear when you click MENU buttons set to top mode. -
VIEWS ZONE
This zone is used to display video content, as well as sidebars. -
LOWER TOOLBARS ZONE
This is the zone where toolbars appear when you click MENU buttons set to bottom mode. -
MENU BUTTONS ZONE
The green and black Menu buttons control what UI elements are displayed in each room.
TOP BAR
Top bar menu contains the most common commands in QTAKE.
HELP
Help screen is used to display QTAKE manual directly inside the application.
Press the HELP button to scale down QTAKE interface and load the User Guide.
Press the HELP button again to close it.
Help screen will allow you to browse the manual using PREVIOUS and NEXT rounded buttons at the bottom of the page that will jump through the sections.
Top rounded button will show you your current position in the document.
Clicking this button will open the Table Of Contents and allow you to jump directly to desired section.
BACK and FORWARD buttons are used to navigate through the history of visited parts of the manual.
Turn on the UI MODE to automatically highlight part of the manual that explains the currently clicked button in the QTAKE user interface. Use the right click (or left click and drag the cursor out of the button area) if you want only help highlighted without activating the primary function of the button.
ROOMS
The main menu of the application consists of 5 Rooms:
FILE
This is the initial room, where you create users and projects, adjust system settings and import/export files. The keyboard shortcut is Shift-1.
SHOOT
This room is used to record and play back clips, enter clip data, and adjust various display options. The keyboard shortcut is Shift-2.
STATUS
The STATUS BAR is located along the top of the interface, next to the ROOM buttons. This area is used to display information about the current state of QTAKE. The first row contains QTAKE version number, current date and time, and performance information. The V numbers correspond to the number of frames processed in each View. M corresponds to the number of frames sent to the GUI monitor and E corresponds to the number of frames sent to the external monitor - GPU output.
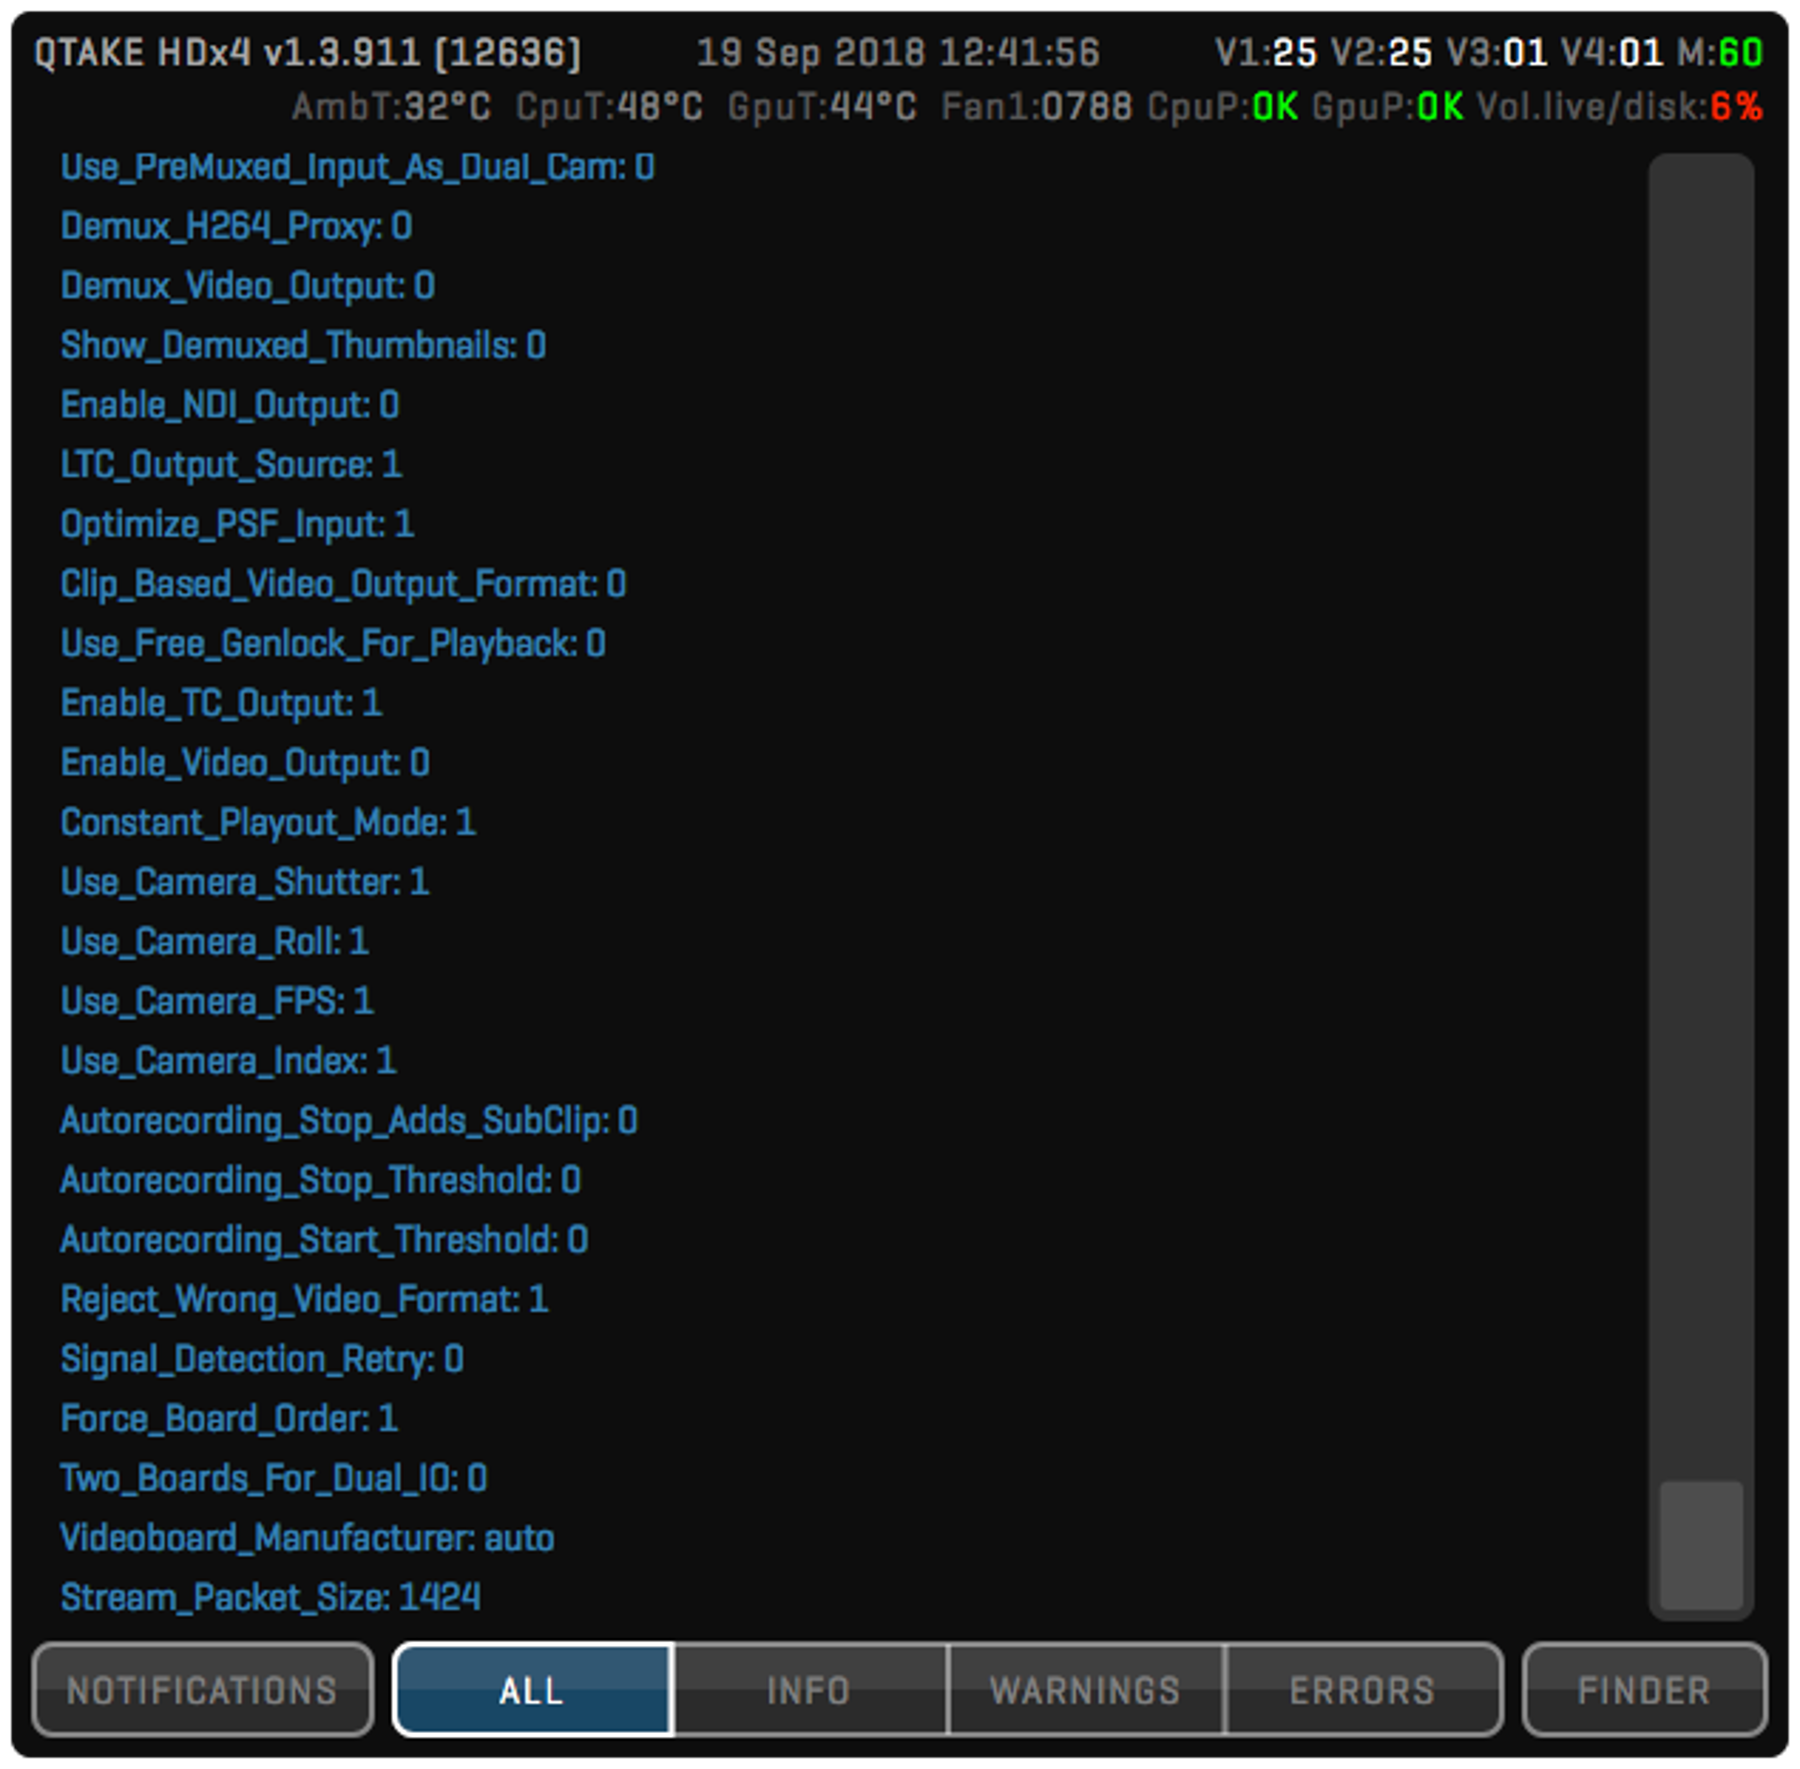
The second row contains hardware status information such as the ambient temperature (as read by the computer’s internal sensors) and fan speeds. CpuP and GpuP indicate the state of system frequency throttling. Any value other than OK indicates that the system is reducing the frequency of the respective component due to the risk of overheating. If you are using the default system audio device as your QTAKE output device (which is not a recommended practice), you will also see the volume level displayed here. Click the status bar to show the expanded log message view. Log view can be set to display NOTIFICATIONS or to filter log messages based on their type: ALL, INFO, WARNINGS, and ERRORS. The FINDER button is used to hide QTAKE and reveal the current log file in the Finder.
LIST
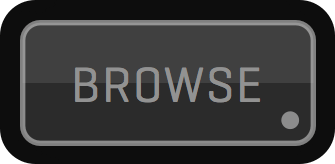
Clicking the LIST button in the special buttons zone (or long clicking the BROWSE button) will open the clip list browser sidebar. This browser gives you an overview of the recorded clips in a convenient list form. Clips are sorted by clicking on any of the column headings. The LIST layout can be customized by moving the columns left or right and by resizing each column.
Custom layout of the LIST sidebar will be automatically stored for the current user.
Clicking any row will load the respective clip into active View. Dragging the cursor through the list will temporarily display a thumbnail of the selected clip. Releasing the mouse button will load the selected clip into active View. Releasing the mouse button outside the LIST will cancel loading and keep the current clip in the View. By selecting the LIVE clip from the list, you can patch the current View to live input.
Long click the LIST button the make the LIST sidebar visible in the full-screen mode.
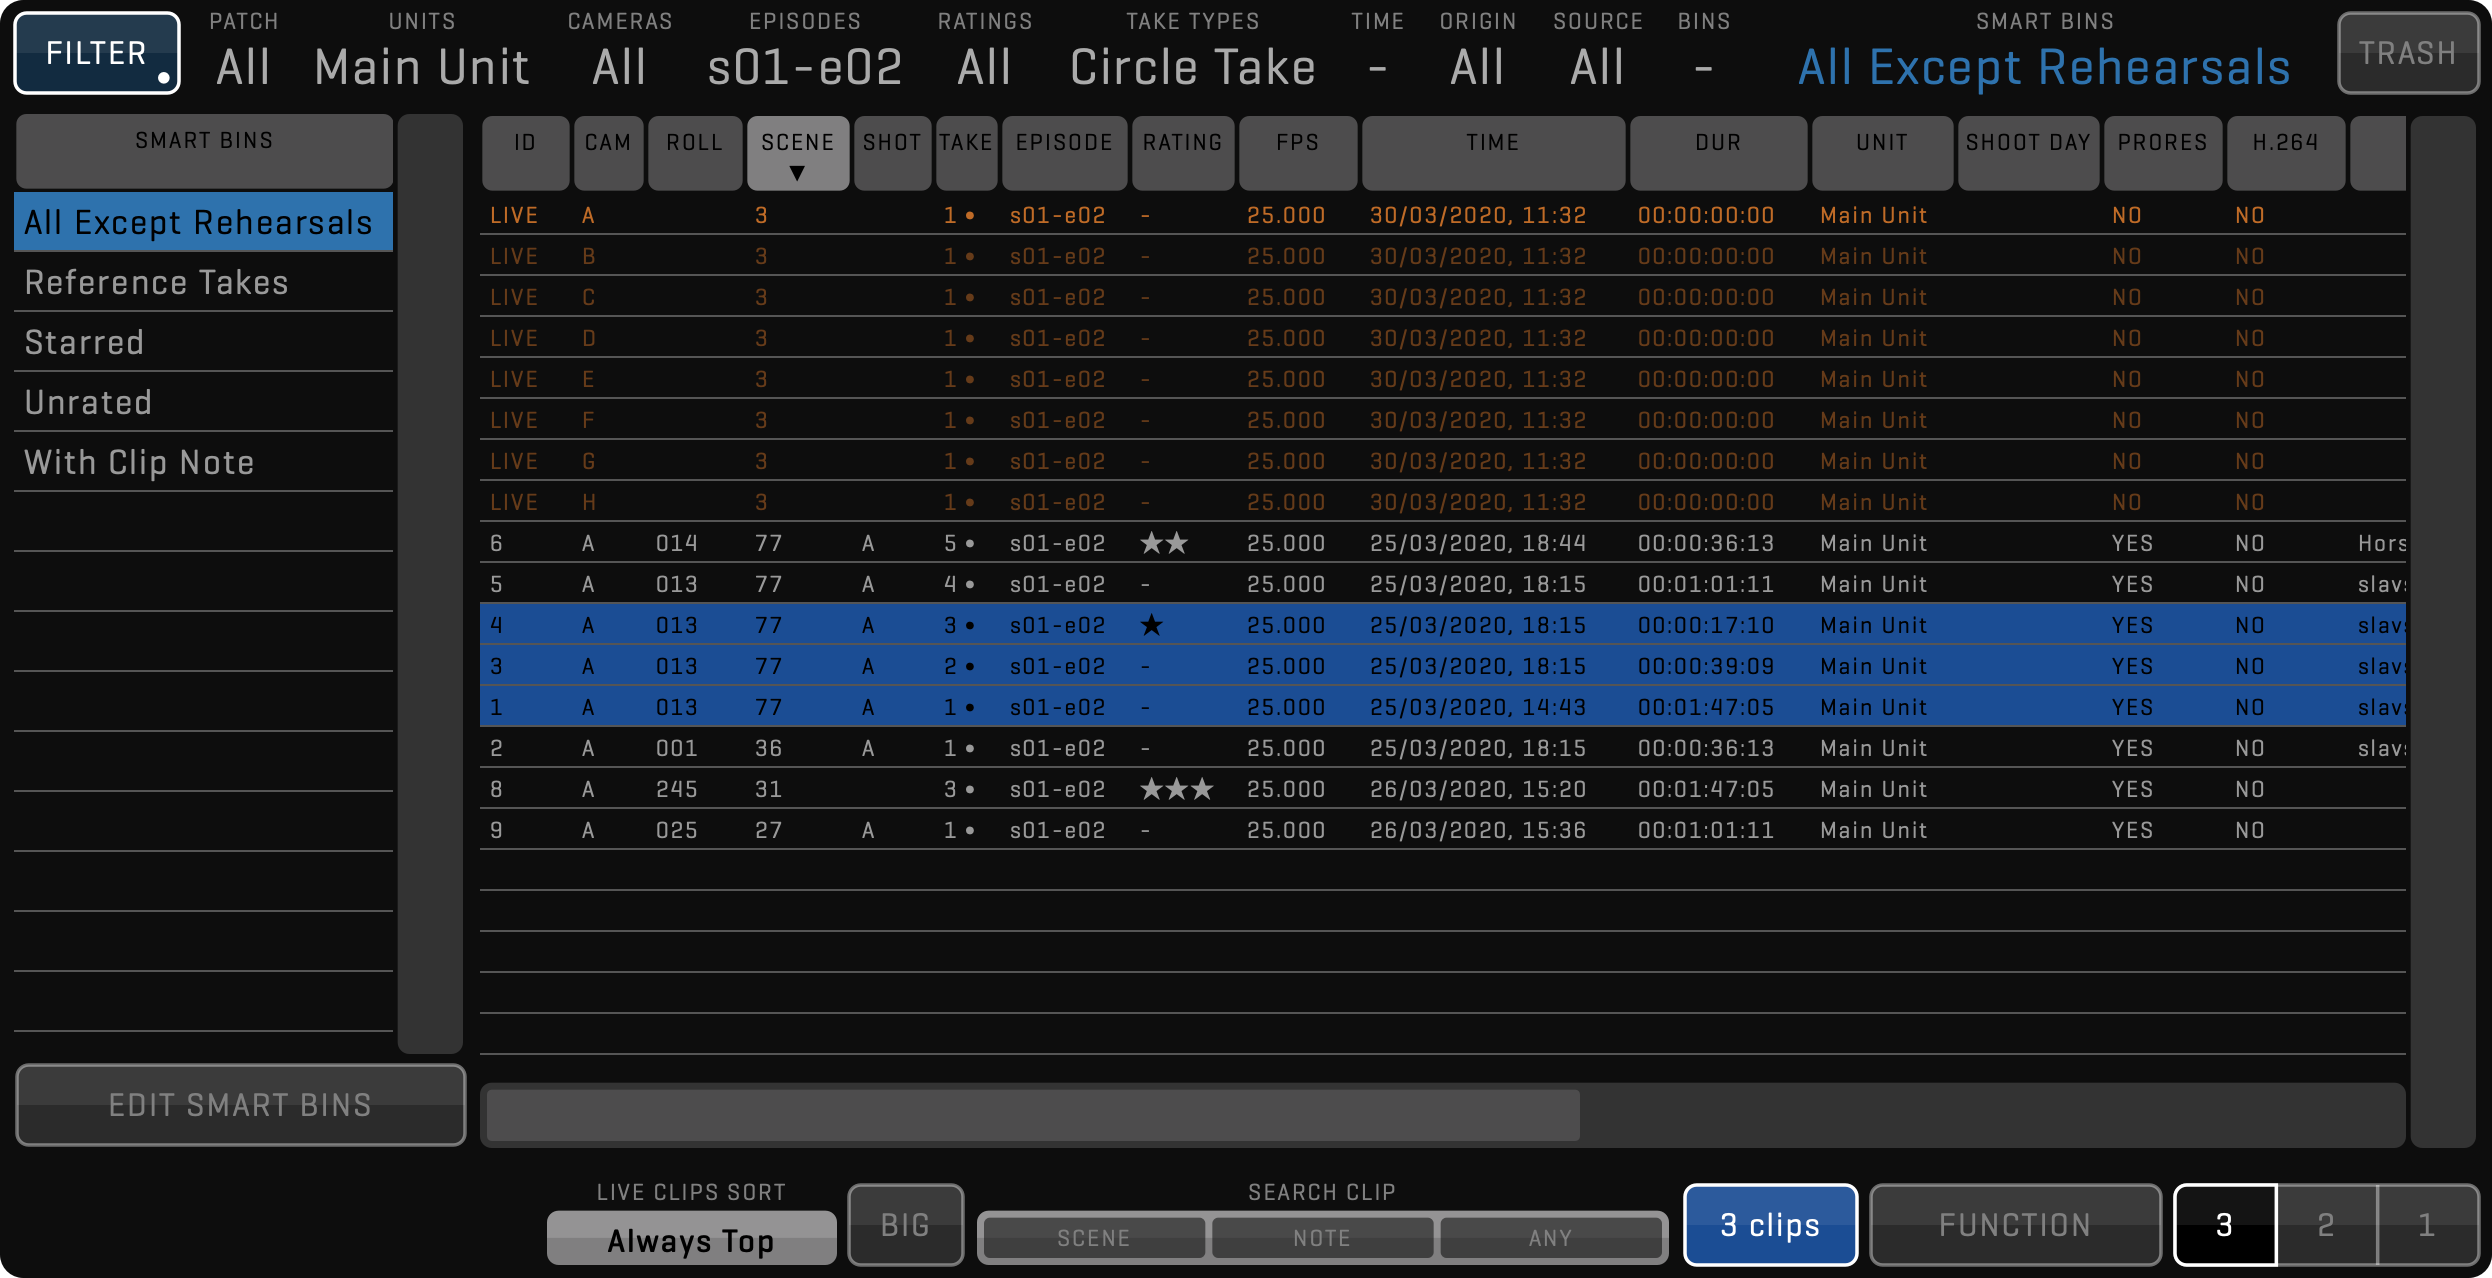
CLIP LIST FILTER
Easy navigation through thousands of clips is possible using various FILTER options. Clicking any item in the horizontal scroll view next to the FILTER button will open a small list with its options.
PATCH
Patch filter provides clip filtering by ACTIVE View patch, which means the list will show only the clips that are corresponding to the selected DISK PATCH of the active View. This can be based on a camera letter or recording input.
UNITS
This filter is indispensable when shooting multiple units and synchronizing projects using QTAKE Server. As with all other LIST filters, you can select one or more units.
CAMERAS
This option filters clips by selected camera letters.
EPISODES
When shooting a series, you can select this filter to show only the currently shot episodes.
RATINGS
RATINGS filters clips by the number of stars.
TAKE TYPES
This option will filter pick-ups, part takes and reference takes.
TIME
The Time filter is used to filter clips by the time they were recorded.
ORIGIN
This filter is based on how the clip was created: RECORDED, IMPORTED, LINKED, RENDERED, SEQUENCE.
SOURCE
Use this filter if you want to show clips from a specific QTAKE system.
BINS
Bins are like folders, they allow you to group clips that have no metadata to be grouped by.
To display the BINS table, click on the LIST header where it says BINS. It will be displayed on the left of the LIST table. Another click will disable the BINS table.
SMART BINS
Use this option to group clips dynamically by their metadata using simple or complex filtering rules in the SMART BIN editor. Alternatively, you can use the SEARCH ANY field to find clips by metadata and turn the search condition into Smart Bin.
To display the SMART BINS table, click on the LIST header where it says SMART BINS. It will be displayed on the left of the LIST table. Another click will disable the SMART BINS table.
ROLE
This option is not selectable by QTAKE Operator. It is used by the QTAKE Server administrator to limit access to clips. Any shared BIN or SMART BIN can be used to filter out clips that should not be seen by specified roles.
The option is only visible if QTAKE Server administrator is limiting clip access for your role to specific BINs. You will find more information in QTAKE Server manual section.
TRASH
Deleting clips in QTAKE is performed in two steps. First, you need to move clips to trash using the MOVE TO TRASH function. Then you can either put them back or permanently delete them. Click the TRASH button in the header of the LIST sidebar to display the contents of the trash bin.
LIST TOOLBAR
At the bottom of the list, you will find buttons that provide additional functionality to the list of clips.
The segmented button labeled 3 2 1 lets you set the horizontal size of the list browser. Note that some functionality is hidden when the horizontal size is set to 2 or 1.
The BIG button resizes each row of the list to enable them to be used with a touch screen.
The LIVE CLIPS SORT option can help you quickly set the order of your LIVE clips.
The SEARCH CLIP input field allows you to filter displayed clips by searching for SCENE, NOTE, or ANY. To disable the filter simply long-click the SEARCH CLIP button again.
The SELECT button lets you select multiple clips to perform a function on. In addition, metadata can be edited for selected clips using the META sidebar, CLIP, and DATA toolbars.
The FUNCTION button displays the list of options for selected clips.
FUNCTION
You can perform additional tasks on a selection of clips. The following functions are currently available.
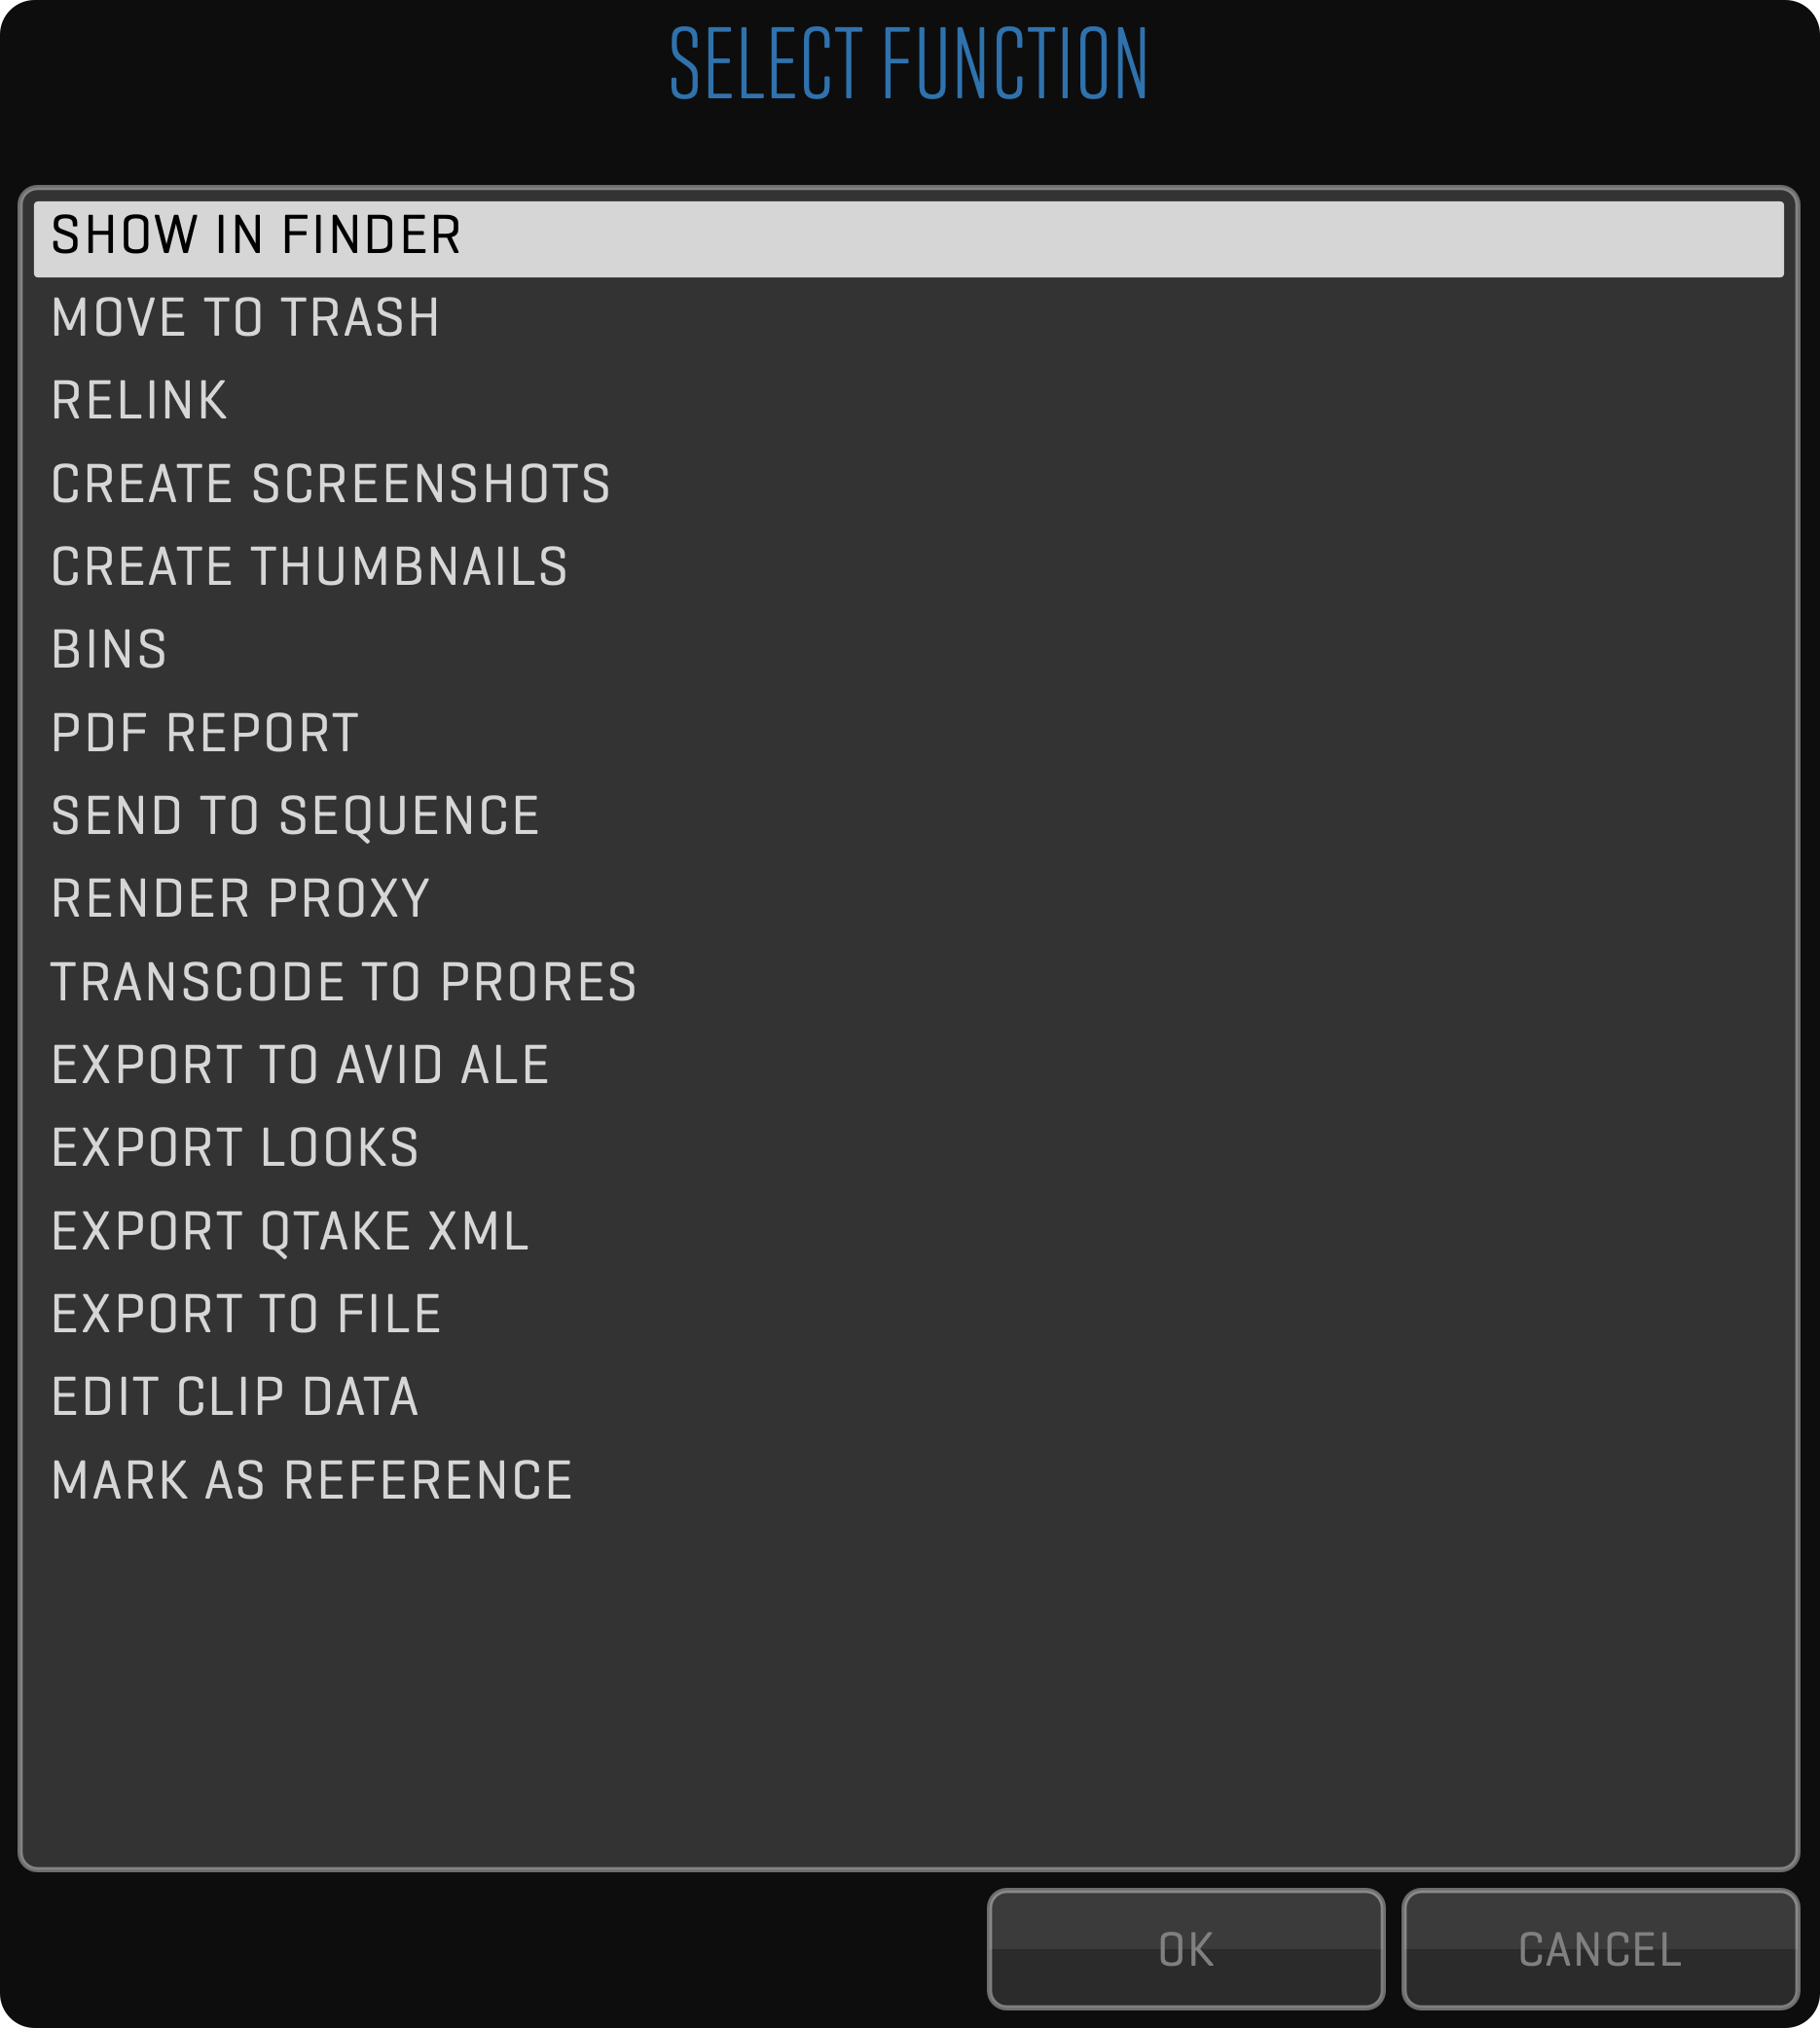
SHOW IN FINDER
Use this FUNCTION when you need to make a quick copy of selected clips to a 3rd party application. This is not a recommended way of exporting media files, because it doesn’t include clip metadata, but some information can be smuggled inside filenames. Since QTAKE doesn’t use human-readable filenames for its internal media, an additional step is necessary to show media files in a single Finder folder.
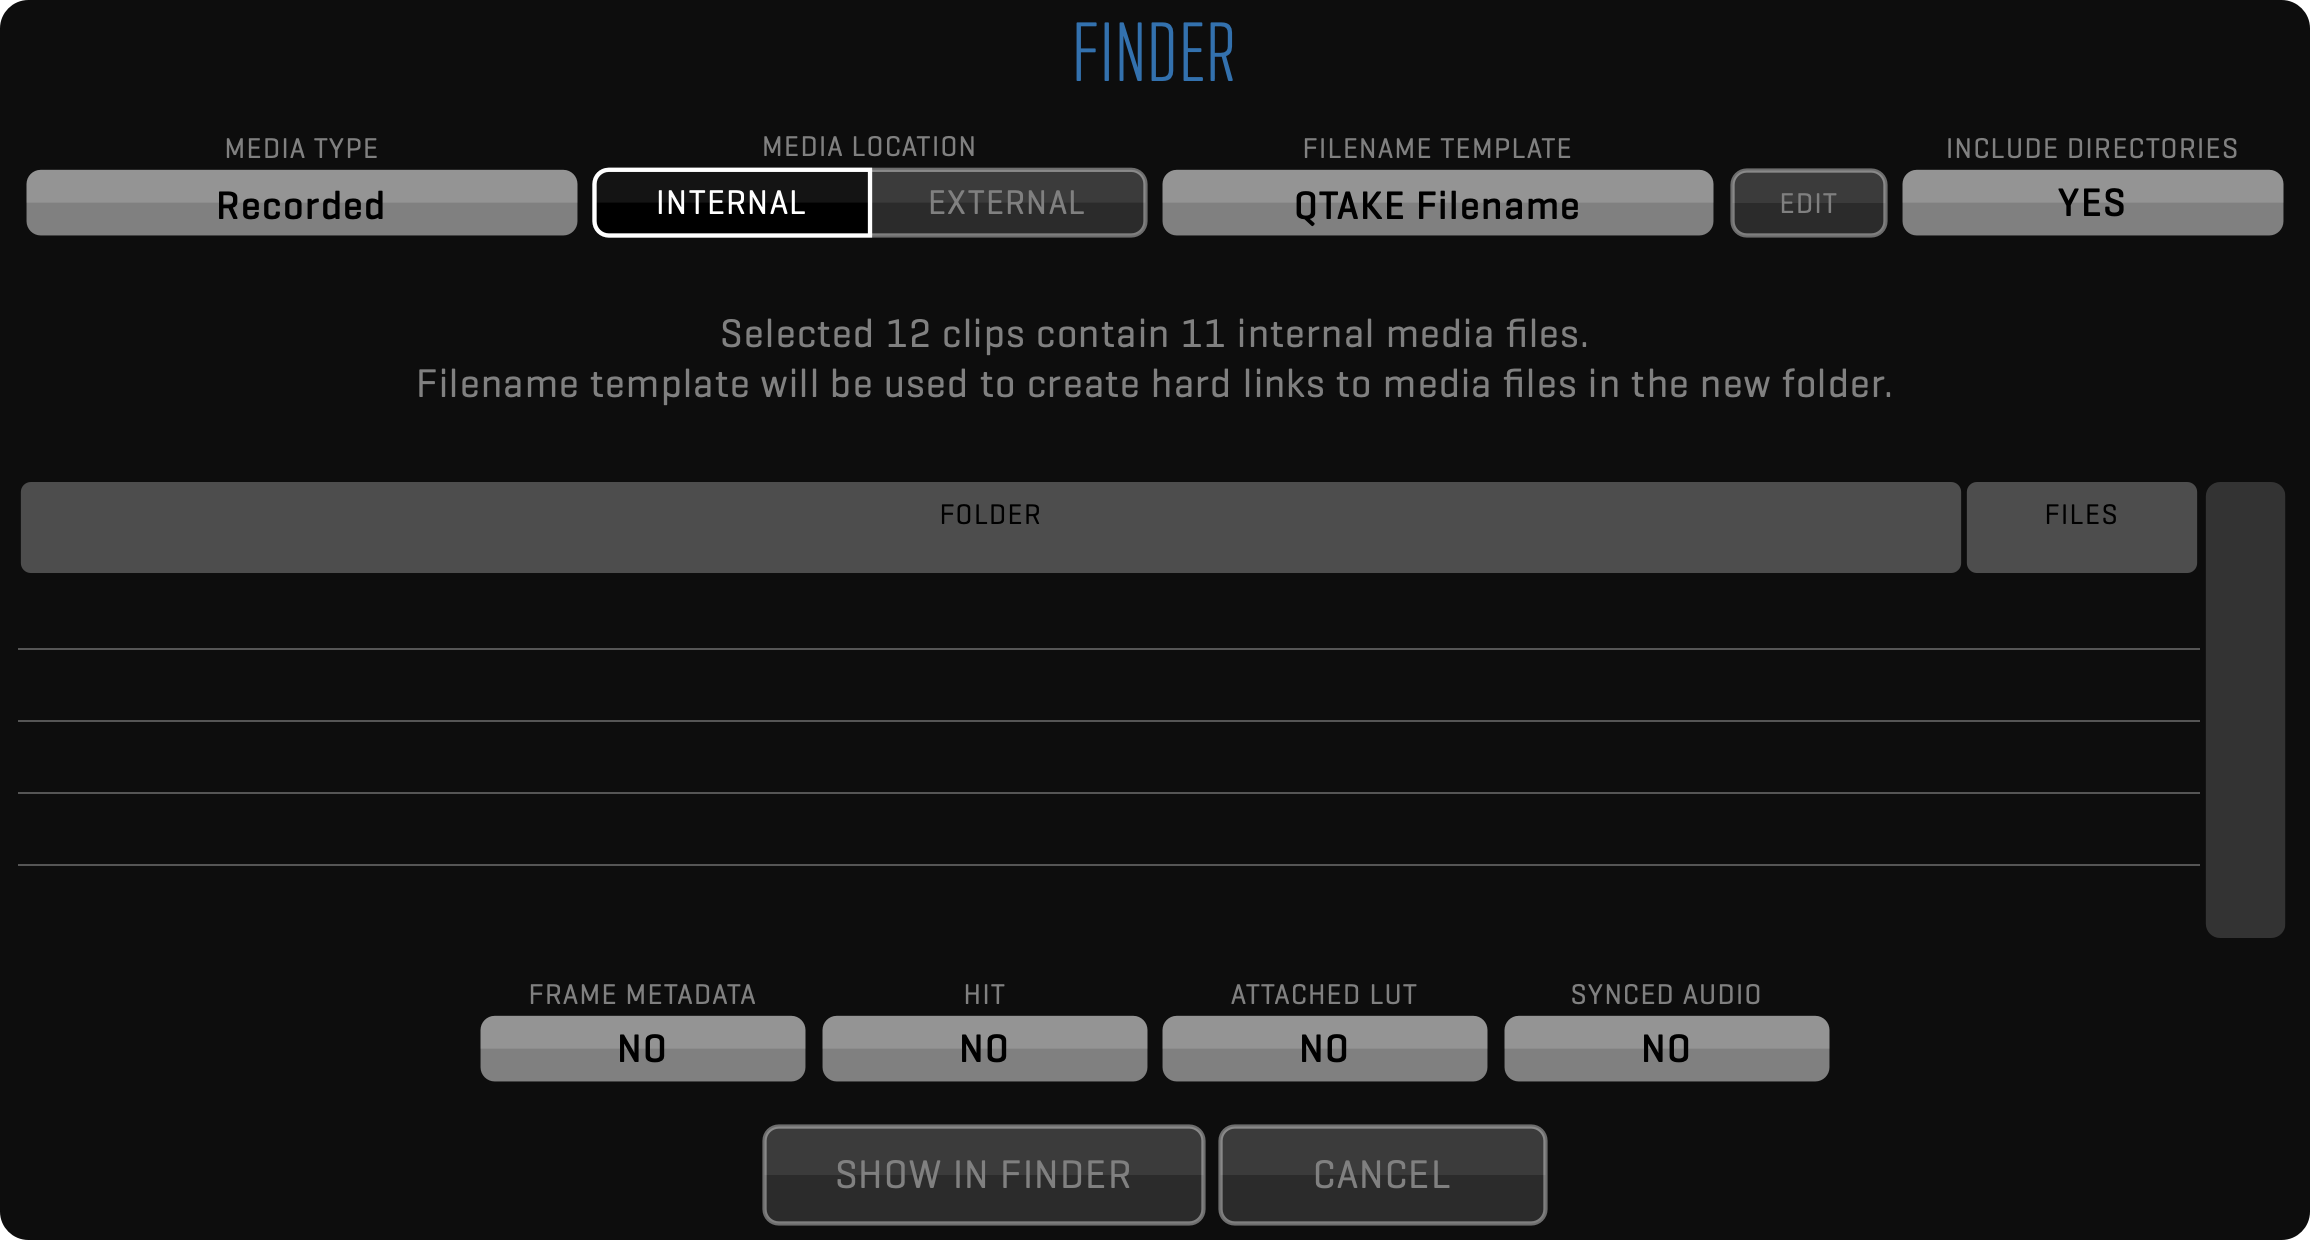
First, you need to select what type of media you want to reveal (Recorded, Proxy, RAW,…) and then select what FILENAME TEMPLATE should be used to generate filenames. If none of the pre-defined templates works for you, you can create your own by clicking the EDIT button.
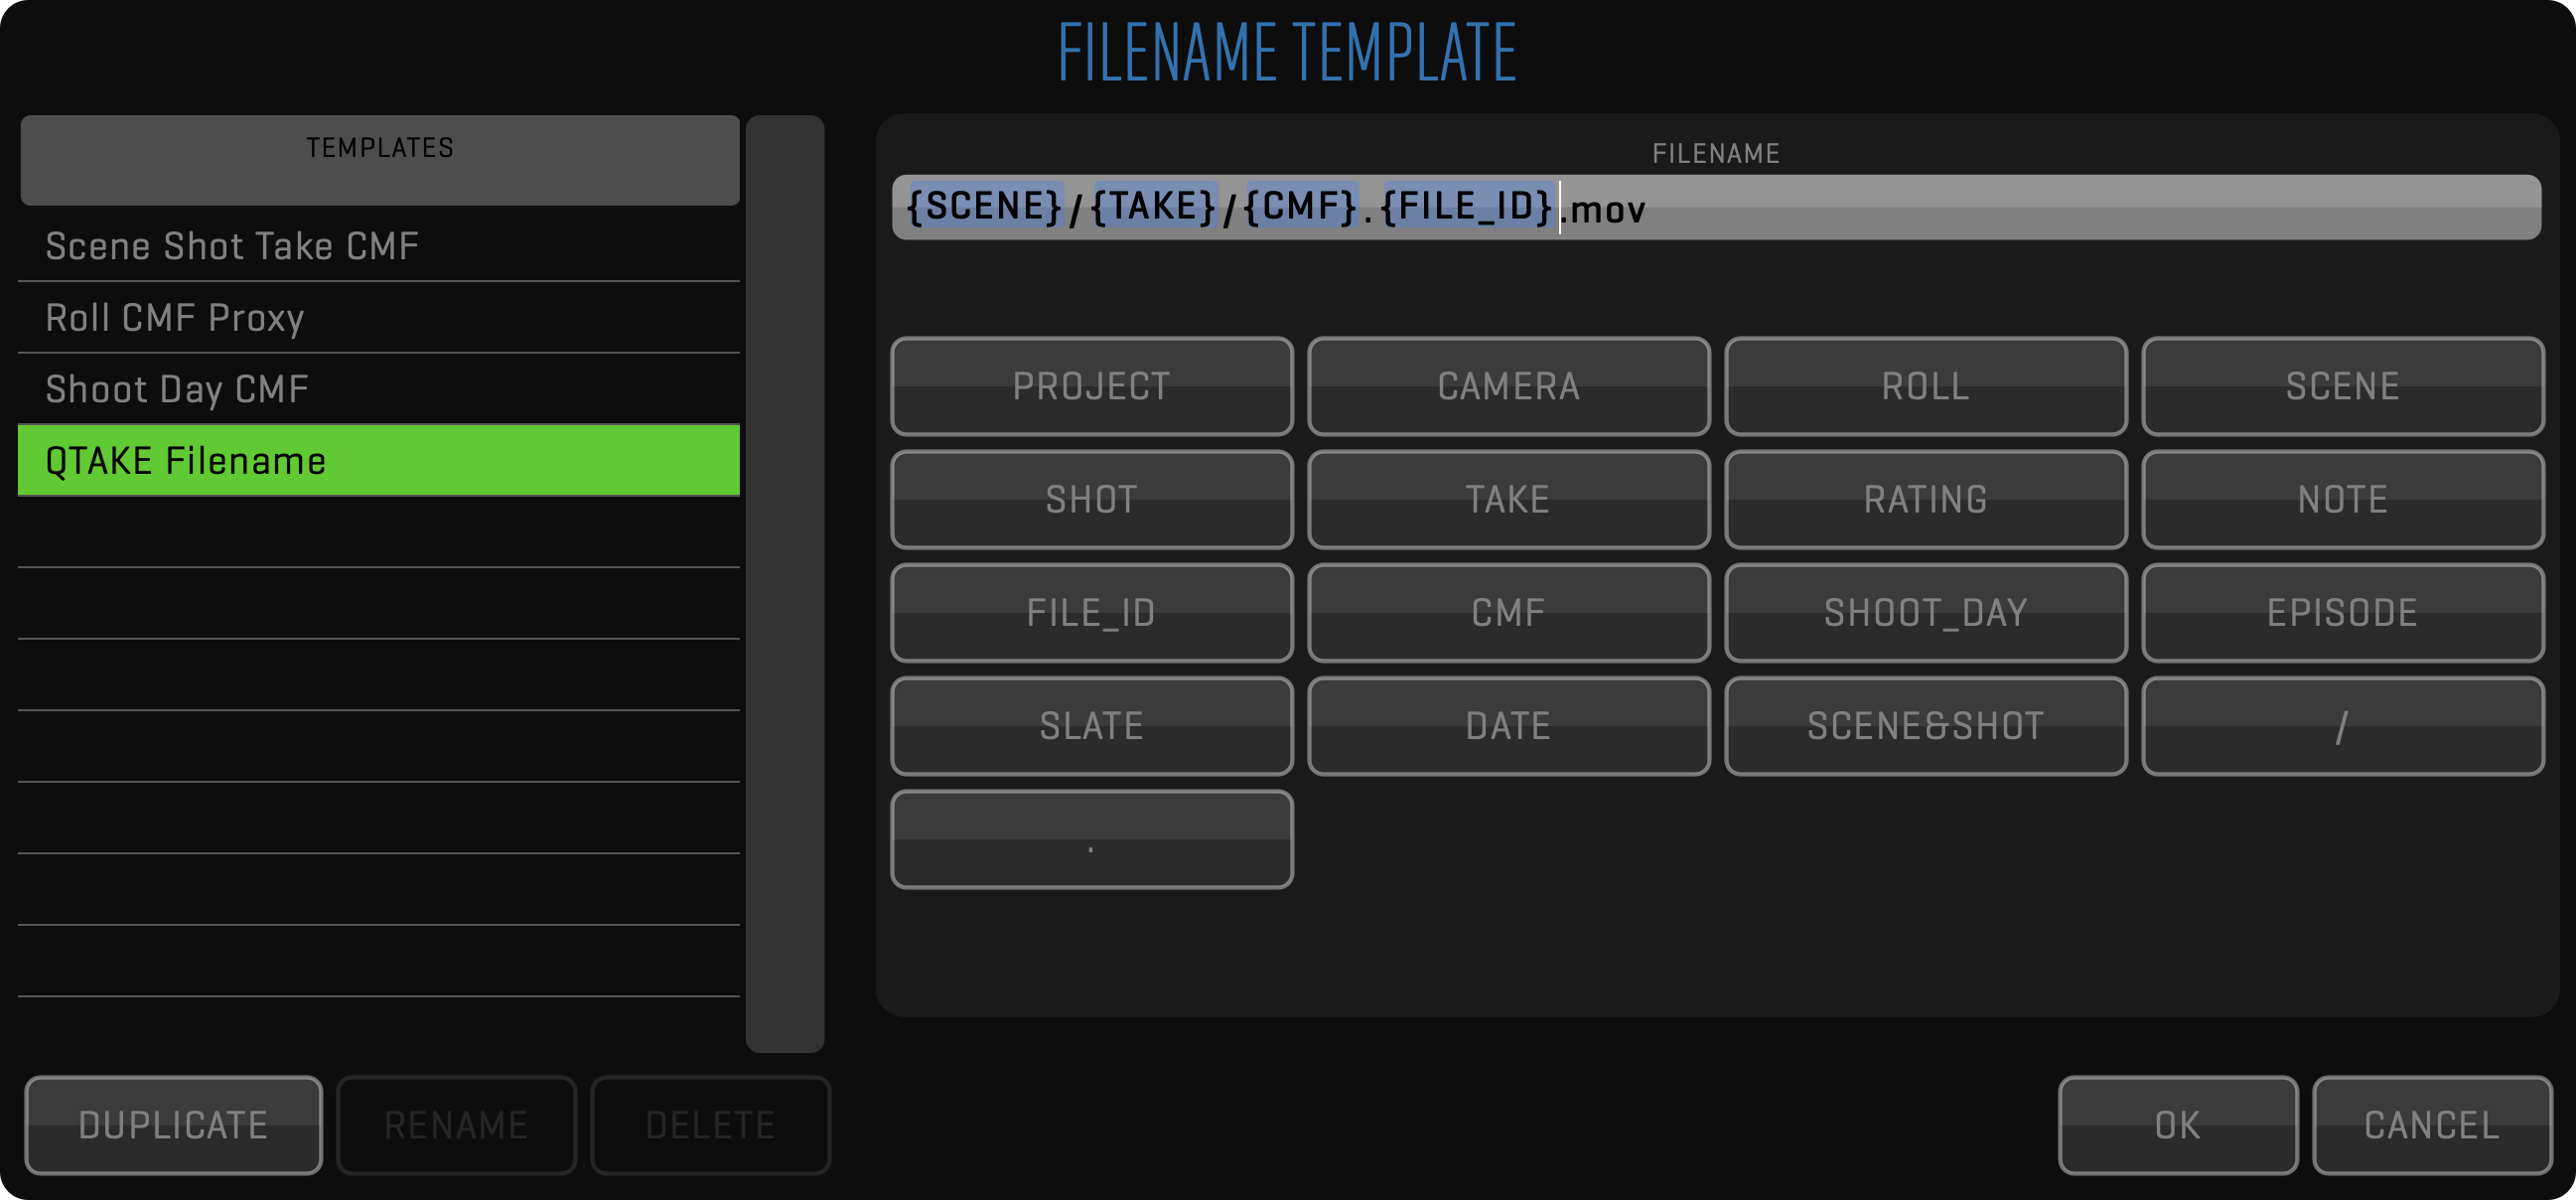
In EDIT mode, you can define how the FILE name will look like and you can define directory structure, based on different metadata. For example, hard links to clips with a matching scene and take are stored in separate folders with a filename consisting of ” Camera Media Filename.FileID “ would be defined as in the picture above. In this example, FileID was added to create unique file names, but it can happen that based on the criteria selected, this function would create duplicated Filenames for different clips. In this case, QTAKE will give information in the main Show in Finder window and also a warning that SHOW IN FINDER will create duplicated file names if you confirm the selection by clicking on SHOW IN FINDER button. If you decide to continue anyway, an incremented suffix will be added automatically at the end of each duplicated name.
SHOW IN FINDER operates differently based on MEDIA LOCATION. For files stored internally, the Filename template will be used to create hard links to media files in a new folder. Press the SHOW IN FINDER button and QTAKE will hide and a finder window with an appropriate new folder will be displayed.
On the other hand for files stored externally finder will open selected folders to reveal the media files.
MOVE TO TRASH
This function will move clips to the trash bin by pressing the FUNCTION button and selecting MOVE TO TRASH. This will only move selected media files to the trash. You can either PUT BACK FROM TRASH or PERMANENTLY DELETE media files from the storage. This operation cannot be undone.
Note that by permanently deleting media files from QTAKE you will not free up the disk space, as files are moved to macOS Bin. To free up the disk space, you have to empty Bin.
RELINK
Relink will try to find link media files that have changed their location. You do not have to select a precise location as QTAKE will be searching also through all subfolders.
CREATE SCREENSHOTS
Use this function to generate screenshots for all selected clips using the poster frame.
CREATE THUMBNAILS
Use this function to generate thumbnails for all selected clips using the poster frame. This function will create both clean and processed thumbnails.
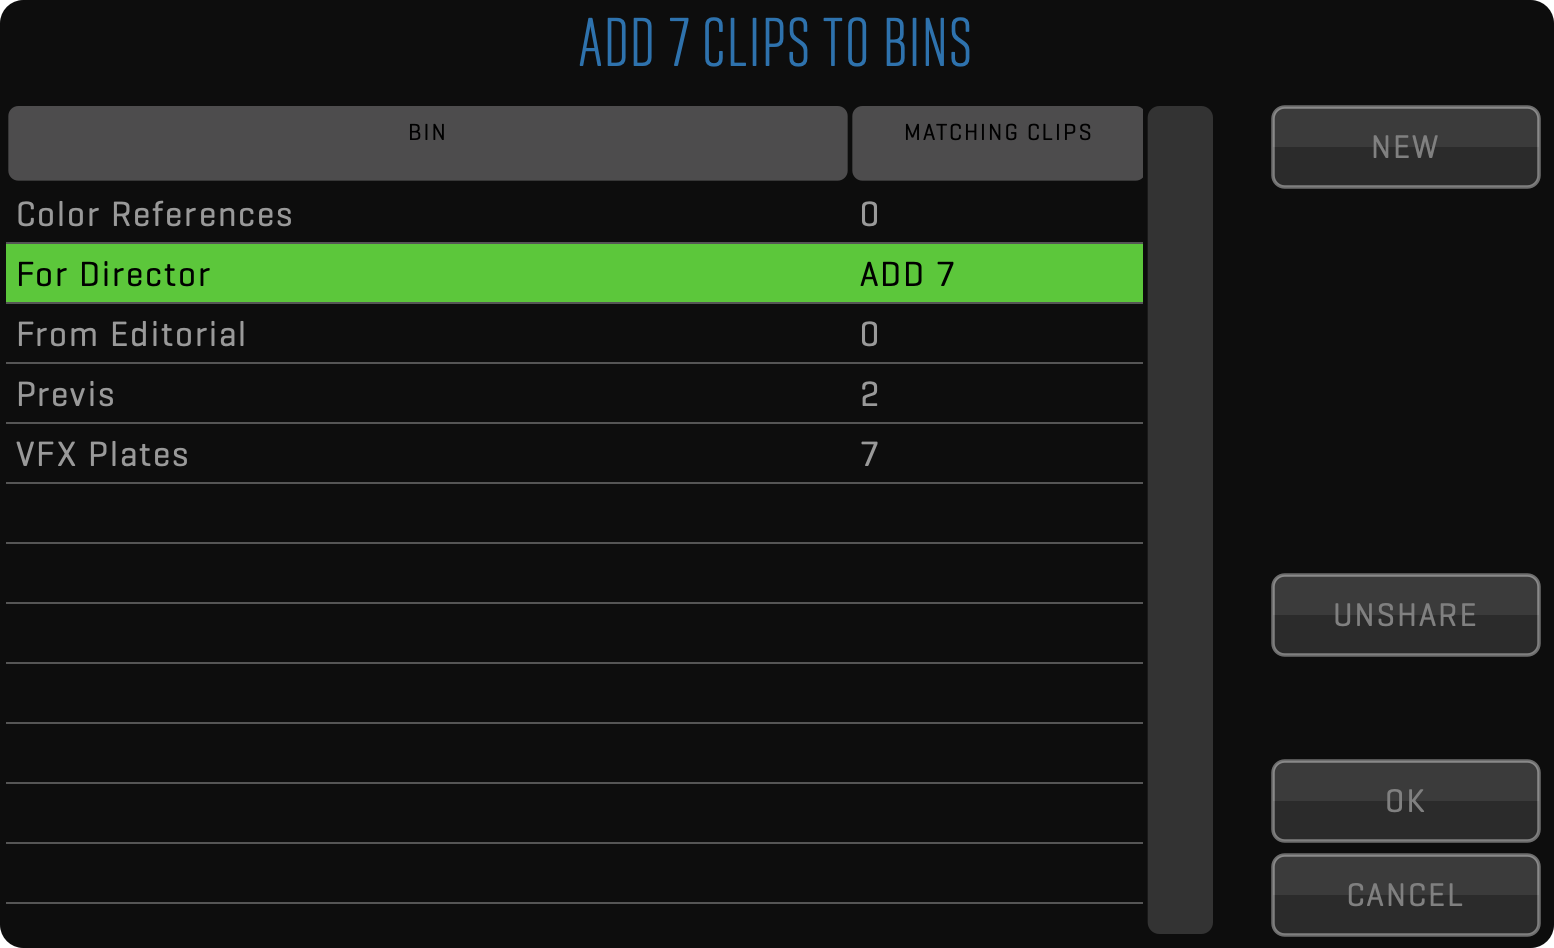
BINS
The BINS function will open a dialog that will show you all created bins and a number of clips inside those bins that match the current selection of clips. Here you can add selected clips to selected bins or remove them.
PDF REPORT
This function lets you create a PDF report using selected clips the same way as using PDF Report.
SEND TO SEQUENCE
Selected clips will be sent to sequence in the order they were selected and QTAKE will switch to the EDIT room.
RENDER PROXY
Use this function to render proxy media for selected clips.
Project settings will be used to set up encoder resolution and quality.
QTAKE storage is limited to one media file for the selected media type per clip.
If you would use this function multiple times on a clip, QTKAE will keep only the most recent one.
TRANSCODE TO PRORES
Proxy media can’t be played back with a variable frame-rate. To do so, you need to transcode it to the Apple ProRes codec.
EXPORT TO AVID ALE
This function will create an ALE file for selected clips using the selected ALE Template.
EXPORT LOOKS
Exporting color grading to 3rd party apps. You can export CDLs and LUTs used on selected clips. Optionally, CDLs can be exported as CCC.
EXPORT QTAKE XML
Export selected clips to QTAKE XML format which contains complete metadata. Media files of the selected type can be exported in addition to XML.
EXPORT TO FILE
This function is used to export clips using the Pipeline.
Click the EXPORT TO FILE button to export multiple takes to iPhone/iPod or Apple TV compatible .m4v format.
If you choose to export a file to QT Movie, you can add LUT and OSD to the video frames.
Press the BACKGROUND button to start the export in the background.
Export to file uses IN and OUT marks to define the export range of each clip.
EDIT CLIP DATA
In case you are not using the META sidebar, you can use this function to edit multi-clip metadata values in a standalone window. Press the SELECT button to enable clip selection. Select the clip, press the FUNCTION button, and then select the EDIT CLIP DATA option.
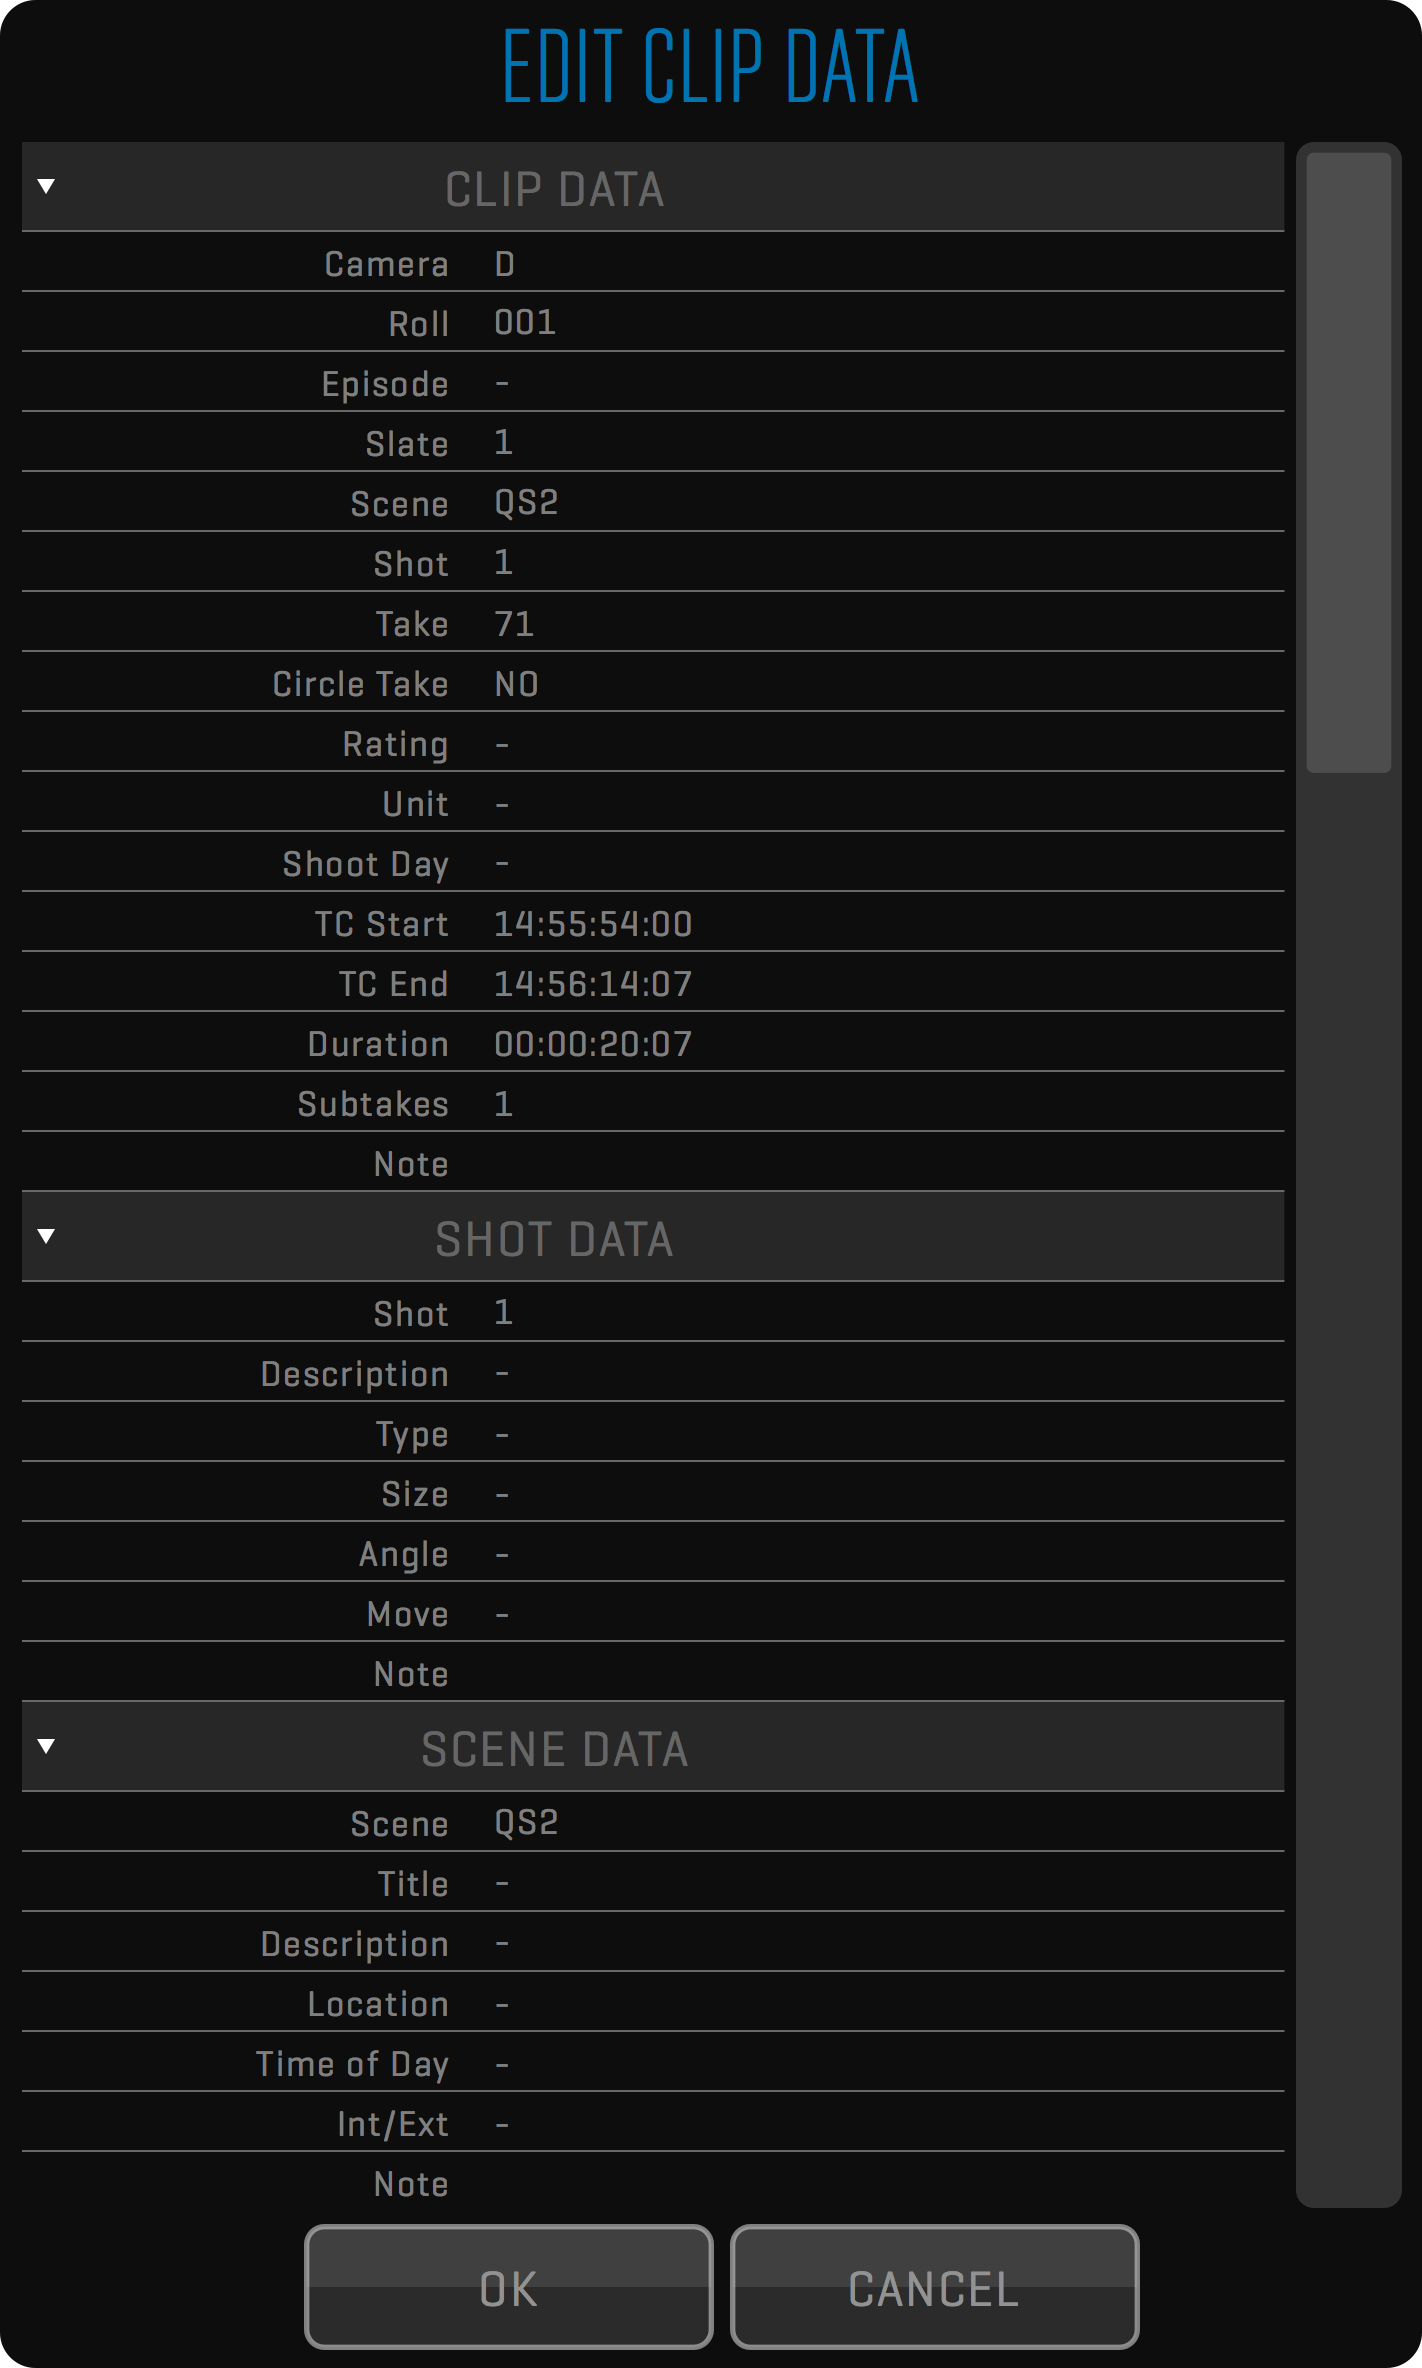
EDITING CLIP DATA FOR MULTIPLE CLIPS
Press the SELECT button to enable clip selection. Select the takes you want to edit, then click the FUNCTION button and EDIT CLIP DATA option. A dialog similar to the EDIT CLIP DATA dialog will appear but with each element blanked out. When editing the TAKE attribute a secondary option called AUTO-INCREMENT TAKE will appear. To number your takes sequentially select YES. Note that the order you selected the files is the order they will be numbered.
MARK AS REFERENCE
Use this function to quickly mark selected clips as a reference. If selected clips contain reference clips, an additional function will be shown allowing you to unmark clips as a reference.
PUT BACK FROM TRASH
This function is available only in TRASH mode. Use it to put back clips that were accidentally moved into the trash.
PERMANENTLY DELETE
This function is available only in TRASH mode. Use it to permanently delete clips and all associated files.
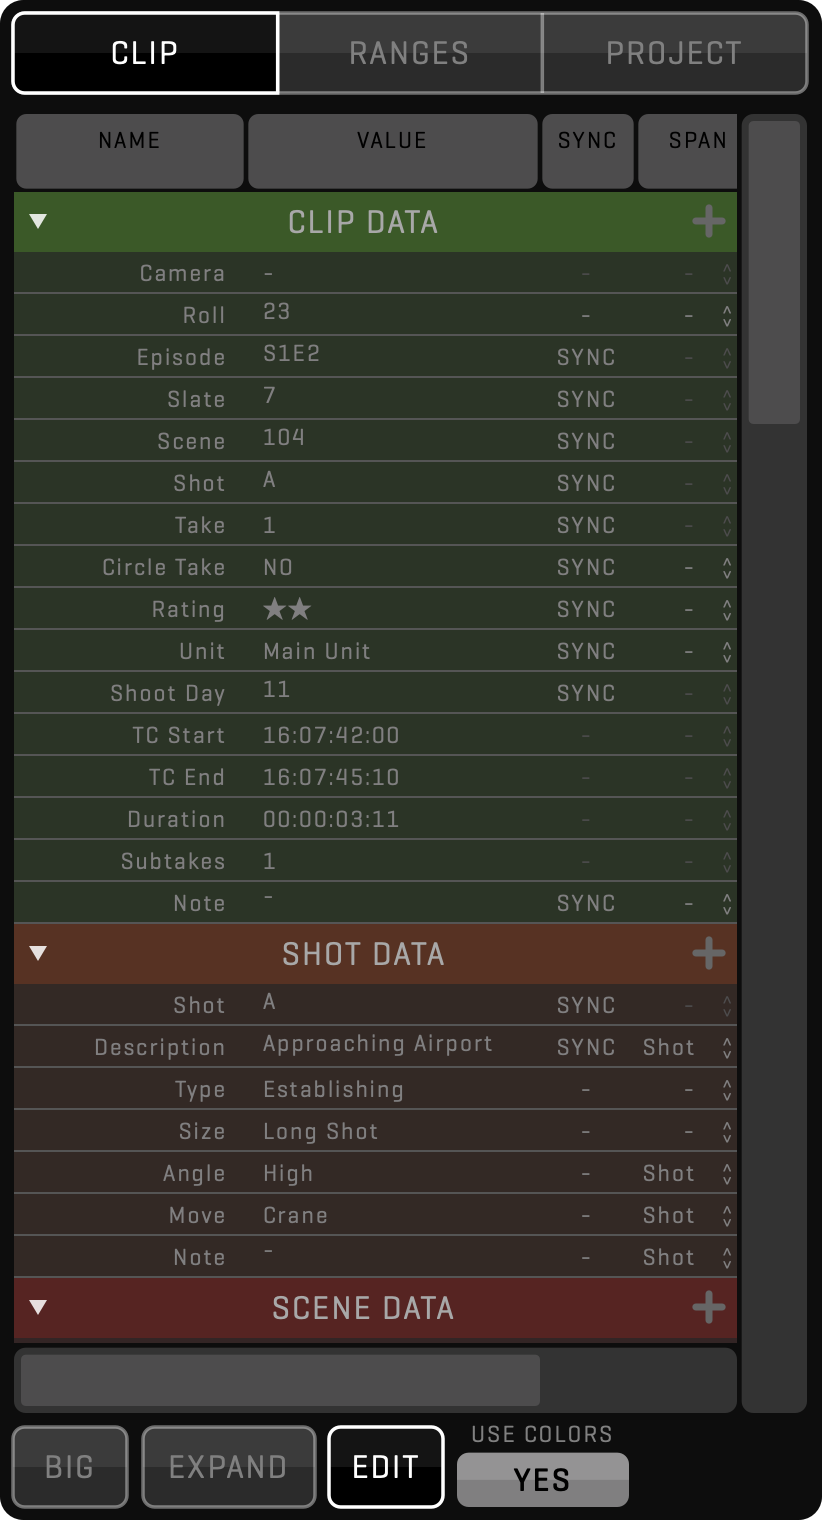
META
The META sidebar provides a convenient way to View and edit all metadata of the clip in the active View. If the SELECT mode is enabled in the LIST, the META sidebar will display aggregated values for all selected clips. This allows you to check if all selected clips have the same value or change the values for multiple clips at the same time.
Long-click the META button to make the META sidebar visible in full-screen mode.
CLIP AND PROJECT DATA
The metadata is divided into categories called GROUPS, they can be collapsed to allow you to fit just the relevant information into a single list. When using QTAKE Server, each group has separate permissions, so the admin can control metadata access per user role.
In addition to clip metadata, the META sidebar allows you to edit project metadata using the PROJECT tab. This part contains project and crew, metadata groups.
SOURCE
The SOURCE column is used to set what source will provide value for each metadata field. If set to AUTO, the latest value will be stored, regardless of the source.
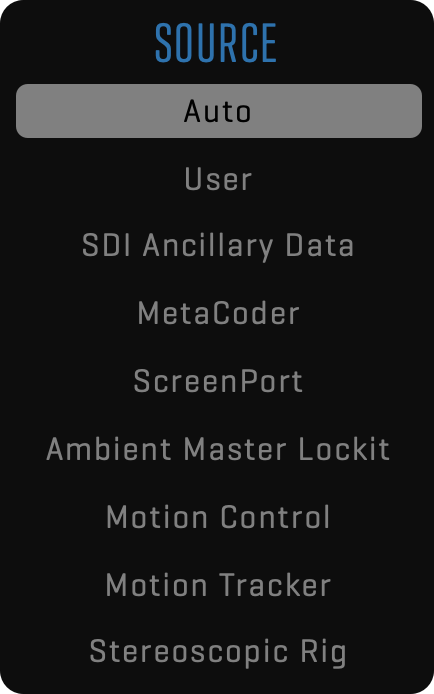
Following is the list of possible metadata sources:
- Auto
- User
- SDI Ancillary Data
- MetaCoder
- ScreenPort SDI
- Ambient Master Lockit
- Motion Control
- Motion Tracker
- Stereoscopic Rig
SPAN
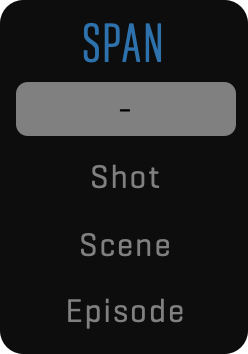
Copying of metadata field values to the next take is controlled by the SPAN column. If the span is set to SHOT, the corresponding field value is copied to the next take only if the CAMERA, SCENE, and SHOT remain the same. If the span is set to SCENE, the metadata value is copied to the next take until the SCENE changes. EPISODE means the value will remain the same throughout the whole episode.
SYNC
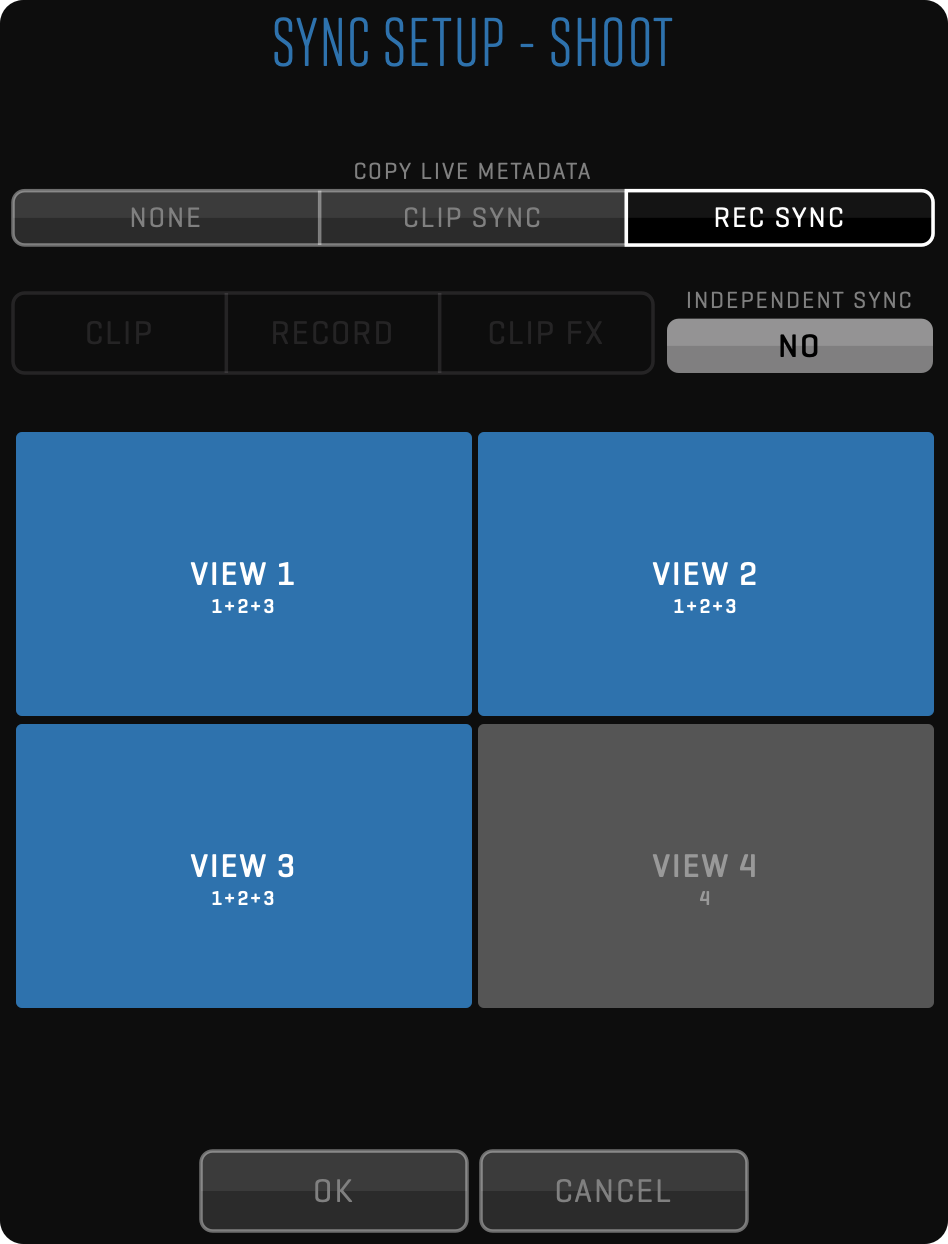
Copying of metadata field values between cameras (Views) is controlled by the SYNC column. When set, the value from the active View is copied to all synced Views, based on the COPY LIVE METADATA option. This can be set by long clicking the REC SYNC, CLIP SYNC, or PLAY SYNC buttons in the SYNC SETUP window.
CUSTOM METADATA GROUPS AND FIELDS
You can add custom fields to any metadata group. Click the EDIT button to enter edit mode, then click the + (plus) symbol on the right side of each category heading. New fields will be shared among all QTAKE Server users that have permissions for the group containing these fields. There is also a PRIVATE DATA group that is not shared with other users and you can use it to store your private notes.
When adding a custom field, you are presented with a dialog that allows you to set the NAME of the field, its TYPE, and any additional attributes for that field type, such as entries for a multi-choice field.
In addition to custom fields within existing metadata groups, you can add custom groups. When the EDIT mode is ON, at the bottom of the metadata groups list there is the ADD NEW GROUP button.
RANGES
Each clip can have multiple groups of ranges, where each group can contain a text note or a freehand drawing. For example, one group can be used to select parts of the clip that represent actions, while another group can be used to set the ranges that will be used in the sequence or composite. Ranges from a single group can not overlap.
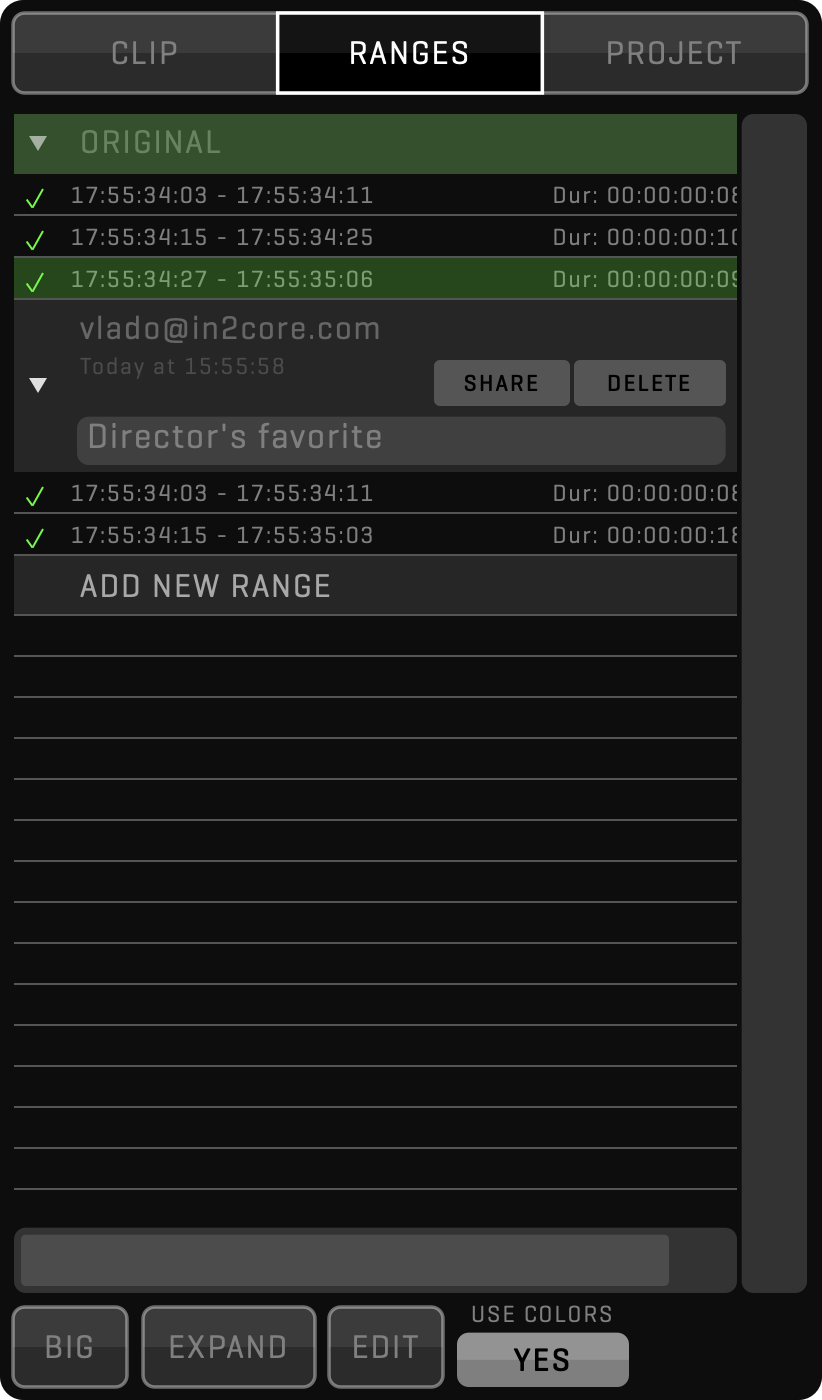
You can expand any group to show all ranges it contains. You can set the active View playhead to start at any range by clicking its row. The checkmark displayed on the left side of each row is used to hide the respective range in the time slider. The SHARE button is used to share the group with other users connected to the current QTAKE project.
Ranges are not limited to QTAKE operator. When used in combination with QTAKE Server, each authorized user can set his own ranges and share them at will. For example, VFX Supervisor can use QTAKE Monitor to mark the range that needs special treatment in the post-production.
TASKS
This button will display a list of existing background tasks of the current session. Background tasks include file copy, upload, download, image processing, and media transcoding operations. You can use TASKS window to check the progress of the specific task.
Additionally, you can PAUSE tasks, if they are affecting your system performance or even CANCEL tasks, if the results are no longer needed. The pause operation in TASK is performed at the frame level, which means that when you click the PAUSE button, the progress of the task will halt precisely at that frame. It remains paused until you choose to unpause it, allowing you to maintain precise control over the task’s progress.
HIDE
Allows you to minimize QTAKE without exiting the application. Note that QTAKE uses kiosk mode when active, which prevents other applications to be displayed in front of the QTAKE interface. Therefore, to interact with the desktop or other apps, you need to click HIDE.
DISABLE KIOSK MODE
In case you prefer using Cmd-Tab to switch between applications, you need to disable kiosk mode using this preference: Kiosk Mode = NO
FULL
Toggling the FULL button (or pressing the F key) will switch your UI between a regular and a full-screen mode. This will allow you to view the image content scaled to full-screen size, by hiding the rest of the interface.
A special case is the LIST, FX, and META sidebar. Each of them can be set to remain displayed in the full-screen mode by long-clicking their respective top bar buttons. The underline will appear under the button title, indicating the full-screen mode of the sidebar.
FILE Room
File room is used to set up the project, import or export files, and access various settings needed for your work environment.
QTAKE Menu
The QTAKE toolbar allows you to quit the QTAKE application by clicking the QUIT button (keyboard shortcut is Q).
Long click this button to change your QTAKE configuration.
See more details in Single Application section.

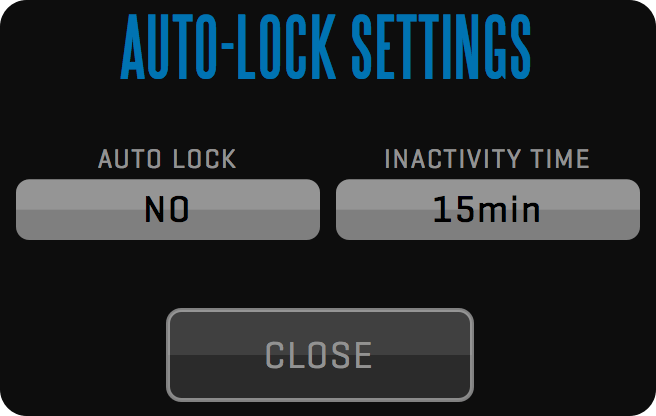
Additionally, you can lock the screen by clicking the LOCK button. Long-clicking this button brings up the AUTO-LOCK SETTINGS window where you can enable automatic screen locking after a specified amount of inactivity time. To unlock the screen you will need to enter your password.
The menu also displays the amount of storage left on your projects media drive. Clicking the label will toggle between displaying FREE DISK SPACE TIME and FREE DISK SPACE SIZE. The time value is calculated from the average bitrate of the selected codec multiplied by the number of inputs supported by the version of QTAKE you are using. A popup will appear warning you when the free disk space is running out.
USER Menu
Before using QTAKE you need to load the existing user or create a new one using the USER toolbar.
Click the OPEN button to open the window containing the user’s browser and related functions.
If a user is already loaded, clicking the USER NAME label will open a dialog, where you can edit user details.

Click the NEW button to create a new user. The same dialog will open if you click the EDIT button to modify existing user details.
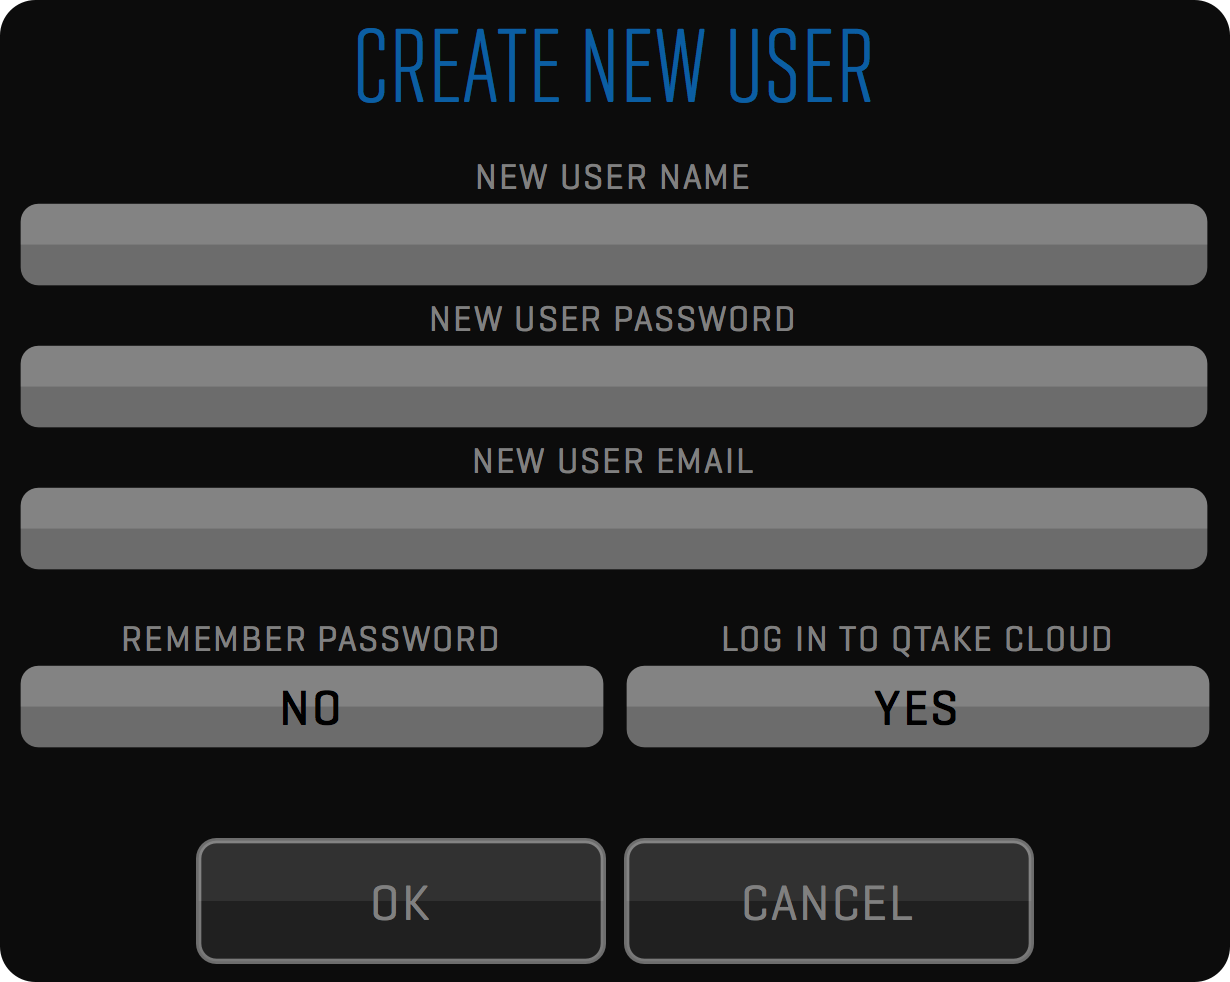
CREATE NEW USER
Users are identified by a NEW USER NAME attribute, which is why each user name has to be unique. You can optionally specify a NEW USER PASSWORD. Password-protected user accounts cannot be opened without entering the correct password, unless the REMEMBER PASSWORD option is turned on. The NEW USER EMAIL field requires an email address. The user’s email and password are used as the login credentials of the QTAKE operator when connecting to QTAKE Cloud.
QTAKE CLOUD LOGIN
You can also select the option to LOG IN TO QTAKE Cloud from this toolbar, which is required for CLOUD STREAM. Clicking the EDIT button in the OPEN USER window will let active user access this window at any time if the change to the above fields is required.
USER DATA
Interface layouts, user options, and keyboard shortcuts are stored as user data when you close the application. This allows each user to have QTAKE customized to his preference.
After deleting a USER, every PRIVATE project created by that user is deleted, including project media files!
AUTO-LOAD
When starting the application, you can use the auto-load feature to automatically load the last user and project. To use this set the following preference:
PROJECT Menu
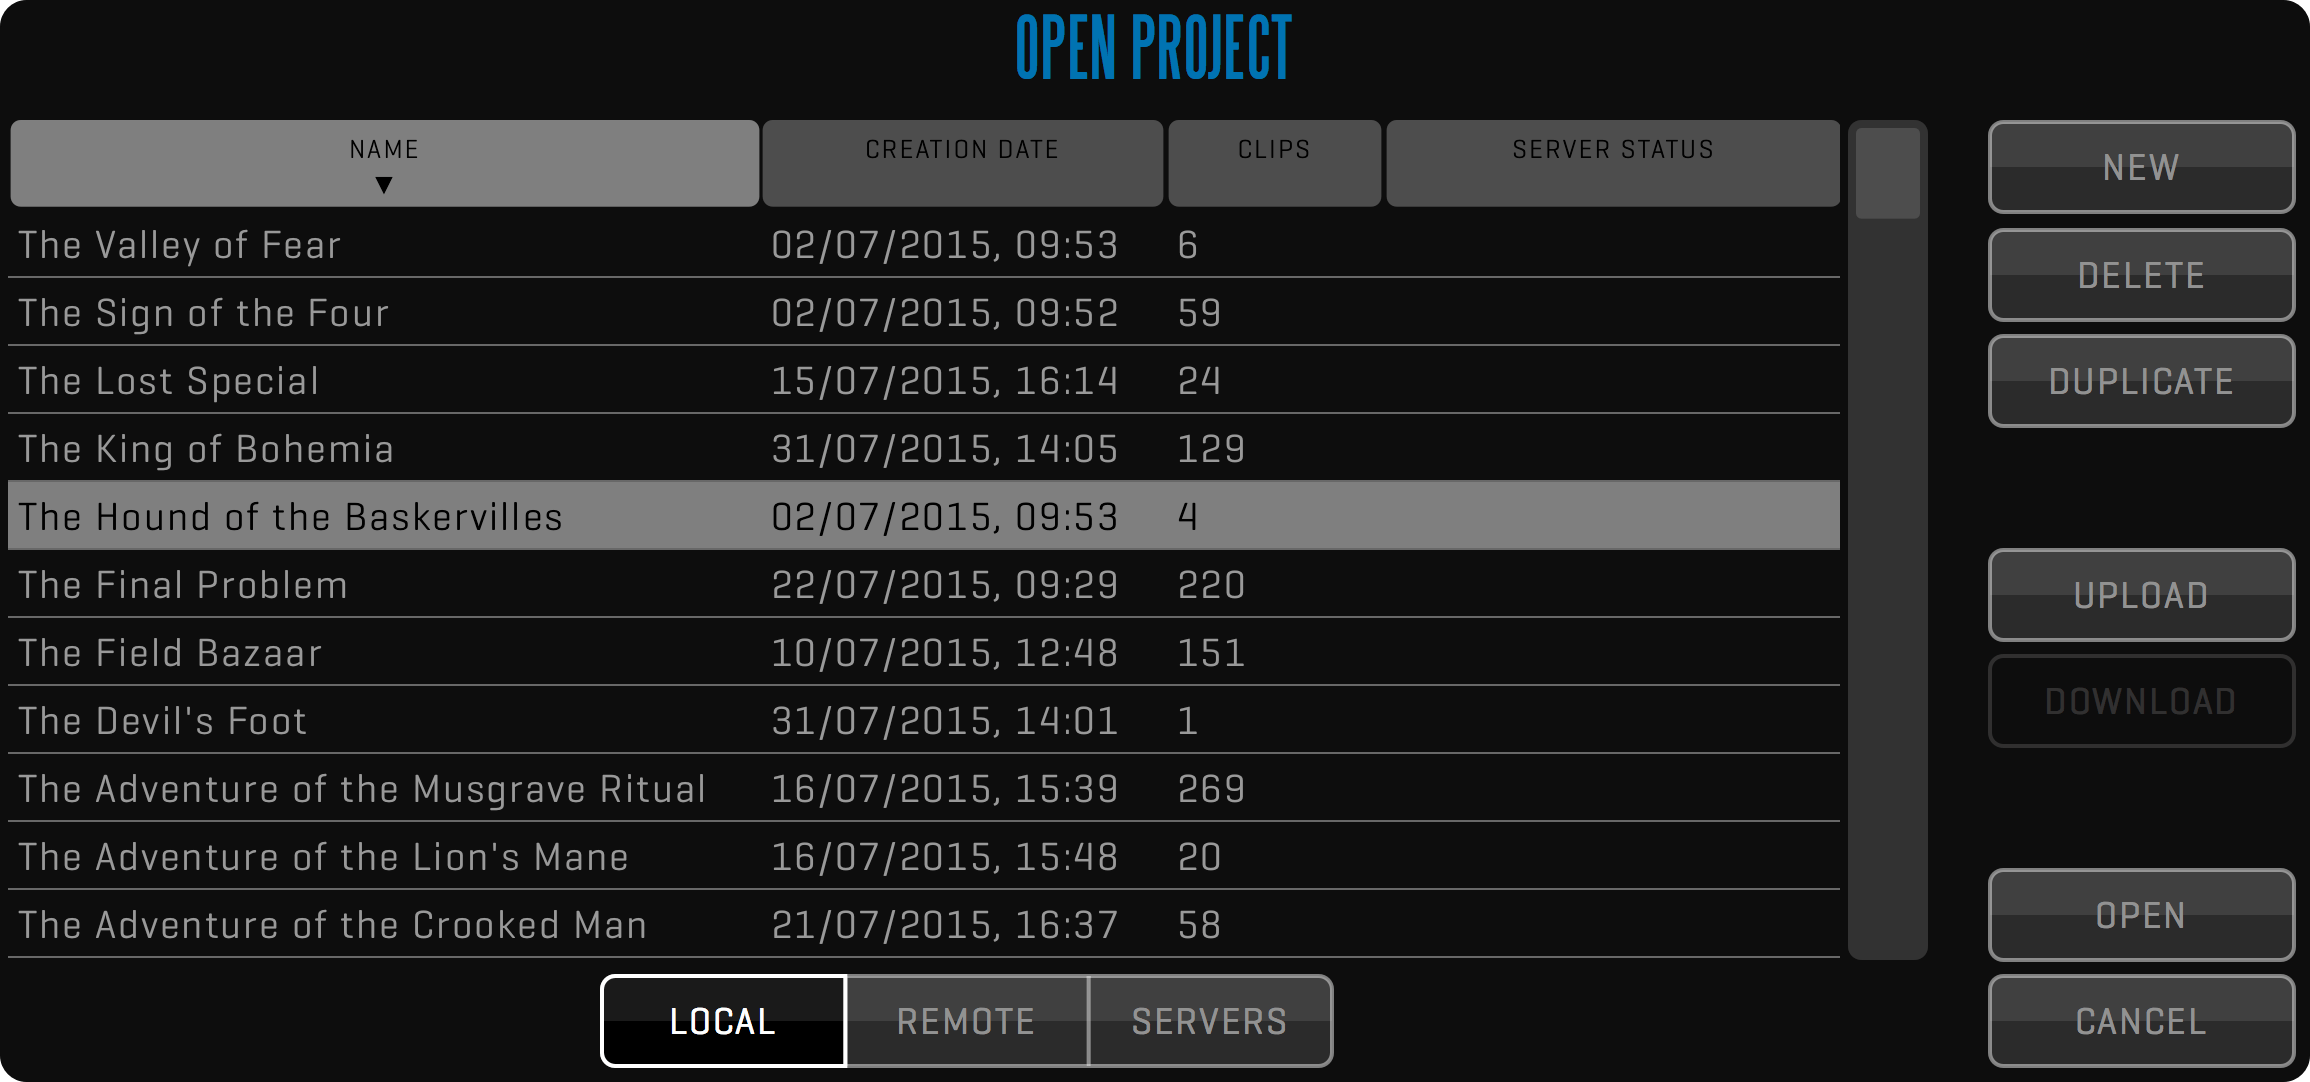
The OPEN button in the PROJECT toolbar opens a list of available projects.
Clicking the PROJECT TITLE label (or Sh-P on the keyboard) lets you edit the settings of the active project.

On the right side of the OPEN PROJECT window there are buttons to create a NEW project, DELETE and DUPLICATE selected project, EDIT button to edit an active project, a button to UPLOAD selected project to a QTAKE Server and a button to OPEN selected project.
Deleting a project will also delete all associated media files!
Duplicating a project will copy all project settings to a new project. This allows you to create template projects that can speed up your workflow.
The segmented button at the bottom of the window controls the contents of the list. LOCAL displays projects that exist on your machine. REMOTE displays projects that are available to DOWNLOAD from QTAKE Server. SERVERS will automatically list any QTAKE Servers that are found on the local network. To connect to a QTAKE Server that is not listed, click the ADD button to enter the IP address or a domain name.
CREATE NEW PROJECT
The project window is used to set the most common properties of the project.
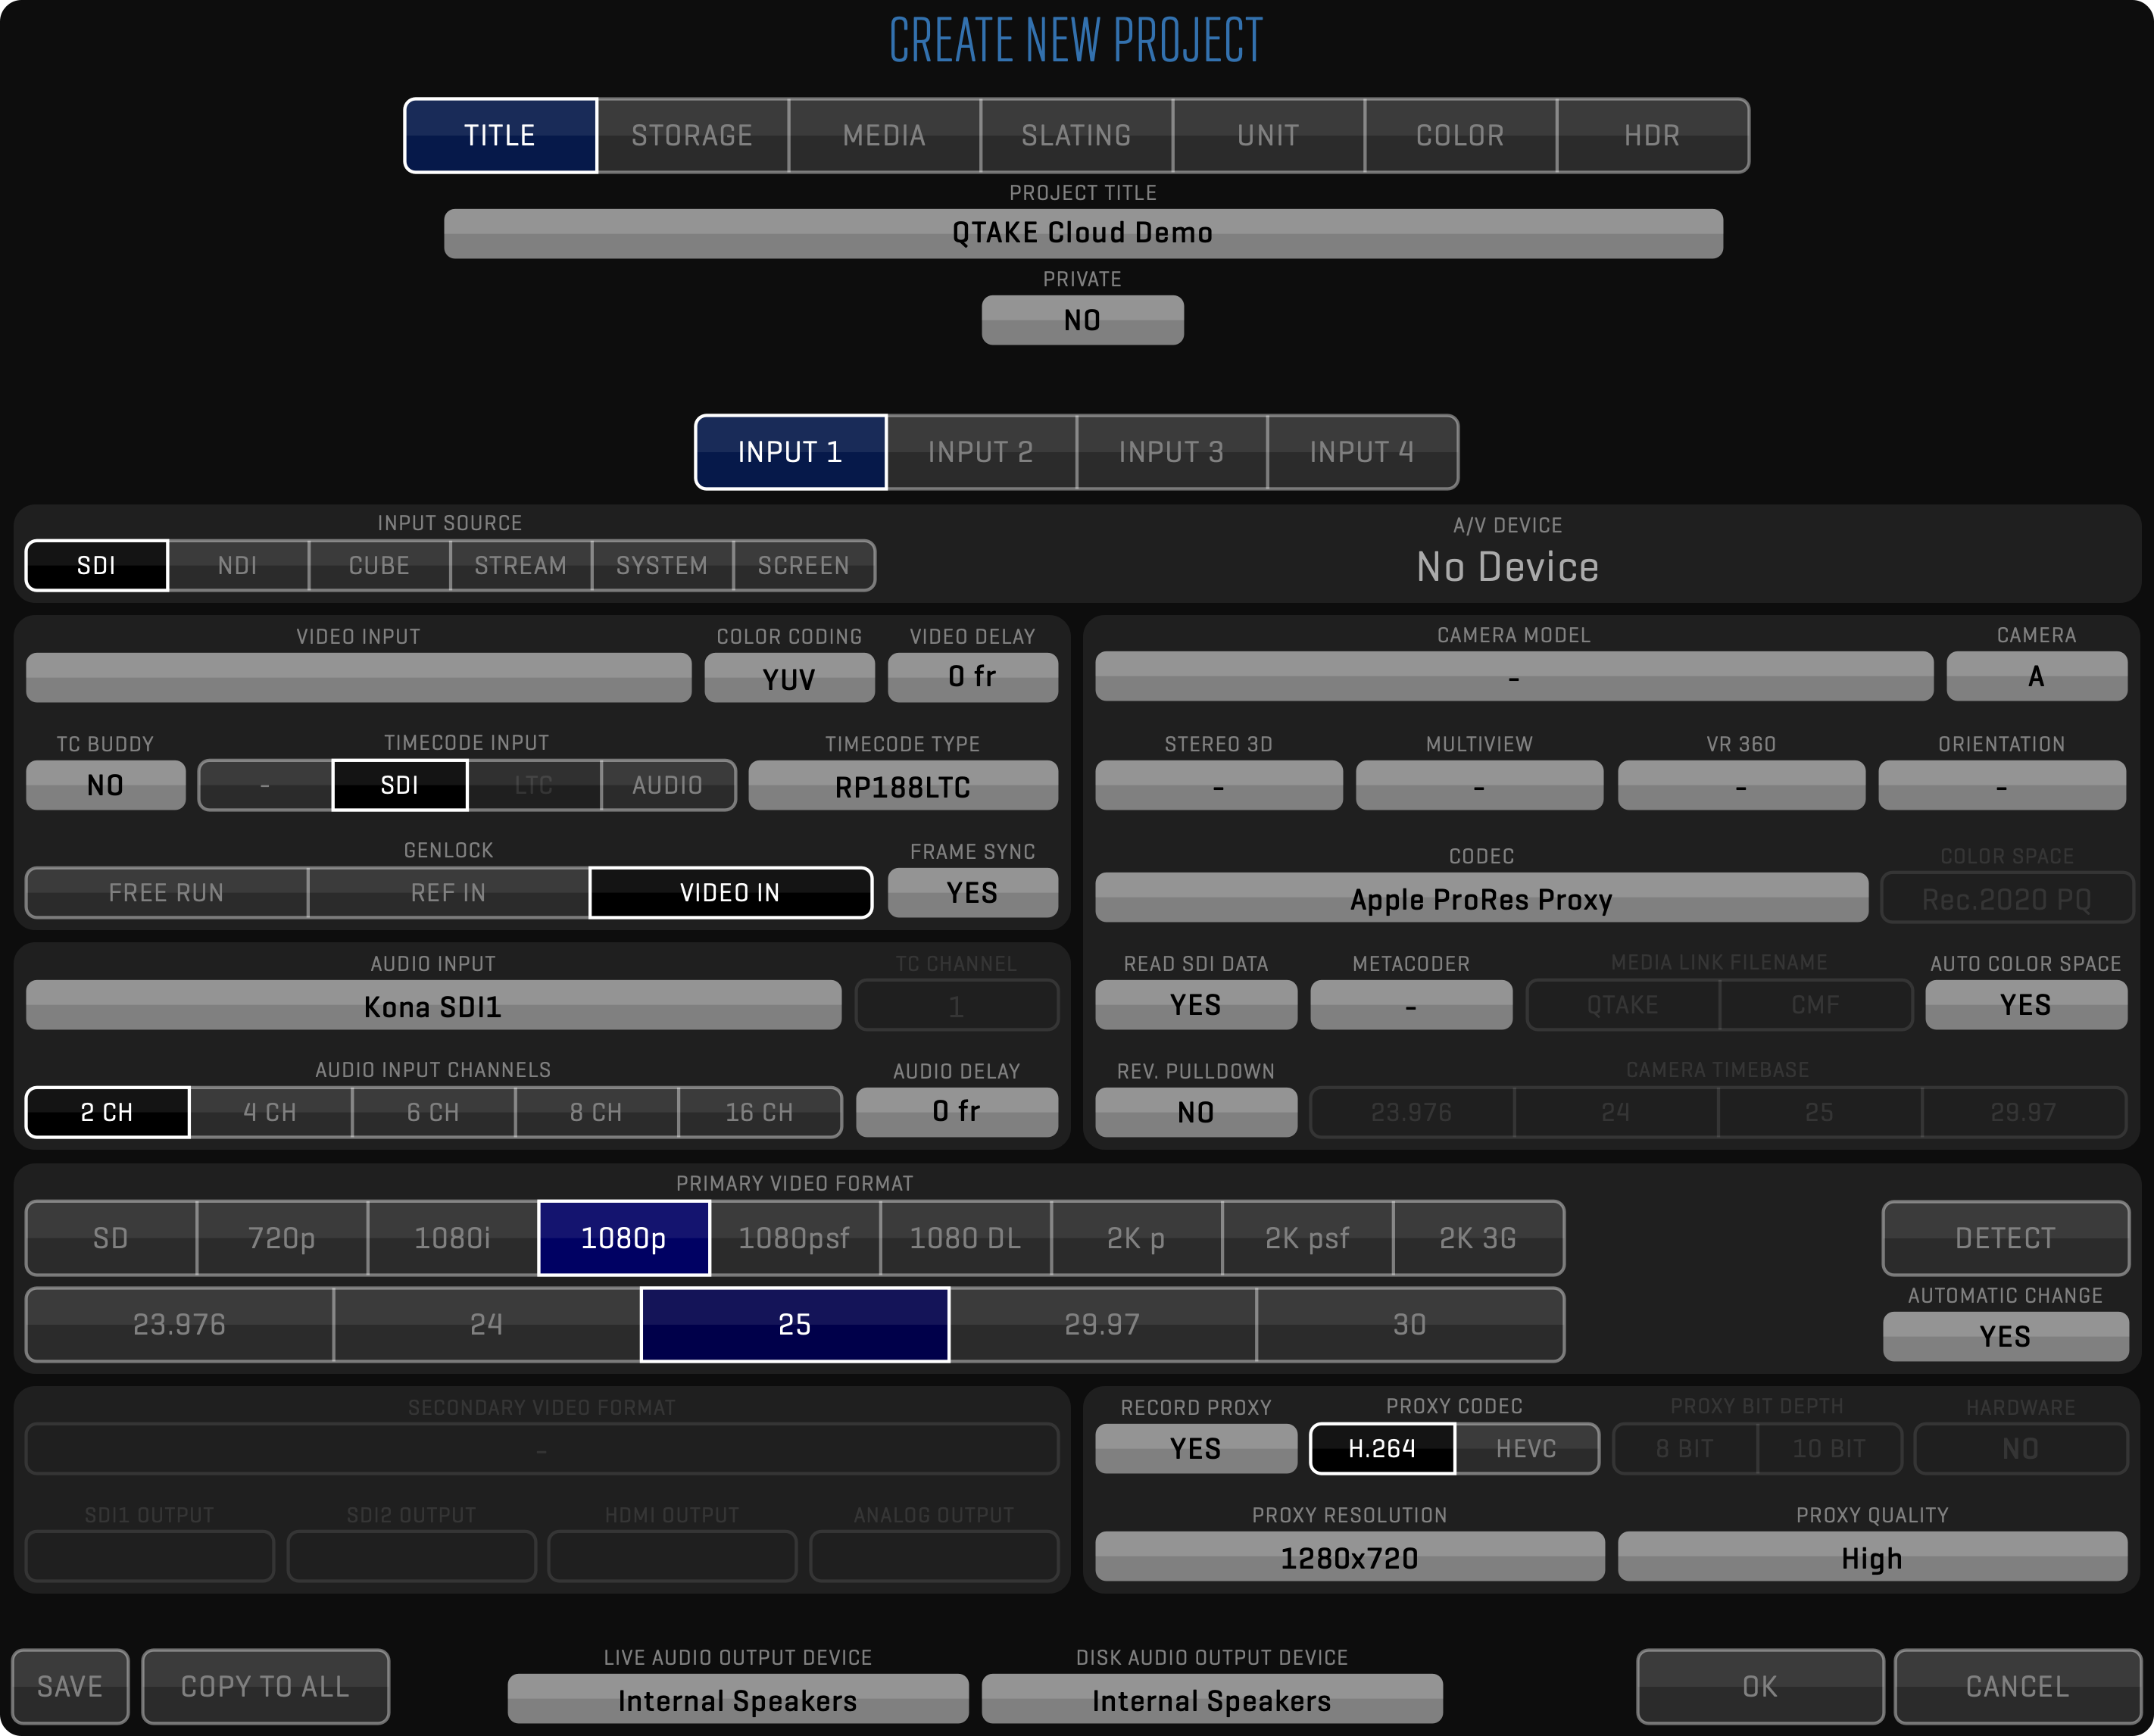
TITLE
Each project is identified by its PROJECT TITLE, which has to be unique. Toggling the PRIVATE button to YES will limit access to the project to the user that created it.
If you need to change the project name for PDF reports, change the value of the PROJECT NAME metadata field in the META sidebar.
STORAGE
Storage volume is selected using the PROJECT STORAGE field. Changing CUSTOM PROXY STORAGE to YES lets you set the PROXY MEDIA STORAGE independently from the main project storage. See STORAGE STRUCTURE for more info.
MEDIA
The DOWNLOAD REMOTE PRORES input field controls when QTAKE will download recorded media from QTAKE Server. DOWNLOAD REMOTE PROXY controls the same for proxy media.
SLATING
Use the SLATING SYSTEM field to select US or UK slating. Additionally, you can specify SCENE SHOT DIVIDER when using there is a need to separate scene and shot names.
UNIT
The UNIT input field is used to set which film unit the QTAKE system is used on, to identify clips in the multi-unit environment. There are four pre-defined choices, but you can easily add additional ones using the META sidebar.
- MAIN UNIT
- SECOND UNIT
- SPLINTER UNIT
- VFX UNIT
COLOR
If you are grading using the ACES color system, set the WORKING COLOR SPACE input field to the desired option. This will also enable the ACES SETTINGS effect in the INPUT FX. Additionally, you should set the output transform using ACES ODT.
Click here to learn more about ACES.
HDR
If your project requires color grading in High Dynamic Range, use the following parameters to set your color space and monitor the luminance range. PRIMARIES drop-down provides the following options:
- Rec.709
- Rec.2020
- P3
Set WHITE POINT to one of the following values:
- D55
- D60
- D65
- DCI
INPUT DEVICES
The segmented INPUT button lets you configure your capture A/V DEVICE as well as other settings for each input. INPUT SOURCE can be set to the following types:
- SDI - video cards from AJA, BMD, or Deltacast, the most advanced option
- NDI® - IP video standard by NewTek™, requires STREAM Module license
- CUBE - Wi-Fi transmitter by Teradek, requires STREAM Module license
- QTAKE - live stream from QTAKE apps, ScreenPort SDI or a MetaCoder device
- SYSTEM - any AV device recognized by macOS, usually offering resolution and FPS selection
- SCREEN - used to capture the contents of the main system screen.
Most of the following settings can be controlled only in case of an SDI input.
If you are using a separate video card for each input you will need to set the following preference:
Two Boards For Dual IO = YES
VIDEO AND AUDIO SETTINGS
After selecting the correct VIDEO INPUT and AUDIO INPUT, you can use DETECT button to set the format based on the input signal. Set AUTOMATIC CHANGE to YES to have QTAKE automatically reconfigure your video card based on the input signal format.
Some video cards will limit the formats that can be selected for different inputs of the same card.
The COLOR CODING selector lets you switch between YUV and RGB to match your input format. The VIDEO DELAY field will make video input delayed by a specified number of frames.
TIMECODE and TIMECODE TYPE let you select the timecode input:
- NO TC “ - “ -> QTAKE will ignore any input TC and will display NO TC information in TC section of
Playtoolbar. - SDI -> SDI input TC will be used for live and recorded clips.
- LTC -> QTAKE will use TC contained in the LTC signal from an external device connected to the LTC IN connector on supported video cards for live and recorded clips. The same TC can be used for all video inputs.
- AUDIO -> This option can be used if the TC is contained on the audio track of the selected AUDIO INPUT device. The audio channel containing TC has to be specified in the TC CHANNEL dropdown located next to AUDIO INPUT.
If your input signal does not contain a timecode you can use wireless timecode from Timecode Buddy by setting TC BUDDY to YES. QTAKE will automatically find any Timecode Buddy devices on the same network.
Note that if NO TC is selected, NO TC will be displayed on live input, but on recorded clip, MacOS system time at the time of recording will be recorded as TC.
GENLOCK is used to set the clock mode of your SDI outputs. FREE RUN will use internal timing, REF IN will sync outputs to an external reference signal, and VIDEO IN will use the video input signal to drive the output clock. Set the FRAME SYNC to YES if you want QTAKE to match the timing of all inputs.
CAMERA AND MEDIA SETTINGS
The right side of the project window lets you set your CAMERA MODEL, CAMERA LETTER, and the recording CODEC for your media files. STEREO 3D, MULTI VIEW, and VR 360 fields are used to identify the type of content in the current input. You should also specify the COLOR SPACE of your input signal using pre-defined values (ACESproxy, Alexa LogC, Rec.601, Rec.709, Rec.2020, Rec.2020 PQ, Rec.2020 HLG, P3 D65 PQ) or set the AUTO COLOR SPACE option to YES.
Codec selection contains the PASSTHROUGH option, which can be used when recording a stream from ScreenPort SDI or another QTAKE app, to store video track in the native codec of the stream.
If the selected camera supports embedded metadata in the SDI feed you can set QTAKE to READ SDI DATA and also choose to name your media links by QTAKE or CAMERA MEDIA FILENAME. For further information see CLIP NAMING CONVENTION. If you are using a METACODER device to preserve the metadata in the wireless SDI signal, set this option to Video or Audio, depending on the selected mode inside the MetaCoder device.
Enabling REVERSE PULLDOWN will only record unique (non-duplicated) frames from the camera output to match the frames recorded by the camera, either in standard camera frame rate or in vari-speed and speed-ramp modes, up to the frame rate of the signal format.
For example, if the camera is recording 40fps into 24fps project, you should set the CAMERA TIMEBASE to 24 and use the 3G-SDI signal from the camera output (that allows the transfer of 60 frames per second). QTAKE will record 40 unique frames from the 60Hz signal and it will stretch the audio to match the slow-motion video. Playback from QTAKE will look the same as if you were playing back from the camera.
If you need to up-convert or down-convert live or playback signal, set the SECONDARY VIDEO FORMAT and select which outputs should use it. If these settings are greyed-out, it means they are not available on your video cards.
PROXY SETTINGS
RECORD PROXY enables QTAKE to record a secondary, highly compressed file, along with your regularly recorded media. Hard-link to this proxy file will be placed in a subfolder of your project folder called /Media/Proxy. Use of the QTAKE Server provides access to recorded clips using QTAKE Monitor app.
Top controls in this section allow you to set the CODEC (H.264 or HEVC), BIT DEPTH (8-bit or 10-bit for HEVC), and HARDWARE acceleration. The bottom row provides settings of the RESOLUTION and QUALITY of these files.
HEVC codec (also known as H.265) produces the same quality output using the same bitrate as H.264 codec, however, it is much more demanding in terms of processing power.
The source image for the proxy encoder is the content of the View. This means that the proxy recording will “burn in” any applied effect or LUT into the recorded media file, so you should take care not to change the settings while recording.
The same encoded frames used for storing proxy media files are used for QTAKE Stream. If you need different settings for proxy media, use the auto-export feature.
To disable OSD burn-in on the proxies set the following preference:
Proxy OSD = NO
COMMON PROJECT SETTINGS
The COPY TO ALL button allows you to copy the settings of the current input to all remaining inputs.
The SAVE button will save the current project setup as the default. The default setup will be used as a starting point when creating a NEW project - unless the project was created by duplicating another project.
If you have multiple audio devices connected you can choose what output device QTAKE will use when in LIVE or DISK mode with the LIVE AUDIO OUTPUT DEVICE and DISK AUDIO OUTPUT DEVICE buttons.
STORAGE STRUCTURE
This section provides insight into how QTAKE stores recorded and imported media files, thumbnails, and other internal files.
QTAKE Storage Folder
Since version 1.5 QTAKE uses new file storage based on unique filenames, compatible with QTAKE Server. The main purpose of this system is to provide the most robust way of linking a database to files, especially in the new, distributed environment, where files can be accessed by the asynchronous upload or download process.
The main file storage folder is called “QTAKE Storage” and it resides in the root of the volume selected in the PROJECT STORAGE field. You should never touch the contents of this folder to avoid breaking the database links or QTAKE Server synchronization.
QTAKE Projects Folder
In addition to the main file storage folder, there is additional “QTAKE Projects” folder that contains folders such as FINDER, EXPORT, or SCREENSHOTS, which serves as an output location for specific FUNCTIONs.
Additionally, QTAKE will automatically create hard links with human-readable filenames to media files inside the MEDIA folder, for compatibility purposes. 3rd party tools that need automatic access to QTAKE media files can use these hard links.
The following filename scheme is used for hard links: [SCENE_SHOT_TAKE_CAMERA] SOURCE-CLIP-INPUT
Automatic hard links inside the QTAKE Projects folder will not have their filenames updated after the clip metadata change.
Copy clips to 3rd party apps
In case you need to copy QTAKE media files to external storage using the current metadata values, you should use the SHOW IN FINDER function. Typical use is copying media files for the editor or director.
Spanning multiple volumes
In case your file storage gets full, you can simply attach new storage to your system and select a new volume using the PROJECT STORAGE field. The old volume will still be used to access old files.
Never try to move or delete files inside QTAKE Storage manually. If you need to free up drive space, delete clips inside the QTAKE app and empty TRASH in the LIST. Afterward, go to macOS Bin and delete media files from the macOS Bin as well.
UPLOAD TO QTAKE SERVER
When you click the UPLOAD button in the OPEN PROJECT window, you will be presented with the following dialog prompting you to select destination QTAKE Server. Usually, this will be the instance of the server running on your local machine.
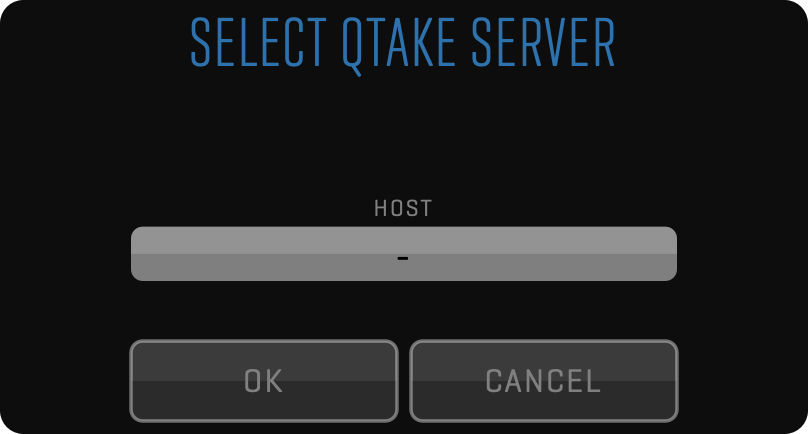
After clicking OK, your project upload will have to be approved by the administrator of the selected QTAKE Server instance.
DOWNLOAD FROM QTAKE SERVER
Sometimes, you will not be the one who is creating the QTAKE project. The most common scenario is the 2nd unit QTAKE system, which is deployed after the shooting has already started. In this case, you should use the REMOTE tab of the OPEN PROJECT window to select an existing project residing on the server and click the DOWNLOAD button to download the project to your QTAKE.
If you don’t see a specific project listed in the table, ask the QTAKE Server administrator to send you the project link. Double-clicking the link will add this project to the list of remote projects and allow you to download it.
EDIT PROJECT
Use the EDIT button to adjust any settings to the project. Note that changing the format will have an impact on sequences. The new sequence is derived from the current project settings.
Clicking the PROJECT STORAGE input field will let you choose a new storage volume for your project. QTAKE will record subsequent media to the project folder on your newly selected volume. Disconnecting your old storage volume will cause any media residing on that volume to be marked as offline (purple outline) in the browser.
Project folder also serves as storage for QTAKE outputs such as PDF reports, clip reports, etc. Exact location is
Volumes/YOUR PROJECT STORAGE VOLUME/QTAKE Projects/YOUR PROJECT TITLE/
OPEN LINK
QTAKE supports QTAKE, QTAKE Server, and QTAKE Monitor invitation links for local network and Cloud operation. If you do not see the desired project in the Project list or you do not see the stream in OPEN PROJECT -> INPUT SOURCE -> STREAM, you can request an invitation link from the QTAKE operator. Afterward, you can either click on the link or you can copy the link and paste it into OPEN PROJECT -> SERVERS tab -> OPEN LINK.
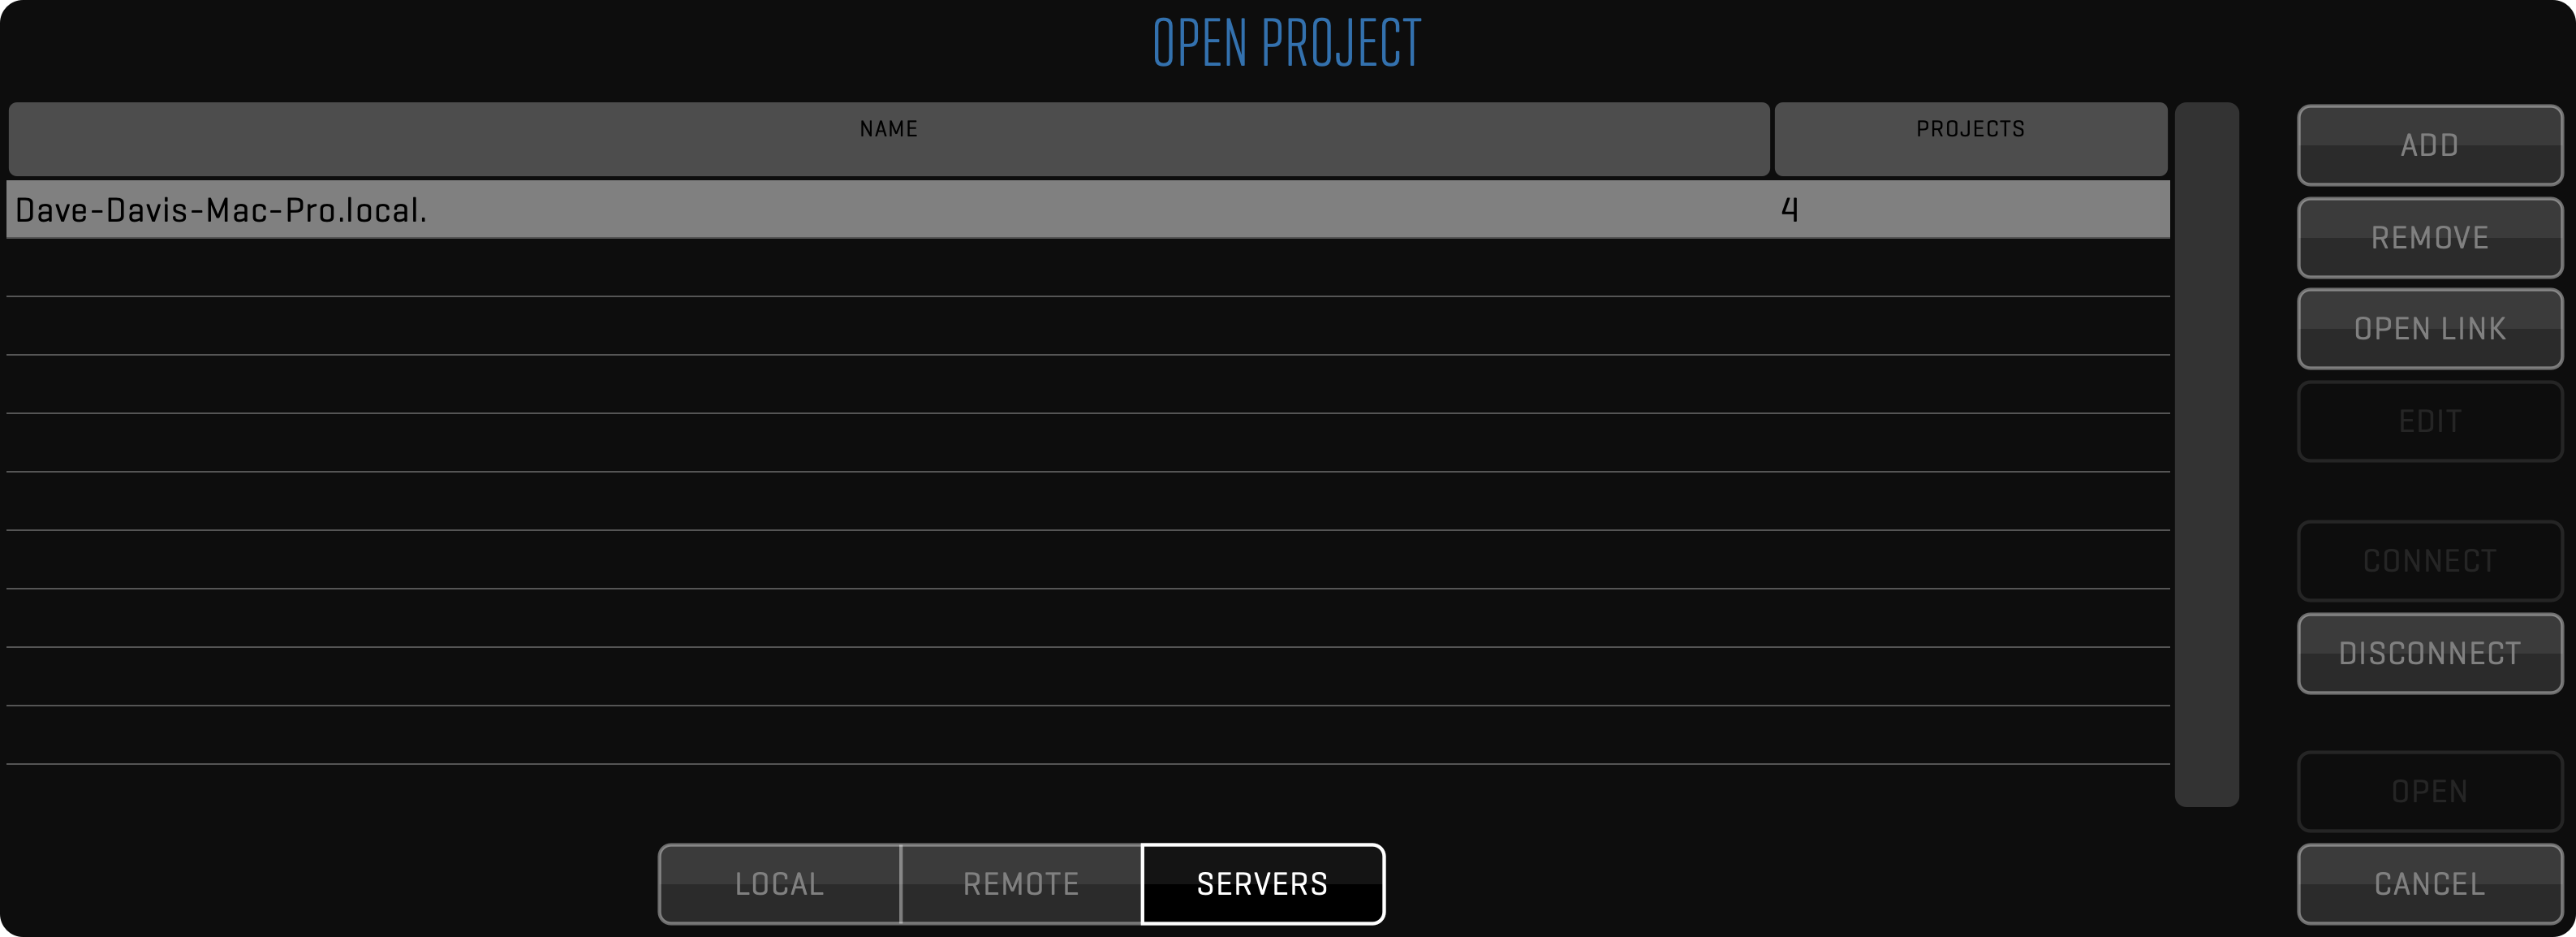
CAMERA METADATA COMPARISON TABLE
This is a comparison table detailing what embedded metadata QTAKE can read from various cameras.
| RED | ALEXA | SONY | CANON | |
|---|---|---|---|---|
| TIMECODE | YES | YES | YES | YES |
| RECORD START/STOP | YES | YES | YES | YES |
| FILE NAME | YES | YES* | YES* | YES* |
| INDEX | YES | YES* | YES* | YES* |
| ROLL | YES | YES* | YES* | YES* |
| SHUTTER | - | YES* | - | - |
| FPS | - | - | YES* | - |
| LENS DATA | - | YES* | YES* | - |
* BMD VIDEO CARDS METADATA
* Blackmagic Design video cards will only receive SDI metadata when QTAKE is set to 10-bit capture mode.
FULL RANGE VIDEO
SDI video usually contains image data encoded in YCbCr color space. QTAKE converts the image into RGB color space to perform GPU-based processing. Standard YCbCr conversion uses SMPTE levels, which means that the legal range YCbCr will be converted to full range RGB. However, some cameras use full-range YCbCr to store the higher luminance range. QTAKE supports conversion to RGB using full range YCbCr to avoid clipping of super-blacks and super-whites. This is controlled using the following preference:
When using FULL RANGE VIDEO preference, your video card output and QOD+ will be automatically set to match the input, but if you are using 3rd party GPU to SDI converters, you may need to set the correct video range using the following preference:
Full-range video processing is slower. Use it only in case your signal source requires the processing of super-black and super-white pixel values.
INFO Menu
This toolbar is used to check the license information of the system, send the logs to the support department and set the preferences that control the operation of the software.
LICENSE
You can view your application license information by clicking the LICENSE button in the INFO toolbar.
You can also review the end-user license agreement by clicking SHOW EULA.
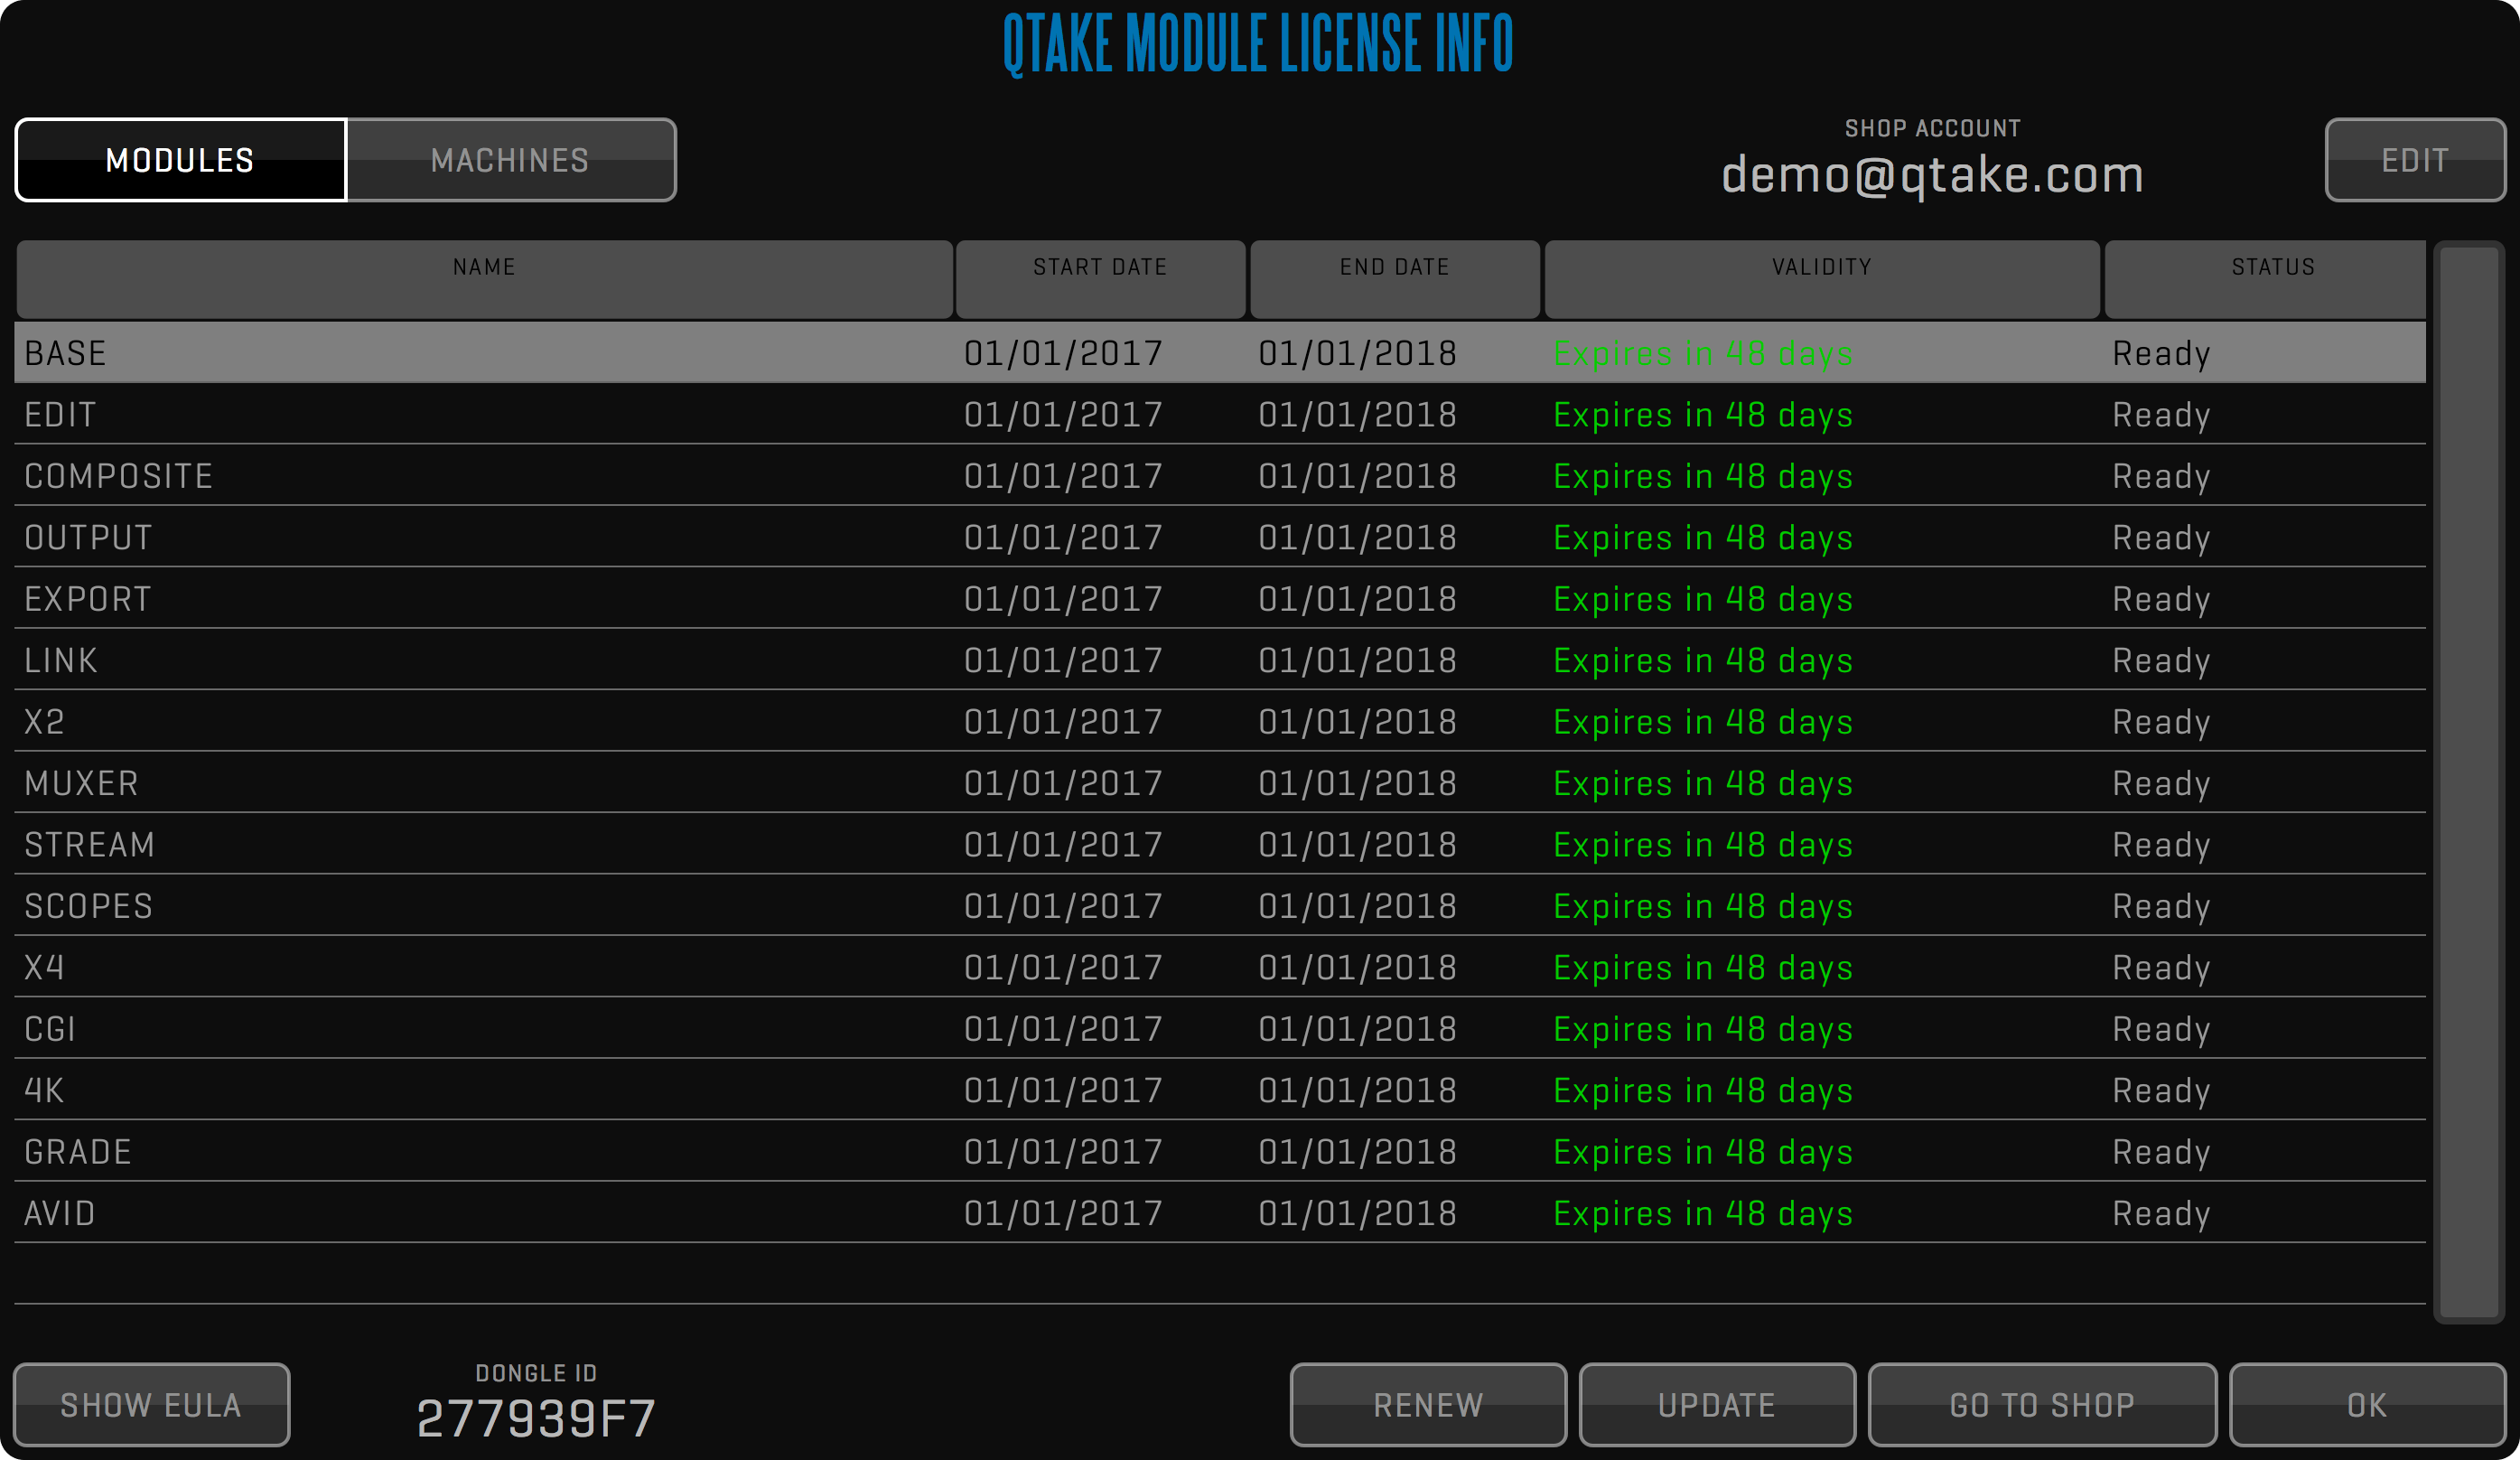
Licenses
A QTAKE license can either be tied to a DONGLE ID or a COMPUTER ID. If a license is tied to a DONGLE ID you can move that dongle and license file to a different computer at will. If a license is tied to a COMPUTER ID it will only work on that particular computer but then you do not have to worry about misplacing the dongle.
Rental Shop
To create a QTAKE Rental Shop account, register machines, and rent modules you can also visit QTAKE Shop directly at: https://shop.qtakehd.com
For instructions on how to use the shop, see: https://shop.qtakehd.com/instructions
WARNING
Tampering with the macOS system Date and Time settings during a rental period may cause the QTAKE Licensing system to reject the license. Consequences may be as fatal as a License system lockdown on the machine, meaning even a valid license would be unusable. Clean macOS re-install might be required.
LICENSE FILE
In case you need to manually add a license file to your QTAKE, make sure it is unzipped, self-contained (not using an alias or a symbolic link), and placed inside /Applications/QTAKE/License folder. The license file is validated only if it has .lic file extension.
SEND REPORT
The SEND REPORT button allows you to conveniently send your settings, QTAKE preferences, and logs to IN2CORE for detailed problem analysis. You can also enter the specific details and problem description in the window field.
PREFERENCES
Application preferences are located in the /Applications/QTAKE/Prefs folder. To avoid conflicts each version of QTAKE will create its preference file. HDx1 preferences are called: QtakeHDx1_Prefs.txt, HDx2 are called: QtakeHDx2_Prefs.txt, etc.
If you delete this file, QTAKE will generate a new one with default values the next time you run QTAKE. Changes to QTAKE preferences can either be made in the PREFERENCES section in the INFO module or by editing the preferences file using any text editing application.
QTAKE will load this file upon application start. See the QTAKE PREFERENCES section for more information.
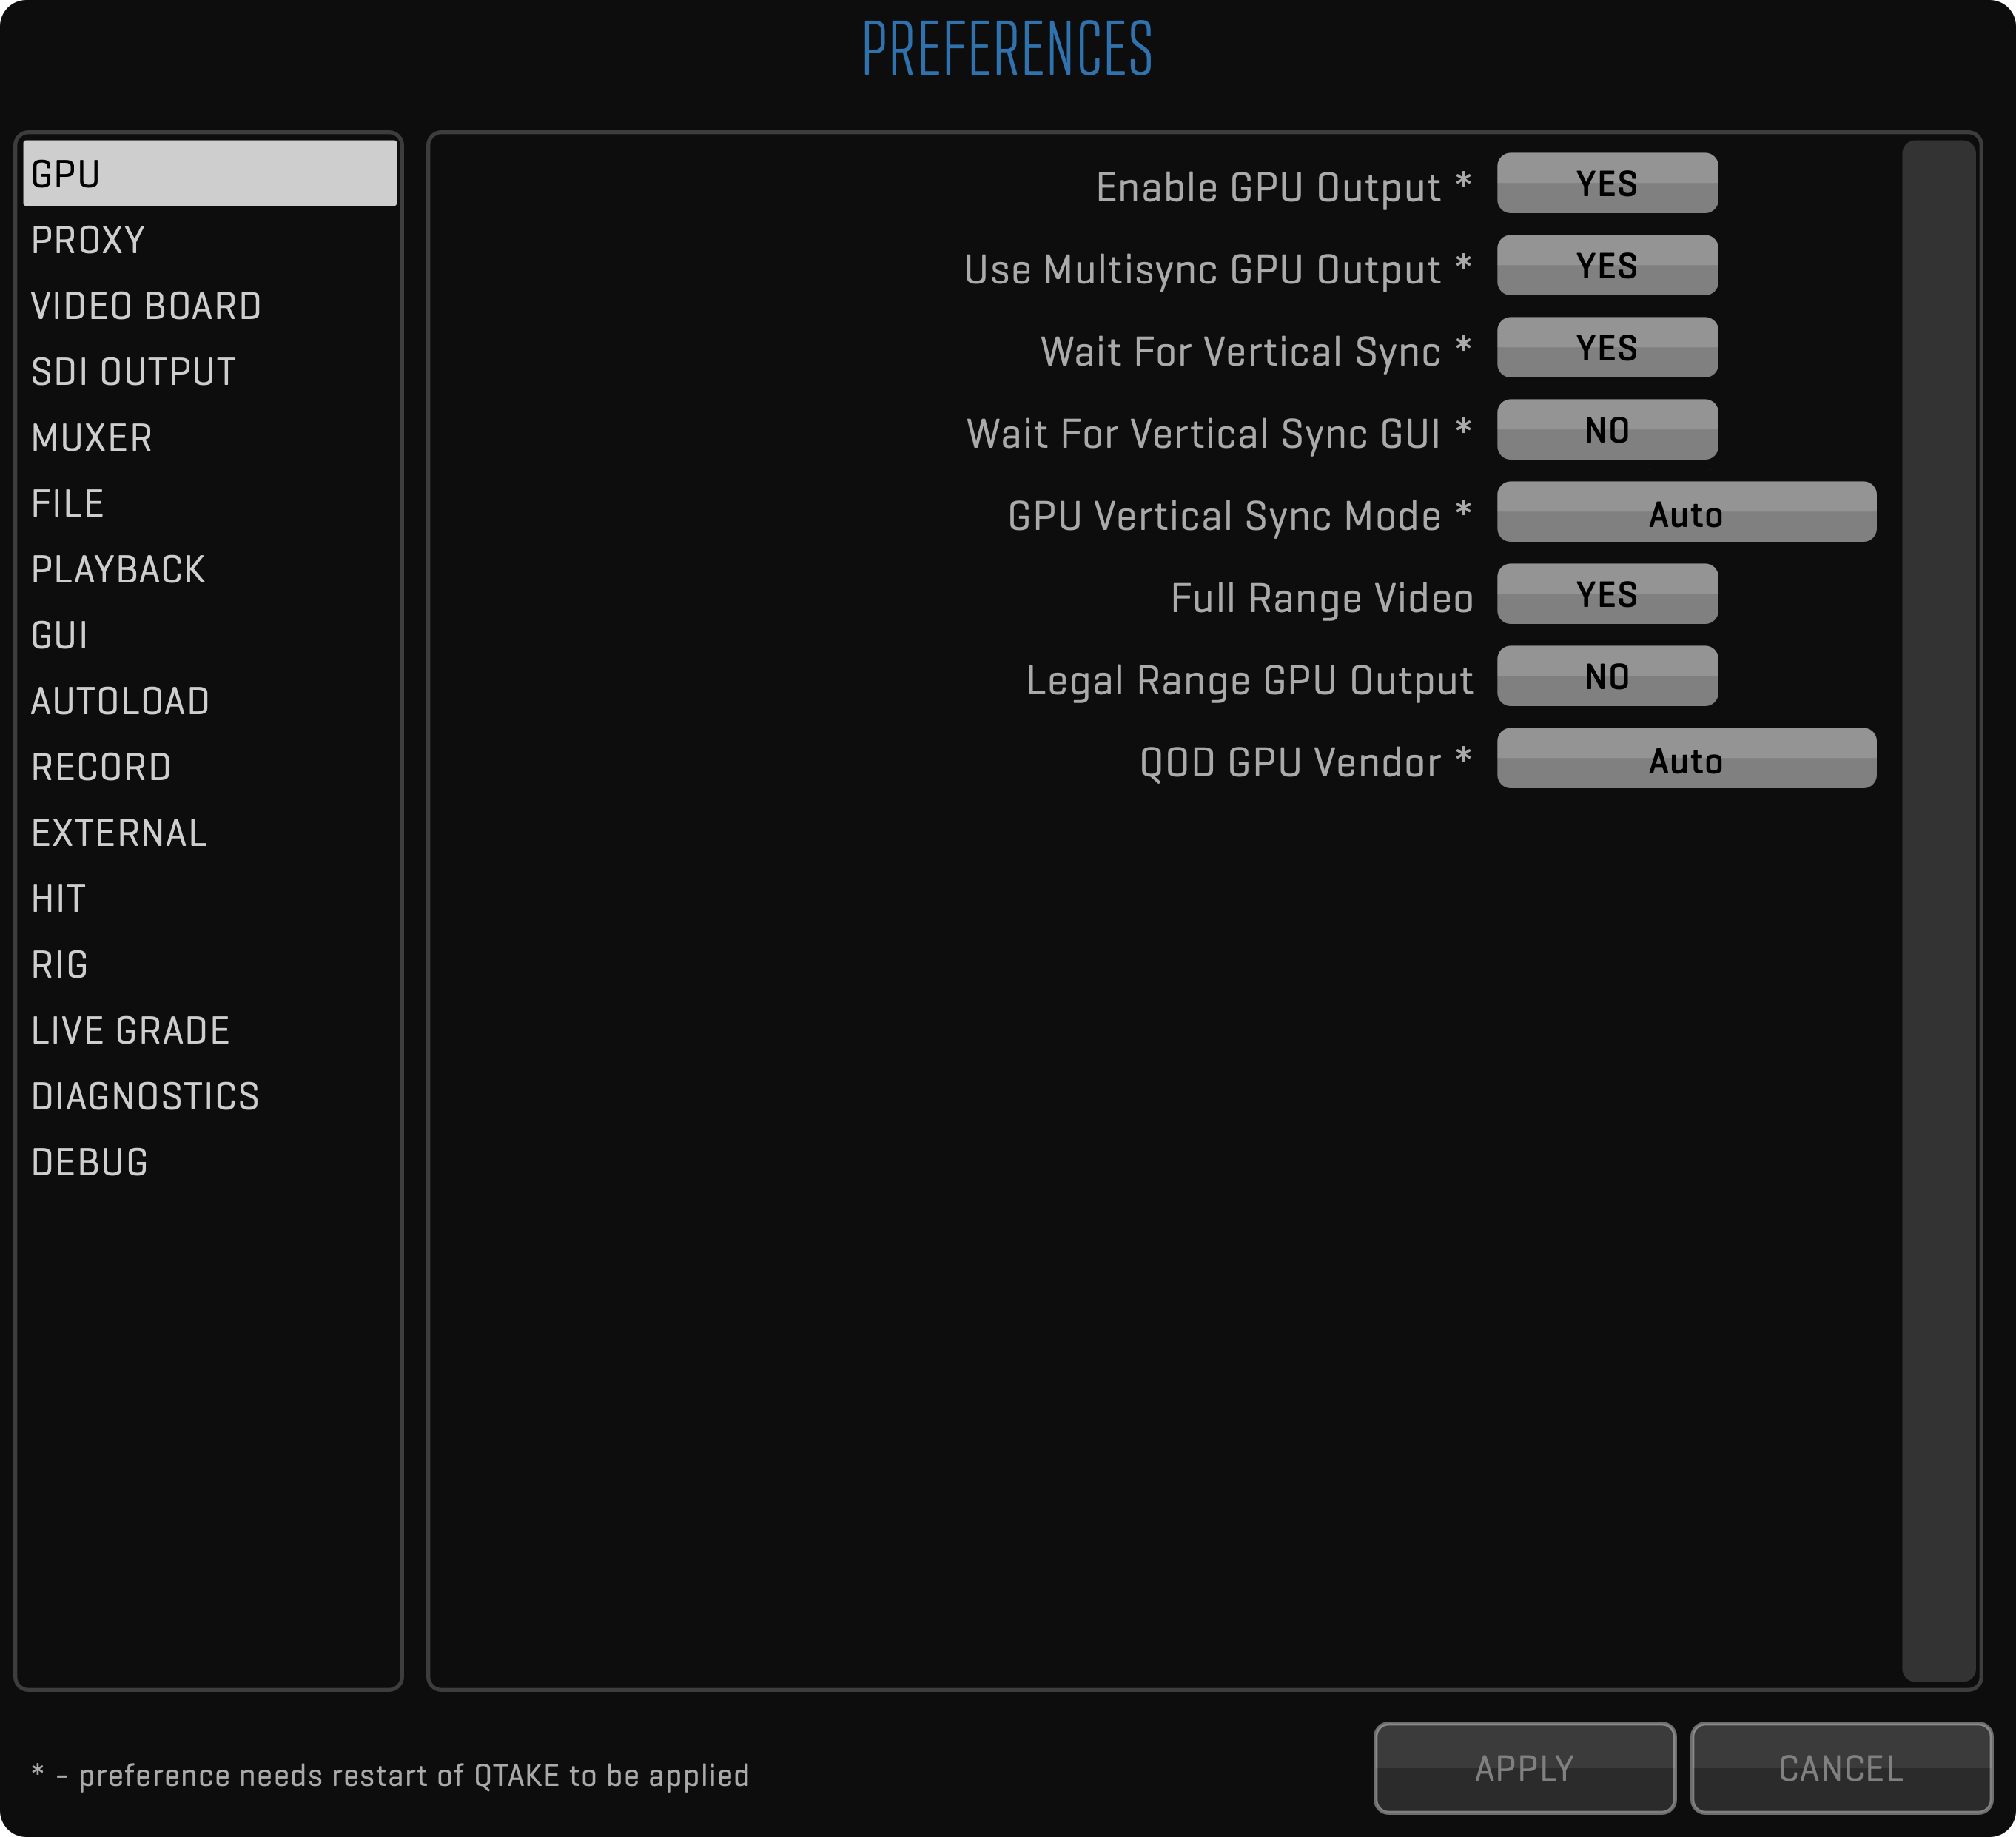
Don’t forget to restart!
QTAKE loads the preferences when the application starts meaning you will have to restart QTAKE if you edit the file while the application is running. When using QTAKE to change the preferences you may be prompted to restart. Options requiring a restart are marked by an asterisk.
OPTIONS Menu
You can use the following user OPTIONS in the QTAKE application - settings are stored for the current USER.


POST-REC ACTION
Select what action should be performed after recording a clip.
LOAD will load the recorded clip into the View.
PLAY will initiate the playback.
KEEP DISK ON REC
Turn this option on to disable the automatic patch to LIVE when recording starts.
AUTO PLAY-SYNC
Turn on to automatically enable the PLAY SYNC button for synced recordings.
AUTO OFFSET
Turn on to automatically set the PLAY SYNC offset when two clips are recorded simultaneously or when recording a composite.
REC ERROR STOP
Turn it on to automatically stop recording when the input signal is lost.
If this option is turned off, QTAKE will duplicate the last frame in case of a dropout.
RENDER OSD
Turn on to burn in OSD information when rendering a clip.
COMP FPS LOCK
Turn it on when using video card output for the composite.
This will ensure composite rendering will use the frame rate of the video card.
FORCE SYNC 3D
Enable accurate display sync of both Views.
You need genlocked cameras to make this work correctly in LIVE.
DEMUX GUI
This option demuxes SBS images in the user interface.
SHOW KEYBOARD
Turn it on to enable a touchscreen visual keyboard for each data entry.
TRACKPAD JOG
Hold the Fn key and drag your finger across the touchpad to jog through the clip.
RESET PLAYHEAD
Resets the playhead position on clip LOAD ONLY or LOAD+PATCH.
PLAYHEAD RANGE
Moves the playhead to the first or last range IN point when the clip is loaded or patched to, based on the RESET PLAYHEAD option.
PIXEL VALUES
Turn on to display AXIAL, GRID, and DVE MOVE values in pixels instead of percentages.
MUTE LIVE B-D
This option will automatically mute LIVE audio from all inputs except the first one to eliminate slight echo in multi-input setups.
CHAPTER SOUND
This is used to enable audio beep on chapter marks.
Useful as audible signals for action on VFX shots.
FULL RANGE GUI
This option will perform full to legal range conversion of the Views in the GUI (enabled when Full_Range_Video=1).
VIEW Menu
Views are the heart of QTAKE Advanced Digital Video Assist.
They use GPU power to perform real-time image processing of video frames.
Think of the Views as internal video monitors that can display any video source.
Set the source for each View in the PATCH toolbar.
Every command is performed on a selected/active View.
The active View is marked by a white border.

ACTIVE VIEW SELECTOR
Select active View by pressing the corresponding segment in VIEW toolbar, or by clicking any View in the Views Zone directly.
Keyboard shortcuts 1, 2, 3 and 4.
MULTI-VIEW MODE
You can use Views in either single or multi-view mode, by clicking the corresponding button or by double-clicking the View. Long-click the multi-view button to switch between DUAL and QUAD modes. The keyboard shortcut is D.

VIEW ORIENTATION
When shooting in portrait mode (camera rotates 90 degrees), or upside-down, you can rotate the active View to match the camera orientation. To do this, you need to set the ORIENTATION field to APPLY and select the correct video content orientation inside the MEDIA Toolbar using
ACES ODT
This button is used to select the output color transform when using ACES.
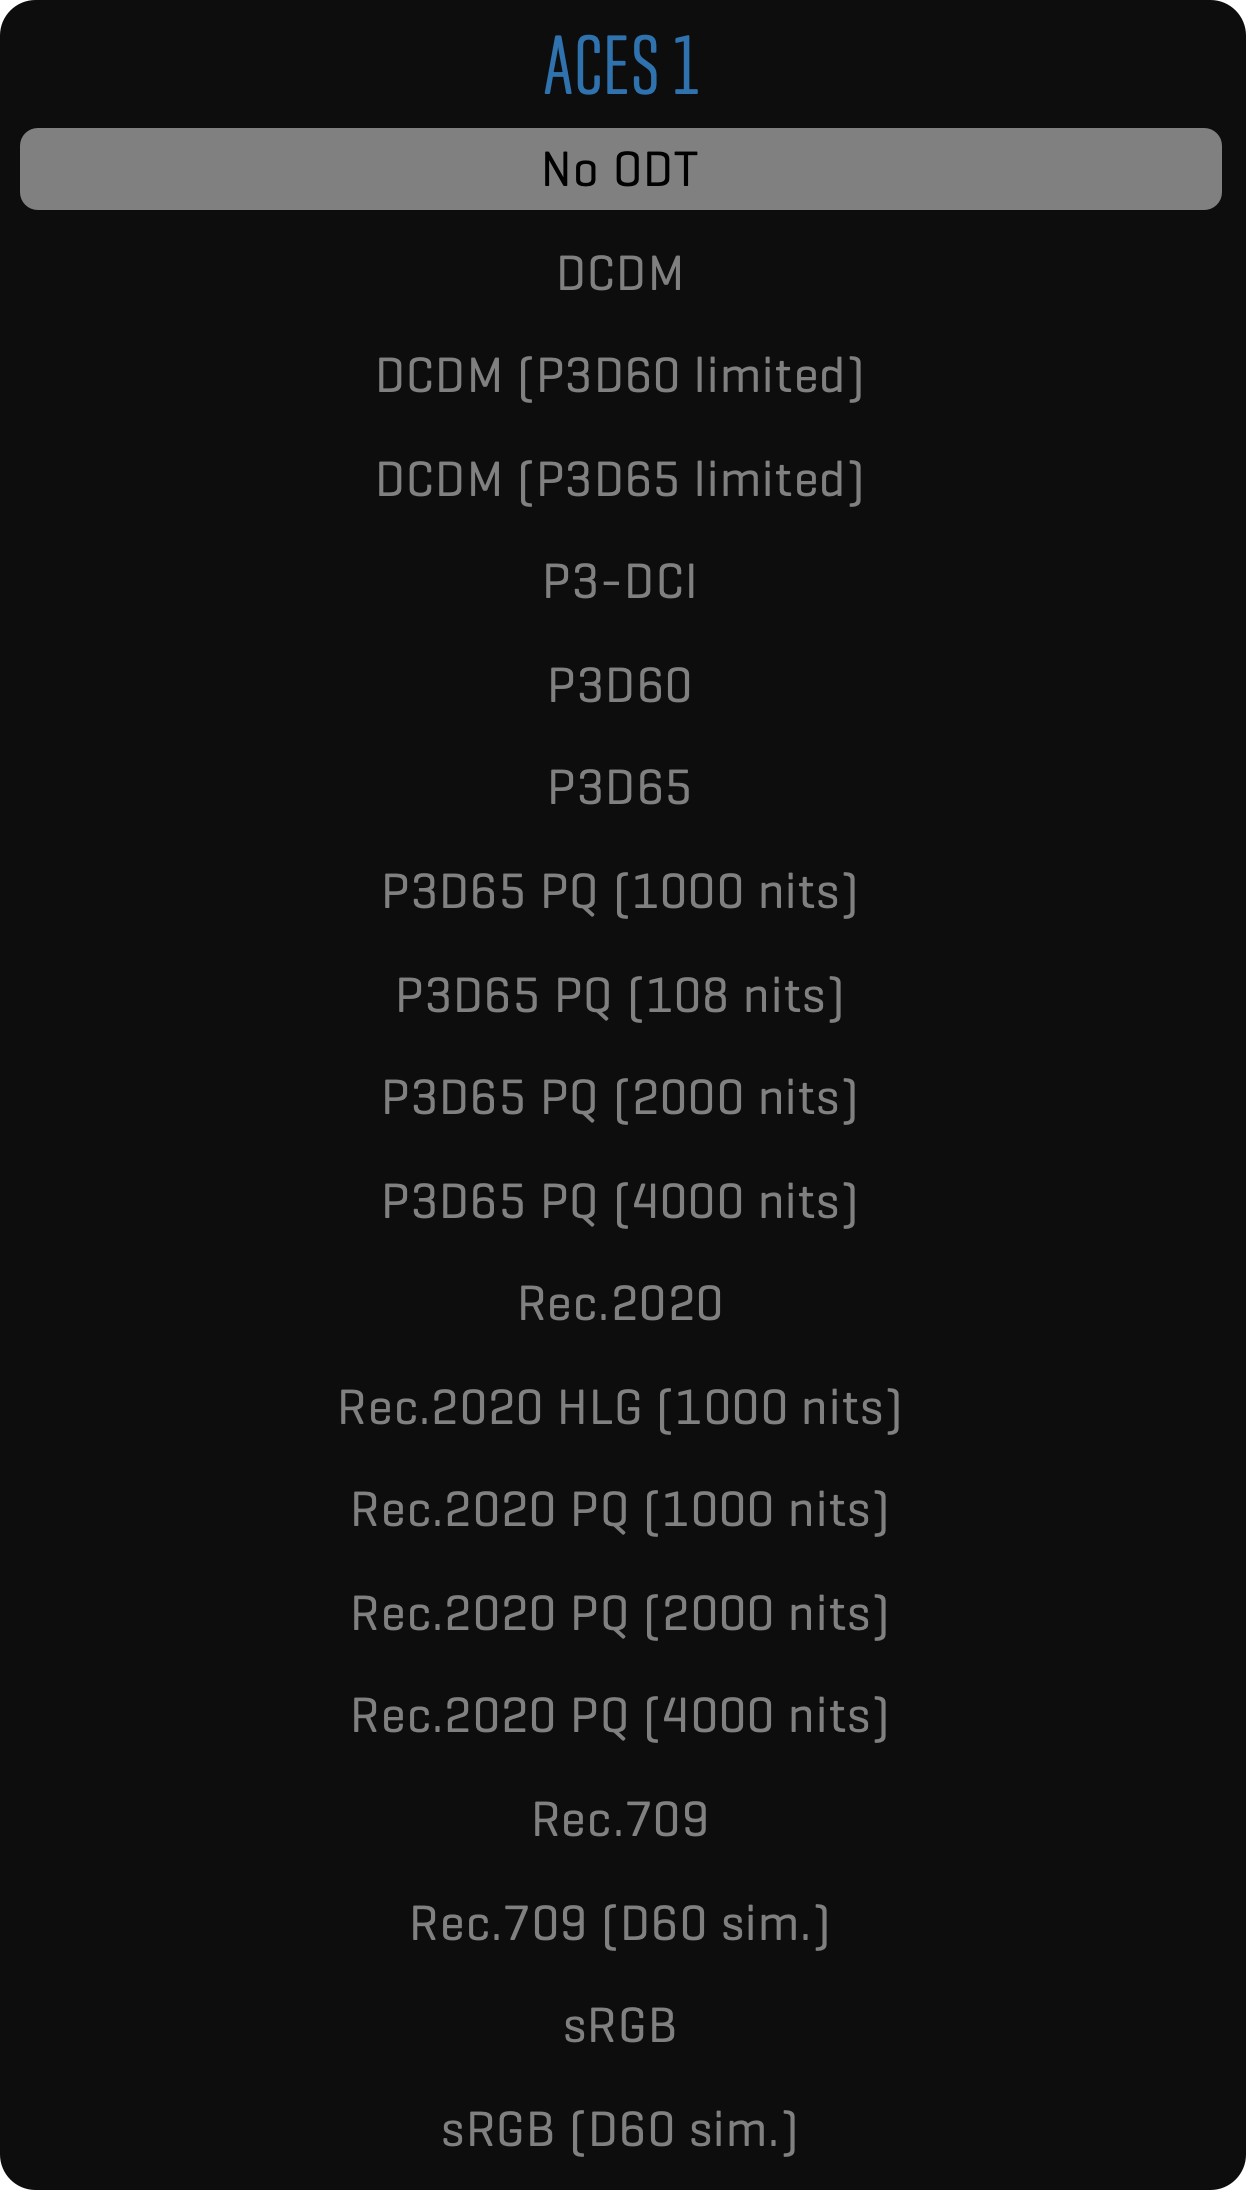
GPU OUT Menu
One of the main QTAKE features is the ability to process live video feed. This allows the system to apply color correction to live video or to output live chroma key compositing with a live or pre-recorded background.
To achieve low latency processed live monitoring, QTAKE uses a video card for input and a graphics card for output. However, graphics card usually provides HDMI or DisplayPort outputs that support only limited cable length (up to 10m). To provide professional video output from your GPU, you need to convert the output signal to SDI. There are many HDMI or DisplayPort to SDI converters, but only QOD+ (QTAKE Output Device) is natively supported in QTAKE to provide up to 4 independent SDI outputs with embedded audio, frame-rate control, and precise color conversion. See QTAKE USB CONTROL for more information.
Each View can be monitored in fullscreen mode using the secondary outputs of your graphics card. These outputs are used to enable monitoring for the Clients or the Director.
4K OUTPUT
Since QOD has four 3G SDI connectors, 4K output is achieved by using all four output connectors. QTAKE sends one quadrant of 4K resolution into each QOD SDI OUT connector. This means, that your monitor has to support quad link SDI to display the 4K QOD output. Alternatively, you can use a 4x3G -> 12G SDI or 4x3G -> HDMI converter to get QOD 4K output into your monitoring device.

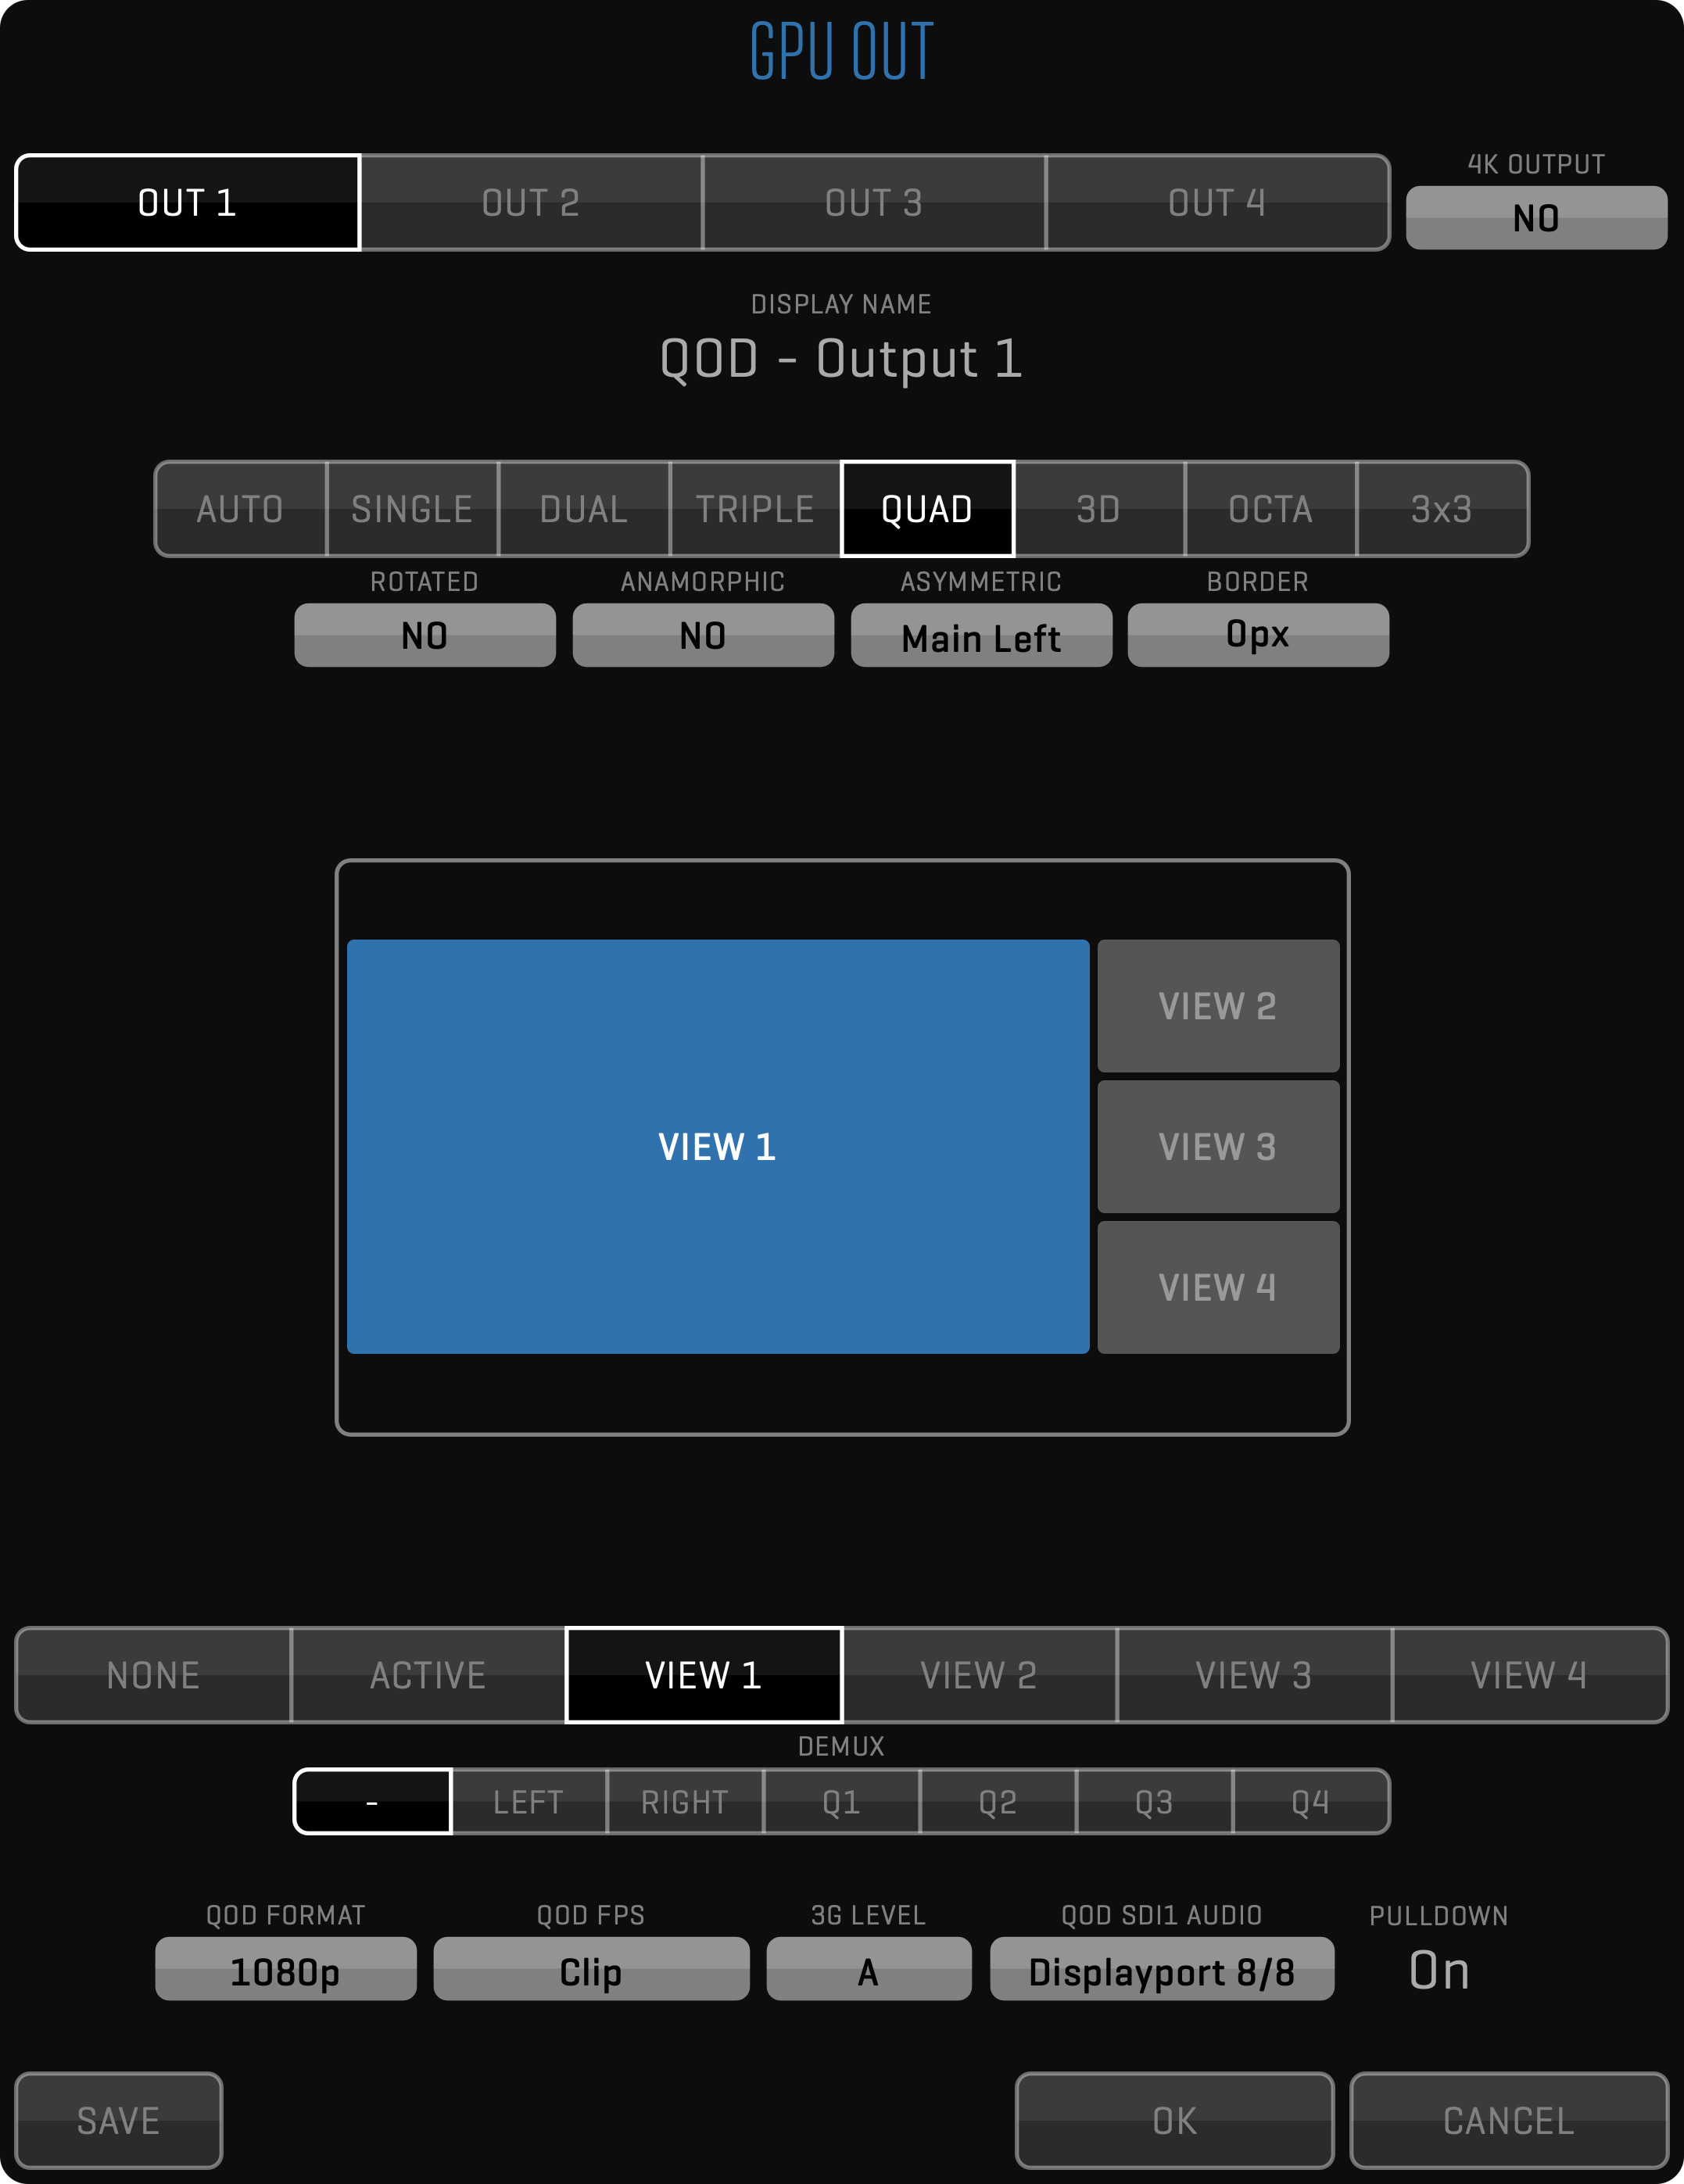
Each GPU OUT can be set to a different layout.
AUTO Output layout follows the operator screen
SINGLE Outputs the selected View in fullscreen
DUAL Outputs two Views on a single output
TRIPLE Outputs three Views
QUAD Outputs four Views
3D Outputs stereoscopic output
When the layout is set to output multiple Views (DUAL, TRIPLE or QUAD) the content of each section can be set independently. The BORDER value determines how much space is added between the Views. In the TRIPLE or QUAD View, you have the option of setting the ASYMMETRIC layout of the output. This allows you to focus on one View while still displaying the other Views on the same monitor.
When GPU OUT is set to 3D layout you also can set the 3D OUTPUT MODE to match the 3D input format that your monitor expects.
SINGLE EYE OUTPUT enables viewing of a single eye on a 3D monitor.
Along the bottom of the window are options for QOD+ output. See QTAKE Output Device for more information.
3D Stereoscopic video output
3D Output can be used with 3D monitors that support side-by-side, line-by-line or DLP mesh input. QTAKE will make sure both video channels (left and right eye) are in sync in LIVE, RECORD, or PLAYBACK mode. Use RECORD SYNC for recording and PLAY SYNC for playback. Enable CLIP SYNC for synchronized browsing of left and right eye clips.
If you need to render out combined 3D frame, you need to use
STEREOtoolbar in COMPOSITE Room, instead of 3D video output.
ROTATED
Allows you to maximize the screen space available to display video by rotating the sections 90 degrees. This requires you to also mount the output monitor accordingly.
SAVE BUTTON
The button allows you to save the current GPU OUT configuration as the default setting. Once saved, this configuration becomes the preset for all new projects, eliminating the need to manually configure GPU OUT settings each time.
This function streamlines your workflow by automatically loading your preferred GPU OUT configuration whenever you initiate a new project, ensuring efficiency and consistency.
IMPORT Menu
This toolbar groups import functions of QTAKE. Import is used to load external assets into QTAKE system or to transfer project from another QTAKE system.

IMPORT
The IMPORT button is used to import QuickTime movie files into QTAKE.
Import will create a copy of selected file and store it in the project media folder.
When importing multiple clips QTAKE will first add entries into the database and then copy the media files.
If you shut down QTAKE while the media is being copied QTAKE will resume the copy operation when started.
For best results, use movies that have the same resolution and timebase as your QTAKE project.
LINK
The LINK button is used for the same purpose as Import, but linking does not create a copy of the selected files in your media folder. This makes linking much faster than importing. The downside is that the media resides in its original location and you can easily lose the link to these clips if you disconnect the drive or move the media.
DRAG AND DROP IMPORT AND LINK
Both LINK and IMPORT can be performed by hiding QTAKE and dragging the files onto the QTAKE dock icon. In addition to QuickTime movies, you can import still images, audio files, and CDL color corrections. When dragging a media file to the QTAKE dock icon the DRAG AND DROP window will appear, letting you set options such as FILENAME PARSING, STILL IMAGE SCALING, STILL IMAGE DURATION. Importing a still image can be useful for reference frames, logos, or background images for VFX shots.
DISK SELECTION
QTAKE can mark imported files with a specific CAMERA LETTER by clicking SELECT DISK and specifying the desired DISK in the DISK LETTER input box. Selecting AUTOMATIC will assign a disk letter according to the filename parsing method.
FILENAME PARSING
When using drag-and-drop import QTAKE can extract metadata from the filename of the imported material but you have to select the correct parsing filter.
Some external recorders can read Camera Media Filename and rename files accordingly. When importing files that are named by camera filename use the appropriate camera import filter even if they were recorded on one of the devices in the list.
NONE The NONE filter will mark the imported clips as belonging to a scene called Import.
QTAKE The QTAKE filter uses the native QTAKE naming convention. Files will be organized in the same way as they were created. Scene_Shot_Take-Sbtk_CamReel_(Rt)_IDx.mov
RED The RED filter will import media with RED filenames to a scene called RED (magazine number), The Camera position will be used as shot and clip number as take. CamReel_[CLR]Clip_MMDDXX.mov
ALEXA The Alexa filter will import Alexa files to a scene called Alexa (reel number). CamReelCClip_DDMMYY_CamID.mov
KIPRO The Ki Pro filter will use Scene and Take numbers as entered. SCSceneTKTake.mov
PIX The PIX 220 or 240 needs to be set to Reel_Scene_Take naming. QTAKE will then use those values. Reel_Scene_Take.mov
ATOMOS The Atomos filter uses Scene, Shot, and Take numbers. UnitName_SceneNum_ShotNum_TakeNum.mov
CANON Use this parsing template to extract information from Canon media files.
SONY Use this parsing template to extract information from Sony media files.
STEREO 3D
When importing stereoscopic footage, recorded as muxed side by side, set the segmented button to SIDE BY SIDE. Non-muxed footage can be imported as FAKE SIDE BY SIDE. This can be useful when using 2D footage as a background plate for a stereoscopic chroma key.
MULTIVIEW
When importing quad split footage, set this field to QUAD to enable related functionality.
VR 360
When importing virtual reality 360 footage, tag it using EQUIRECTANGULAR or CUBEMAP options to enable correct interpretation by QTAKE.
ORIENTATION
When importing footage captured in portrait mode or upside-down, set this field to 90 CW, 90 CCW, or 180 value.
STILL IMAGES
QTAKE can import various still image formats. On import, the image is converted to a QuickTime movie. Adjust the duration of this movie by entering the desired number of seconds in the STILL DURATION input field. To adjust the scaling of the imported image in relation to the View use the STILL IMAGE SCALING segmented button. QTAKE will preserve the transparency of imported images.
USE FILE META
Set this option to YES to extract metadata from the imported file and insert it into the QTAKE database.
ATTACH TO EXISTING CLIPS
Set this field to YES when importing new media for existing clips. Read more about this in the MATCHER section.
OVERRIDE FILE DATE
When importing new media for existing clips, it is important to use correct data to make matching successful. If CMF is not present in the existing clips, CAMERA, TIMECODE, and DATE information is used instead. QTAKE is using file date if it can’t find embedded metadata inside imported media. However, the file date can be misleading, because usually it is set to the time of transcoding and not the time of recording. Using the OVERRIDE FILE DATE field you can set the correct date of the imported file.
IMPORT/LINK FROM QTAKE
Import/Link from QTAKE is used to import clips and associated metadata that were exported using EXPORT TO QTAKE XML. This is useful when you need to transfer clips and data from one QTAKE system to another. Select the storage volume by pressing the IMPORT STORAGE field. Then select the project and the session to IMPORT or LINK clips and metadata. If you select the IMPORT option, clips will be copied to your local project storage.
REPORT Menu
This toolbar contains commands for generating PDF reports and screenshots.
PDF REPORT
QTAKE can generate custom PDF reports with thumbnails and metadata for each clip. You can specify the range of clips and filter clip selection by various attributes. PDF files are saved to a subfolder of your project folder called /Reports. PDF Reports are generated based on a template. You can create new templates by clicking the EDIT TEMPLATE button. This provides custom reports for different departments.
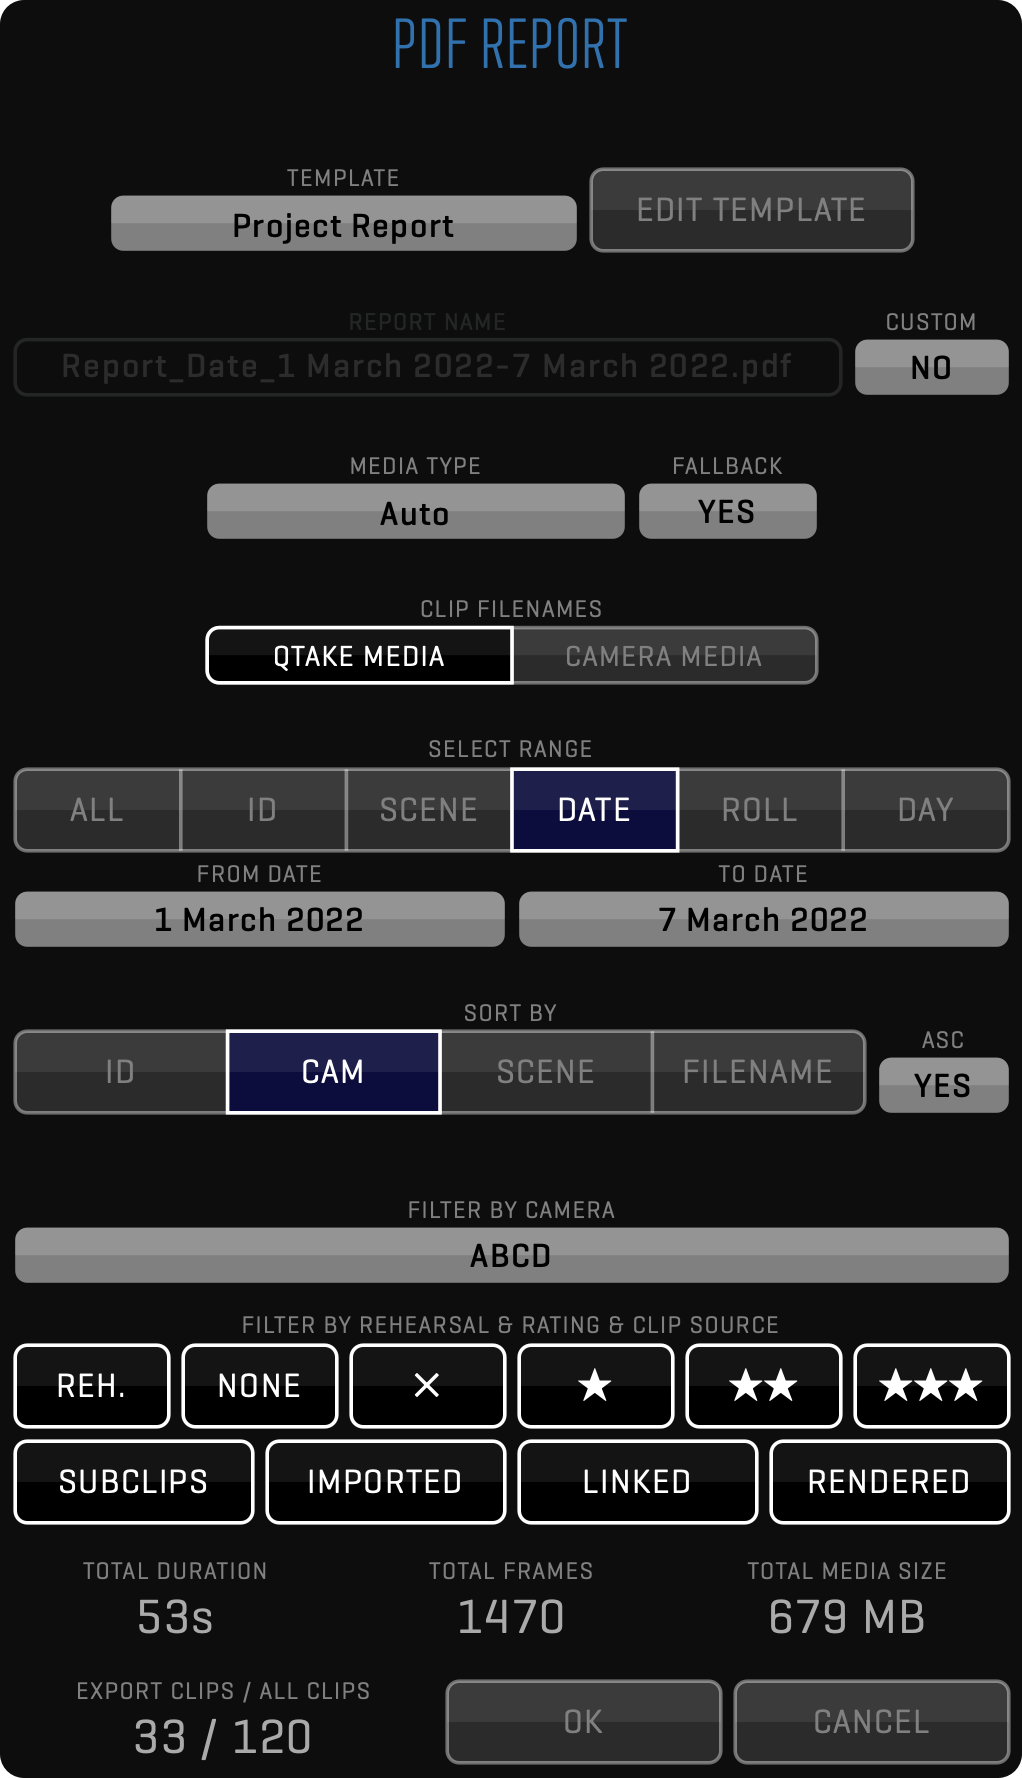
EDIT TEMPLATES
QTAKE comes with two pre-made PDF Report templates. Project Report and Camera Report. To create a new PDF report template first select the report you would like to base your new report on and click DUPLICATE.
The left half of the template editor control what metadata fields are included and the sorting order of the clips in the report. Use the segmented button to choose whether the fields should be added to the page header or the individual clip entries in the report. To add a field select it from the Available Fields list and use the arrow button (>) to add it. When the report is in Flow Layout both the Page Header and the clip entries have a heading and a data section. These are separated by a horizontal line in the Included Fields list.
Drag the field to move it between the data section and the heading. Each field in the Included Fields list also has a drop-down menu to define its relation to the next field. The options are No Space, Slash, Space and New Line.
Fields added to the Page Header will show up in the gray section of the preview. The Page Header will be repeated at the top of each page in the report. The header would normally be populated with fields from the Project Data group but you can optionally add fields from other groups. If fields with multiple values are added the header will show all values separated by commas.
The Sort Order tab lets you control the sorting of clips and the page breaks of the report. Clips in the report are sorted, in order from top to bottom, by the fields in the Included Fields list. There is a horizontal bar dividing the Included Fields list into two sections just like in the Clip and Page Header. Fields added above this line will cause the report to be divided into sections separated by page breaks based on their values.
REPORT LAYOUT
The right half of the template editor contains a preview of the report and controls for the page layout of the report. A segmented button near the top lets you choose between a Flow Layout and a Table Layout for the report. Click TEMPLATE and select the Camera Report for an example of a report in the table layout. You can add the name of the template and the date when the report was generated to the report header by setting Show template title in page header and Show date in page header to YES. Setting Full header on the first page only to YES will remove fields below the horizontal line in the Page Header tab on all pages of the report except for the first.
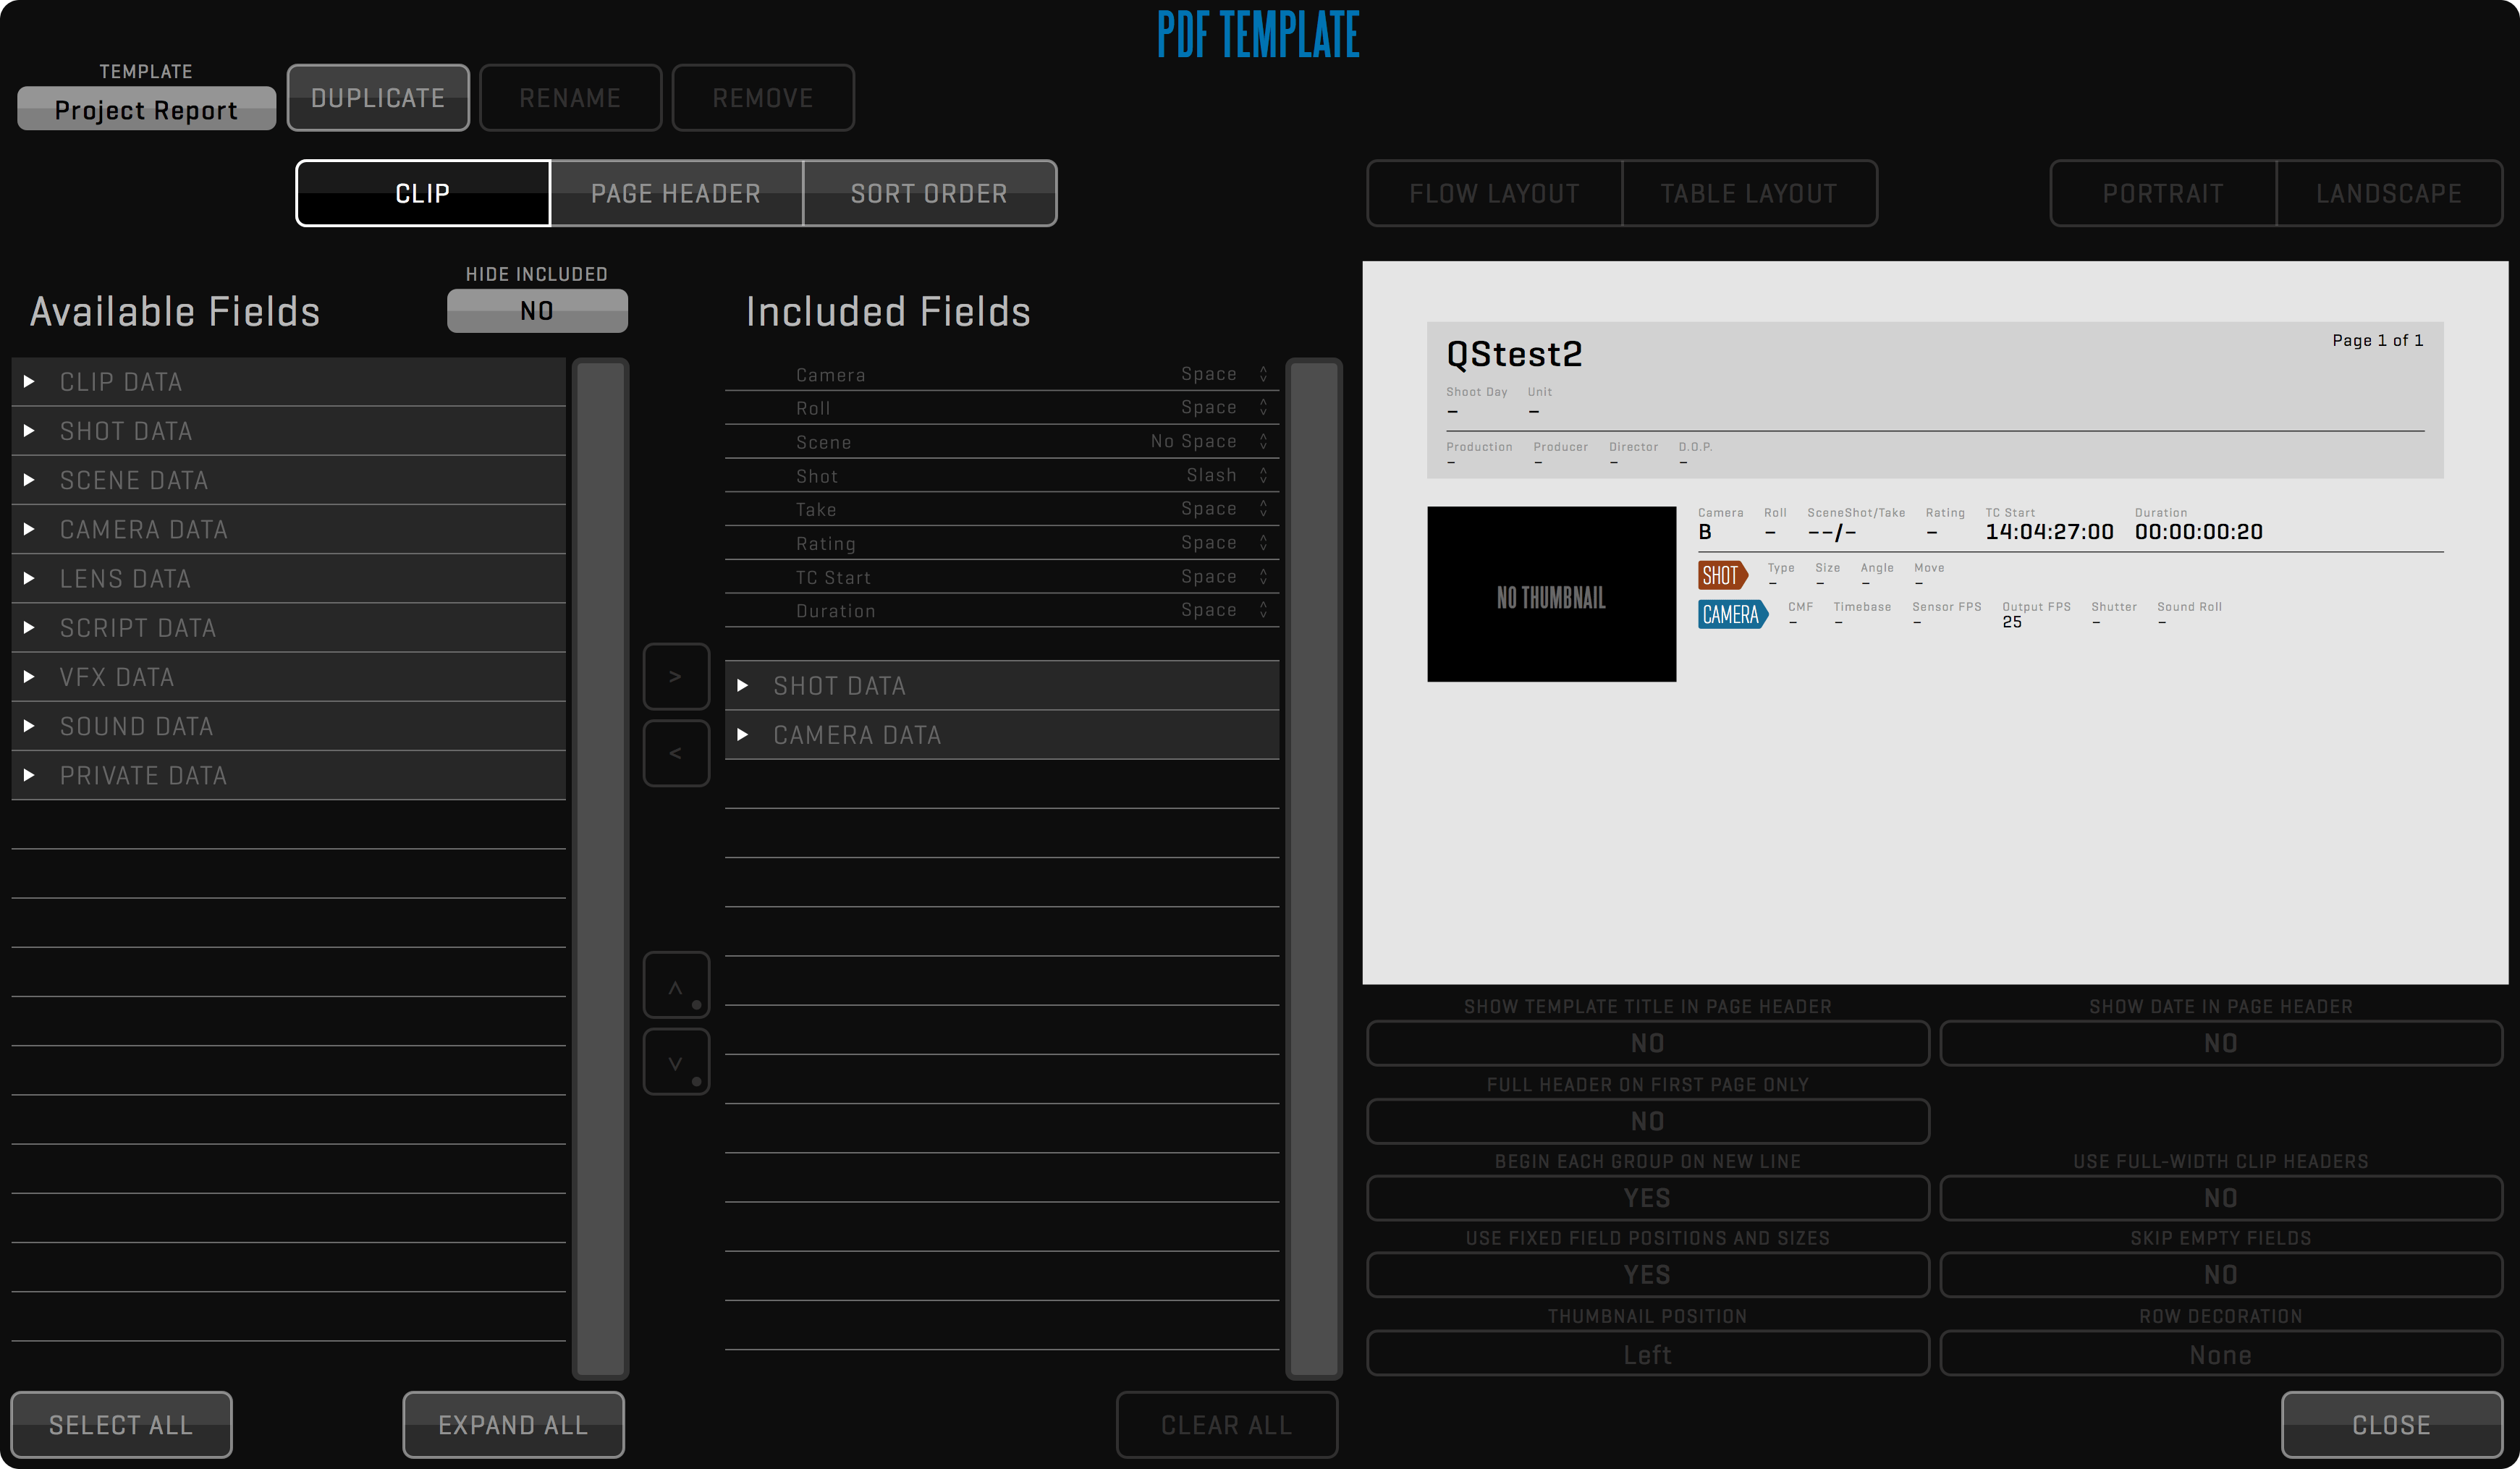
The bottom row of controls allows you to change the layout of the clip entries. Setting Begin each group on a new line to NO allows for a more compact layout by putting the metadata groups closer together. Use fixed field positions and sizes will make sure the fields stay in the same place in each clip entry by adjusting the size of the field in the report to accommodate the clip with the largest amount of characters in that field. Use full-width clip headers will adjust the thumbnail to allow more information in the header. Skip empty fields will remove fields without data from the report. You can also adjust the thumbnail position and row decoration for the clips.
SCREENSHOT
Use the SCREENSHOT button in REPORT toolbar to store the current frame of the active View to a jpeg file.
Screenshots are saved to the current Project folder into the /Screenshots subfolder using clip filename and timecode.
When PLUS 3D is enabled the screenshot will depict the PLUS 3D View.
Long-click this button to generate screenshots for all Views.

CLIP REPORT
The CLIP REPORT button in the REPORT toolbar creates a PDF file with screenshots and metadata for the clips loaded into all Views.
Clip reports are saved to the /Dual Screenshots subfolder of the current Project folder.
LINK Menu
The link feature is used to control two or more QTAKE systems.

Follow these steps to start a network job:
- Make sure every machine is on the network.
- Run QTAKE on all machines you wish to link, open user, and project.
- Press the MASTER button on the master machine (displays “Master Active” in Connection Status).
- Press the SLAVE button on the slave machine (“SLAVE #: OFF”, where #is the number of the slave - in order of connection).
- To activate the SLAVE press the NUMBER button on the master machine (turns green) - now the slave can accept commands.
- Repeat steps 4,5 for each slave.
You can activate/deactivate slave machines by clicking their number buttons on the master QTAKE.
The following functionality is supported through the LINK:
- Select ROOM (File room or Shoot room, Edit and Composite are disabled on slaves when active)
- Entering CLIP DATA (scene, shot, take, rating) that is common to every camera
- RECORD, RECORD SYNC, RECORD ABORT
- All PLAYBACK commands
- Selecting ACTIVE View, DUAL View
- BROWSE CLIP (based on clip data, so make sure you don’t have two clips with the same data)
How it works?
Master machine is advertising its presence on the network using the MASTER button. The Slave machine uses the SLAVE button to find the master on a local network and makes a connection. The master confirms the connection and activates the slave. You can control up to 8 slave systems. If you choose HDx1 to be master, then you can control only HDx1 slaves. QTAKE LITE can only control a single slave unit.
BROWSE CLIP in the LIST works based on EPISODE, SCENE, SHOT, TAKE metadata. These metadata values have to be unique so the BROWSE CLIP could work as expected. In case there are multiple clips with matching EPISODE, SCENE, SHOT TAKE metadata values ( including empty values ), it is not possible to determine which clip was selected on the MASTER side, so SLAVE will select the first clip with matching EPISODE, SCENE, SHOT, TAKE.
VIDEOHUB Menu
The VIDEOHUB toolbar enables direct control of Blackmagic Design Videohub and AJA Kumo SDI routers from QTAKE.
Up to 64 inputs and 64 outputs are supported.
Pressing a GROUP button in the left segmented button will show the 10 PRESETS in that GROUP on the right. Press SETUP to configure your routing, groups, and presets. See the PRESETS AND GROUPS section below.
VIDEOHUB SETUP
Set the correct VIDEOHUB IP address and PORT number in the appropriate input fields. You can alternatively press the LOCATE button to list any video routers on the local network. Routing is performed by clicking the output node and then selecting the input. Linking two inputs/outputs is done by long-clicking the button associated with the input/output and then selecting another input/output to link. Linked inputs/outputs are routed together. The PREP and EXEC buttons let you first PREPare multiple routes and later EXECute the actual routing all at once. Press the RESET PREP button to revert any changes made during PREP. The segmented button in the top left corner of the VIDEOHUB SETUP window lets you change between editing LABELS and TAGS. When set to LABELS you can customize the labels for inputs and outputs to help you organize your videohub routing. Pressing TAGS lets you assign what inputs and outputs are connected to your video card. Tagging the videohub inputs and outputs like this is necessary to use the LIVE PASS functionality.

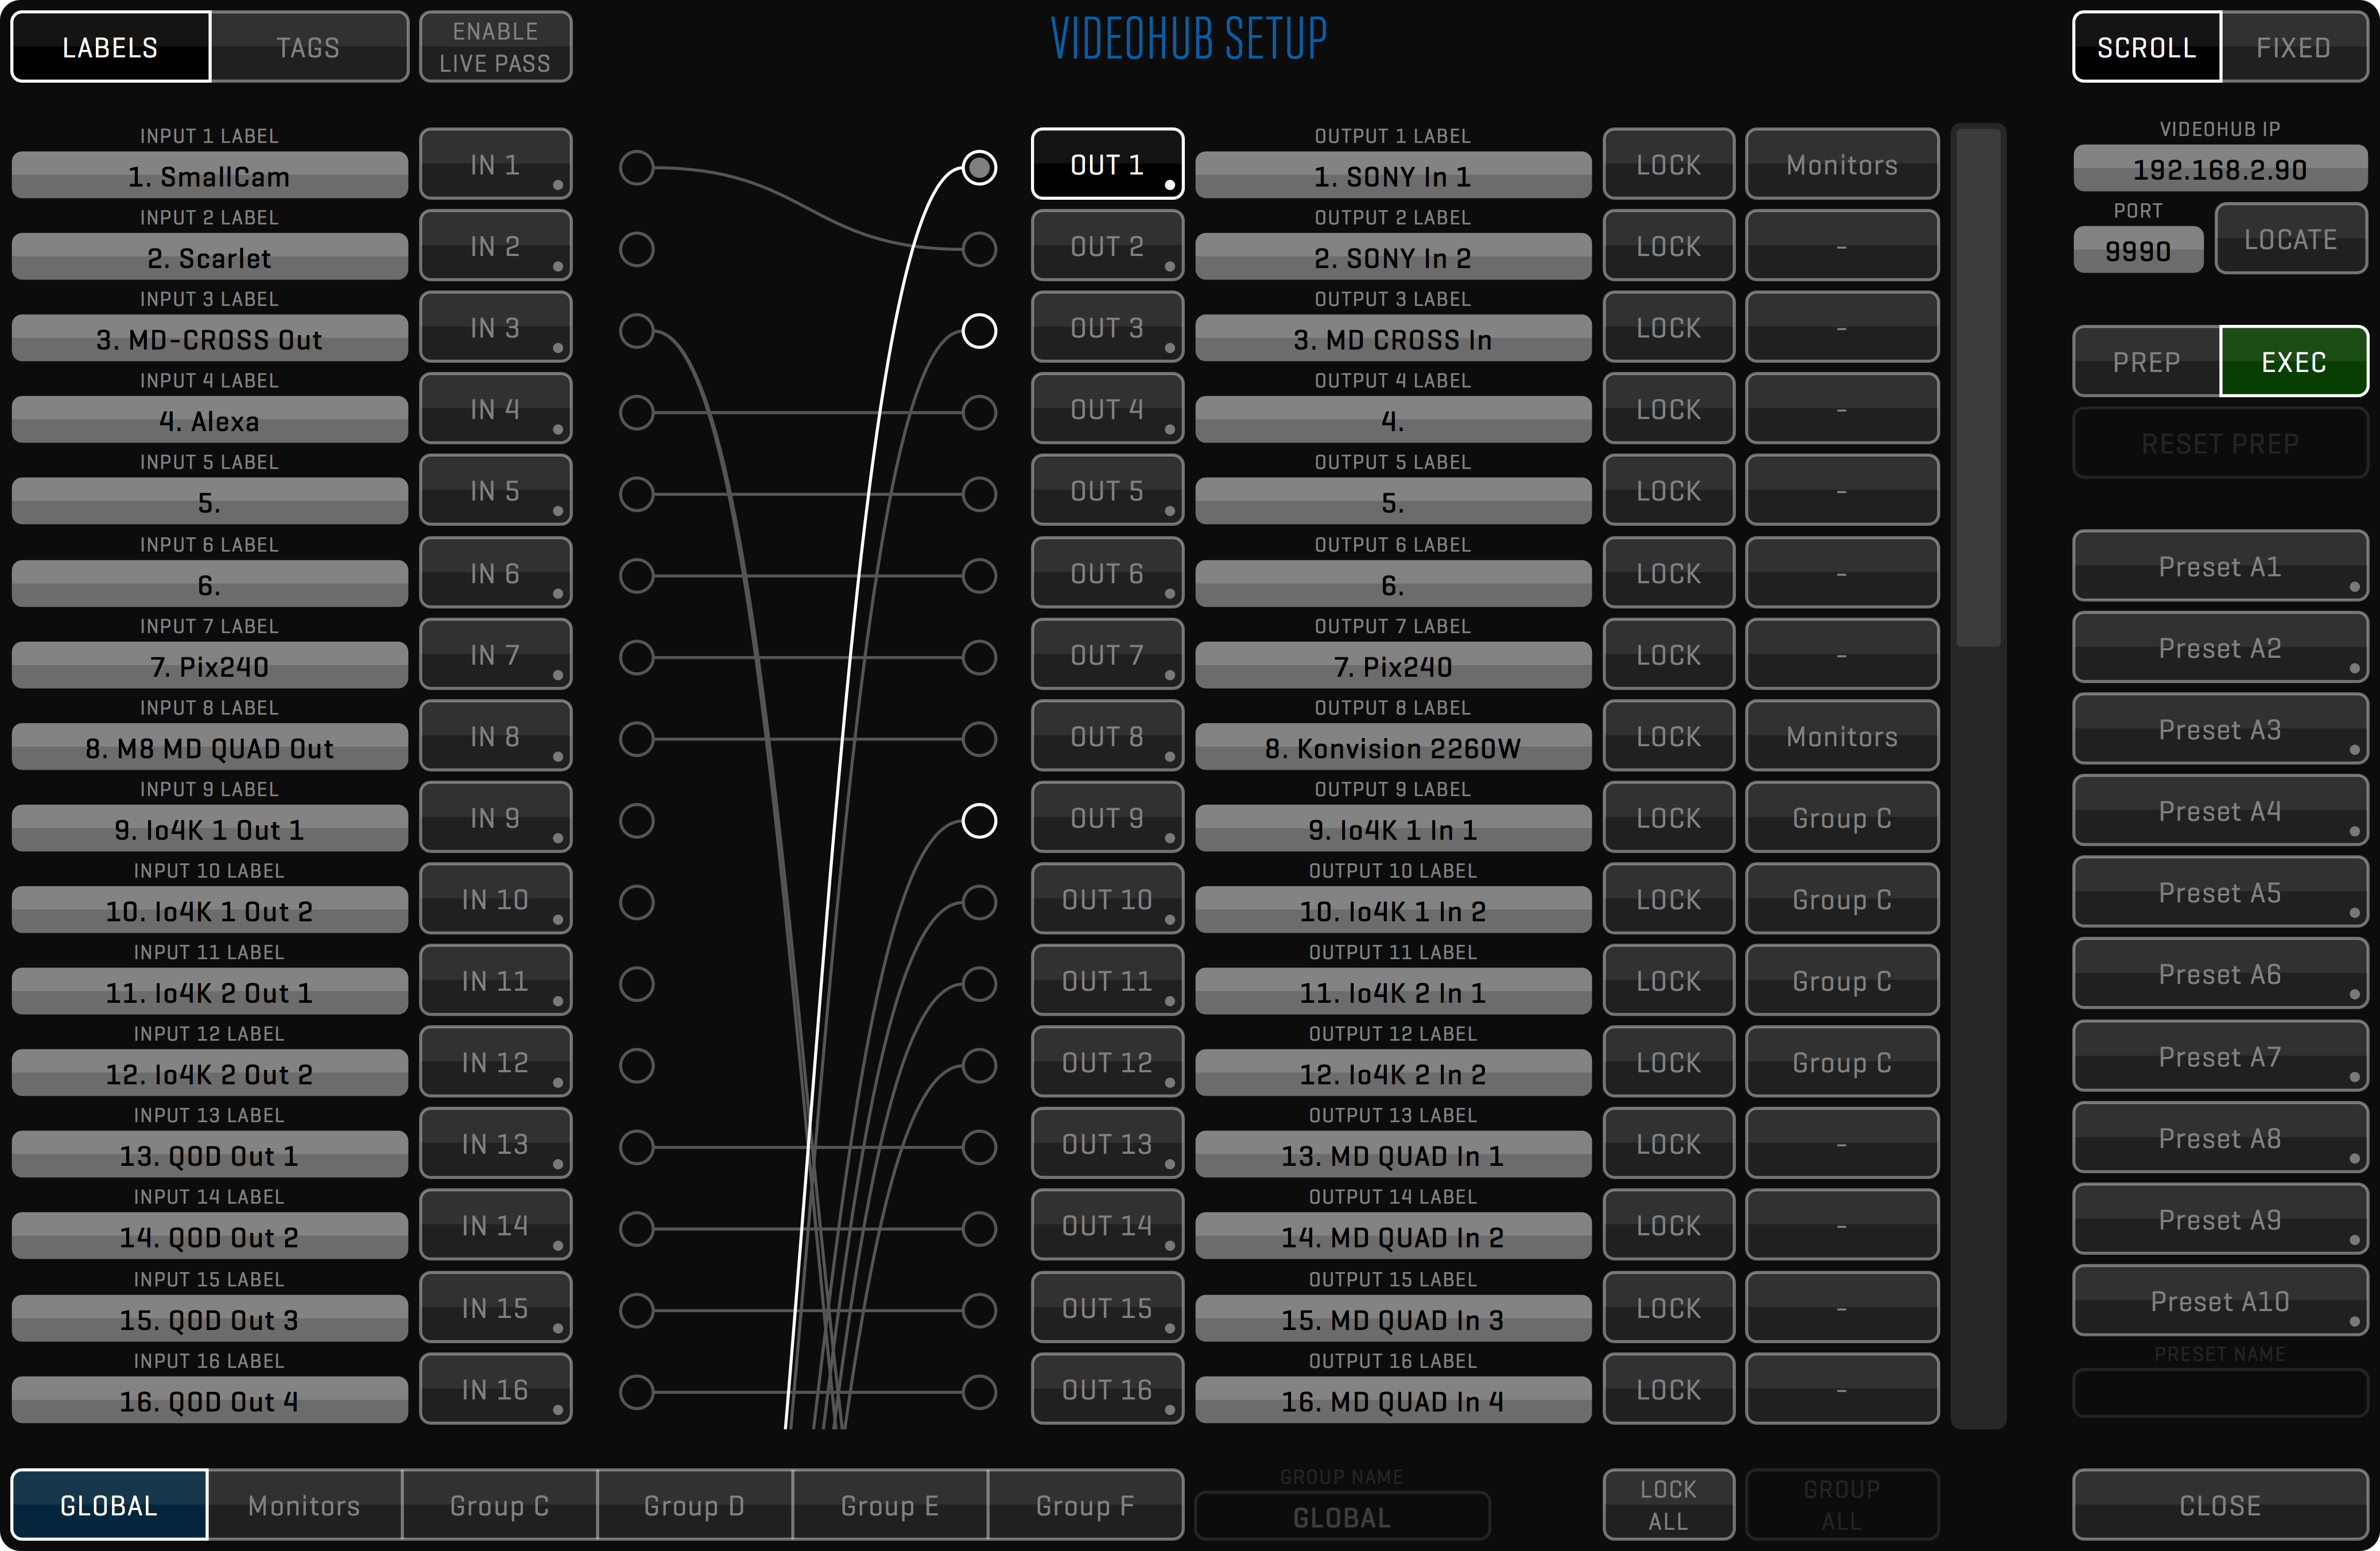
LIVE PASS
QTAKE can perform context-aware videohub routing to bypass the video card for selected outputs when a View is patched to LIVE. You can avoid videohub manual re-routing when you need a low-latency camera feed during recording and video card output during playback.
PREPARE LIVE PASS
First, you need to prepare the LIVE PASS functionality. Click the TAGS button in the top left corner of the VIDEOHUB SETUP window. Select the correct tag for each videohub connector that is connected to your video card(s). For videohub inputs connected to video card outputs select the V-OUT tag with the corresponding output number. For videohub outputs connected to video card inputs select the V-IN tag with the correct input number. You only need to do this once if you did not change your internal cabling.
USE LIVE PASS
You can assign what outputs should bypass the video card by enabling the LIVE PASS button next to the TAG. The ENABLE LIVE PASS button lets you enable or disable the LIVE PASS behavior globally. Outputs that have the LIVE PASS button enabled will show two routes. One green and one orange, representing the DISK route and the LIVE route. The non-dotted line indicates the output current routing.
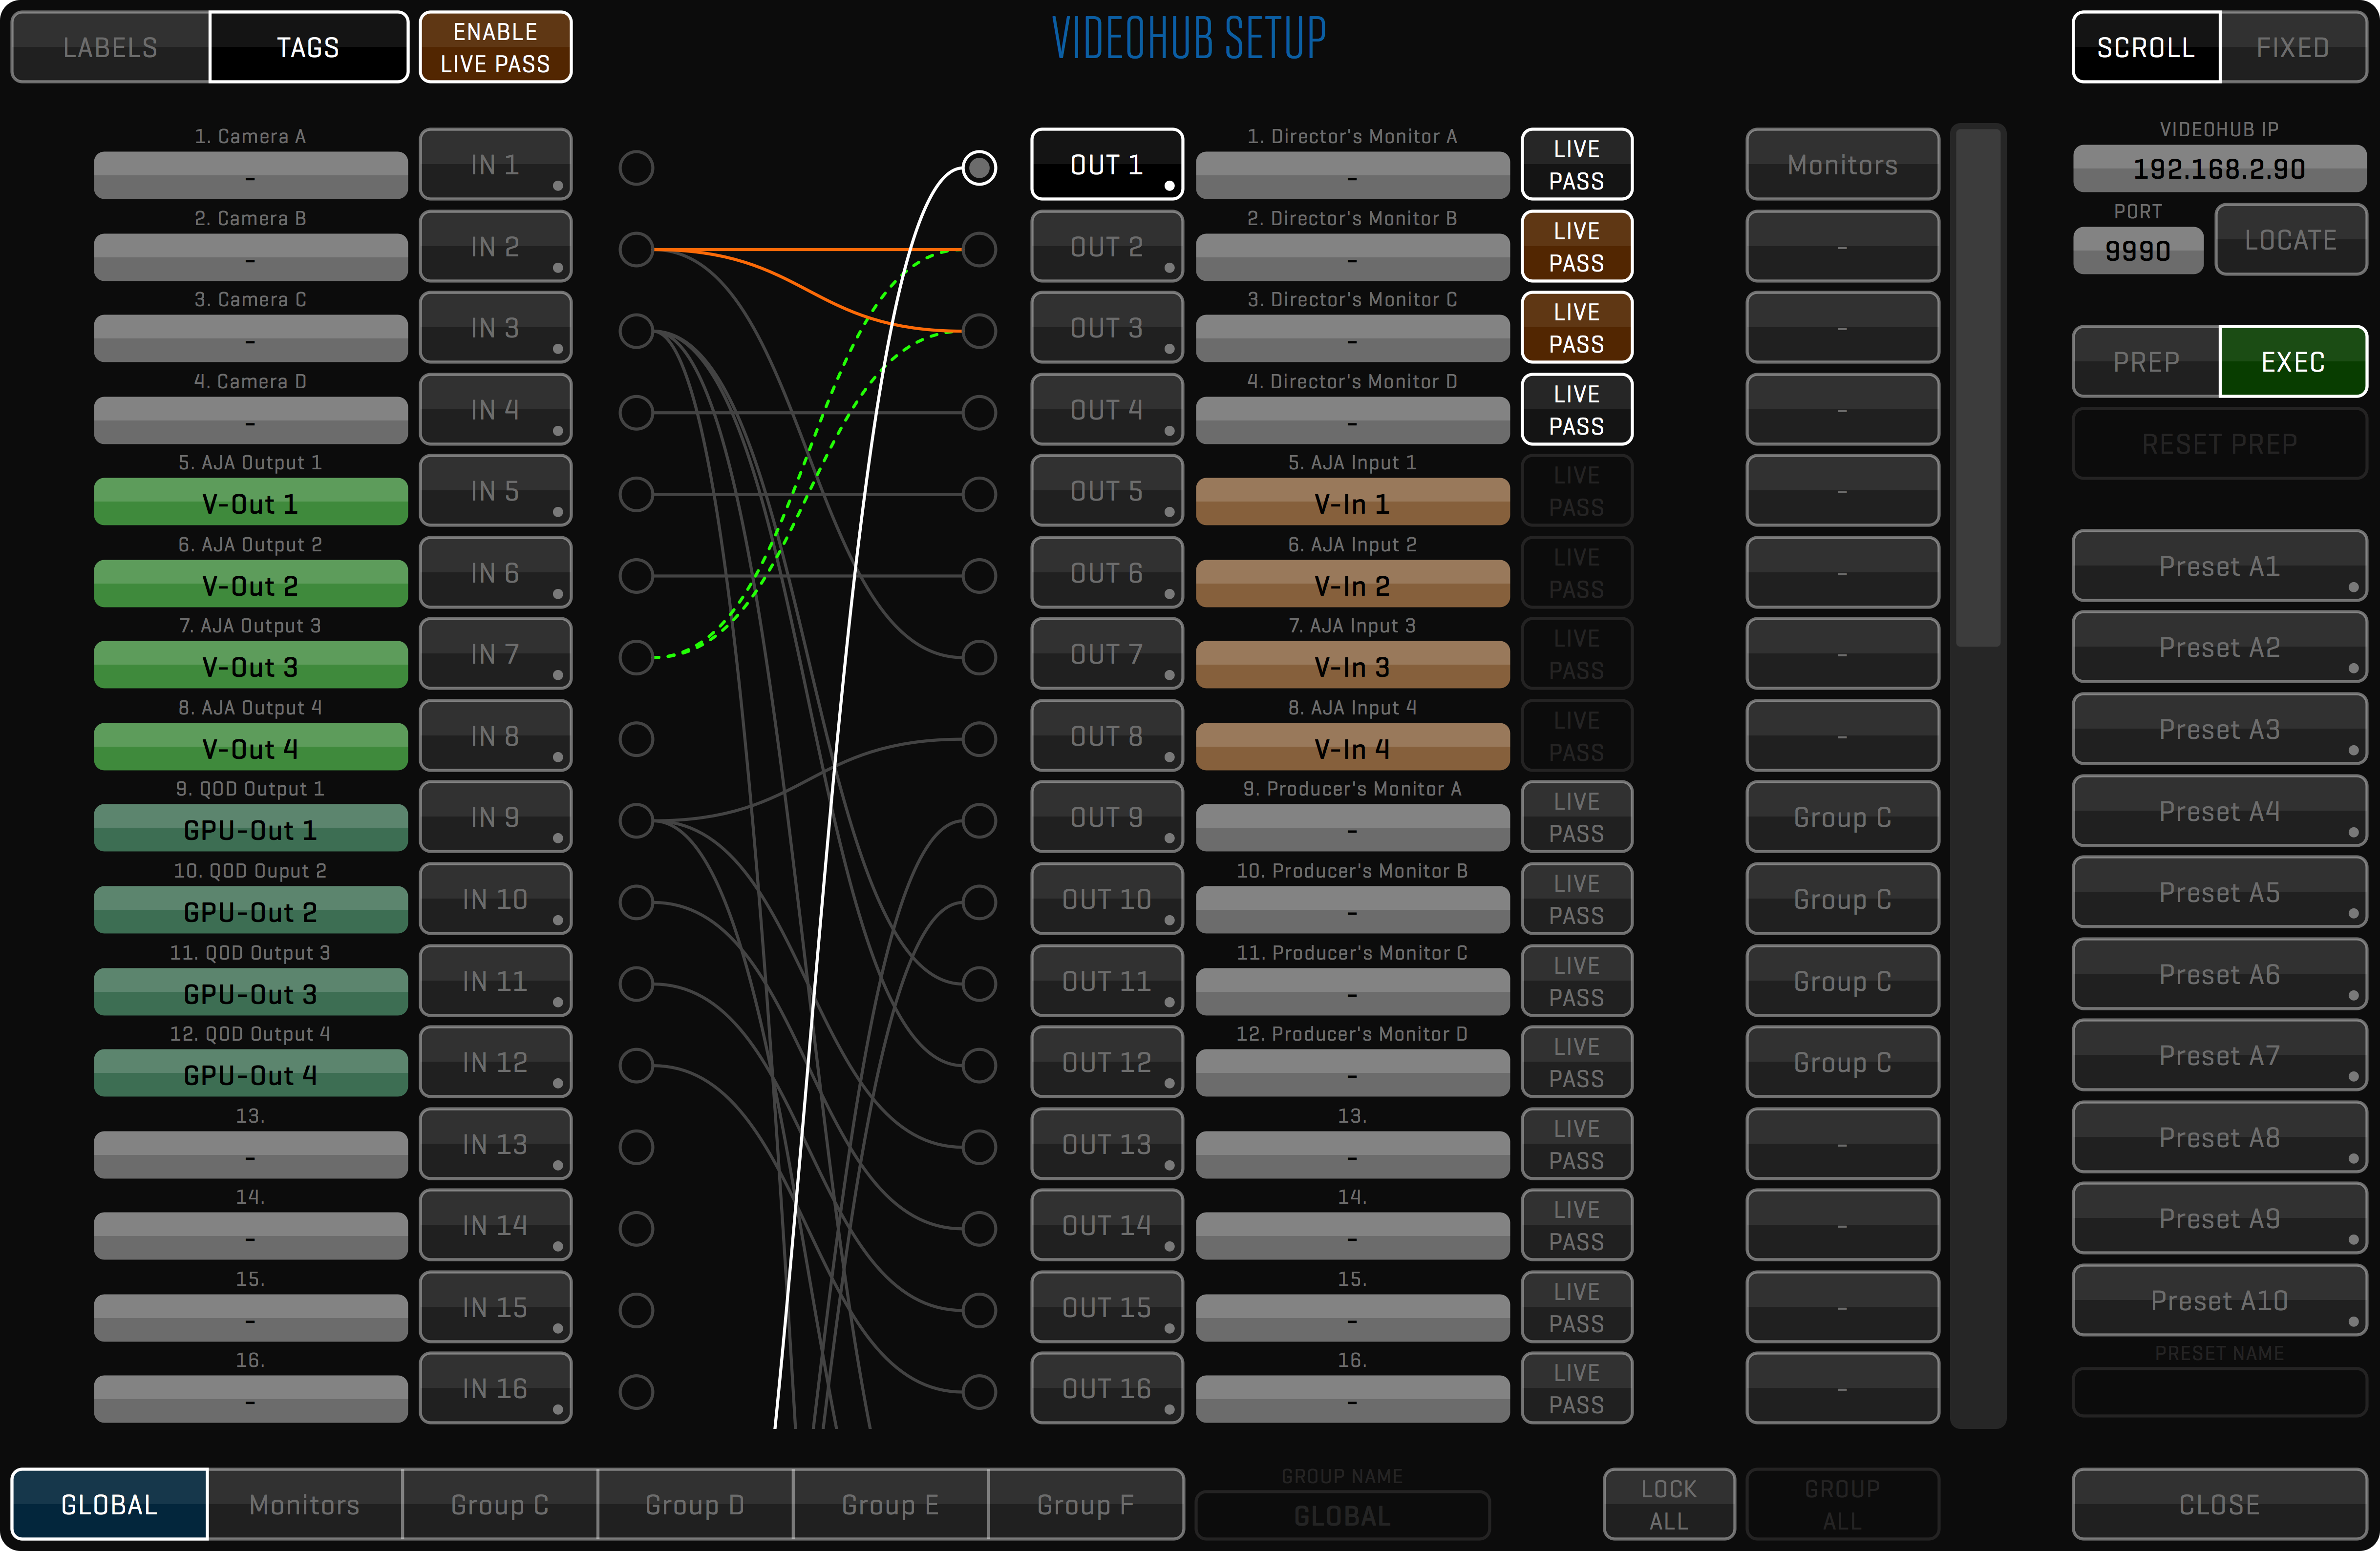
PRESETS AND GROUPS
The current routing can be saved into a PRESET. Long-click one of the PRESET buttons to save the current routing. Load a PRESET by clicking on the associated button. When loaded you can change the PRESET NAME. Along the bottom of the window are six GROUP buttons. Each GROUP can have a subset of the videohub outputs assigned to it and can have up to 10 PRESETS saved. The GLOBAL group is the exception to this, the PRESETS in this group apply to all outputs. To assign videohub outputs to one of the other GROUPS, select the GROUP and press the button next to the LOCK button.
DEFAULT PORT NUMBERS
AJA Kumo default port: 80
BMD videohub default port: 9990
The LOCK button will lock output to an input. While locked the route is not available for routing.
SHOOT ROOM
This room is used for general video assist work - recording and playback.
RECORD Menu
Pressing the RECORD buttons (R key for View 1, T key for View 2) will initiate the capture process. Recording will automatically patch recording View to LIVE.

Can I Record without patching the Views to LIVE?
Yes. If you turn on the KEEP DISK ON REC (FILE room -> OPTIONS), automatic patching to live on recording start will be disabled. Note that this is not possible if using half-duplex cards, such as AJA with VIDEO OUT active.
REC SYNC
Enable REC SYNC (key Y) to record all Views that have signal in sync. If SYNC ALL is enabled, you can press any of the RECORD buttons to start recording all inputs. Long-clicking the SYNC button will open SYNC SETUP - SHOOT dialog (window layout may vary with QTAKE HDx version), where you can choose different SYNC settings for CLIP, RECORD, and CLIP FX. Clips recorded with SYNC enabled will automatically have a sync OFFSET, so you can immediately play them back in sync.
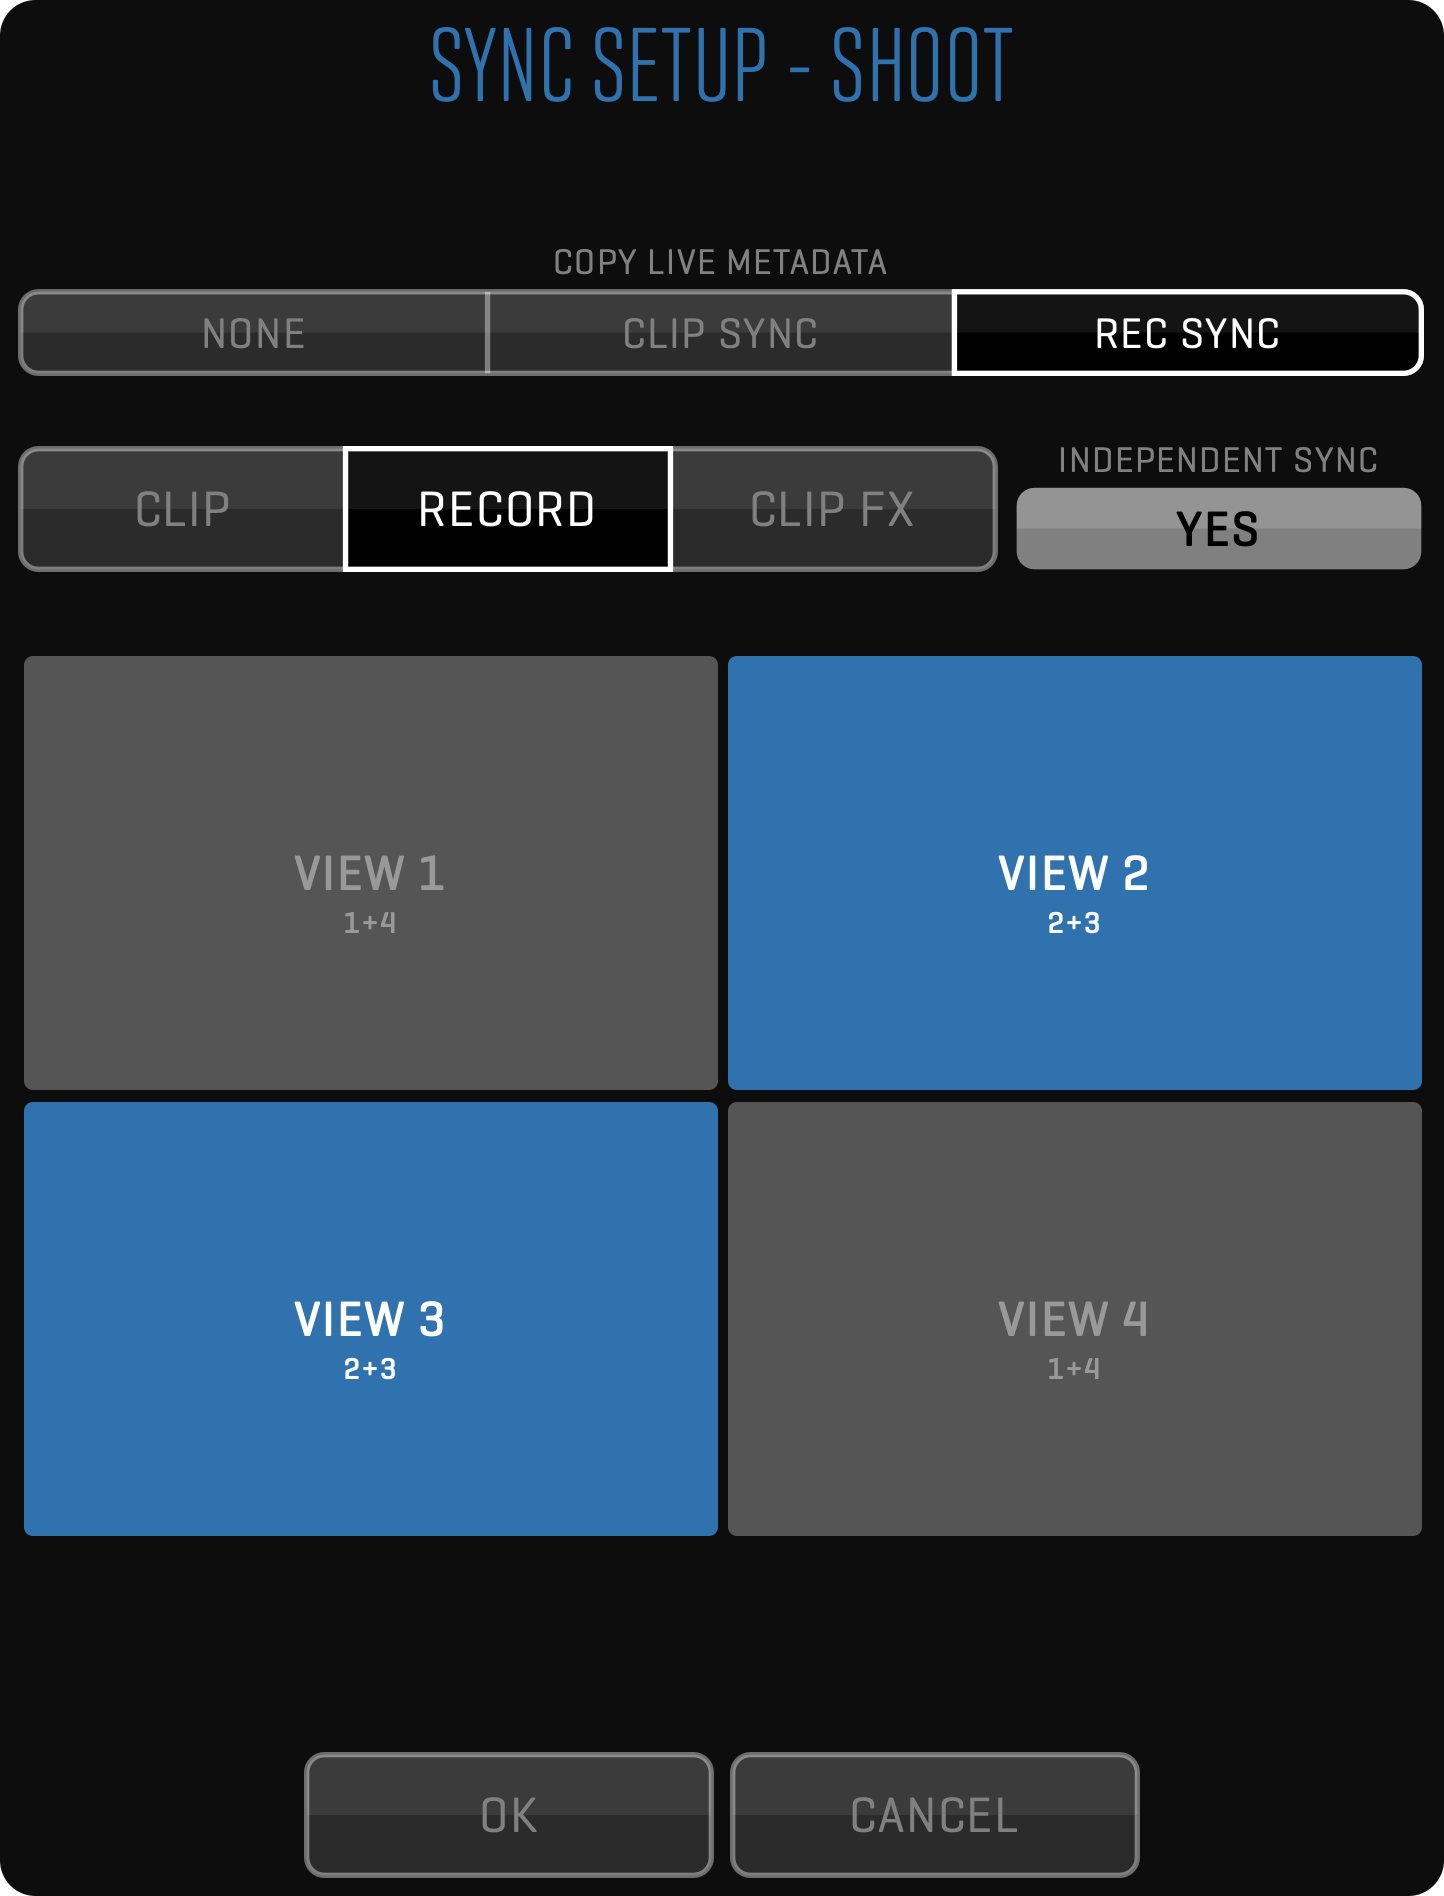
If RECORD SYNC is enabled, entering clip data in LIVE mode will also copy this data to other Views, except the CAMERA letter and ROLL number. QTAKE will also ask if you want to copy the active View’s clip data to the other Views when SYNC is enabled.
AUTO REC
Some cameras provide a record trigger or record-run timecode to allow external devices to automatically record the signal with exact start and stop times.
The second page of the RECORD toolbar provides AUTO REC options for each input.
Using the LINK INPUTS toggle button you can link all inputs to follow the auto-recording option selected in the first input.

The following auto-record options are available:
- SDI FLAG - start/stop recording when the SDI record flag is received
- REC RUN - start/stop recording based on the running timecode
- METACODER - start/stop recording based on the MetaCoder flag
RECORD CONTROLS
During the recording process, you can use the following features:
IN & OUT ON THE FLY
During recording, you can set the IN and OUT (I and O keys) points to mark the important part of the clip.
CHAPTERS ON THE FLY
Besides the IN and OUT points you can create CHAPTER MARKS during recording (J key) to help you quickly navigate to the interesting parts of the shot during playback (< and > keys).
SUBCLIPS ON THE FLY
If you press the MAKE SUB button (P key), the subclip is created based on IN and OUT marks.
If there is no OUT mark, the subclip range is determined by the IN mark and the current time.
After creating the subclip, a new IN mark is set at the end of the subclip range.
You can repeat this action to create the subclip for each take of the series.
In addition, CHAPTERS are created for each IN and OUT point used to create a subclip.
CREATE THUMBNAIL
Press the THUMB button (U key) to set the current frame as the thumbnail for the recorded clip.
If you don’t specify thumbnail time, IN point will be used to generate a thumbnail.
ABORT RECORD
You can abort recording at any time by pressing the ABORT button in the RECORD toolbar.
The current clip will be discarded.
The keyboard shortcut is Esc.
RECORD MULTI IN & OUT
When shooting a series or multiple actions in a single take, you can use multiple IN and OUT points to mark more than one selection. After pressing IN and OUT points for the first time, this selection is automatically stored and you can set different IN and OUT points.
BIT DEPTH
Video is usually recorded in YCbCr color code. You can choose to record in either 8-bit, 10-bit, or 12-bPit mode. A higher bit depth mode will store video in higher quality, but it also requires more disk space and more processing power.
This is controlled using the preference:
CODEC
QTAKE records clips in Apple QuickTime file format. You can compress video to various codecs during a recording. Select the codec that best fits your postproduction workflow or make your selection based on space and quality requirements. QTAKE lets you use any of the following codecs: Apple ProRes Proxy, Apple ProRes LT, Apple ProRes, Apple ProRes HQ, Apple ProRes4444, and H.264 or HEVC. The codec that requires the least CPU resources is Apple ProRes Proxy.
TERADEK CUBE Support
QTAKE can record RTSP (Real Time Streaming Protocol) from Teradek CUBE over Wi-Fi, without the need for additional video input hardware.
To enable the Teradek CUBEs video input you will need to enter the RTSP address in the PROJECT window.
The Teradek CUBE has a bonjour-enabled web interface that is used to set up the device and update its firmware.
Step by step for connecting Teradek CUBE to QTAKE:
- Connect to the Cubes admin interface. Click the Show All Bookmarks item in the Safari Bookmarks toolbar and select your Cube device from the devices listed under the Bonjour heading. For troubleshooting your connection refer to the Teradek Cube manual.
- Make sure Teradek Cube is running the latest Firmware. Note that the text on the bottom of the Info > About window in the admin interface should say “Your device firmware is up to date.”
- Set your Compression profile. Go to Video Setup > Encoder Settings and set it to Baseline.
- Disable Quickview. You will need to disable Quickview for proper operation of the Teradek Cube in 1080 resolution. Go to Video Setup > Stream Settings, then click on the QuickView Stream tab and set the radio button to disabled.
- Make note of Cube settings. Write down your Primary (RTSP) address and your Output Resolution from the Dashboard section of the admin interface.
- Set up QTAKE. Start QTAKE and set the Teradek Cube option to YES in your project window. You will need to enter your Primary stream address and set the video format with the format selector. Refer to the Teradek CUBE manual for more setup information.
CUBE video reception is dependent on Wi-Fi signal strength. Using a router with external antennas can improve performance.
Only hardware that supports VDA decoding of H.264s can use other Profiles than Baseline.
QTAKE uses “LIVE555 Streaming Media” software licensed under LGPL. Live Networks, Inc. http://www.live555.com/
FRAME Menu
QTAKE can be used to record clips frame-by-frame for stop-motion animation:
- Press the FRAME REC Button to enable frame recording mode.
- REC Button will change to FRAME Button.
- Press the FRAME Button to add a single frame.
- Repeat step 3 until you reach the end of the recording.
- Press the FRAME REC Button again to finish recording (or ABORT to discard the whole clip).

In case of FRAME REC buttons are greyed out, you have to set AUTO REC to -.
You can also setup up frames to be recorded at set intervals, so-called time-lapse recording.
-
Long click the FRAME REC button to enable TIMER REC.
- Enable TIMER REC. The REC button will change to TIMER.
-
Enter the desired interval in TIME-LAPSE INTERVAL.
- Press TIMER to start the timer and start capturing.
- Press TIMER again to stop recording.
- Disable TIMER REC to finish the recording.
VIEW FX Menu
The VIEW FX toolbar allows you to enable, disable, and set up effects applied to the active View.
VIEW FX differ from FX in that they are tied to a particular View and any content in the View will have the effect applied.
The available effects are:
DVE - Digital video effects such as scale and crop
OSD - On-screen display of metadata
STILL MIX - Still image mix and overlay
UPSCALE 1080 - Global upscale of View content to 1920x1080
Long-click any of the buttons (marked with a dot) to adjust effect settings (see below).

DVE - IMAGE TRANSFORMATION
Use the DVE button to adjust ( long-click ) and apply (short-click) Digital Video Effects on the View.
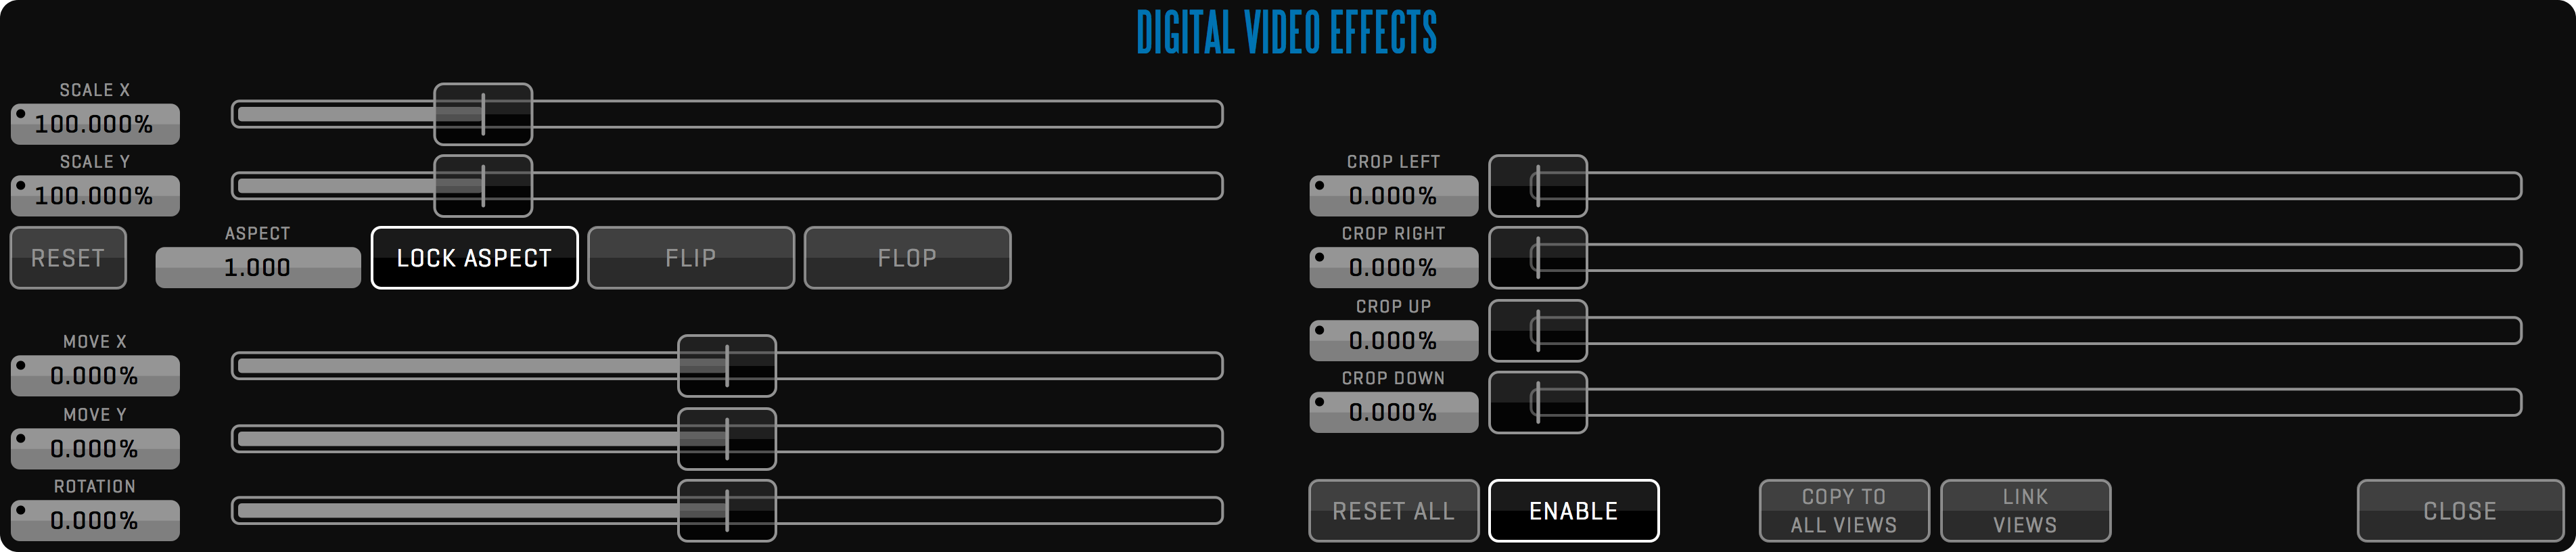
You can scale, position, rotate, mirror, and crop the video frame by adjusting the following parameters: SCALE X, SCALE Y, MOVE X, MOVE Y, FLIP, FLOP, ROTATION, CROP TOP, CROP BOTTOM, CROP LEFT, CROP RIGHT.
To perform the same picture adjustment on all Views simultaneously press the LINK VIEWS button. To apply the current adjustment to the other Views press the COPY TO ALL VIEWS button.
OSD - ON-SCREEN DISPLAY
Turn on the OSD button to display the View status and clip information. Long-click to adjust OSD contents.
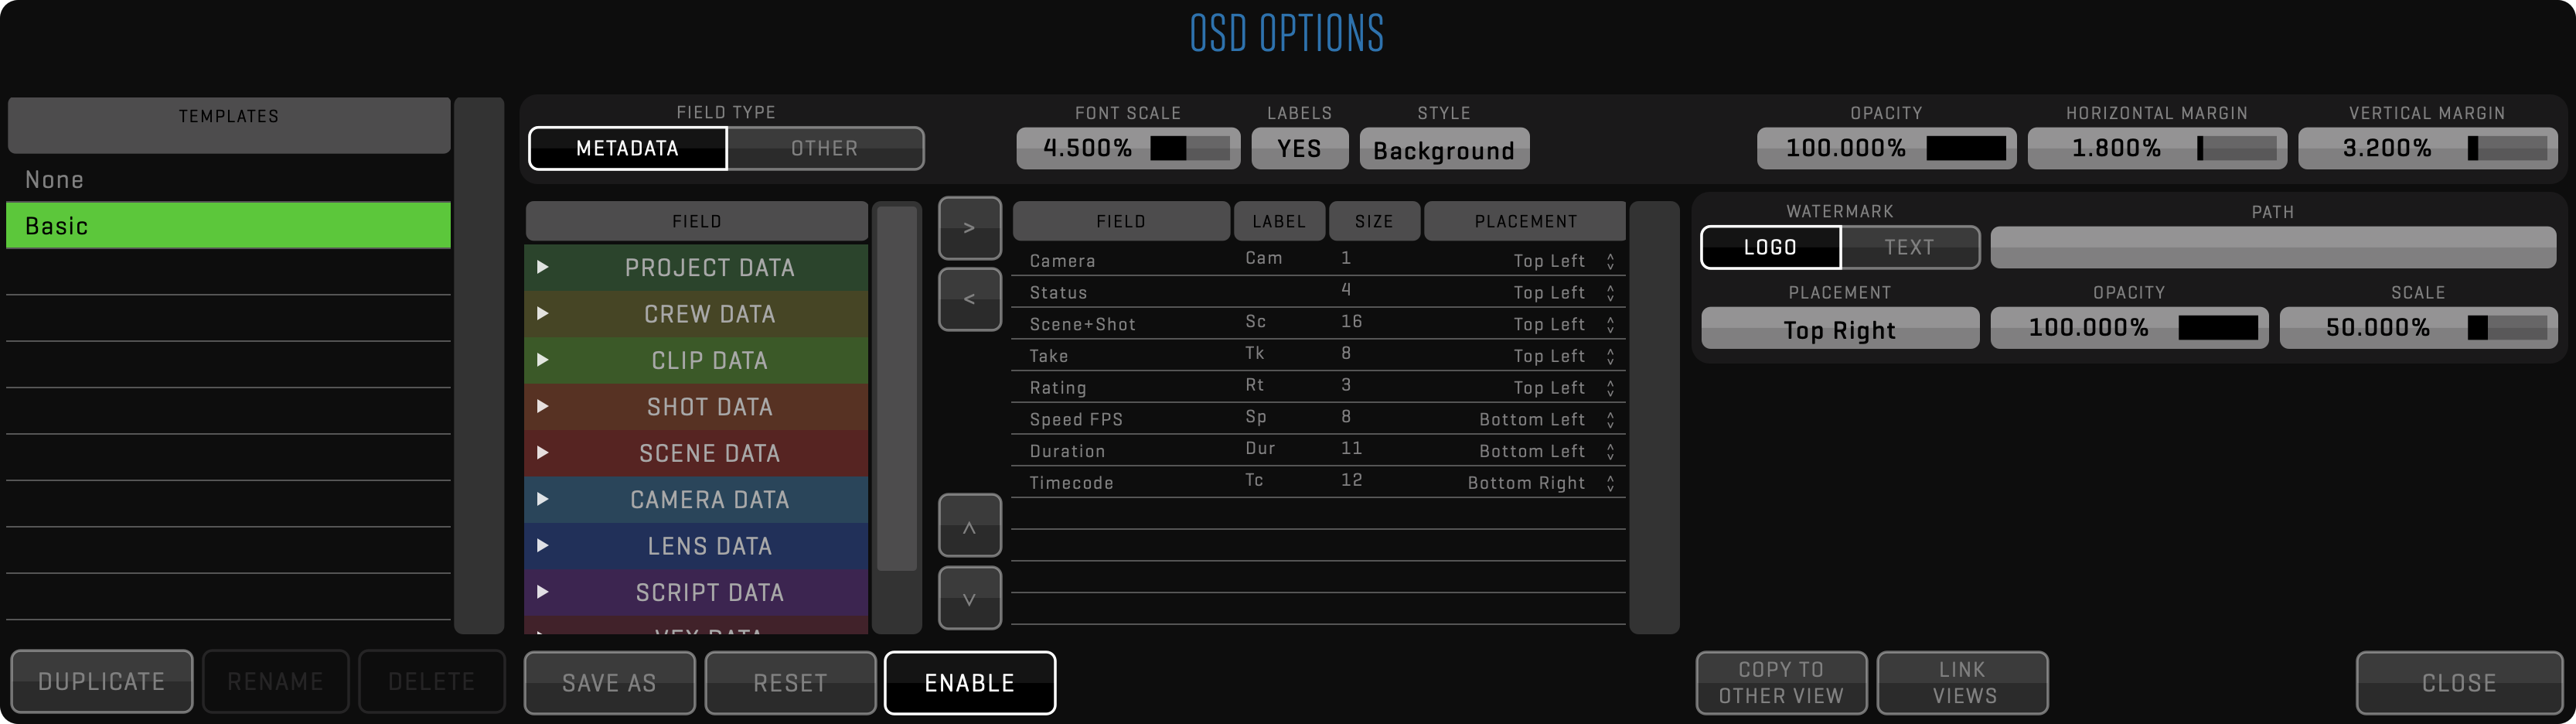
Following attributes can be displayed on screen in addition to CLIP, PROJECT, and CREW metadata: CLIP ID, STATUS, SCENE+SHOT, TIMECODE, FRAME NUMBER, CLIP DURATION, SPEED FPS OR PERCENTAGE, TIMELINE, CHAPTER, LUT, HIT, INTER AXIAL, CONVERGENCE, CAMERA XYZ and TARGET XYZ. Each item can have a custom LABEL, SIZE, and PLACEMENT.
You can change the FONT SCALE and the STYLE of the titles and choose to turn off LABELS. Additionally, OPACITY and MARGIN can be adjusted globally for all items.
Part of the OSD is the WATERMARK section, where you can add custom TEXT and LOGO overlays with adjustable PLACEMENT, OPACITY, and SCALE. Use the PATH field to browse for the logo image.
MIX
Enabling STILL MIX lets you overlay a static image on a View or key the View contents over a static background. Click SELECT STILL IMAGE to bring up the clip browser. From here you can select any clip in your database, including imported footage.
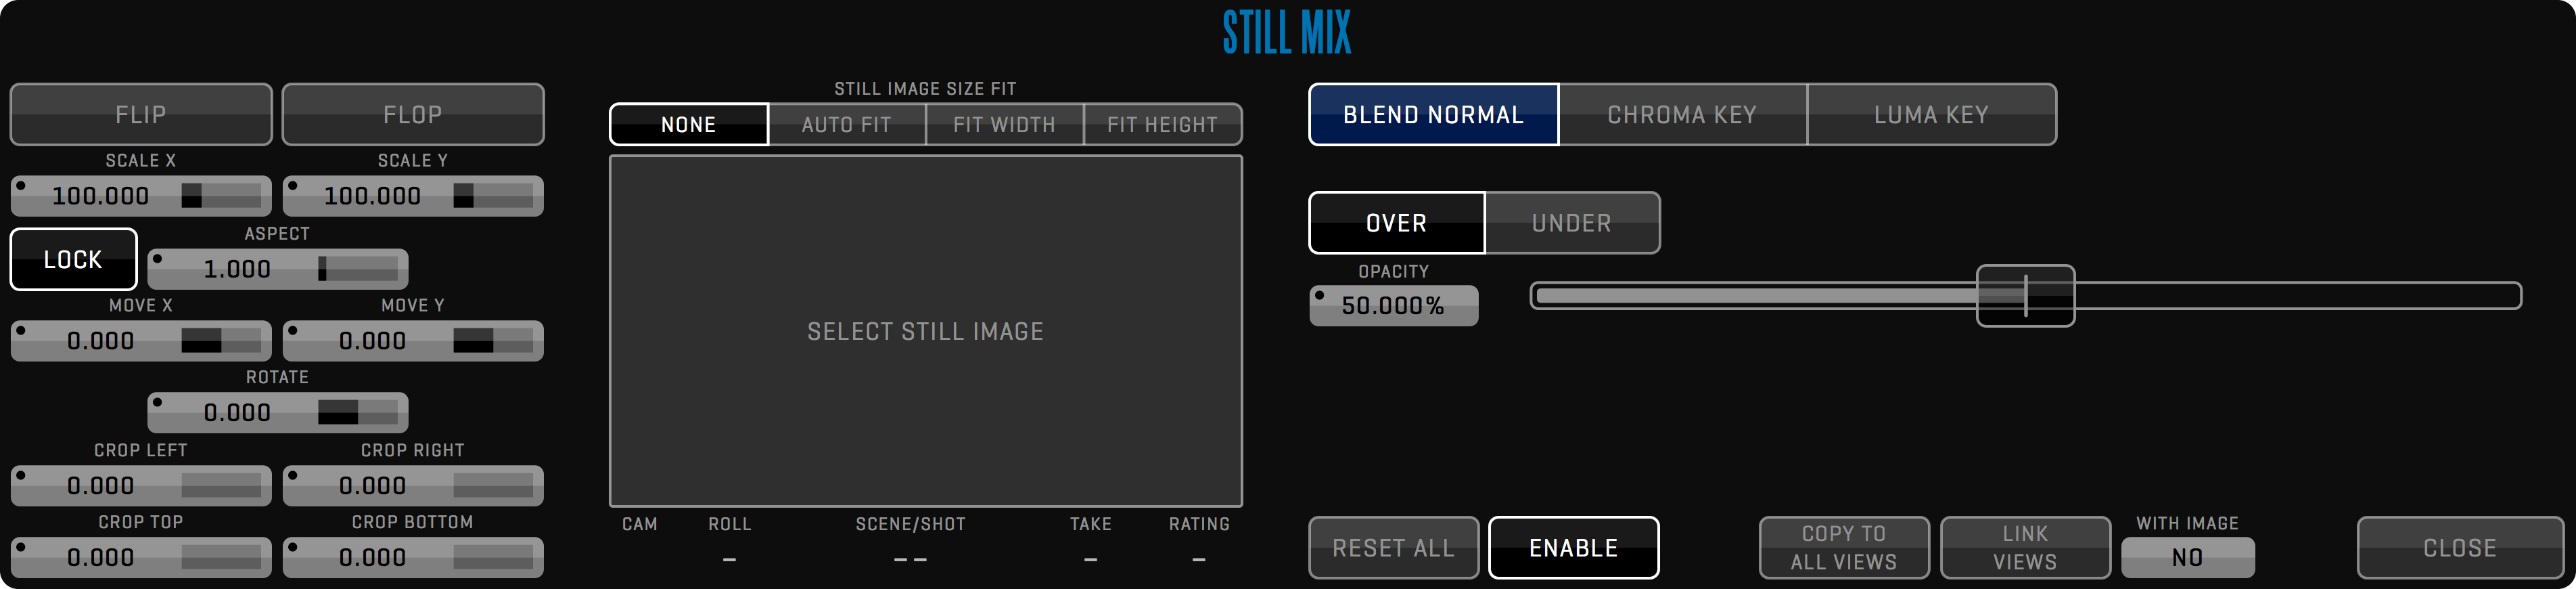
The sliders on the left-hand side of the Still Mix setup window let you SCALE, MOVE, ROTATE and CROP the still frame.
BLEND NORMAL lets you overlay the still image on the contents of the View. You can control the blending by adjusting the OPACITY slider and selecting if you want the image to blend OVER or UNDER the source. The OPACITY slider can be set to AUTO mode. See the USER INTERFACE section for more information about AUTO SLIDERs. The STILL MIX supports alpha channel in imported material.
CHROMA KEY lets you key the contents of the View over the selected still image. Click the COLOR button to pick the hue you want to key out. ALPHA lets you view the alpha channel of the current key and the BLACK and WHITE sliders allow you to adjust the key to patch holes.
The STILL MIX uses the selected clip’s thumbnail frame (defaults to IN-point or first frame if no IN-point is found) as the reference frame. Setting a new THUMB in the source clip will allow you to mix the content of the View with that particular frame.
You can LINK VIEWS and COPY TO ALL VIEWS just like with other VIEW FX. The WITH IMAGE button lets you choose whether the source image and any scaling or cropping are LINKED or COPIED along with the BLEND or CHROMA settings.
PATCH Menu
Each View is like a monitor with two inputs.
The PATCH toolbar lets you switch the active View’s source between LIVE (shortcut 9) and DISK (shortcut 0).
When in LIVE, the INPUT button lets you select what input to monitor by selecting its number.
When the active View is patched to DISK the DISK selector lets you select the camera letter or AUTO.
When a View is patched to DISK, PREV and NEXT will only load clips that have the same camera letter.


If you select AUTO in the disk selection window, PREV and NEXT in the CLIP toolbar will ignore the camera letter, and instead of loading clips based on INPUT, meaning that if you are recording cameras A, B, and C all on the same input, PREV and NEXT will call up those clips in chronological order.
Clicking the double arrow (») on the side of the PATCH toolbar displays additional options.
The patch rules allow you to define the behavior of QTAKE when loading a clip into a View for both CLIP SYNC and non-CLIP SYNC operations.
For both you can define these patch rules: Patch by clip, Patch lock, Ask user.

PATCH RULE and PATCH RULE SYNC
NON-CLIP SYNCED operation when loading a single clip with a different disk letter than the active View disk letter.
CLIP SYNCED operation when loading synced clips with different disk letters.
Patch by clip will change the patched DISK letter of the View based on the clip that you are loading.
Patch lock will load the clip into a View with a matching DISK letter.
Ask user will ask you whether to change the patch or load to View in case loading the clip with a different disk letter than the active View.
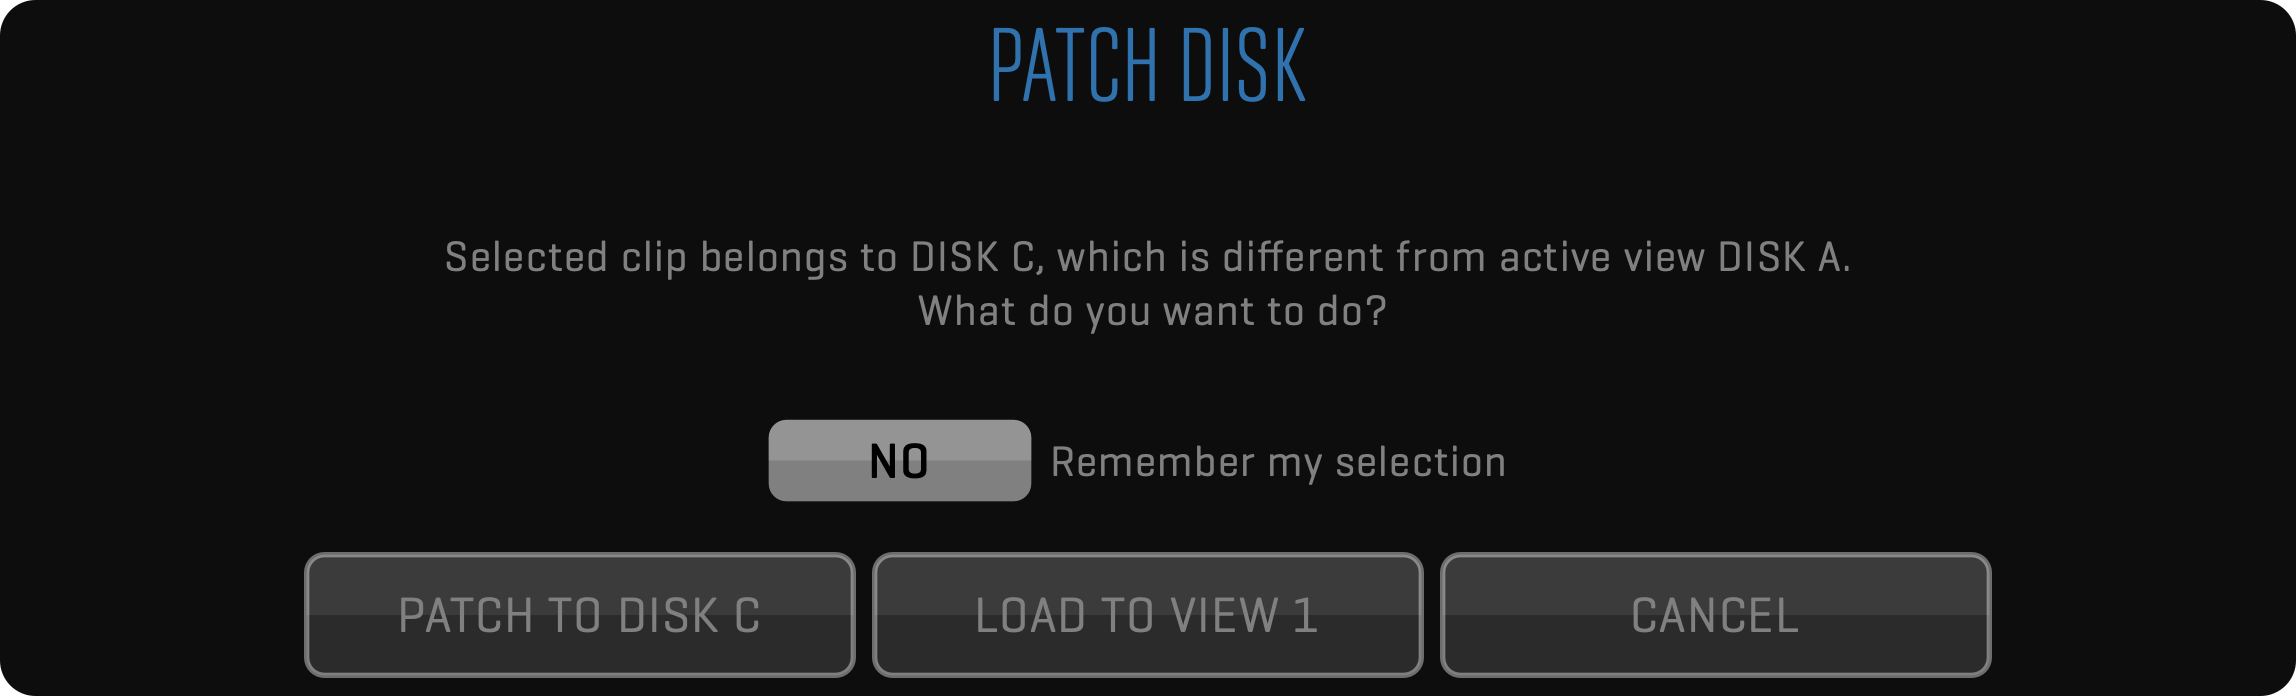
CLIP Menu
Every clip consists of video and audio media and metadata stored in the database.
You can enter clip metadata before, during, or after recording.
The CLIP toolbar lets you enter the following standard information about each clip: CAMERA, ROLL, SCENE, SHOT/SLATE, TAKE and RATING.
A take can be marked as a REHEARSAL and tagged with REF (for reference), P/T (for partial take), and P/U (for pick-up) in the TAKE window. Takes tagged with REF will automatically show up in the REFERENCE section of the browser.
The TAKE value is automatically incremented if entered in LIVE mode, before or during recording. If RECORD-SYNC is enabled, clip data entered in LIVE mode is automatically copied to other camera clips.
Extended clip data can be accessed in the META sidebar and the DATA toolbar.
UK Slating
You can replace the SHOT field with a SLATE field to conform with UK (European) slating. The SLATE field will auto-increment each time SCENE is changed. Slating system can be changed in the project window SLATING section.
The SHOT value can still be entered in the META sidebar.
CLIP NAMING CONVENTION
Recording, importing, or rendering clips is producing Quicktime movie files encoded with the selected codec. All media files are located in the QTAKE Storage folder on the PROJECT STORAGE volume, using unique, persistent filenames.
Additionally, the /QTAKE Projects/PROJECT_NAME/Media folder on the same volume is used to store screenshots and exported files as well as hard links to your media files. These links can be created using CMF (Camera Media Filename) or pre-defined QTAKE filename structure:
[Scene_Shot_Take_Cam]SourceID-ClipID-InputID.mov
When using CMF, hard links will be named according to corresponding clips on the camera magazine. This only applies to clips that are recorded while QTAKE receives a valid record flag and filename metadata embedded in the SDI output of the camera. Clips that are recorded while the camera is not recording will be named by the standard QTAKE clip naming convention.
IMPORT CLIPS and LINK CLIPS functions can parse multiple types of filenames, select the appropriate import parsing filter in the Import dialog. See IMPORT QT MOVIES for specifics on each parsing filter.
CLIP ID BROWSER
Click the CLIP ID number (or press the G button on the keyboard) to display the textual clip browser. Select the clip and press the OK button (or double-click the item in the list) to load the clip into the active View.
CLIP SELECT
Use PREV. and NEXT buttons (or Up and Down arrows on the keyboard) to select and load a specific clip into the active View. All metadata fields will display information for the selected clip.

VISUAL CLIP BROWSER
If you have more clips recorded you should use the BROWSE button (or B on the keyboard) to open our tree-based visual clip browser. When the ALL CLIPS button is active, every clip is retrieved from the database and displayed in the Clip Browser. If you select the REFERENCE button, you can quickly access clips marked as REFERENCE. Enter the SCENE+SHOT to immediately select the scene and shot by name.
Clip Slate Information is divided into 3 windows: SCENE, SHOT, and THUMBNAILS. The thumbnail window usually displays TAKES, but it can also display Scenes or Shots by clicking the appropriate segmented button. When you choose the Scene, Thumbnail Window will switch to Shots and then to Takes. The active take has a thicker white outline, if a take has a purple outline the media associated with that clip could not be located.
Use the filter tool to display the selection of takes, based on the RATING or REHEARSAL attribute.
By clicking the take thumbnail, the clip BROWSER closes and the selected take is loaded into the active View. You can use keyboard arrows to navigate inside each window. Press TAB or click the window to put it in focus. Press the SPACE key on your keyboard, or click to load the take.
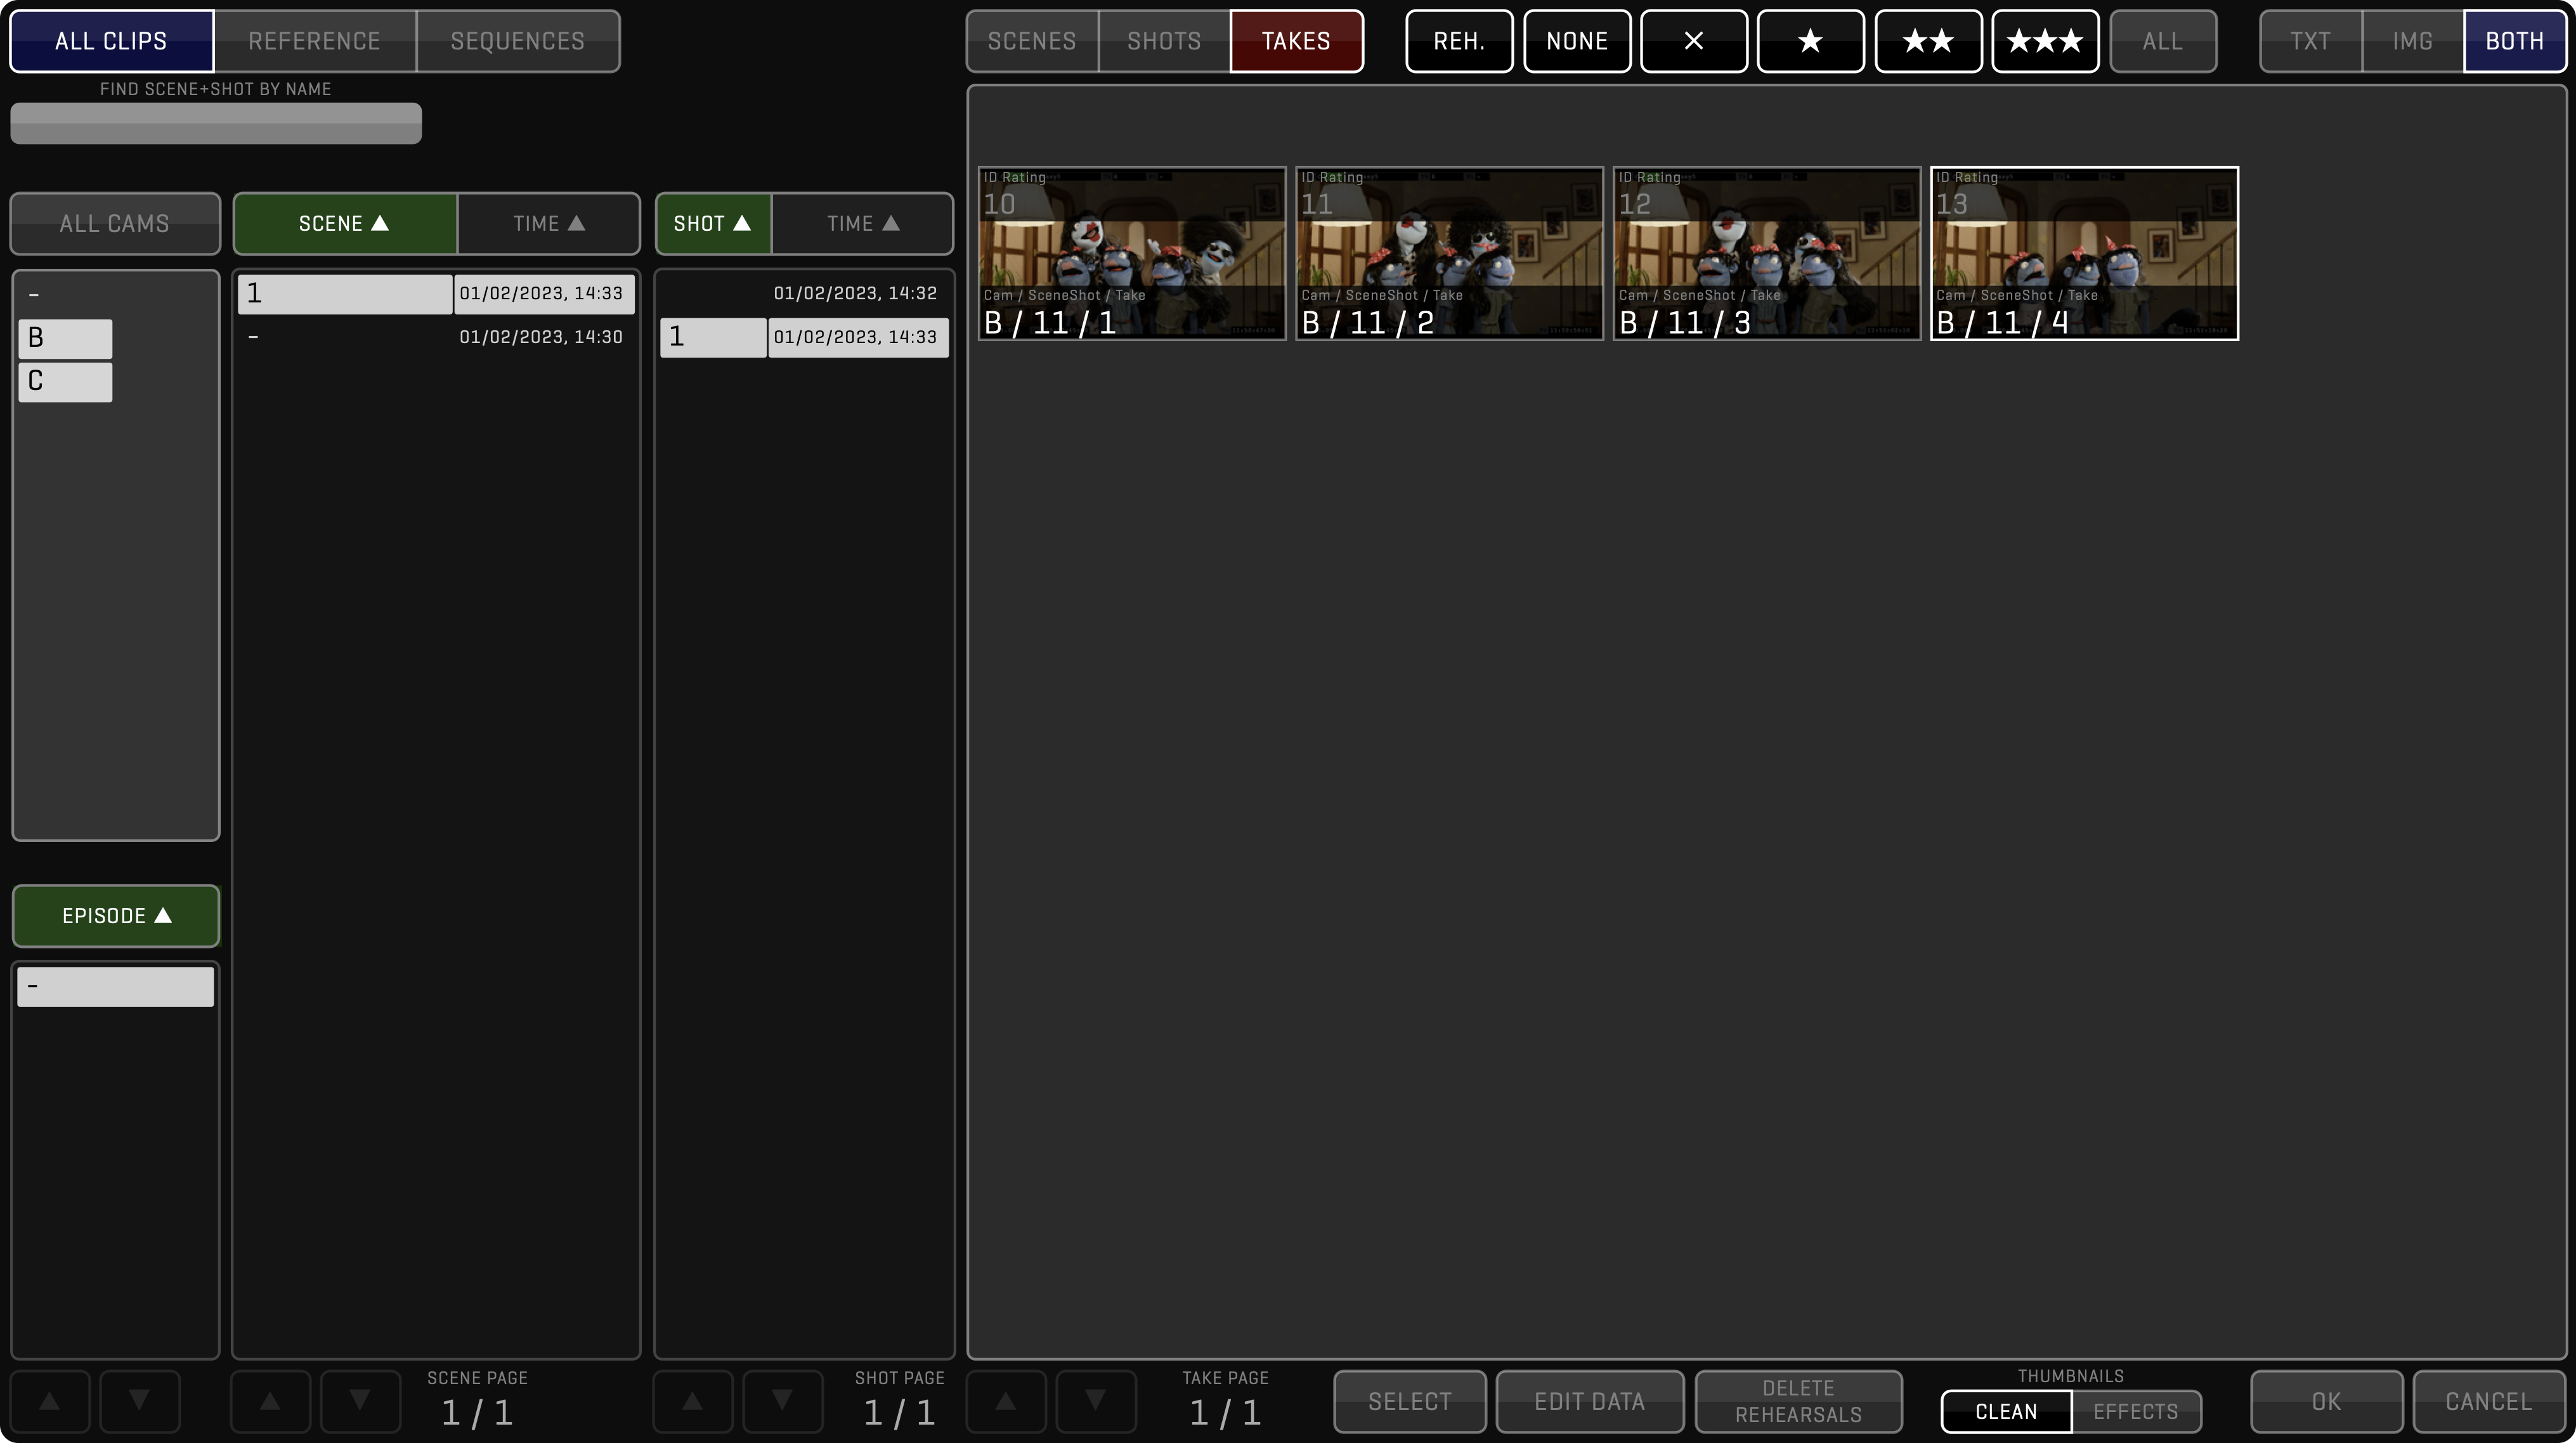
Press the SELECT button to enable clip selection. Select clips by clicking on their thumbnails (or by pressing the SPACE key on the keyboard). Enable the camera letters from which you want to select clips. Choose another SCENE or SHOT to select takes from multiple scenes/shots. When clips are selected the bottom row of buttons will change to reflect actions that can be carried out on multiple clips. For details about these actions see the FUNCTION section.
Use DELETE REHEARSALS to delete all clips from the current project marked as rehearsals.
DATA Menu
The DATA toolbar is used to store the most common metadata.
It contains a segmented button to let you switch between camera, shot, note, and media categories.
All of this metadata can be also accessed via the META sidebar.
CAM
ROLL, SENSOR FPS, FOCAL LENGTH, APERTURE, SHUTTER

SHOT
SHOT TYPE: AER - Aerial, EST - Establishing, OTS - Over The Shoulder, TWO - Two Shot, POV - Point of View, SEQ - Sequence, CI - Cut in, CA - Cutaway, MNS - Money Shot, VFX - Visual Effect, PLT - Plate, FG - Foreground, BG - Background.
SHOT SIZE: XLS - Extreme Long Shot, LS - Long Shot, FS - Full Shot, MLS - Medium Long Shot, MS - Medium Shot, MCU - Medium Close Up, CU - Close Up, BCU - Big Close Up, XCU - Extreme Close Up.
SHOT ANGLE: WORM - Worm’s Eye, LOW - Low Angle, EYE - Eye Level, HIGH - High Angle, BIRD - Bird’s Eye, TOP - Top shot, CANT - Canted Shot, DT - Dutch Tilt.
SHOT MOVE: ARC, CRAB, DLY - Dolly, HH - Handheld, PAN - Panning, WP - Whip Pan, TILT, STDI - Steadicam, TRCK - Tracking, ZOOM - Zooming, CRN - Crane, MC - Motion control, CC - Camera Car, LD - Locked-Down.

NOTE
You can also enter a CLIP NOTE for each take. Ctrl+Enter lets you enter a line break and create multi-line notes.

MEDIA
MEDIA is used to display the filename of the associated camera media of the RED or ALEXA cameras. To extract metadata you need to select the correct CAMERA MODEL and enable READ SDI DATA in the Project Window. While the camera is not recording the filename will be shown in brackets to indicate that changes might occur.

SCENE Menu
The SCENE toolbar enables quick navigation between scenes and shots.
Default shortcuts are Ct-Up, Ct-Down arrows to navigate between SCENEs, and Alt-Up, Alt-Down to navigate between SHOTs.
The SORT BY button lets you toggle between NAME and DATE sorting and the LOAD button defines what TAKE to load when navigating to another SCENE.

PLAY Menu
After recording, QTAKE can automatically switch to the DISK or PLAY mode, based on POST-REC ACTION in the OPTIONS toolbar.
The Timecode label displays the current timecode either in LIVE or DISK mode.
Clicking the TIMECODE label will toggle the display between the timecode and frame number.
The following playback commands are available:
- PLAY - play forward (Space)
- REVERSE - play in reverse (Ct-Space)
- MARK - jump to previous IN point ( [ ) or to next OUT point ( ] )
- FRAME - go to previous frame (Left) or to next frame (Right)
- SKIP - skip backwards (Ct-Left) or forward (Ct-Right) using number of seconds specified in the SKIP TIME field.
If the playback was active before using the FRAME and SKIP commands, it will stop. Jumping between ranges will keep the playback active.
The second page of the PLAY toolbar also contains a powerful SLAVE PLAYBACK command that will automatically seek to correct the frame based on the external timecode.
This feature is also known as “timecode chase” and it is used to slave the playback to an external master source, such as another player or a motion control rig.

QTAKE will remember where the playhead was located last time you had a clip loaded but if you prefer to have the playhead automatically jump to the IN point enable the RESET PLAYHEAD option and select which range to reset to using PLAYHEAD RANGE option in the OPTIONS toolbar.
Looping, speed, and synchronization of multiple players are available in the CONTROL toolbar.
Scrubbing/jogging through the clip is done by dragging the TIME SLIDER in the SLIDER toolbar or dragging the cursor horizontally through the View.
Shuttling through the clip is available in the SHUTTLE toolbar.
Ramping the speed of the clip is available in the RAMP toolbar.
PLAYBACK STATE
The playback state keeps active when browsing through the clips. If the playback hasn’t been stopped, it will continue with a new clip after loading into View.
PLAYBACK MULTIPLE IN & OUT
If you have marked multiple ranges within a clip you can use the <MARK and MARK> buttons to move between the selections. Long-click the PLAY Button to switch from PLAY ONE to PLAY ALL mode. Short-click RESET to delete the current selection, and long-click RESET to delete all selections. Selected IN-OUT range (SUBTAKE) number will be displayed in OSD (in the TAKE field). Turn off the USE RANGE option in the SLIDER to allow playback outside of the marked ranges.
SLIDER Menu
You can use the TIME SLIDER to scrub through the clip, or just drag your finger/mouse pointer across the View. If you try to scrub during playback, play is paused and it will resume when you finish scrubbing.

PLAYBACK RANGE
The active part of the clip is defined by the IN and OUT points and it is visually presented by the solid bar inside the TIME SLIDER.
Every clip is played from IN to OUT point.
You can go past this range by scrubbing or by using the SHUTTLE, but playback outside of the range is possible only if you disable the USE RANGE option.
IN and OUT buttons (with I and O hotkeys) are used to create ranges during recording or playback. Long-clicking IN or OUT button will reset the active IN or OUT point. Use the RESET button (Backspace) to remove the active range, long click it to remove all ranges from the active clip. Click the DURATION label to toggle the display between the timecode and frame number.
There are multiple groups of ranges available to provide independent annotation by multiple users. Additionally, the QTAKE operator can now use a different group of ranges in the EDIT or COMPOSITE to avoid losing original ranges from the SHOOT room. See more in the RANGES section.
POSTER MARK
The triangle icon in the top part of the slider indicates the position of the poster frame. Click the THUMB button to change the poster frame to the current frame. The poster frame is used for thumbnail images in the Clip Browser or PDF Report.

SYNC MARK
The diamond icon in the bottom part of the slider indicates the position of the sync frame, used to synchronize the playback of multiple clips. Click the OFFSET button in the Control toolbar to change the sync frame.

SLIDER 2 Menu
If you want to save some UI screen space, you can use a smaller version of the TIME SLIDER with limited functionality. Only IN and OUT buttons are available in this version.

SUBCLIPS
To take this even further, you can make subclips based on IN and OUT points. Press the MAKE SUB button to create a subclip including a copy of all metadata. When the subclip is the current clip, this button changes to the MASTER button. Pressing this button loads the master clip of the current subclip into the active View. In addition, IN and OUT points are set to display which part of the master clip makes the content of the subclip.
THUMBNAILS
Press the THUMB button (U hotkey) to update the browser thumbnail image of the selected clip to the current frame.
CONTROL Menu
Inside the CONTROL toolbar you will find the LOOP button.
Press it to enable seamless re-start of playback after reaching the OUT mark.
Long-click the LOOP button to switch it to PONG mode.
In this mode, the clip will play in reverse when it reaches the OUT mark and forward again when it reaches the IN mark.

A section of two data entries is used to control playback speed:
- CAMERA SPEED - enter camera speed to simulate different camera speeds.
- PLAY SPEED % - Allows you to adjust the playback speed in percentage. PLAY SPEED can also be set to negative values to allow reverse playback without using the REVERSE button.
CLIP SYNC
Press the CLIP SYNC button for comfortable, synchronized clip loading. With CLIP SYNC enabled you need to load only clip from one camera and the synced Views will load corresponding clips (with matching ID) automatically.
Long-click the CLIP SYNC button to display sync options.
The full logic of CLIP SYNC consists of two steps.
- CLIP SYNC searches for clips with matching IDs and different camera letters of the corresponding disk originating in the same machine as the selected clip
- If CLIP SYNC does not find any matching clips based on ID, it searches for clips with matching EPISODE/SCENE/SHOT/TAKE but different camera letters of the corresponding disk.
PLAY SYNC
Two or more clips can be played in sync.
For synced playback, you need to specify OFFSET.
The right section of the CONTROL toolbar is the OFFSET display.
Clips recorded at the same time automatically get offset values in relation to each other.
Use AUTO PLAY-SYNC in the OPTIONS toolbar to automatically enable PLAY SYNC mode for sync-recorded clips.
The AUTO-OFFSET option will enable automatic offset even if the clips are not recorded in sync.
To specify the OFFSET manually and play two or more clips in sync, follow these steps:
-
Load the clips you want to play in sync into your Views.
-
Find the sync point for each clip.
-
Press the OFFSET display to store the time difference between clips.
-
PLAY SYNC button is automatically enabled for synchronized playback.
-
Press any button in the
PLAYtoolbar for synchronized playback commands.
To specify the OFFSET automatically by timecode, use this Preference:
Set Play Sync Offset By TC = YES
Set to = YES if you want QTAKE to determine PLAY SYNC OFFSET using the timecode of the clips. QTAKE will automatically MUTE clips in V2-4 when playing back clips with the same ID in sync. You can override this by setting:
Enable Play Sync Auto Mute = NO
Why did my IN and OUT points change?
When you PLAY SYNC two or more clips QTAKE will adjust IN and OUT points so that only overlapping sections of the clips are enabled for playback. You can change this behavior in the preferences by setting:
PreRoll And PostRoll For PlaySync = YES
This will adjust all synced clips to match the longest one.
Use the + and - buttons to adjust the offset of the active View in relation to the other Views.
REV. PLAY or negative PLAY SPEED?
Enabling PLAY SYNC will keep playback synchronized when using PLAY or REV. PLAY. If you want to synchronize one clip playing forward with another clip playing in reverse you can achieve this by entering a negative PLAY SPEED for one of the clips.
SYNC SETUP
QTAKE will by default synchronize actions across all Views (1+2+3+4) when a sync button such as REC SYNC or CLIP SYNC is enabled. The SYNC SETUP window lets you exclude Views or break down the Views into smaller groups. Long-click one of the sync buttons to enter the SYNC SETUP window. The Views indicated in blue belong to the current sync group. Click one or more of the Views to exclude it from the group.
Views that are excluded from a sync group can be added to their group by closing the SYNC SETUP window, activating the View, and entering the SYNC SETUP window again. The sync buttons will indicate what Views are part of the current group in parentheses under the button title.
SHUTTLE Menu
Using the SHUTTLE toolbar, you can play through the whole clip using variable speeds ranging from 1/64x to 64x.
Note that this way of transport doesn’t play audio and doesn’t respect IN and OUT points.
STICKY option YES means that playback will use speed value based on the position where you released the SHUTTLE slider cursor. On the other hand, option NO only applies the speed value as you hold the cursor, as you release it, the speed value is reset to 0, and the SHUTTLE playback stops.

CHAPTERS Menu
When recording series or long takes, you might have problems finding the right part of the clip.

In the CHAPTERS toolbar you can create (shortcut J) and delete (shortcut Ctrl+J) QuickTime-compatible chapters for each clip (chapters are stored in the media files and can be retrieved with QuickTime Player).
Each chapter can have its name.
QTAKE will parse the chapter names for the keywords GOOD and BAD and display a green or red chapter marker if found.
If you would like to add a chapter directly with either of the keywords the keyboard shortcuts are Ctrl-Alt-G for GOOD and Ctrl-Alt-B for BAD.
Chapters can also be used to trigger GPI Outputs which lets you sync external equipment to playback.
You can jump between the chapters with the PREV. NEXT buttons and use the MARK button to set the IN and OUT points based on current and next CHAPTER markers.
AUDIO Menu
The AUDIO toolbar mainly controls various aspects of QTAKE audio output.
The following controls are available in the AUDIO menu (use the double arrow (») to navigate to the second page of the menu):


MUTE LIVE
MUTE LIVE button disables live audio output (shortcut N). Input audio is still recorded, but it is not routed to the audio output. This functionality is very useful during playback when live audio would mix with playback audio creating confusing audio output.
AUTO MUTE LIVE OPTIONS
Long-click the MUTE LIVE button to reveal automatic mute options for live audio.
Turn on the AUTO MUTE LIVE option to automatically mute live audio when all Views are patched to DISK. If you want to mute live audio when any View is patched to DISK, turn on the MUTE LIVE ANY option.
MUTE VIEW
Playback audio of each View can be muted individually using MUTE VIEW x buttons.
Long-click MUTE VIEW x will enable mute channel selection of the selected View. In case the View source contains multiple audio channels, this option allows you to mute particular channels.
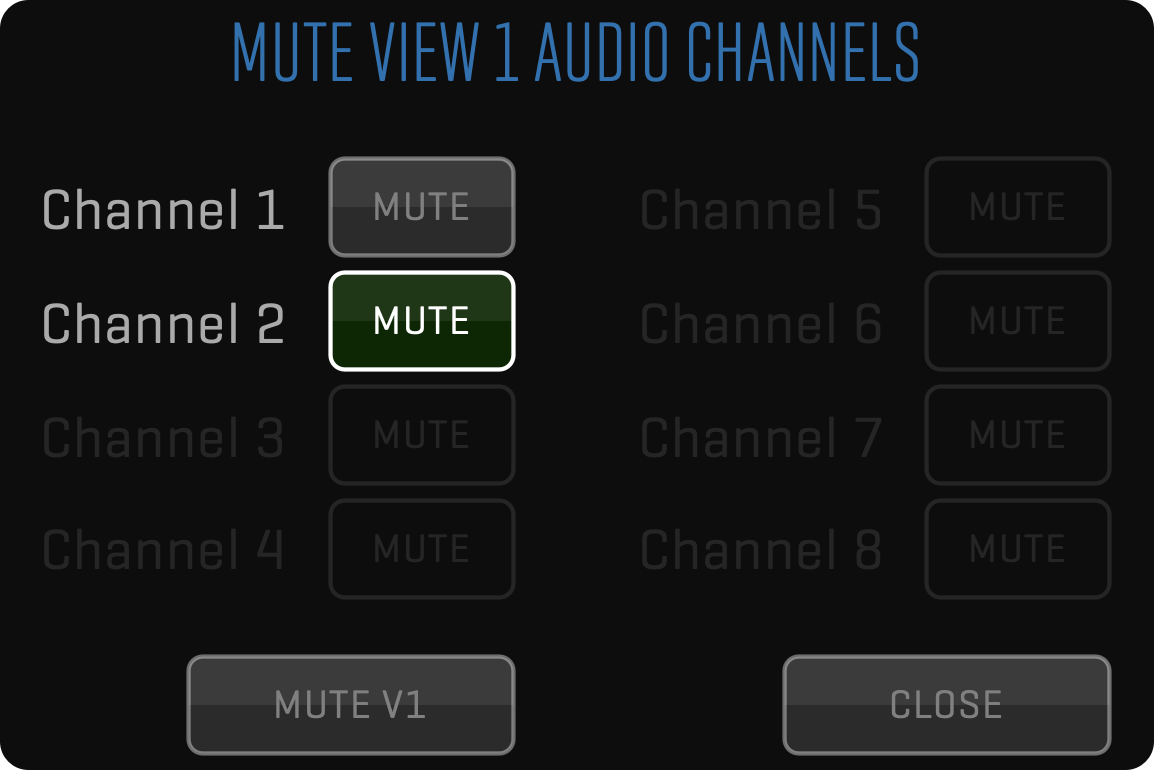
AUDIO INPUT LEVEL
Use the AUDIO INPUT LEVEL field to adjust input level of the incoming audio. This will also affect the level of your recorded audio.
METER Enables audio level metering for LIVE and PLAY mode (key Ctrl-M).
LIVE AUDIO OUTPUT DEVICE Select the system device to use for analog audio output.
LIVE DELAY Adjusts the delay between LIVE video and audio.
DISK AUDIO OUTPUT DEVICE Select the system device to use for analog audio output.
DISK DELAY Adjusts the delay between playback (DISK) video and audio.
WAVE - Enables a waveform display of the audio track below each View.
Why is the WAVE button inactive?
To use the waveform audio display you will need to set:
Enable Audio Waveform = YES
However you should be aware that enabling audio waveform will increase the performance requirements for the system.
AUDIO INPUT is set in the
PROJECTwindow.
VIDEO OUT Menu
This menu is used to activate SDI outputs from the video card. To enable video card outputs globally, turn on this preference:
Each video card output is controlled independently from the VIDEO OUT toolbar.
When V-OUT is disabled in DISK mode, your video card outputs live passthrough, the same as in LIVE mode.

Most video cards are half-duplex - they can either capture or playback. This means you won’t be able to monitor processed LIVE image (only clean live passthrough) through the video card in this mode.
There are also limited compositing capabilities because QTAKE uses View 2 (SDI2) for composite. This means you can only mix LIVE A on top of DISK A or B.
View 1 is mapped to SDI1 OUTPUT, View 2 to SDI2 OUTPUT, etc. When the View is in LIVE mode, you will see an unprocessed passthrough signal on the SDI Output. When the View is in DISK mode, your video card is switched to playback and you will now see the processed image on the SDI Output.
Audio
Some half-duplex video cards have only one audio stream (even though there are 2 video streams inside) you can capture only one audio (which is copied to both A & B clips).
The same goes for playback.
If you play back both Views, you will hear only the sound of the ACTIVE View.
Audio is embedded into SDI output, both in LIVE and DISK mode
PROS:
Using fully processed SDI playback directly from a video card without DVI TO SDI converters
Monitoring unprocessed LIVE feed (zero delay) and processed PLAYBACK on the same wire (no need for SDI switcher)
CONS:
When using a single AJA video card for two channels the inputs need to be genlocked for passthrough to function properly.
Inability to monitor processed LIVE feed.
Limited compositing capabilities (due to the half-duplex nature of the card)
Limited auto-rec (since a half duplex video card cannot read SDI input while in playback)
SIMULTANEOUS SDI INPUT & OUTPUT
QTAKE can use multi-channel video cards to provide simultaneous SDI input and output. Using QTAKE in this way enables processed live output, but it will also add around 4 frames of latency because each frame has to be captured, processed, and sent to monitor over the SDI output.
Some video cards provide full-duplex channels, which means each channel can be used for input and simultaneous output. But all AJA cards are half-duplex, which means QTAKE will use twice as many channels to provide full-duplex functionality. Additionally, all AJA cards are limited to the same format on output, so you need to use one card per camera to provide independent outputs.
See VIDEO CARDS for more details.
To enable 2 cards support, set this preference:
This is an alternative to using DVI outputs converted to SDI, although an additional image processing pipeline will add 2-3 frames of delay compared to DVI output.
To enable simultaneous SDI input and output, set this preference:
SDI HDR OUTPUT
QTAKE supports High Dynamic Range via AJA, Blackmagic Design, and Deltacast video cards to HDR monitors. HDR signal is automatically detected in both LIVE and DISK modes. If V-OUT is enabled, QTAKE sends the HDR signal automatically to video card output, no additional project setting or preference is required, signal has to be flagged with the correct HDR-compatible color space.
In the MEDIA Menu COLOR SPACE you can switch between HDR-compatible color spaces and supported monitors will reflect the signal change. HDR-compatible color spaces:
- Rec.2020
- Rec.2020 PQ
- Rec.2020 HLG
- P3 D65 PQ
- P3 D65 HLG
HDMI OUT Menu
This menu is used to turn on processed HDMI output from QTAKE. If the HDMI OUT button is OFF, the output will be plain video card unprocessed output with no playback possible. If the HDMI OUT button is ON, QTAKE sends processed video output from the selected HDMI VIEW dropdown. Double arrow (») secondary option provides HDMI HDR MODE options. You can choose from HDR10, Dolby Vision®, Dolby Vision® / No Letterbox.


NDI® OUT Menu
This menu is used to turn on NDI outputs. NDI is an IP Video standard created by Newtek to provide high-quality video delivery on the local network.

DOCK Menu
The DOCK toolbar gives a convenient way to store and recall up to 16 clips without entering the browser.
Long-clicking a slot will store the clip currently loaded in the active View into that slot.
The MODE button allows toggling between Image, Text (Camera Letter / Scene / Shot / Take) or Both.
The CLEAR button will clear all clips from the dock.

QUAD Menu
When using QUAD SPLIT unit to record 4 cameras using single QTAKE input, you can select which quadrant to blow up to full size.
Use S1 or S2 to blow up stereoscopic pairs Q1+Q2 or Q3+Q4.
DEMUX LEFT and DEMUX RIGHT let you stretch the Left or Right eye for 2D output.
This also lets you use a muxed signal as two separate cameras by demuxing left and right sections of the image to your two Views.


SEND Menu
If you have foreground and background clips loaded in the Views inside the SHOOT room, you can easily load them into a composite using the SEND TO COMPOSITE button.

You will be presented with a dialog that will let you select an existing composite or create a new one. If you decide to use existing composite, previously loaded clips will be replaced by current clips.
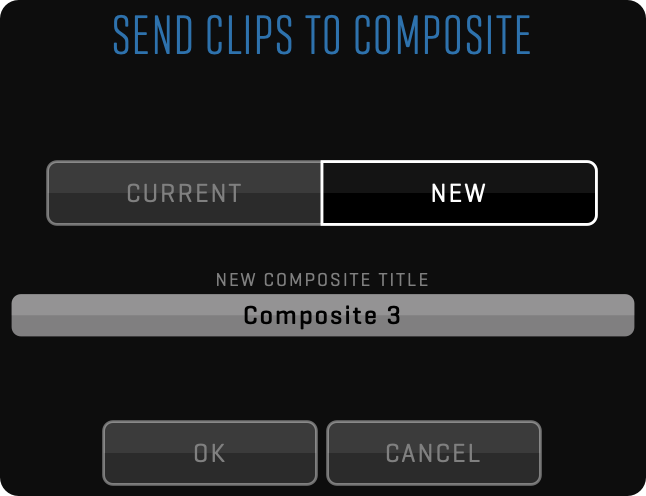
MUXER Menu
With the MUXER toolbar you can capture muxed side-by-side 3D clips.
Each clip recorded in muxed mode will get an SBS attribute.
You can set the clip to SBS by clicking the MUXED label.
This is useful when importing SBS footage.
When a clip is set to SBS, QTAKE will process each side separately in DVE, MASK, GRID, OSD, and WIPE functions to provide the correct result.
Another click on the MUXED label will set the clip to FSBS (fake side-by-side) which will duplicate the left side to the right side of the image and place them side-by-side.
This is useful when using a 2D image in a 3D SBS project.

DEMUX
Press the DEMUX button to un-squeeze either side of the muxed clip. This is used to watch a single camera feed. Select which camera to monitor using the DISPLAY button - this way you can display the selected camera on a 2D monitor. If the DEMUX button is disabled DISPLAY will copy the selected camera to another half of the image to enable a single camera display on a 3D monitor (without the need to exit the 3D mode of the monitor).
REMUX
If your 3D monitor doesn’t support SIDE-BY-SIDE input mode, you can remux GPU Output to (this doesn’t affect video board output):
LBL - for 3D monitors that support only LBL input. DLP - for 3D monitors that support only DLP input. 2D Left - if you want to display only the left eye on a standard 2D monitor. LBL Swap - same as LBL but with left and right eye swapped. DLP Swap - same as DLP but with left and right eye swapped. 2D Right - if you want to display only the right eye on a standard 2D monitor.
Working with MUXED 3D The project window lets you set the camera layout for each input. When receiving a premuxed, side-by-side signal set LAYOUT to 3D SBS. There are several settings in the PREFERENCES that control the behavior of QTAKE in relation to muxed material.
Show Demuxed Thumbnails = NO is set by default.
Set to = YES if you want to display demuxed thumbnails of the muxed clips.
Demux Video Output = NO is set by default.
Set to = YES if you want to output a demuxed image from the video board output. This will enable simultaneous 3D (from GPU) and 2D (from Video Board) output.
3D TOOLS Menu
When shooting stereoscopic projects, you can set following parameters for clips:

FLIP - horizontally flips the image of the current clip (original QT file is transformed).
FLOP - vertically flips the image of the current clip (original QT file is transformed).
H.I.T. - adjust the 3D convergence by horizontal shift (also known as H.I.T or POST-CONVERGENCE).
QTAKE also features dedicated keystrokes for incrementing/decrementing axial (Alt-Left, Alt-Right). This is useful for external controllers, which can map button clicks to standard keystrokes.
AUTO-SCALE To avoid black edges when setting AXIAL (convergence), you can set SCALE to scale the IMAGE or MASK based on shift amount.
RAMP Menu
The RAMP toolbar allows you to create speed ramps in a clip.
Clicking the RAMP button enables or disables the RAMP, when RAMP is enabled the active part of the clip turns green.
Note that you can only create or edit keyframes when the RAMP button is disabled.

The NEW button creates a keyframe at the position of the playhead. By adjusting the CAM SPEED or PLAY SPEED of a keyframe you can set the playback behavior of the clip from that keyframe forward.
The HOLD or LINEAR value alters the playback behavior between two keyframes. HOLD will play at the speed value of the last keyframe until the playhead encounters another keyframe. LINEAR will create a linear speed ramp between the current keyframe and the next. PREV and NEXT let you jump quickly between keyframes.
3D VIEW Menu
3D VIEW toolbar is an additional tool to help you analyze 3D images.


Press the PLUS 3D button to enable 3D VIEW in DUAL or QUAD View mode a separate image window called the 3D VIEW will appear to display various modes of stereoscopic image representation (selected by 3D VIEW MODE):
- ANAGLYPH - Color separation in most popular red/cyan color channels.
- DIFFERENCE - Grey difference of left and right camera view.
- INTERLACE - Line-by-line mux of left and right camera view.
- BOX BLEND - Left and Right camera image is blended through a checkerboard.
- DISSOLVE - Left and Right camera image is blended using 50/50 dissolve.
- WIGGLE - Each camera view is displayed for a selected amount of frames.
- DUAL - Each View is displayed side-by-side.
- SBS - Stereoscopic side-by-side mode.
Use the OPTION field to customize the selected 3D display mode. You can discard DUAL or QUAD View and display only 3D VIEW by holding the PLUS 3D button. The button title will change to 3D SOLO. If you want to return to DUAL or QUAD View + 3D VIEW, long-click this button again.
Using the OUT button, you can send 3D VIEW to 1st GPU-OUT. You can also send 3D VIEW to your SDI output by long-clicking the V-OUT button and activating it. Additionally, you have to select the 3D VIEW MODE upon clicking the double arrow (») within this toolbar. When using non-muxed 3D, the Left eye image is in View 1 and the Right eye image is in View 2 (respectively View 3 and View 4 for the second 3D rig), the 3D VIEW will take left and right images and use them to create a stereoscopic image. When using muxed inputs, each View contains Left and Right eye images in side-by-side muxed mode. In this case, PLUS 3D VIEW will take both images from the ACTIVE View. You can override this by forcing PLUS 3D source to a specific View using the preference:
When set to zero, PLUS 3D will use ACTIVE View as the source. Set it to 1, 2, 3, or 4 to specify what View to use as the 3D VIEW source.
MEDIA Menu
A single clip in QTAKE can have multiple media files associated with it.
For example, if you are recording proxy media in addition to the main recording, you would have both the RECORDED file and a PROXY file connected to that specific take.
The MEDIA toolbar allows you to switch between these different media files for the clip loaded in the active View.


ACTIVE MEDIA
Using the ACTIVE MEDIA you can switch between media types available for the active clip. If you want to globally change what type of media is loaded for each clip, set the PREFERRED MEDIA field. The following values are available:
- RAW
- Original
- Intermediate
- Recorded
- Proxy
RENDER PROXY
The RENDER PROXY button allows you to render the proxy file for the clip loaded in the active View. It can be handy if you made changes to the clip look and you need to update the proxy file to match the original. In this case, QTAKE will render a new PROXY media file and will delete the old one. A dot will appear on the RENDER PROXY button if you have clips in your project that do not have proxies. Long-clicking the RENDER PROXY button will create proxies for any clips that are missing them.
ACTIVE AUDIO
Using the ACTIVE AUDIO you can switch between audio media available for the active clip. If you want to globally change what type of audio media is loaded for each clip, set the PREFERRED AUDIO field. The following values are available:
- Embedded - audio tracks contained in the video media file
- Synced - external audio media synced to video media
SYNC AV
Load a video clip into View 1 and an audio clip into View 2. Use PLAY SYNC functionality to synchronize the playback of video and audio media. When done, click the SYNC AV button to attach the new audio media active clip. This will allow you to play back and export clips with external media.
AV OFFSET
Use the AV OFFSET field to enter a numerical value for audio/video offset.
DECREASE AV OFFSET
Use the -1/4F button to decrease audio/video offset by 1/4 of the frame duration.
INCREASE AV OFFSET
Use the +1/4F button to increase audio/video offset by 1/4 of the frame duration.
MEDIA INFO
The MEDIA INFO section displays relevant information about the currently loaded media file, such as video format and codec.
COLOR SPACE
Use the COLOR SPACE field if you want to override the color space value contained in the media file. The following values are available:
- ACESproxy
- Alexa LogC
- ACES
- Rec.601
- Rec.709
- Rec.2020
- Rec.2020 PQ
- Rec.2020 HLG
- P3 D65
- P3 D65 PQ
- P3 D65 HLG
- Sony S-Log3 S-Gamut3
Note that for the LIVE signal, the COLOR SPACE override is not possible if the AUTO COLOR SPACE option in the PROJECT SETTINGS is set to YES. The selection will fall back to the detected COLOR SPACE of the LIVE signal.
The COLOR SPACE picker behaves differently in LIVE, RECORD, DISK, and CLIP SELECTION modes.
- LIVE
In LIVE mode, the picker displays the same value as the COLOR SPACE picker in the PROJECT SETTINGS. If you change the value in theMEDIAtoolbar while in LIVE mode, it changes the picker value in PROJECT SETTINGS automatically.
In case the AUTO COLOR SPACE option in PROJECT SETTINGS is set to YES, manual selection in theMEDIAtoolbar is not applicable. Selection always falls back to automatically detected COLOR SPACE in the LIVE signal. - RECORD
While recording it is not possible to change the COLOR SPACE value. If you try changing it, you will get an informational pop-up message. - DISK
In DISK mode the picker displays media original COLOR SPACE in bold. If you select a different value, it will override the original one. Long-clicking the picker resets the override and the media’s original COLOR SPACE is used. - CLIP SELECTION
If CLIP SELECTION is active in the LIST sidebar and at least one clip is selected, the picker sets media COLOR SPACE override for RECORDED clips included in the selection. For LIVE clips that are part of the selection, QTAKE sets the INPUT COLOR SPACE value based on the picker value.
PAUSE DOLBY VISION® ANALYSIS
This button will pause real-time image analysis performed by the Dolby Vision processing and keep the Dolby Vision metadata set to the last value. This function is useful when performing live color grading that would otherwise be dynamically compensated by the Dolby Vision processing. After live adjustments to color are finished, you can turn off this button to resume dynamic processing.
STEREO 3D
Set the STEREO 3D field to one of the following values to describe stereoscopic video content:
- 3D LEFT - video content represents left-eye view
- 3D RIGHT - video content represents right-eye view
- 3D SBS - video contains multiplexed side-by-side 3D
- FAKE SBS - turns 2D content into fake side-by-side 3D
MULTIVIEW
If the media contains four different images laid out in quadrants, set the MULTIVIEW field to the QUAD value.
VR 360
Use the VR 360 field to describe 360 video content with the following values:
- EQUIRECT - 360 video is stored in equirectangular mode
- CUBEMAP - 360 video is stored in a cubemap mode
ORIENTATION
This field is used to describe the orientation of the video content when shooting in portrait mode or upside-down. Set the ORIENTATION to one of the following values:
- 90 CW - the camera is rotated 90 degrees clockwise
- 90 CCW - the camera is rotated 90 degrees counterclockwise
- 180 - the camera is rotated 180 degrees (upside-down)
When the orientation is set correctly in the MEDIA toolbar, you can rotate the active View using the VIEW Toolbar.
TC TRACK
When using LTC timecode recorded as an audio track in the media file, use the TC TRACK field to select the correct audio track number to be interpreted as timecode and muted to avoid unwanted audio noise during the playback.
ZOOM Menu
The ZOOM toolbar lets you ZOOM the Views IN or OUT and offset.
This only affects the operator monitor (GUI).
While in the DRAW or EDIT mode of the GARBAGE MATTE, the ZOOM value is automatically set to 75%.

QTAKE Preferences
This section describes each of QTAKE’s preferences. Preferences control various aspects of QTAKE operation and are independent of the user or project.
Wait For Vertical Sync GUI
Set this preference to YES to enable synchronizing of video to redraw to vertical refresh of the GUI monitor.
Disabling this preference will improve the performance of the graphics card, but it will cause image tearing in the user interface.
GPU Vertical Sync Mode
Set this preference to NO to disable GPU Vertical Sync, AUTO for Automatic Vertical Sync, and FORCE to Force Vertical Sync.
Full Range Video
Set this preference to YES to enable Full Range video processing. The default value (NO) uses SMPTE legal levels, which will clip the super-black and super-white values.
VIDEO BOARD GROUP
Videoboard Manufacturer
If you have multiple video cards from different manufacturers connected you can explicitly state which cards QTAKE should use. The options are AJA, Blackmagic Design, Deltacast, or AUTO (manufacturer will be determined automatically according to first video board found).
Two Boards For Dual IO
Only boards from one manufacturer can be combined in QTAKE. Using the same model of the board is recommended. You will find more information on supported cards and manufacturers in Video Cards section. This preference manages how multiple video boards are configured.
In general, the same board will be configured to use both inputs and outputs if this preference is set to YES. If the preference is set to NO, first board will be used for inputs and second board for outputs.
For example, in case of two AJA Io4K video boards in QTAKE HDx4 version:
- Board #1 - 4 inputs and board #2 - 4 processed outputs if you set the preference to NO.
- Board #1 - 2 inputs with 2 processed outputs and board #2 - 2 inputs with 2 processed outputs, if you set the preference to YES.
- Multi-channel Blackmagic Design boards register in macOS as separate boards per each channel.
Force Board Order
Forces the order of used video boards based on the serial number. This is important in order to keep QTAKE inputs and outputs consistently assigned to same boards after restart of the computer.
Signal Detection Retry
Sometimes it takes longer than one frame for AJA cards to adapt to a new input format. A side effect of this can be corrupted audio. If you experience such issues, set this preference to 25.
Reject Wrong Video Format
Set this to NO to allow the input of a non-compliant signal. Note, however, that this solution should only be considered as a last resort due to its potential for unstable performance. We recommend re-clocking your signal to make it recognized by hardware.
Autorecording Start Threshold
Set this to the number of frames by which you wish to delay the recording start. Can add robustness in bad signal conditions.
Autorecording Stop Threshold
Set this to the number of frames by which you wish to delay the recording stop. Can add robustness in bad signal conditions.
Autorecording Stop Adds SubClip
When using subclips, set to YES to add a subclip at the end of the recording if the camera is set to auto-record.
SDI OUTPUT GROUP
Constant Playout Mode
Set this preference to YES for simultaneous input and output with compatible cards. This mode enables processed live output.
Enable Video Output
Set to YES to enable video outputs. In case this is set to NO, a video board outputs only live passthrough and all other preferences affecting Video Output will be ignored.
Enable TC Output
Set to YES to enable timecode output. This only applies to compatible video cards.
Use Free Genlock For Playback
Set to YES to switch to free Genlock automatically when in DISK mode. This will keep stable SDI output if the camera is disconnected and you have no external reference signal. This setting is ignored when the Constant Playout Mode preference is set to YES.
Clip Based Video Output Format
When mixing various video formats in a single project, you can set this option to YES to enable automatic switching of output video format based on clip resolution and timebase. If set to NO, QTAKE will scale all clips to match the SDI output resolution, however, it will not interpolate FPS to match the output. This setting is ignored when the Constant Playout Mode preference is set to YES.
Optimize PSF Input
Set it to YES to improve performance with PSF format input when using AJA video cards.
LTC Output Source
Sets the source of the analog LTC output based on the video output of the video card.
FILE GROUP
Capture Mode Bit Depth
Set the capture mode to 8bit, 10bit, or 12bit. Setting this preference to 10bit or 12bit will also set the internal processing pipeline to floating point precision.
Audio File Format
Sets the audio recording format. AUTO will set the recording format to match the input audio. 16bit, 24bit, and 32bit will record audio as integers at the selected bit-depth. 32bit Float will record audio as 32bit floating point values.
Ignore External Timecode
Set to YES to override the embedded timecode. The system clock is used instead.
Use Internal ProRes Encoder
Set to YES to handle Apple ProRes encoding using an internal library. In some cases, this may be a bit faster than using an external process.
Import CPD From ProRes
Set to YES to import camera positioning data from imported ProRes files.
ScreenShot File Format
Selects file format for screenshots. Options are JPEG, PNG, BMP, JPEG 2000, GIF, and TIFF.
ScreenShot Compression Quality
Set JPEG compression quality for Screenshots in the range of 1 to 10. The lower number means lower quality. The default value is 10.
ScreenShot Video Range
Set this preference to define a video range of the screenshot images. The following options are available: Auto, Legal, or Full Range.
LUT Interpolation Method
Set this preference to Trilinear (faster), or Tetrahedral (higher quality).
Use RED RAW Clips
This preference enables the usage of RED camera raw files.
PLAYBACK GROUP
PreRoll And PostRoll For PlaySync
Set to YES to enable pre-roll and post-roll for Play Synced clips. This will allow you to play back clips with various duration in sync.
Use Audio For Varispeed
Set to YES to allow vari-speed audio from 50% to 200% clip speed.
Enable Play Sync Auto Mute
QTAKE will mute Views 2-4 when playing back clips with play sync enabled to avoid the same audio playing from multiple Views. Set this to NO to disable this feature.
Set Play Sync Offset By TC
Set to YES if you want QTAKE to determine PLAY SYNC OFFSET using the timecode of the clips.
Enable Caching
Set to YES if you want QTAKE to cache RAW frames for real-time playback.
Cache Size Per Clip MB
Use this preference to set the cache size for RAW playback based on available memory in your system. The default value is 1000.
Min Cache Length SEC
Set the minimal RAW playback cache duration.
RAW Auto Quality
Set to YES if you want QTAKE to determine the quality of RAW debayering to provide real-time playback based on your system performance.
GUI GROUP
Use Film Style Scene Sorting
Set to YES to ignore letters before numbers when sorting Scene names. For example 33, A33, 34.
OSD Speed In FPS
Set to YES if you want to display OSD speed in FPS, instead of percentage.
Imperial Distance Units
Will convert values (such as focus distance) to imperial units.
Logo Opacity
Use this preference to set the NO VIDEO INPUT screen logo opacity. The default value is 0.25.
GUI Background Red / Green / Blue
Set each color channel to a value of 0.0 - 1.0 to set the custom background color. The default value is 0.12 for each channel.
Multiclip Metadata Toolbars Mode
This preference is used to make CLIP, DATA, and CONTROL toolbars work with multi-clip selection.
GUI Screen Blocks Count
Adjusts the number of menu “blocks” on a single horizontal row. The default value is 4 and it can be set to up to 8 to support ultra widescreen displays. This preference will effectively scale down the GUI to fit more content.
GUI Menu Blocks Limit
Adjusts the number of “blocks” the menu bars are allowed to occupy. The rest of the horizontal space will be used by side windows such as the LIST, FX, and META. The default value is 4, it can be set to up to 8.
Ovide Smart Mode
Use the following values if using OVIDE hardware for QTAKE: SmartAssist HD2, SmartAssist 4, SmartAssist Evo 2, and SmartAssist Evo 4.
On Screen Controls
Enables playback control overlay on the Views. The following options are available: Off, Disk only, Live & Disk.
Kiosk Mode
QTAKE runs in kiosk mode by default. Set this preference to NO to disable kiosk mode. This will allow you to Cmd-Tab between running applications or display a window of another application in front of QTAKE UI.
Default Viewer Background
The Viewer background can be set to Black or Clear, by default.
AUTOLOAD GROUP
AutoLoad Last Project
Set to YES to automatically load the user and project after starting QTAKE.
RECORD GROUP
Prevent Media Drive Sleep
Prevent Media Drive Sleep by recording a small file for each specified number of seconds. Set to zero to disable.
Stop Recording On System Slow
Set to NO to allow recording to continue even if QTAKE is dropping frames.
EXTERNAL GROUP
Use Videohub
Set to YES to enable control of the BMD Videohub or AJA Kumo SDI routers.
DIAGNOSTICS GROUP
Report Main Thread Blocking
This preference is used to test the performance of QTAKE and send a report if the user interface is blocked.
Acknowledgements
Portions of QTAKE Software may be using copyrighted 3rd party material. The following list includes the general license agreements that may cover multiple packages, and the agreements specific to those packages.
ACES
Academy Color Encoding System (ACES) software and tools are provided by the Academy under the following terms and conditions: A worldwide, royalty-free, non-exclusive right to copy, modify, create derivatives, and use, in source and binary forms, is hereby granted, subject to acceptance of this license. Copyright © 2015 Academy of Motion Picture Arts and Sciences (A.M.P.A.S.). Portions contributed by others as indicated. All rights reserved. Performance of any of the aforementioned acts indicates acceptance to be bound by the following terms and conditions: Copies of source code, in whole or in part, must retain the above copyright notice, this list of conditions, and the Disclaimer of Warranty. Use in binary form must retain the above copyright notice, this list of conditions, and the Disclaimer of Warranty in the documentation and/or other materials provided with the distribution. Nothing in this license shall be deemed to grant any rights to trademarks, copyrights, patents, trade secrets, or any other intellectual property of A.M.P.A.S. or any contributors, except as expressly stated herein. Neither the name “A.M.P.A.S.” nor the name of any other contributors to this software may be used to endorse or promote products derivative of or based on this software without express prior written permission of A.M.P.A.S. or the contributors, as appropriate. This license shall be construed pursuant to the laws of the State of California, and any disputes related thereto shall be subject to the jurisdiction of the courts therein. Disclaimer of Warranty: THIS SOFTWARE IS PROVIDED BY A.M.P.A.S. AND CONTRIBUTORS “AS IS” AND ANY EXPRESS OR IMPLIED WARRANTIES, INCLUDING, BUT NOT LIMITED TO, THE IMPLIED WARRANTIES OF MERCHANTABILITY, FITNESS FOR A PARTICULAR PURPOSE, AND NON-INFRINGEMENT ARE DISCLAIMED. IN NO EVENT SHALL A.M.P.A.S., OR ANY CONTRIBUTORS OR DISTRIBUTORS, BE LIABLE FOR ANY DIRECT, INDIRECT, INCIDENTAL, SPECIAL, EXEMPLARY, RESITUTIONARY, OR CONSEQUENTIAL DAMAGES (INCLUDING, BUT NOT LIMITED TO, PROCUREMENT OF SUBSTITUTE GOODS OR SERVICES; LOSS OF USE, DATA, OR PROFITS; OR BUSINESS INTERRUPTION) HOWEVER CAUSED AND ON ANY THEORY OF LIABILITY, WHETHER IN CONTRACT, STRICT LIABILITY, OR TORT (INCLUDING NEGLIGENCE OR OTHERWISE) ARISING IN ANY WAY OUT OF THE USE OF THIS SOFTWARE, EVEN IF ADVISED OF THE POSSIBILITY OF SUCH DAMAGE. WITHOUT LIMITING THE GENERALITY OF THE FOREGOING, THE ACADEMY SPECIFICALLY DISCLAIMS ANY REPRESENTATIONS OR WARRANTIES WHATSOEVER RELATED TO PATENT OR OTHER INTELLECTUAL PROPERTY RIGHTS IN THE ACADEMY COLOR ENCODING SYSTEM, OR APPLICATIONS THEREOF, HELD BY PARTIES OTHER THAN A.M.P.A.S.,WHETHER DISCLOSED OR UNDISCLOSED.
Boost
Boost Software License - Version 1.0 - August 17th, 2003
Permission is hereby granted, free of charge, to any person or organization obtaining a copy of the software and accompanying documentation covered by this license (the “Software”) to use, reproduce, display, distribute, execute, and transmit the Software, and to prepare derivative works of the Software, and to permit third-parties to whom the Software is furnished to do so, all subject to the following:
The copyright notices in the Software and this entire statement, including the above license grant, this restriction and the following disclaimer, must be included in all copies of the Software, in whole or in part, and all derivative works of the Software, unless such copies or derivative works are solely in the form of machine-executable object code generated by a source language processor.
THE SOFTWARE IS PROVIDED “AS IS”, WITHOUT WARRANTY OF ANY KIND, EXPRESS OR IMPLIED, INCLUDING BUT NOT LIMITED TO THE WARRANTIES OF MERCHANTABILITY, FITNESS FOR A PARTICULAR PURPOSE, TITLE AND NON-INFRINGEMENT. IN NO EVENT SHALL THE COPYRIGHT HOLDERS OR ANYONE DISTRIBUTING THE SOFTWARE BE LIABLE FOR ANY DAMAGES OR OTHER LIABILITY, WHETHER IN CONTRACT, TORT OR OTHERWISE, ARISING FROM, OUT OF OR IN CONNECTION WITH THE SOFTWARE OR THE USE OR OTHER DEALINGS IN THE SOFTWARE.
CocoaAsyncSocket
This library is in the public domain. However, not all organizations are allowed to use such a license. For example, Germany doesn’t recognize the Public Domain and one is not allowed to use libraries under such license (or similar).
Thus, the library is now dual licensed, and one is allowed to choose which license they would like to use.
################################################## License Option #1 : ##################################################
Public Domain
################################################## License Option #2 : ##################################################
Software License Agreement (BSD License)
Copyright (c) 2017, Deusty, LLC All rights reserved.
Redistribution and use of this software in source and binary forms, with or without modification, are permitted provided that the following conditions are met:
-
Redistributions of source code must retain the above copyright notice, this list of conditions and the following disclaimer.
-
Neither the name of Deusty LLC nor the names of its contributors may be used to endorse or promote products derived from this software without specific prior written permission of Deusty LLC.
THIS SOFTWARE IS PROVIDED BY THE COPYRIGHT HOLDERS AND CONTRIBUTORS “AS IS” AND ANY EXPRESS OR IMPLIED WARRANTIES, INCLUDING, BUT NOT LIMITED TO, THE IMPLIED WARRANTIES OF MERCHANTABILITY AND FITNESS FOR A PARTICULAR PURPOSE ARE DISCLAIMED. IN NO EVENT SHALL THE COPYRIGHT OWNER OR CONTRIBUTORS BE LIABLE FOR ANY DIRECT, INDIRECT, INCIDENTAL, SPECIAL, EXEMPLARY, OR CONSEQUENTIAL DAMAGES (INCLUDING, BUT NOT LIMITED TO, PROCUREMENT OF SUBSTITUTE GOODS OR SERVICES; LOSS OF USE, DATA, OR PROFITS; OR BUSINESS INTERRUPTION) HOWEVER CAUSED AND ON ANY THEORY OF LIABILITY, WHETHER IN CONTRACT, STRICT LIABILITY, OR TORT (INCLUDING NEGLIGENCE OR OTHERWISE) ARISING IN ANY WAY OUT OF THE USE OF THIS SOFTWARE, EVEN IF ADVISED OF THE POSSIBILITY OF SUCH DAMAGE.
CocoaLumberJack
BSD 3-Clause License
Copyright (c) 2010-2022, Deusty, LLC All rights reserved.
Redistribution and use in source and binary forms, with or without modification, are permitted provided that the following conditions are met:
-
Redistributions of source code must retain the above copyright notice, this list of conditions and the following disclaimer.
-
Redistributions in binary form must reproduce the above copyright notice, this list of conditions and the following disclaimer in the documentation and/or other materials provided with the distribution.
-
Neither the name of Deusty nor the names of its contributors may be used to endorse or promote products derived from this software without specific prior written permission of Deusty, LLC.
THIS SOFTWARE IS PROVIDED BY THE COPYRIGHT HOLDERS AND CONTRIBUTORS “AS IS” AND ANY EXPRESS OR IMPLIED WARRANTIES, INCLUDING, BUT NOT LIMITED TO, THE IMPLIED WARRANTIES OF MERCHANTABILITY AND FITNESS FOR A PARTICULAR PURPOSE ARE DISCLAIMED. IN NO EVENT SHALL THE COPYRIGHT HOLDER OR CONTRIBUTORS BE LIABLE FOR ANY DIRECT, INDIRECT, INCIDENTAL, SPECIAL, EXEMPLARY, OR CONSEQUENTIAL DAMAGES (INCLUDING, BUT NOT LIMITED TO, PROCUREMENT OF SUBSTITUTE GOODS OR SERVICES; LOSS OF USE, DATA, OR PROFITS; OR BUSINESS INTERRUPTION) HOWEVER CAUSED AND ON ANY THEORY OF LIABILITY, WHETHER IN CONTRACT, STRICT LIABILITY, OR TORT (INCLUDING NEGLIGENCE OR OTHERWISE) ARISING IN ANY WAY OUT OF THE USE OF THIS SOFTWARE, EVEN IF ADVISED OF THE POSSIBILITY OF SUCH DAMAGE.
###CocoaLUT The MIT License (MIT)
Copyright (c) 2014 Wil Gieseler wil@wilgieseler.com & Greg Cotten greg@gregcotten.com
Permission is hereby granted, free of charge, to any person obtaining a copy of this software and associated documentation files (the “Software”), to deal in the Software without restriction, including without limitation the rights to use, copy, modify, merge, publish, distribute, sublicense, and/or sell copies of the Software, and to permit persons to whom the Software is furnished to do so, subject to the following conditions:
The above copyright notice and this permission notice shall be included in all copies or substantial portions of the Software.
THE SOFTWARE IS PROVIDED “AS IS”, WITHOUT WARRANTY OF ANY KIND, EXPRESS OR IMPLIED, INCLUDING BUT NOT LIMITED TO THE WARRANTIES OF MERCHANTABILITY, FITNESS FOR A PARTICULAR PURPOSE AND NONINFRINGEMENT. IN NO EVENT SHALL THE AUTHORS OR COPYRIGHT HOLDERS BE LIABLE FOR ANY CLAIM, DAMAGES OR OTHER LIABILITY, WHETHER IN AN ACTION OF CONTRACT, TORT OR OTHERWISE, ARISING FROM, OUT OF OR IN CONNECTION WITH THE SOFTWARE OR THE USE OR OTHER DEALINGS IN THE SOFTWARE.
AppleCoreAudioUtilityClasses
Disclaimer: IMPORTANT: This Apple software is supplied to you by Apple Inc. (“Apple”) in consideration of your agreement to the following terms, and your use, installation, modification or redistribution of this Apple software constitutes acceptance of these terms. If you do not agree with these terms, please do not use, install, modify or redistribute this Apple software.
In consideration of your agreement to abide by the following terms, and subject to these terms, Apple grants you a personal, non-exclusive license, under Apple’s copyrights in this original Apple software (the “Apple Software”), to use, reproduce, modify and redistribute the Apple Software, with or without modifications, in source and/or binary forms; provided that if you redistribute the Apple Software in its entirety and without modifications, you must retain this notice and the following text and disclaimers in all such redistributions of the Apple Software. Neither the name, trademarks, service marks or logos of Apple Inc. may be used to endorse or promote products derived from the Apple Software without specific prior written permission from Apple. Except as expressly stated in this notice, no other rights or licenses, express or implied, are granted by Apple herein, including but not limited to any patent rights that may be infringed by your derivative works or by other works in which the Apple Software may be incorporated.
The Apple Software is provided by Apple on an “AS IS” basis. APPLE MAKES NO WARRANTIES, EXPRESS OR IMPLIED, INCLUDING WITHOUT LIMITATION THE IMPLIED WARRANTIES OF NON-INFRINGEMENT, MERCHANTABILITY AND FITNESS FOR A PARTICULAR PURPOSE, REGARDING THE APPLE SOFTWARE OR ITS USE AND OPERATION ALONE OR IN COMBINATION WITH YOUR PRODUCTS.
IN NO EVENT SHALL APPLE BE LIABLE FOR ANY SPECIAL, INDIRECT, INCIDENTAL OR CONSEQUENTIAL DAMAGES (INCLUDING, BUT NOT LIMITED TO, PROCUREMENT OF SUBSTITUTE GOODS OR SERVICES; LOSS OF USE, DATA, OR PROFITS; OR BUSINESS INTERRUPTION) ARISING IN ANY WAY OUT OF THE USE, REPRODUCTION, MODIFICATION AND/OR DISTRIBUTION OF THE APPLE SOFTWARE, HOWEVER CAUSED AND WHETHER UNDER THEORY OF CONTRACT, TORT (INCLUDING NEGLIGENCE), STRICT LIABILITY OR OTHERWISE, EVEN IF APPLE HAS BEEN ADVISED OF THE POSSIBILITY OF SUCH DAMAGE.
Copyright (C) 2013 Apple Inc. All Rights Reserved.
GNU LGPL v2.1
Version 2.1, February 1999 Copyright (C) 1991, 1999 Free Software Foundation, Inc. 51 Franklin Street, Fifth Floor, Boston, MA 02110-1301 USA Everyone is permitted to copy and distribute verbatim copies of this license document, but changing it is not allowed.
[This is the first released version of the Lesser GPL. It also counts as the successor of the GNU Library Public License, version 2, hence the version number 2.1.]
Preamble
The licenses for most software are designed to take away your freedom to share and change it. By contrast, the GNU General Public Licenses are intended to guarantee your freedom to share and change free software–to make sure the software is free for all its users.
This license, the Lesser General Public License, applies to some specially designated software packages–typically libraries–of the Free Software Foundation and other authors who decide to use it. You can use it too, but we suggest you first think carefully about whether this license or the ordinary General Public License is the better strategy to use in any particular case, based on the explanations below.
When we speak of free software, we are referring to freedom of use, not price. Our General Public Licenses are designed to make sure that you have the freedom to distribute copies of free software (and charge for this service if you wish); that you receive source code or can get it if you want it; that you can change the software and use pieces of it in new free programs; and that you are informed that you can do these things.
To protect your rights, we need to make restrictions that forbid distributors to deny you these rights or to ask you to surrender these rights. These restrictions translate to certain responsibilities for you if you distribute copies of the library or if you modify it.
For example, if you distribute copies of the library, whether gratis or for a fee, you must give the recipients all the rights that we gave you. You must make sure that they, too, receive or can get the source code. If you link other code with the library, you must provide complete object files to the recipients, so that they can relink them with the library after making changes to the library and recompiling it. And you must show them these terms so they know their rights.
We protect your rights with a two-step method: (1) we copyright the library, and (2) we offer you this license, which gives you legal permission to copy, distribute and/or modify the library.
To protect each distributor, we want to make it very clear that there is no warranty for the free library. Also, if the library is modified by someone else and passed on, the recipients should know that what they have is not the original version, so that the original author’s reputation will not be affected by problems that might be introduced by others.
Finally, software patents pose a constant threat to the existence of any free program. We wish to make sure that a company cannot effectively restrict the users of a free program by obtaining a restrictive license from a patent holder. Therefore, we insist that any patent license obtained for a version of the library must be consistent with the full freedom of use specified in this license.
Most GNU software, including some libraries, is covered by the ordinary GNU General Public License. This license, the GNU Lesser General Public License, applies to certain designated libraries, and is quite different from the ordinary General Public License. We use this license for certain libraries in order to permit linking those libraries into non-free programs.
When a program is linked with a library, whether statically or using a shared library, the combination of the two is legally speaking a combined work, a derivative of the original library. The ordinary General Public License therefore permits such linking only if the entire combination fits its criteria of freedom. The Lesser General Public License permits more lax criteria for linking other code with the library.
We call this license the “Lesser” General Public License because it does Less to protect the user’s freedom than the ordinary General Public License. It also provides other free software developers Less of an advantage over competing non-free programs. These disadvantages are the reason we use the ordinary General Public License for many libraries. However, the Lesser license provides advantages in certain special circumstances.
For example, on rare occasions, there may be a special need to encourage the widest possible use of a certain library, so that it becomes a de-facto standard. To achieve this, non-free programs must be allowed to use the library. A more frequent case is that a free library does the same job as widely used non-free libraries. In this case, there is little to gain by limiting the free library to free software only, so we use the Lesser General Public License.
In other cases, permission to use a particular library in non-free programs enables a greater number of people to use a large body of free software. For example, permission to use the GNU C Library in non-free programs enables many more people to use the whole GNU operating system, as well as its variant, the GNU/Linux operating system.
Although the Lesser General Public License is Less protective of the users’ freedom, it does ensure that the user of a program that is linked with the Library has the freedom and the wherewithal to run that program using a modified version of the Library.
The precise terms and conditions for copying, distribution and modification follow. Pay close attention to the difference between a “work based on the library” and a “work that uses the library”. The former contains code derived from the library, whereas the latter must be combined with the library in order to run.
TERMS AND CONDITIONS FOR COPYING, DISTRIBUTION AND MODIFICATION
- This License Agreement applies to any software library or other program which contains a notice placed by the copyright holder or other authorized party saying it may be distributed under the terms of this Lesser General Public License (also called “this License”). Each licensee is addressed as “you”.
A “library” means a collection of software functions and/or data prepared so as to be conveniently linked with application programs (which use some of those functions and data) to form executables.
The “Library”, below, refers to any such software library or work which has been distributed under these terms. A “work based on the Library” means either the Library or any derivative work under copyright law: that is to say, a work containing the Library or a portion of it, either verbatim or with modifications and/or translated straightforwardly into another language. (Hereinafter, translation is included without limitation in the term “modification”.)
“Source code” for a work means the preferred form of the work for making modifications to it. For a library, complete source code means all the source code for all modules it contains, plus any associated interface definition files, plus the scripts used to control compilation and installation of the library.
Activities other than copying, distribution and modification are not covered by this License; they are outside its scope. The act of running a program using the Library is not restricted, and output from such a program is covered only if its contents constitute a work based on the Library (independent of the use of the Library in a tool for writing it). Whether that is true depends on what the Library does and what the program that uses the Library does.
- You may copy and distribute verbatim copies of the Library’s complete source code as you receive it, in any medium, provided that you conspicuously and appropriately publish on each copy an appropriate copyright notice and disclaimer of warranty; keep intact all the notices that refer to this License and to the absence of any warranty; and distribute a copy of this License along with the Library.
You may charge a fee for the physical act of transferring a copy, and you may at your option offer warranty protection in exchange for a fee.
- You may modify your copy or copies of the Library or any portion of it, thus forming a work based on the Library, and copy and distribute such modifications or work under the terms of Section 1 above, provided that you also meet all of these conditions:
a) The modified work must itself be a software library. b) You must cause the files modified to carry prominent notices stating that you changed the files and the date of any change. c) You must cause the whole of the work to be licensed at no charge to all third parties under the terms of this License. d) If a facility in the modified Library refers to a function or a table of data to be supplied by an application program that uses the facility, other than as an argument passed when the facility is invoked, then you must make a good faith effort to ensure that, in the event an application does not supply such function or table, the facility still operates, and performs whatever part of its purpose remains meaningful. (For example, a function in a library to compute square roots has a purpose that is entirely well-defined independent of the application. Therefore, Subsection 2d requires that any application-supplied function or table used by this function must be optional: if the application does not supply it, the square root function must still compute square roots.)
These requirements apply to the modified work as a whole. If identifiable sections of that work are not derived from the Library, and can be reasonably considered independent and separate works in themselves, then this License, and its terms, do not apply to those sections when you distribute them as separate works. But when you distribute the same sections as part of a whole which is a work based on the Library, the distribution of the whole must be on the terms of this License, whose permissions for other licensees extend to the entire whole, and thus to each and every part regardless of who wrote it.
Thus, it is not the intent of this section to claim rights or contest your rights to work written entirely by you; rather, the intent is to exercise the right to control the distribution of derivative or collective works based on the Library.
In addition, mere aggregation of another work not based on the Library with the Library (or with a work based on the Library) on a volume of a storage or distribution medium does not bring the other work under the scope of this License.
- You may opt to apply the terms of the ordinary GNU General Public License instead of this License to a given copy of the Library. To do this, you must alter all the notices that refer to this License, so that they refer to the ordinary GNU General Public License, version 2, instead of to this License. (If a newer version than version 2 of the ordinary GNU General Public License has appeared, then you can specify that version instead if you wish.) Do not make any other change in these notices.
Once this change is made in a given copy, it is irreversible for that copy, so the ordinary GNU General Public License applies to all subsequent copies and derivative works made from that copy.
This option is useful when you wish to copy part of the code of the Library into a program that is not a library.
- You may copy and distribute the Library (or a portion or derivative of it, under Section 2) in object code or executable form under the terms of Sections 1 and 2 above provided that you accompany it with the complete corresponding machine-readable source code, which must be distributed under the terms of Sections 1 and 2 above on a medium customarily used for software interchange.
If distribution of object code is made by offering access to copy from a designated place, then offering equivalent access to copy the source code from the same place satisfies the requirement to distribute the source code, even though third parties are not compelled to copy the source along with the object code.
- A program that contains no derivative of any portion of the Library, but is designed to work with the Library by being compiled or linked with it, is called a “work that uses the Library”. Such a work, in isolation, is not a derivative work of the Library, and therefore falls outside the scope of this License.
However, linking a “work that uses the Library” with the Library creates an executable that is a derivative of the Library (because it contains portions of the Library), rather than a “work that uses the library”. The executable is therefore covered by this License. Section 6 states terms for distribution of such executables.
When a “work that uses the Library” uses material from a header file that is part of the Library, the object code for the work may be a derivative work of the Library even though the source code is not. Whether this is true is especially significant if the work can be linked without the Library, or if the work is itself a library. The threshold for this to be true is not precisely defined by law.
If such an object file uses only numerical parameters, data structure layouts and accessors, and small macros and small inline functions (ten lines or less in length), then the use of the object file is unrestricted, regardless of whether it is legally a derivative work. (Executables containing this object code plus portions of the Library will still fall under Section 6.)
Otherwise, if the work is a derivative of the Library, you may distribute the object code for the work under the terms of Section 6. Any executables containing that work also fall under Section 6, whether or not they are linked directly with the Library itself.
- As an exception to the Sections above, you may also combine or link a “work that uses the Library” with the Library to produce a work containing portions of the Library, and distribute that work under terms of your choice, provided that the terms permit modification of the work for the customer’s own use and reverse engineering for debugging such modifications.
You must give prominent notice with each copy of the work that the Library is used in it and that the Library and its use are covered by this License. You must supply a copy of this License. If the work during execution displays copyright notices, you must include the copyright notice for the Library among them, as well as a reference directing the user to the copy of this License. Also, you must do one of these things:
a) Accompany the work with the complete corresponding machine-readable source code for the Library including whatever changes were used in the work (which must be distributed under Sections 1 and 2 above); and, if the work is an executable linked with the Library, with the complete machine-readable “work that uses the Library”, as object code and/or source code, so that the user can modify the Library and then relink to produce a modified executable containing the modified Library. (It is understood that the user who changes the contents of definitions files in the Library will not necessarily be able to recompile the application to use the modified definitions.) b) Use a suitable shared library mechanism for linking with the Library. A suitable mechanism is one that (1) uses at run time a copy of the library already present on the user’s computer system, rather than copying library functions into the executable, and (2) will operate properly with a modified version of the library, if the user installs one, as long as the modified version is interface-compatible with the version that the work was made with. c) Accompany the work with a written offer, valid for at least three years, to give the same user the materials specified in Subsection 6a, above, for a charge no more than the cost of performing this distribution. d) If distribution of the work is made by offering access to copy from a designated place, offer equivalent access to copy the above specified materials from the same place. e) Verify that the user has already received a copy of these materials or that you have already sent this user a copy. For an executable, the required form of the “work that uses the Library” must include any data and utility programs needed for reproducing the executable from it. However, as a special exception, the materials to be distributed need not include anything that is normally distributed (in either source or binary form) with the major components (compiler, kernel, and so on) of the operating system on which the executable runs, unless that component itself accompanies the executable.
It may happen that this requirement contradicts the license restrictions of other proprietary libraries that do not normally accompany the operating system. Such a contradiction means you cannot use both them and the Library together in an executable that you distribute.
- You may place library facilities that are a work based on the Library side-by-side in a single library together with other library facilities not covered by this License, and distribute such a combined library, provided that the separate distribution of the work based on the Library and of the other library facilities is otherwise permitted, and provided that you do these two things:
a) Accompany the combined library with a copy of the same work based on the Library, uncombined with any other library facilities. This must be distributed under the terms of the Sections above. b) Give prominent notice with the combined library of the fact that part of it is a work based on the Library, and explaining where to find the accompanying uncombined form of the same work.
-
You may not copy, modify, sublicense, link with, or distribute the Library except as expressly provided under this License. Any attempt otherwise to copy, modify, sublicense, link with, or distribute the Library is void, and will automatically terminate your rights under this License. However, parties who have received copies, or rights, from you under this License will not have their licenses terminated so long as such parties remain in full compliance.
-
You are not required to accept this License, since you have not signed it. However, nothing else grants you permission to modify or distribute the Library or its derivative works. These actions are prohibited by law if you do not accept this License. Therefore, by modifying or distributing the Library (or any work based on the Library), you indicate your acceptance of this License to do so, and all its terms and conditions for copying, distributing or modifying the Library or works based on it.
-
Each time you redistribute the Library (or any work based on the Library), the recipient automatically receives a license from the original licensor to copy, distribute, link with or modify the Library subject to these terms and conditions. You may not impose any further restrictions on the recipients’ exercise of the rights granted herein. You are not responsible for enforcing compliance by third parties with this License.
-
If, as a consequence of a court judgment or allegation of patent infringement or for any other reason (not limited to patent issues), conditions are imposed on you (whether by court order, agreement or otherwise) that contradict the conditions of this License, they do not excuse you from the conditions of this License. If you cannot distribute so as to satisfy simultaneously your obligations under this License and any other pertinent obligations, then as a consequence you may not distribute the Library at all. For example, if a patent license would not permit royalty-free redistribution of the Library by all those who receive copies directly or indirectly through you, then the only way you could satisfy both it and this License would be to refrain entirely from distribution of the Library.
If any portion of this section is held invalid or unenforceable under any particular circumstance, the balance of the section is intended to apply, and the section as a whole is intended to apply in other circumstances.
It is not the purpose of this section to induce you to infringe any patents or other property right claims or to contest validity of any such claims; this section has the sole purpose of protecting the integrity of the free software distribution system which is implemented by public license practices. Many people have made generous contributions to the wide range of software distributed through that system in reliance on consistent application of that system; it is up to the author/donor to decide if he or she is willing to distribute software through any other system and a licensee cannot impose that choice.
This section is intended to make thoroughly clear what is believed to be a consequence of the rest of this License.
-
If the distribution and/or use of the Library is restricted in certain countries either by patents or by copyrighted interfaces, the original copyright holder who places the Library under this License may add an explicit geographical distribution limitation excluding those countries, so that distribution is permitted only in or among countries not thus excluded. In such case, this License incorporates the limitation as if written in the body of this License.
-
The Free Software Foundation may publish revised and/or new versions of the Lesser General Public License from time to time. Such new versions will be similar in spirit to the present version, but may differ in detail to address new problems or concerns.
Each version is given a distinguishing version number. If the Library specifies a version number of this License which applies to it and “any later version”, you have the option of following the terms and conditions either of that version or of any later version published by the Free Software Foundation. If the Library does not specify a license version number, you may choose any version ever published by the Free Software Foundation.
- If you wish to incorporate parts of the Library into other free programs whose distribution conditions are incompatible with these, write to the author to ask for permission. For software which is copyrighted by the Free Software Foundation, write to the Free Software Foundation; we sometimes make exceptions for this. Our decision will be guided by the two goals of preserving the free status of all derivatives of our free software and of promoting the sharing and reuse of software generally.
NO WARRANTY
-
BECAUSE THE LIBRARY IS LICENSED FREE OF CHARGE, THERE IS NO WARRANTY FOR THE LIBRARY, TO THE EXTENT PERMITTED BY APPLICABLE LAW. EXCEPT WHEN OTHERWISE STATED IN WRITING THE COPYRIGHT HOLDERS AND/OR OTHER PARTIES PROVIDE THE LIBRARY “AS IS” WITHOUT WARRANTY OF ANY KIND, EITHER EXPRESSED OR IMPLIED, INCLUDING, BUT NOT LIMITED TO, THE IMPLIED WARRANTIES OF MERCHANTABILITY AND FITNESS FOR A PARTICULAR PURPOSE. THE ENTIRE RISK AS TO THE QUALITY AND PERFORMANCE OF THE LIBRARY IS WITH YOU. SHOULD THE LIBRARY PROVE DEFECTIVE, YOU ASSUME THE COST OF ALL NECESSARY SERVICING, REPAIR OR CORRECTION.
-
IN NO EVENT UNLESS REQUIRED BY APPLICABLE LAW OR AGREED TO IN WRITING WILL ANY COPYRIGHT HOLDER, OR ANY OTHER PARTY WHO MAY MODIFY AND/OR REDISTRIBUTE THE LIBRARY AS PERMITTED ABOVE, BE LIABLE TO YOU FOR DAMAGES, INCLUDING ANY GENERAL, SPECIAL, INCIDENTAL OR CONSEQUENTIAL DAMAGES ARISING OUT OF THE USE OR INABILITY TO USE THE LIBRARY (INCLUDING BUT NOT LIMITED TO LOSS OF DATA OR DATA BEING RENDERED INACCURATE OR LOSSES SUSTAINED BY YOU OR THIRD PARTIES OR A FAILURE OF THE LIBRARY TO OPERATE WITH ANY OTHER SOFTWARE), EVEN IF SUCH HOLDER OR OTHER PARTY HAS BEEN ADVISED OF THE POSSIBILITY OF SUCH DAMAGES.
END OF GNU LESSER GENERAL PUBLIC LICENSE 2.1
GNU LGPL v3
GNU LESSER GENERAL PUBLIC LICENSE Version 3, 29 June 2007
Copyright (C) 2007 Free Software Foundation, Inc. http://fsf.org/ Everyone is permitted to copy and distribute verbatim copies of this license document, but changing it is not allowed.
This version of the GNU Lesser General Public License incorporates the terms and conditions of version 3 of the GNU General Public License, supplemented by the additional permissions listed below.
- Additional Definitions.
As used herein, “this License” refers to version 3 of the GNU Lesser General Public License, and the “GNU GPL” refers to version 3 of the GNU General Public License.
“The Library” refers to a covered work governed by this License, other than an Application or a Combined Work as defined below.
An “Application” is any work that makes use of an interface provided by the Library, but which is not otherwise based on the Library. Defining a subclass of a class defined by the Library is deemed a mode of using an interface provided by the Library.
A “Combined Work” is a work produced by combining or linking an Application with the Library. The particular version of the Library with which the Combined Work was made is also called the “Linked Version”.
The “Minimal Corresponding Source” for a Combined Work means the Corresponding Source for the Combined Work, excluding any source code for portions of the Combined Work that, considered in isolation, are based on the Application, and not on the Linked Version.
The “Corresponding Application Code” for a Combined Work means the object code and/or source code for the Application, including any data and utility programs needed for reproducing the Combined Work from the Application, but excluding the System Libraries of the Combined Work.
- Exception to Section 3 of the GNU GPL.
You may convey a covered work under sections 3 and 4 of this License without being bound by section 3 of the GNU GPL.
- Conveying Modified Versions.
If you modify a copy of the Library, and, in your modifications, a facility refers to a function or data to be supplied by an Application that uses the facility (other than as an argument passed when the facility is invoked), then you may convey a copy of the modified version:
a) under this License, provided that you make a good faith effort to ensure that, in the event an Application does not supply the function or data, the facility still operates, and performs whatever part of its purpose remains meaningful, or
b) under the GNU GPL, with none of the additional permissions of this License applicable to that copy.
- Object Code Incorporating Material from Library Header Files.
The object code form of an Application may incorporate material from a header file that is part of the Library. You may convey such object code under terms of your choice, provided that, if the incorporated material is not limited to numerical parameters, data structure layouts and accessors, or small macros, inline functions and templates (ten or fewer lines in length), you do both of the following:
a) Give prominent notice with each copy of the object code that the Library is used in it and that the Library and its use are covered by this License.
b) Accompany the object code with a copy of the GNU GPL and this license document.
- Combined Works.
You may convey a Combined Work under terms of your choice that, taken together, effectively do not restrict modification of the portions of the Library contained in the Combined Work and reverse engineering for debugging such modifications, if you also do each of the following:
a) Give prominent notice with each copy of the Combined Work that the Library is used in it and that the Library and its use are covered by this License.
b) Accompany the Combined Work with a copy of the GNU GPL and this license document.
c) For a Combined Work that displays copyright notices during execution, include the copyright notice for the Library among these notices, as well as a reference directing the user to the copies of the GNU GPL and this license document.
d) Do one of the following:
   0) Convey the Minimal Corresponding Source under the terms of this License, and the Corresponding Application Code in a form suitable for, and under terms that permit, the user to recombine or relink the Application with a modified version of the Linked Version to produce a modified Combined Work, in the manner specified by section 6 of the GNU GPL for conveying Corresponding Source.

   1) Use a suitable shared library mechanism for linking with the Library.  A suitable mechanism is one that (a) uses at run time a copy of the Library already present on the user's computer system, and (b) will operate properly with a modified version of the Library that is interface-compatible with the Linked Version.
e) Provide Installation Information, but only if you would otherwise be required to provide such information under section 6 of the GNU GPL, and only to the extent that such information is necessary to install and execute a modified version of the Combined Work produced by recombining or relinking the Application with a modified version of the Linked Version. (If you use option 4d0, the Installation Information must accompany the Minimal Corresponding Source and Corresponding Application Code. If you use option 4d1, you must provide the Installation Information in the manner specified by section 6 of the GNU GPL for conveying Corresponding Source.)
- Combined Libraries.
You may place library facilities that are a work based on the Library side by side in a single library together with other library facilities that are not Applications and are not covered by this License, and convey such a combined library under terms of your choice, if you do both of the following:
a) Accompany the combined library with a copy of the same work based on the Library, uncombined with any other library facilities, conveyed under the terms of this License.
b) Give prominent notice with the combined library that part of it is a work based on the Library, and explaining where to find the accompanying uncombined form of the same work.
- Revised Versions of the GNU Lesser General Public License.
The Free Software Foundation may publish revised and/or new versions of the GNU Lesser General Public License from time to time. Such new versions will be similar in spirit to the present version, but may differ in detail to address new problems or concerns.
Each version is given a distinguishing version number. If the Library as you received it specifies that a certain numbered version of the GNU Lesser General Public License “or any later version” applies to it, you have the option of following the terms and conditions either of that published version or of any later version published by the Free Software Foundation. If the Library as you received it does not specify a version number of the GNU Lesser General Public License, you may choose any version of the GNU Lesser General Public License ever published by the Free Software Foundation.
If the Library as you received it specifies that a proxy can decide whether future versions of the GNU Lesser General Public License shall apply, that proxy’s public statement of acceptance of any version is permanent authorization for you to choose that version for the Library.
END OF GNU LESSER GENERAL PUBLIC LICENSE 3.0
Apache v2.0
                             Apache License
                       Version 2.0, January 2004
                    http://www.apache.org/licenses/
TERMS AND CONDITIONS FOR USE, REPRODUCTION, AND DISTRIBUTION
-
Definitions.
“License” shall mean the terms and conditions for use, reproduction, and distribution as defined by Sections 1 through 9 of this document.
“Licensor” shall mean the copyright owner or entity authorized by the copyright owner that is granting the License.
“Legal Entity” shall mean the union of the acting entity and all other entities that control, are controlled by, or are under common control with that entity. For the purposes of this definition, “control” means (i) the power, direct or indirect, to cause the direction or management of such entity, whether by contract or otherwise, or (ii) ownership of fifty percent (50%) or more of the outstanding shares, or (iii) beneficial ownership of such entity.
“You” (or “Your”) shall mean an individual or Legal Entity exercising permissions granted by this License.
“Source” form shall mean the preferred form for making modifications, including but not limited to software source code, documentation source, and configuration files.
“Object” form shall mean any form resulting from mechanical transformation or translation of a Source form, including but not limited to compiled object code, generated documentation, and conversions to other media types.
“Work” shall mean the work of authorship, whether in Source or Object form, made available under the License, as indicated by a copyright notice that is included in or attached to the work (an example is provided in the Appendix below).
“Derivative Works” shall mean any work, whether in Source or Object form, that is based on (or derived from) the Work and for which the editorial revisions, annotations, elaborations, or other modifications represent, as a whole, an original work of authorship. For the purposes of this License, Derivative Works shall not include works that remain separable from, or merely link (or bind by name) to the interfaces of, the Work and Derivative Works thereof.
“Contribution” shall mean any work of authorship, including the original version of the Work and any modifications or additions to that Work or Derivative Works thereof, that is intentionally submitted to Licensor for inclusion in the Work by the copyright owner or by an individual or Legal Entity authorized to submit on behalf of the copyright owner. For the purposes of this definition, “submitted” means any form of electronic, verbal, or written communication sent to the Licensor or its representatives, including but not limited to communication on electronic mailing lists, source code control systems, and issue tracking systems that are managed by, or on behalf of, the Licensor for the purpose of discussing and improving the Work, but excluding communication that is conspicuously marked or otherwise designated in writing by the copyright owner as “Not a Contribution.”
“Contributor” shall mean Licensor and any individual or Legal Entity on behalf of whom a Contribution has been received by Licensor and subsequently incorporated within the Work.
-
Grant of Copyright License. Subject to the terms and conditions of this License, each Contributor hereby grants to You a perpetual, worldwide, non-exclusive, no-charge, royalty-free, irrevocable copyright license to reproduce, prepare Derivative Works of, publicly display, publicly perform, sublicense, and distribute the Work and such Derivative Works in Source or Object form.
-
Grant of Patent License. Subject to the terms and conditions of this License, each Contributor hereby grants to You a perpetual, worldwide, non-exclusive, no-charge, royalty-free, irrevocable (except as stated in this section) patent license to make, have made, use, offer to sell, sell, import, and otherwise transfer the Work, where such license applies only to those patent claims licensable by such Contributor that are necessarily infringed by their Contribution(s) alone or by combination of their Contribution(s) with the Work to which such Contribution(s) was submitted. If You institute patent litigation against any entity (including a cross-claim or counterclaim in a lawsuit) alleging that the Work or a Contribution incorporated within the Work constitutes direct or contributory patent infringement, then any patent licenses granted to You under this License for that Work shall terminate as of the date such litigation is filed.
-
Redistribution. You may reproduce and distribute copies of the Work or Derivative Works thereof in any medium, with or without modifications, and in Source or Object form, provided that You meet the following conditions:
(a) You must give any other recipients of the Work or Derivative Works a copy of this License; and
(b) You must cause any modified files to carry prominent notices stating that You changed the files; and
(c) You must retain, in the Source form of any Derivative Works that You distribute, all copyright, patent, trademark, and attribution notices from the Source form of the Work, excluding those notices that do not pertain to any part of the Derivative Works; and
(d) If the Work includes a “NOTICE” text file as part of its distribution, then any Derivative Works that You distribute must include a readable copy of the attribution notices contained within such NOTICE file, excluding those notices that do not pertain to any part of the Derivative Works, in at least one of the following places: within a NOTICE text file distributed as part of the Derivative Works; within the Source form or documentation, if provided along with the Derivative Works; or, within a display generated by the Derivative Works, if and wherever such third-party notices normally appear. The contents of the NOTICE file are for informational purposes only and do not modify the License. You may add Your own attribution notices within Derivative Works that You distribute, alongside or as an addendum to the NOTICE text from the Work, provided that such additional attribution notices cannot be construed as modifying the License.
You may add Your own copyright statement to Your modifications and may provide additional or different license terms and conditions for use, reproduction, or distribution of Your modifications, or for any such Derivative Works as a whole, provided Your use, reproduction, and distribution of the Work otherwise complies with the conditions stated in this License.
-
Submission of Contributions. Unless You explicitly state otherwise, any Contribution intentionally submitted for inclusion in the Work by You to the Licensor shall be under the terms and conditions of this License, without any additional terms or conditions. Notwithstanding the above, nothing herein shall supersede or modify the terms of any separate license agreement you may have executed with Licensor regarding such Contributions.
-
Trademarks. This License does not grant permission to use the trade names, trademarks, service marks, or product names of the Licensor, except as required for reasonable and customary use in describing the origin of the Work and reproducing the content of the NOTICE file.
-
Disclaimer of Warranty. Unless required by applicable law or agreed to in writing, Licensor provides the Work (and each Contributor provides its Contributions) on an “AS IS” BASIS, WITHOUT WARRANTIES OR CONDITIONS OF ANY KIND, either express or implied, including, without limitation, any warranties or conditions of TITLE, NON-INFRINGEMENT, MERCHANTABILITY, or FITNESS FOR A PARTICULAR PURPOSE. You are solely responsible for determining the appropriateness of using or redistributing the Work and assume any risks associated with Your exercise of permissions under this License.
-
Limitation of Liability. In no event and under no legal theory, whether in tort (including negligence), contract, or otherwise, unless required by applicable law (such as deliberate and grossly negligent acts) or agreed to in writing, shall any Contributor be liable to You for damages, including any direct, indirect, special, incidental, or consequential damages of any character arising as a result of this License or out of the use or inability to use the Work (including but not limited to damages for loss of goodwill, work stoppage, computer failure or malfunction, or any and all other commercial damages or losses), even if such Contributor has been advised of the possibility of such damages.
-
Accepting Warranty or Additional Liability. While redistributing the Work or Derivative Works thereof, You may choose to offer, and charge a fee for, acceptance of support, warranty, indemnity, or other liability obligations and/or rights consistent with this License. However, in accepting such obligations, You may act only on Your own behalf and on Your sole responsibility, not on behalf of any other Contributor, and only if You agree to indemnify, defend, and hold each Contributor harmless for any liability incurred by, or claims asserted against, such Contributor by reason of your accepting any such warranty or additional liability.
END OF TERMS AND CONDITIONS
OpenEXR
Copyright (c) 2006-2019 OpenEXR a Series of LF Projects, LLC. All rights reserved.
Redistribution and use in source and binary forms, with or without modification, are permitted provided that the following conditions are met:
Redistributions of source code must retain the above copyright notice, this list of conditions and the following disclaimer. Redistributions in binary form must reproduce the above copyright notice, this list of conditions and the following disclaimer in the documentation and/or other materials provided with the distribution. Neither the name of the copyright holder nor the names of its contributors may be used to endorse or promote products derived from this software without specific prior written permission. THIS SOFTWARE IS PROVIDED BY THE COPYRIGHT HOLDERS AND CONTRIBUTORS “AS IS” AND ANY EXPRESS OR IMPLIED WARRANTIES, INCLUDING, BUT NOT LIMITED TO, THE IMPLIED WARRANTIES OF MERCHANTABILITY AND FITNESS FOR A PARTICULAR PURPOSE ARE DISCLAIMED. IN NO EVENT SHALL THE COPYRIGHT OWNER OR CONTRIBUTORS BE LIABLE FOR ANY DIRECT, INDIRECT, INCIDENTAL, SPECIAL, EXEMPLARY, OR CONSEQUENTIAL DAMAGES (INCLUDING, BUT NOT LIMITED TO, PROCUREMENT OF SUBSTITUTE GOODS OR SERVICES; LOSS OF USE, DATA, OR PROFITS; OR BUSINESS INTERRUPTION) HOWEVER CAUSED AND ON ANY THEORY OF LIABILITY, WHETHER IN CONTRACT, STRICT LIABILITY, OR TORT (INCLUDING NEGLIGENCE OR OTHERWISE) ARISING IN ANY WAY OUT OF THE USE OF THIS SOFTWARE, EVEN IF ADVISED OF THE POSSIBILITY OF SUCH DAMAGE.
© 2022 Copyright OpenEXR a Series of LF Projects, LLC and/or its contributors. All documentation on this website made available under a Creative Commons Attribution 4.0 International License. All rights reserved.
ORSerialPort
Copyright (c) 2011-2012 Andrew R. Madsen (andrew@openreelsoftware.com)
Permission is hereby granted, free of charge, to any person obtaining a copy of this software and associated documentation files (the “Software”), to deal in the Software without restriction, including without limitation the rights to use, copy, modify, merge, publish, distribute, sublicense, and/or sell copies of the Software, and to permit persons to whom the Software is furnished to do so, subject to the following conditions:
The above copyright notice and this permission notice shall be included in all copies or substantial portions of the Software.
THE SOFTWARE IS PROVIDED “AS IS”, WITHOUT WARRANTY OF ANY KIND, EXPRESS OR IMPLIED, INCLUDING BUT NOT LIMITED TO THE WARRANTIES OF MERCHANTABILITY, FITNESS FOR A PARTICULAR PURPOSE AND NONINFRINGEMENT. IN NO EVENT SHALL THE AUTHORS OR COPYRIGHT HOLDERS BE LIABLE FOR ANY CLAIM, DAMAGES OR OTHER LIABILITY, WHETHER IN AN ACTION OF CONTRACT, TORT OR OTHERWISE, ARISING FROM, OUT OF OR IN CONNECTION WITH THE SOFTWARE OR THE USE OR OTHER DEALINGS IN THE SOFTWARE.
peertallk
Copyright (c) 2012 Rasmus Andersson http://rsms.me/
Permission is hereby granted, free of charge, to any person obtaining a copy of this software and associated documentation files (the “Software”), to deal in the Software without restriction, including without limitation the rights to use, copy, modify, merge, publish, distribute, sublicense, and/or sell copies of the Software, and to permit persons to whom the Software is furnished to do so, subject to the following conditions:
The above copyright notice and this permission notice shall be included in all copies or substantial portions of the Software.
THE SOFTWARE IS PROVIDED “AS IS”, WITHOUT WARRANTY OF ANY KIND, EXPRESS OR IMPLIED, INCLUDING BUT NOT LIMITED TO THE WARRANTIES OF MERCHANTABILITY, FITNESS FOR A PARTICULAR PURPOSE AND NONINFRINGEMENT. IN NO EVENT SHALL THE AUTHORS OR COPYRIGHT HOLDERS BE LIABLE FOR ANY CLAIM, DAMAGES OR OTHER LIABILITY, WHETHER IN AN ACTION OF CONTRACT, TORT OR OTHERWISE, ARISING FROM, OUT OF OR IN CONNECTION WITH THE SOFTWARE OR THE USE OR OTHER DEALINGS IN THE SOFTWARE.
Sparkle
Copyright (c) 2006-2013 Andy Matuschak. Copyright (c) 2009-2013 Elgato Systems GmbH. Copyright (c) 2011-2014 Kornel Lesiński. Copyright (c) 2015-2017 Mayur Pawashe. Copyright (c) 2014 C.W. Betts. Copyright (c) 2014 Petroules Corporation. Copyright (c) 2014 Big Nerd Ranch. All rights reserved.
Permission is hereby granted, free of charge, to any person obtaining a copy of this software and associated documentation files (the “Software”), to deal in the Software without restriction, including without limitation the rights to use, copy, modify, merge, publish, distribute, sublicense, and/or sell copies of the Software, and to permit persons to whom the Software is furnished to do so, subject to the following conditions:
The above copyright notice and this permission notice shall be included in all copies or substantial portions of the Software.
THE SOFTWARE IS PROVIDED “AS IS”, WITHOUT WARRANTY OF ANY KIND, EXPRESS OR IMPLIED, INCLUDING BUT NOT LIMITED TO THE WARRANTIES OF MERCHANTABILITY, FITNESS FOR A PARTICULAR PURPOSE AND NONINFRINGEMENT. IN NO EVENT SHALL THE AUTHORS OR COPYRIGHT HOLDERS BE LIABLE FOR ANY CLAIM, DAMAGES OR OTHER LIABILITY, WHETHER IN AN ACTION OF CONTRACT, TORT OR OTHERWISE, ARISING FROM, OUT OF OR IN CONNECTION WITH THE SOFTWARE OR THE USE OR OTHER DEALINGS IN THE SOFTWARE.
EXTERNAL LICENSES
bspatch.c and bsdiff.c, from bsdiff 4.3 http://www.daemonology.net/bsdiff/: Copyright (c) 2003-2005 Colin Percival.
sais.c and sais.c, from sais-lite (2010/08/07): Copyright (c) 2008-2010 Yuta Mori.
SUDSAVerifier.m: Copyright (c) 2011 Mark Hamlin.
All rights reserved.
Redistribution and use in source and binary forms, with or without modification, are permitted providing that the following conditions are met:
- Redistributions of source code must retain the above copyright notice, this list of conditions and the following disclaimer.
- Redistributions in binary form must reproduce the above copyright notice, this list of conditions and the following disclaimer in the documentation and/or other materials provided with the distribution.
THIS SOFTWARE IS PROVIDED BY THE AUTHOR ``AS IS’’ AND ANY EXPRESS OR IMPLIED WARRANTIES, INCLUDING, BUT NOT LIMITED TO, THE IMPLIED WARRANTIES OF MERCHANTABILITY AND FITNESS FOR A PARTICULAR PURPOSE ARE DISCLAIMED. IN NO EVENT SHALL THE AUTHOR BE LIABLE FOR ANY DIRECT, INDIRECT, INCIDENTAL, SPECIAL, EXEMPLARY, OR CONSEQUENTIAL DAMAGES (INCLUDING, BUT NOT LIMITED TO, PROCUREMENT OF SUBSTITUTE GOODS OR SERVICES; LOSS OF USE, DATA, OR PROFITS; OR BUSINESS INTERRUPTION) HOWEVER CAUSED AND ON ANY THEORY OF LIABILITY, WHETHER IN CONTRACT, STRICT LIABILITY, OR TORT (INCLUDING NEGLIGENCE OR OTHERWISE) ARISING IN ANY WAY OUT OF THE USE OF THIS SOFTWARE, EVEN IF ADVISED OF THE POSSIBILITY OF SUCH DAMAGE.
STPrivilegedTask
BSD 3-Clause License
Copyright (c) 2008-2021, Sveinbjorn Thordarson All rights reserved.
Redistribution and use in source and binary forms, with or without modification, are permitted provided that the following conditions are met:
-
Redistributions of source code must retain the above copyright notice, this list of conditions and the following disclaimer.
-
Redistributions in binary form must reproduce the above copyright notice, this list of conditions and the following disclaimer in the documentation and/or other materials provided with the distribution.
-
Neither the name of the copyright holder nor the names of its contributors may be used to endorse or promote products derived from this software without specific prior written permission.
THIS SOFTWARE IS PROVIDED BY THE COPYRIGHT HOLDERS AND CONTRIBUTORS “AS IS” AND ANY EXPRESS OR IMPLIED WARRANTIES, INCLUDING, BUT NOT LIMITED TO, THE IMPLIED WARRANTIES OF MERCHANTABILITY AND FITNESS FOR A PARTICULAR PURPOSE ARE DISCLAIMED. IN NO EVENT SHALL THE COPYRIGHT HOLDER OR CONTRIBUTORS BE LIABLE FOR ANY DIRECT, INDIRECT, INCIDENTAL, SPECIAL, EXEMPLARY, OR CONSEQUENTIAL DAMAGES (INCLUDING, BUT NOT LIMITED TO, PROCUREMENT OF SUBSTITUTE GOODS OR SERVICES; LOSS OF USE, DATA, OR PROFITS; OR BUSINESS INTERRUPTION) HOWEVER CAUSED AND ON ANY THEORY OF LIABILITY, WHETHER IN CONTRACT, STRICT LIABILITY, OR TORT (INCLUDING NEGLIGENCE OR OTHERWISE) ARISING IN ANY WAY OUT OF THE USE OF THIS SOFTWARE, EVEN IF ADVISED OF THE POSSIBILITY OF SUCH DAMAGE.
websocket-kit
The MIT License (MIT)
Copyright (c) 2020 Qutheory, LLC
Permission is hereby granted, free of charge, to any person obtaining a copy of this software and associated documentation files (the “Software”), to deal in the Software without restriction, including without limitation the rights to use, copy, modify, merge, publish, distribute, sublicense, and/or sell copies of the Software, and to permit persons to whom the Software is furnished to do so, subject to the following conditions:
The above copyright notice and this permission notice shall be included in all copies or substantial portions of the Software.
THE SOFTWARE IS PROVIDED “AS IS”, WITHOUT WARRANTY OF ANY KIND, EXPRESS OR IMPLIED, INCLUDING BUT NOT LIMITED TO THE WARRANTIES OF MERCHANTABILITY, FITNESS FOR A PARTICULAR PURPOSE AND NONINFRINGEMENT. IN NO EVENT SHALL THE AUTHORS OR COPYRIGHT HOLDERS BE LIABLE FOR ANY CLAIM, DAMAGES OR OTHER LIABILITY, WHETHER IN AN ACTION OF CONTRACT, TORT OR OTHERWISE, ARISING FROM, OUT OF OR IN CONNECTION WITH THE SOFTWARE OR THE USE OR OTHER DEALINGS IN THE SOFTWARE.