QOD+ USER GUIDE
Introduction
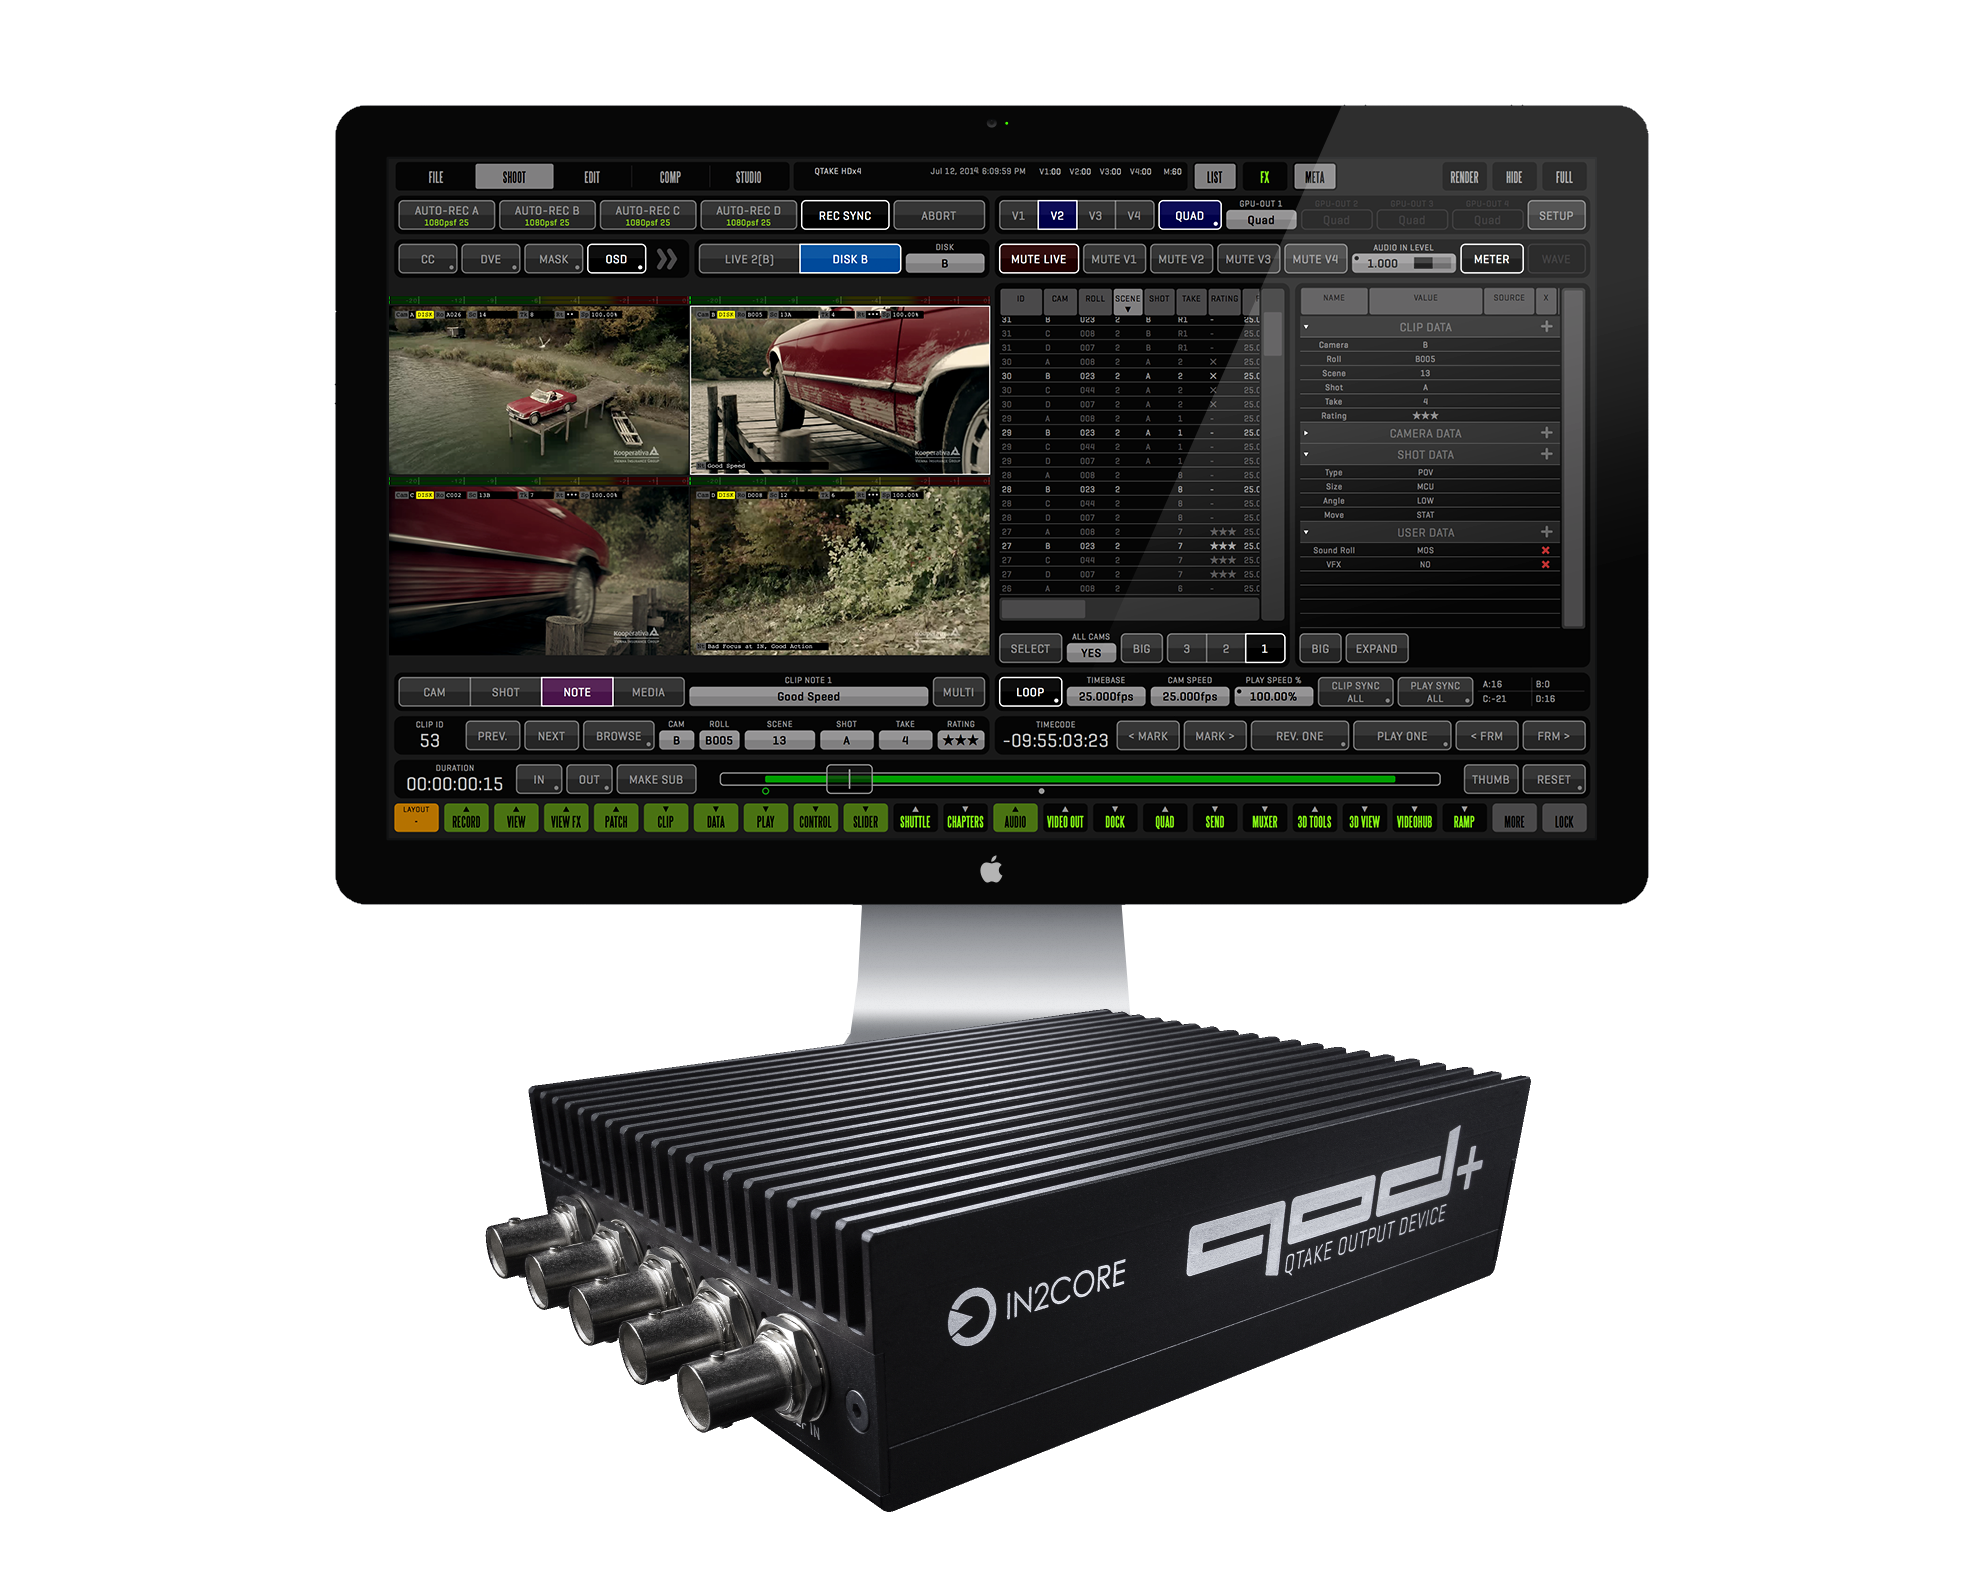
QTAKE is the most advanced software application designed and developed for video assist professionals. It logs, captures, playbacks, edits, and processes video output of Digital Cinema Cameras as well as traditional film cameras with a video tap.
The QTAKE Output Device - QOD+ is the ultimate hardware device developed by IN2CORE to provide a superior solution for GPU-driven low-latency video output. It supports up to four independent 3G SDI outputs or a single UHD output. QOD+ is a fanless version of the previous QOD model, thus providing entirely silent operation.
HOW IT WORKS
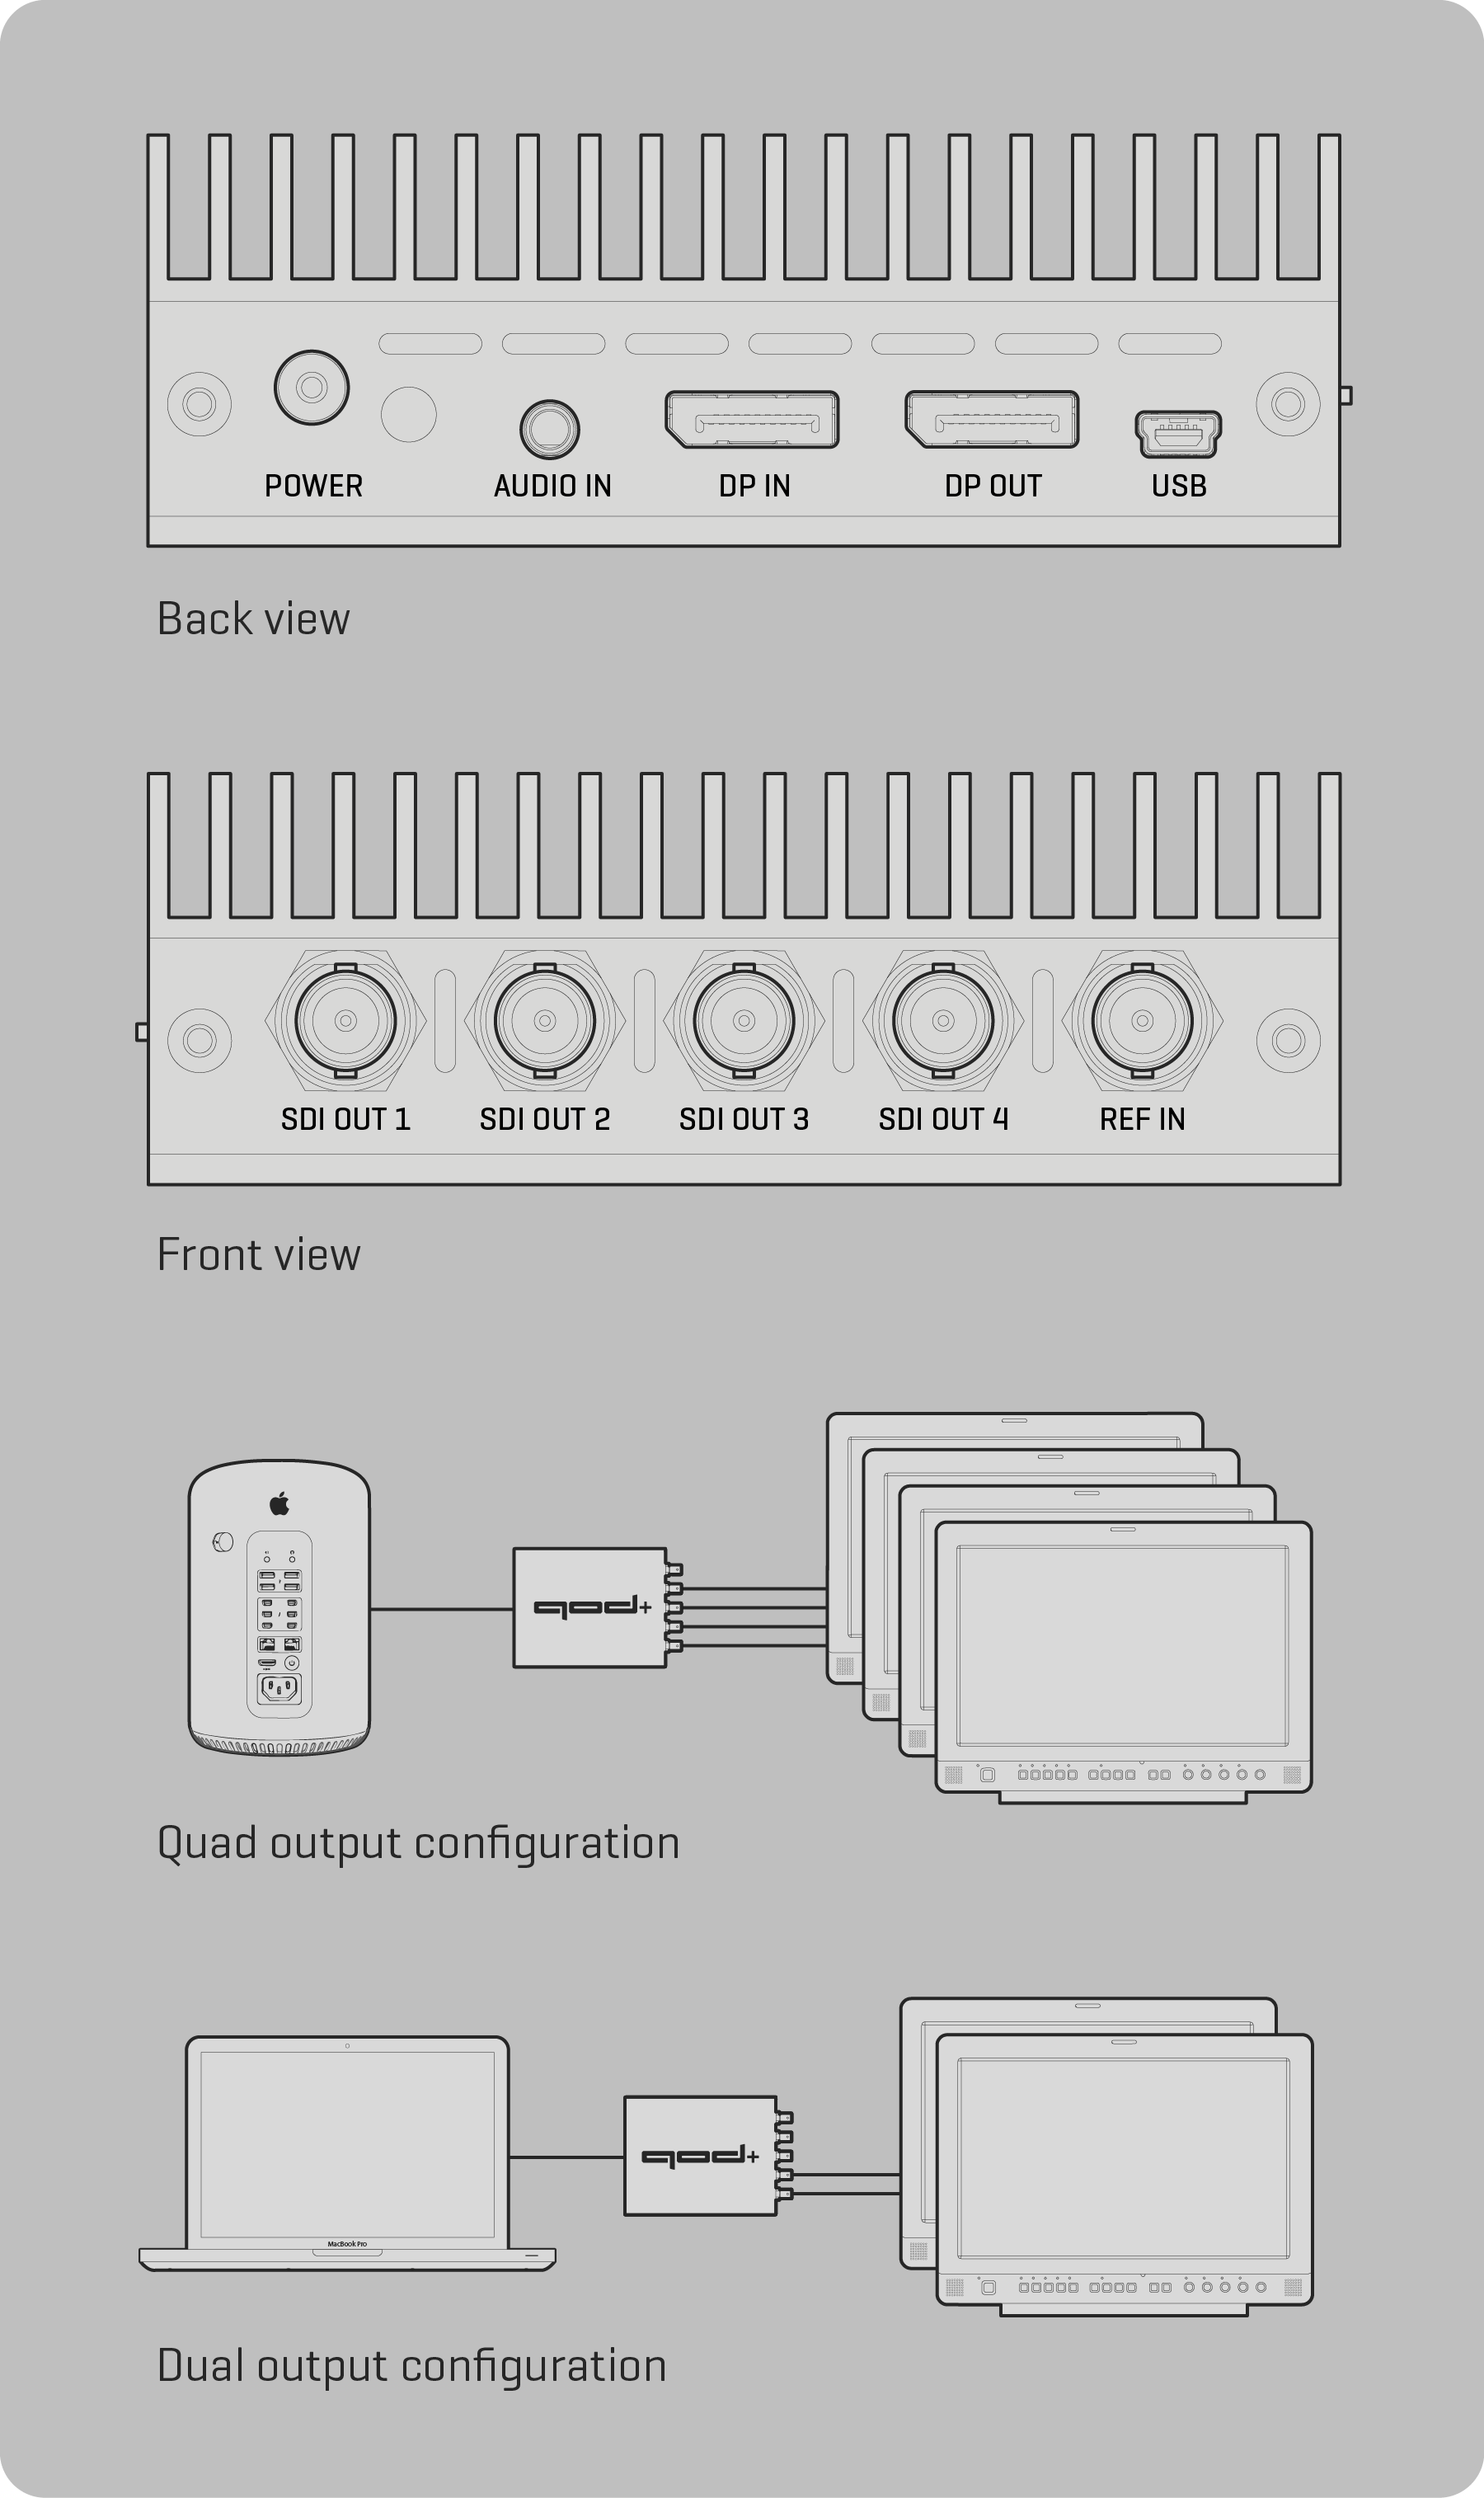
QOD+ converts the DisplayPort output of your Mac to four independent SDI outputs supporting all standard HD-SDI and 3G-SDI frame rates. When you connect QOD+ to your Mac, it is detected as an external monitor.
The QOD+ can operate in two modes:
- STANDALONE, where settings are adjusted by the DIP switches on the side of the device,
- USB CONNECTED, where the QOD+ is controlled by QTAKE via USB connection (only QTAKE version 1.2 or later supports “connected” mode).
SYSTEM REQUIREMENTS
The following are minimum hardware and software system requirements:
- Apple Mac computer with DisplayPort or Thunderbolt output running OS X 10.10.5 or later,
- QTAKE version 1.2 or later
QTAKE GUI DESCRIPTION IN THIS USER GUIDE REFLECTS QTAKE PRO AND DOES NOT APPLY TO OLDER VERSIONS!
If you are running QOD+ with an older version of QTAKE (version number below 1.2), you have to use DIP switches to control the QOD+ unit.
Please refer to STANDALONE OPERATION for more details.
Hardware
TECHNICAL SPECIFICATIONS
Video Input:
DisplayPort with embedded audio
Reference Input:
HD Tri-level sync input
Input formats:
1x SDI (1920x1080)
4x SDI (3840x2160)
Video Output:
4x 3G-SDI with embedded audio
DisplayPort with embedded audio
Audio Input:
DisplayPort embedded audio, up to 8 channels
3.5mm stereo analog audio (mini-jack)
Communication interface:
USB 2.0 interface with Mini-B jack input
Dimensions:
169 x 117 x 40 mm (6.65” x 4.61” x 1.58”)
Weight 770 g (1.70 lb)
Power:
Input power range 5-18V
Universal Power Supply (included)
100-240V,
50/60Hz AC input 12V,
24W max DC output
FEATURES
- Four independent SDI outputs*
- Low latency of just 1 frame**
- SDI embedded audio
- SDI embedded timecode
- Thunderbolt compatible DisplayPort input
- Analog audio input
- Genlock input
- Support for HD-SDI and 3G-SDI formats (currently only 1080 full HD)
- Interlaced, Progressive or PsF output
- UHD output support up to 60fps
- USB control directly from QTAKE software
- DIP switch control for standalone operation
- Single, compact, DC powered unit
- Future-proof design upgradable by firmware
- Fanless design for entirely silent operation
* also available with QTAKE HDx2
** output latency is 2 frames when using pulldown removal
QOD HDR OUTPUT Pro
Starting with QTAKE Pro v2.1, QOD supports High Dynamic Range output. SDI Monitors with HDR payload detection will correctly set the colorspace and other HDR metadata when connected to QOD.
BOX CONTENTS
QOD+ package includes:
- QTAKE Output Device (QOD+)
- Power supply
- USB-C-to-DisplayPort cable
- MiniUSB-to-USB cable
QOD+ Installation
General Installation
QOD+ Installation requires a few simple steps:
- Connect the DisplayPort cable to the DP IN port on the QOD+ and connect the other end (USB-C) to a USB-C/Thunderbolt port on your Mac.
- Connect the USB cable to the port labeled USB on the QOD+ and the other end to an available USB port on your Mac.
- Connect the Power supply to the QOD+.
- Start up the Mac.
Mac Pro
New Mac Pro computers have three Thunderbolt buses on the back. To avoid the QOD+ showing up as your primary monitor, connect it to Thunderbolt bus 0 (bottom two Thunderbolt connectors) and your GUI screen to bus 1 or 2. That also means you should not connect your primary monitor (GUI) to the HDMI output of your Mac Pro. See this Apple knowledge base article for more details.
QOD+ STATUS
The RGB LED next to the power jack indicates the operational state of the QOD+. When the device is booting, the LED will flash white. Red indicates that the QOD+ is waiting for the input signal, and Green indicates that the signal is acquired. When the device is in standalone mode, the LED will light yellow-green.
Operation
GENERAL OPERATION
When the QOD+ is plugged into the DisplayPort/Thunderbolt port of your Mac, the operating system will detect it as a new monitor. You can verify that macOS has detected your QOD+ in System Preferences - Displays or use the Display Menu application (see DISPLAY MENU below).
WARNING
When handling with QOD+, ensure to power off the device by disconnecting the power cord. This step is vital to prevent internal shortages when connecting or disconnecting SDI output cables.
DISPLAY MENU
If you need to change the input resolution of the QOD+ without QTAKE, use the Display Menu application.
You can download the Display Menu app from the App Store for free.
QOD+ supports following resolutions:
1920 x 1080 - Single HD output, all SDI outputs will output the same image
3840 x 2160 - Quad HD output, each SDI output is independent.
PULLDOWN REMOVAL
To ensure smooth QOD+ output, the device removes duplicated frames from the DisplayPort input signal. This results in an output format that perfectly matches the source. QTAKE enables this feature automatically upon startup if there is a USB connection to the QOD+. To enable pulldown removal in a standalone operation, please refer to the STANDALONE OPERATION chapter.
QTAKE GPU output always runs at 50Hz or 60Hz frequency. It means that 24fps video playback repeats the original frames in a 3-2-3-2 cadence to fill out 60Hz DisplayPort output. It’s called (3:2) pulldown. During the signal conversion from DisplayPort to SDI, QOD+ identifies original frames and discards repeated ones. This pulldown removal is an essential mechanism to produce smooth 24fps or 25fps SDI output. However, there is an additional frame of latency because it requires buffering - waiting to receive the next frame. To output an SDI signal with the lowest possible latency, set QOD+ to output 1080p60 or 1080i30 video mode (or 1080p50/i25 in case of 50Hz GPU output). This output mode will turn off buffering because it doesn’t perform pulldown removal.
QTAKE USB CONTROL
QTAKE controls the QOD+ operation via a USB connection.
You can change settings in the TF & QOD toolbar in the FILE room.
The TF & QOD toolbar displays the following information:


Device Selector
When using two QOD+s or QOD in combination with ThunderFace, the DEVICE Selector lets you choose the unit the TF & QOD toolbar controls.
If only one unit is connected to a Mac, the selector is grayed out.
If multiple units are detected, the selector is enabled.

QOD RESOLUTION
QOD+ Current input resolution.
QOD AUDIO
This button controls the QOD+ audio input and embedded audio output. Your options are:
None - No embedded audio in the output.
Audio In - Embedded analog line audio input in all SDI outputs.
DisplayPort2/8 - Each SDI output uses 2 out of 8 audio channels available from the DisplayPort input.
It allows each View to have independent embedded audio but is limited to stereo.
DisplayPort 8/8 - All four SDI outputs utilize all eight available audio channels from the DisplayPort input.
MUTE
Mutes the audio output if DisplayPort audio is selected. Otherwise, the button is disabled.
AUDIO LEVEL
Adjusts the audio level output if DisplayPort audio is selected. Otherwise, the input field is disabled
TEMP
QOD+ internal temperature. QTAKE will notify you with a message in the status bar if the QOD+ temperature exceeds 76 Celsius. The QOD+ will shut down if the internal temperature reaches 85 Celsius to prevent internal components damage.
SERIAL NUMBER
Serial number of the QOD+.
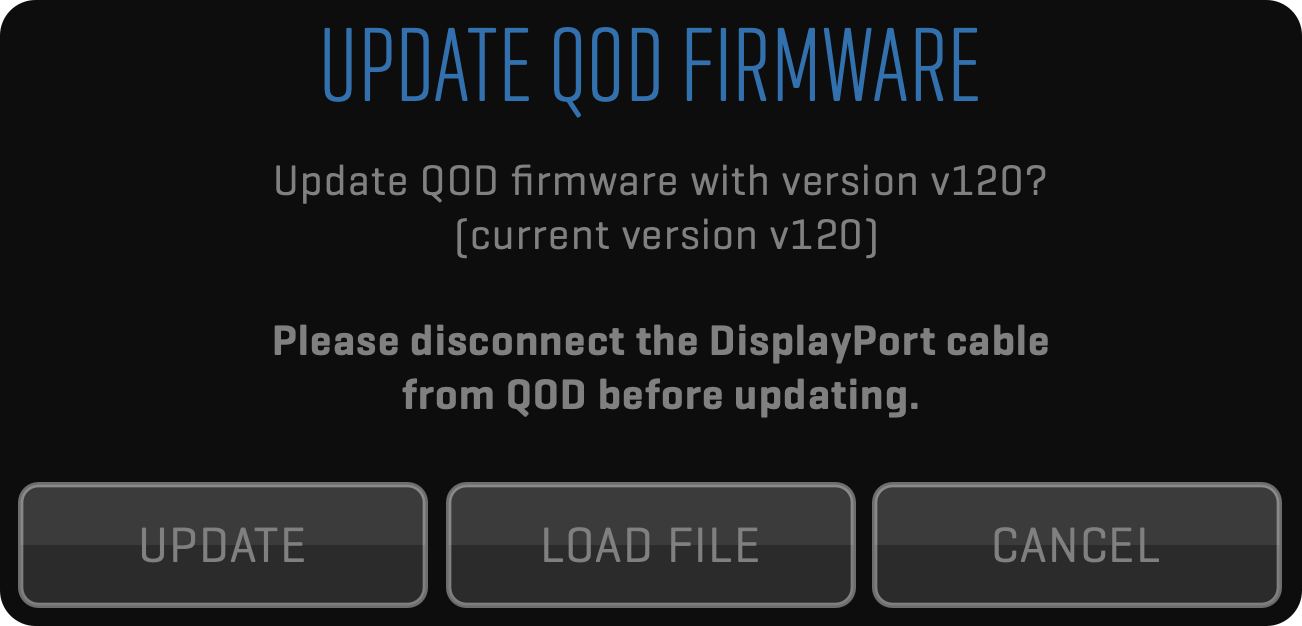
UPDATE FIRMWARE
The QOD+ contains a programmable chip that you can upgrade to apply bug fixes or additional functionality. It is bundled with the latest firmware binary. Do not attempt to downgrade the QOD+ by updating the firmware from an older version of QTAKE.
Use this button to update the QOD+ firmware. After updating the firmware, you need to quit QTAKE and power-cycle QOD+. Once the macOS detects the QOD+, you can start the QTAKE application.
Make sure to follow instructions during the update process.
* Disconnect DisplayPort when instructed.
* At the end of the update process, quit QTAKE.
* Unplug QOD’s power cable.
* Reconnect DisplayPort.
* Power QOD+ back on.
* Launch QTAKE.
RESET
This button performs QOD+ soft reset.
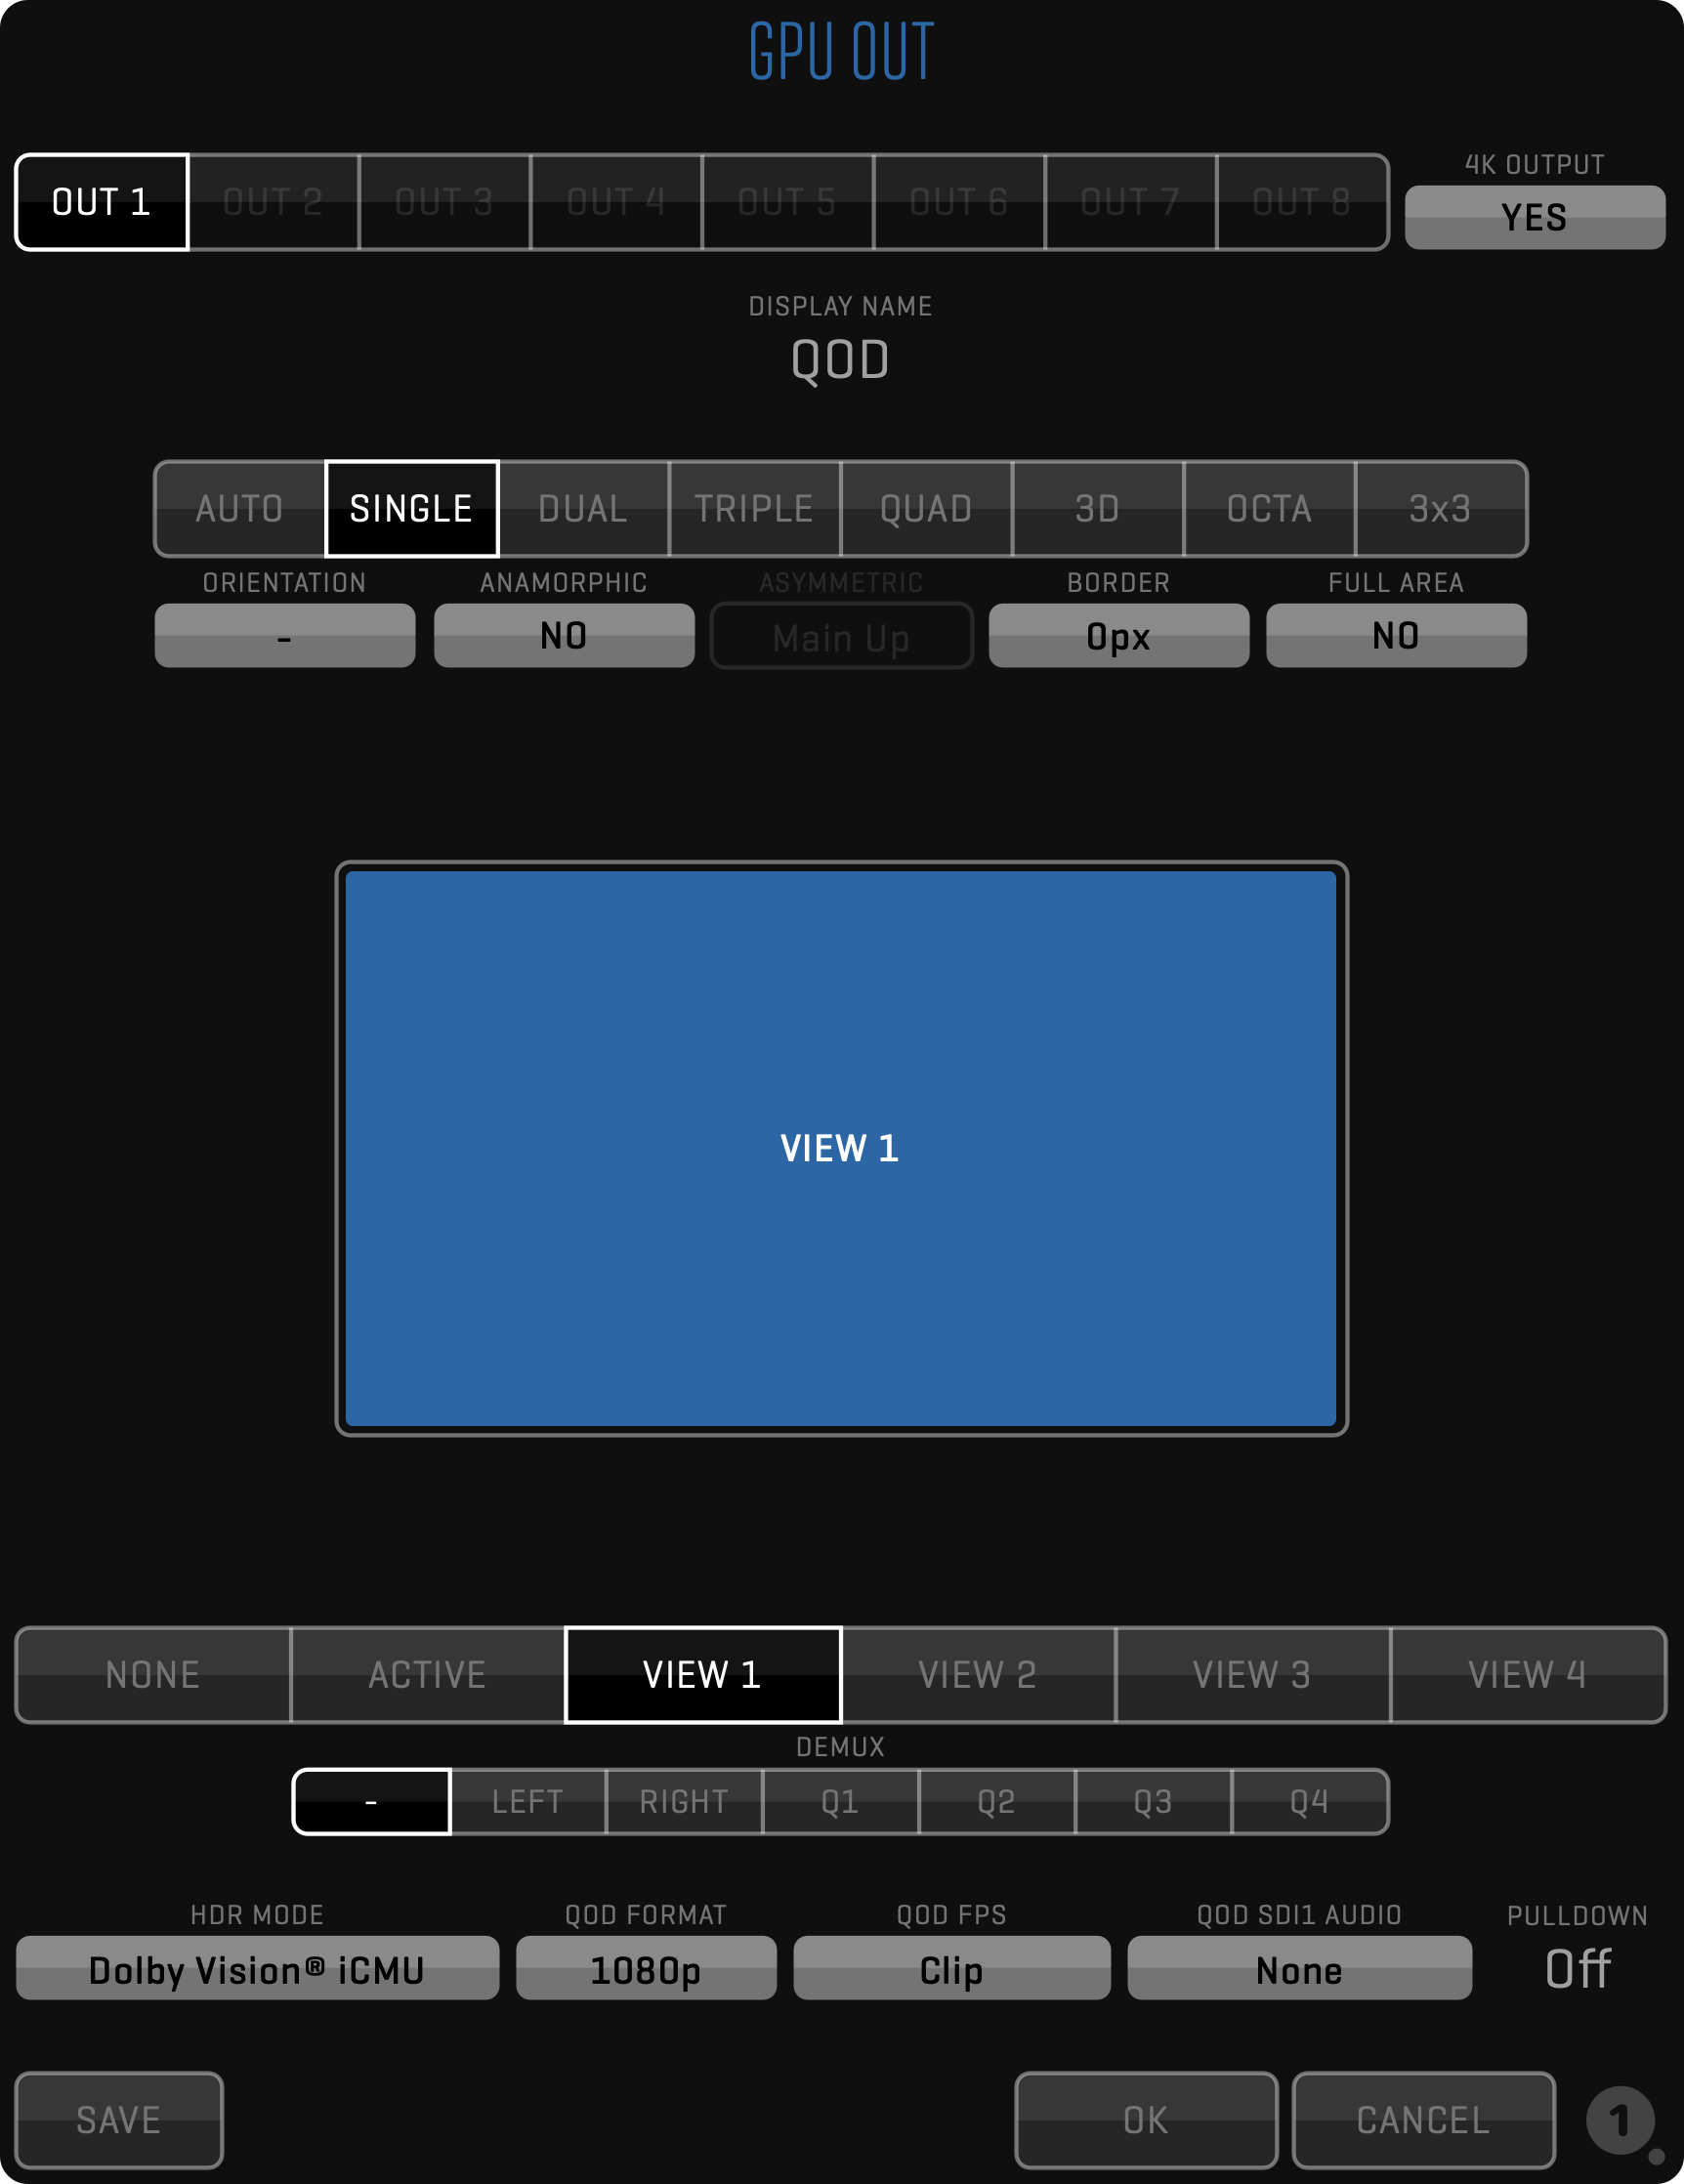
GPU OUT SETTINGS
The GPU OUT window controls QOD+ output channels.
QOD FORMAT can be set to either 1080p, 1080i or 1080psf.
QOD FPS can be set from 23.976 to 60, Clip or Input.
Setting QOD+ FPS to Clip means that QOD+ will output a signal at the same frequency as the clip in the corresponding View.
Setting QOD+ FPS to Input means that QOD+ will output a signal at the same frequency as the LIVE input in the corresponding View.
The QOD AUDIO setting is the same as in the TF & QOD toolbar and applies to all outputs.
You can set each GPU OUT to a different LAYOUT MODE.
- AUTO Output layout follows the operator screen
- SINGLE Outputs the selected View in fullscreen
- DUAL Outputs two Views on a single output
- TRIPLE Outputs three Views
- QUAD Outputs four Views
- 3D Outputs stereoscopic output
- OCTA Outputs eight Views
- 3x3 Outputs 3x3 Views grid
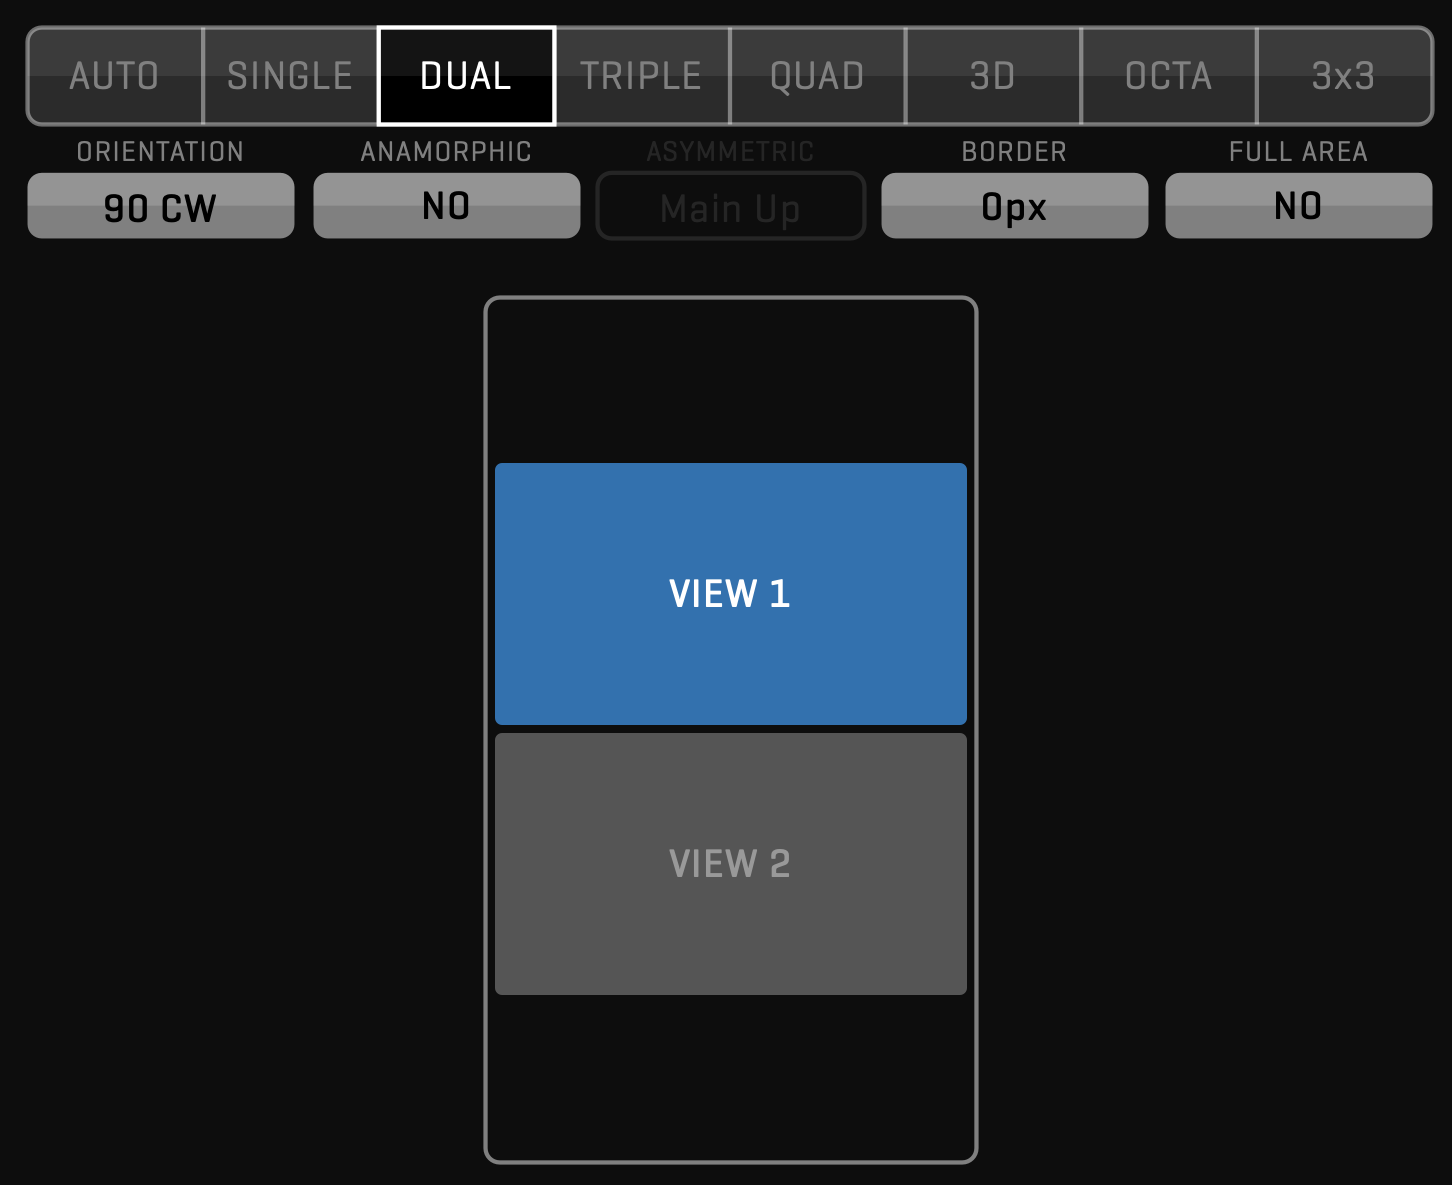
When you set the layout mode to output multiple Views (DUAL, TRIPLE, …) you can set the content of each section independently. The BORDER value determines how much space is added between the Views. In the TRIPLE or QUAD View, you have the option of setting the ASYMMETRIC layout mode. One View occupies the majority of the screen space, allowing you to focus on a single View while still displaying the other Views.
When GPU OUT is set to 3D layout you can also set the 3D OUTPUT MODE to match the 3D input format that your monitor expects.
SINGLE EYE OUTPUT enables viewing of a single eye on a 3D monitor.
3D Stereoscopic video output
3D Output can be used with 3D monitors that support side-by-side, line-by-line or DLP mesh input. QTAKE will make sure both video channels (left and right eye) are in sync in LIVE, RECORD, or PLAYBACK mode. Use RECORD SYNC for recording and PLAY SYNC for playback. Enable CLIP SYNC for synchronized browsing of left and right eye clips.
If you need to render out combined 3D frame, you need to use
STEREOtoolbar in COMPOSITE Room, instead of 3D video output.
ORIENTATION
Allows you to maximize the screen space available to display video by rotating the sections 90 degrees clockwise, counterclockwise, or 180 degrees. This requires you to also mount the output monitor accordingly. In case orientation is set, the GPU OUT toolbar will have the letter “R” next to the respective output number.
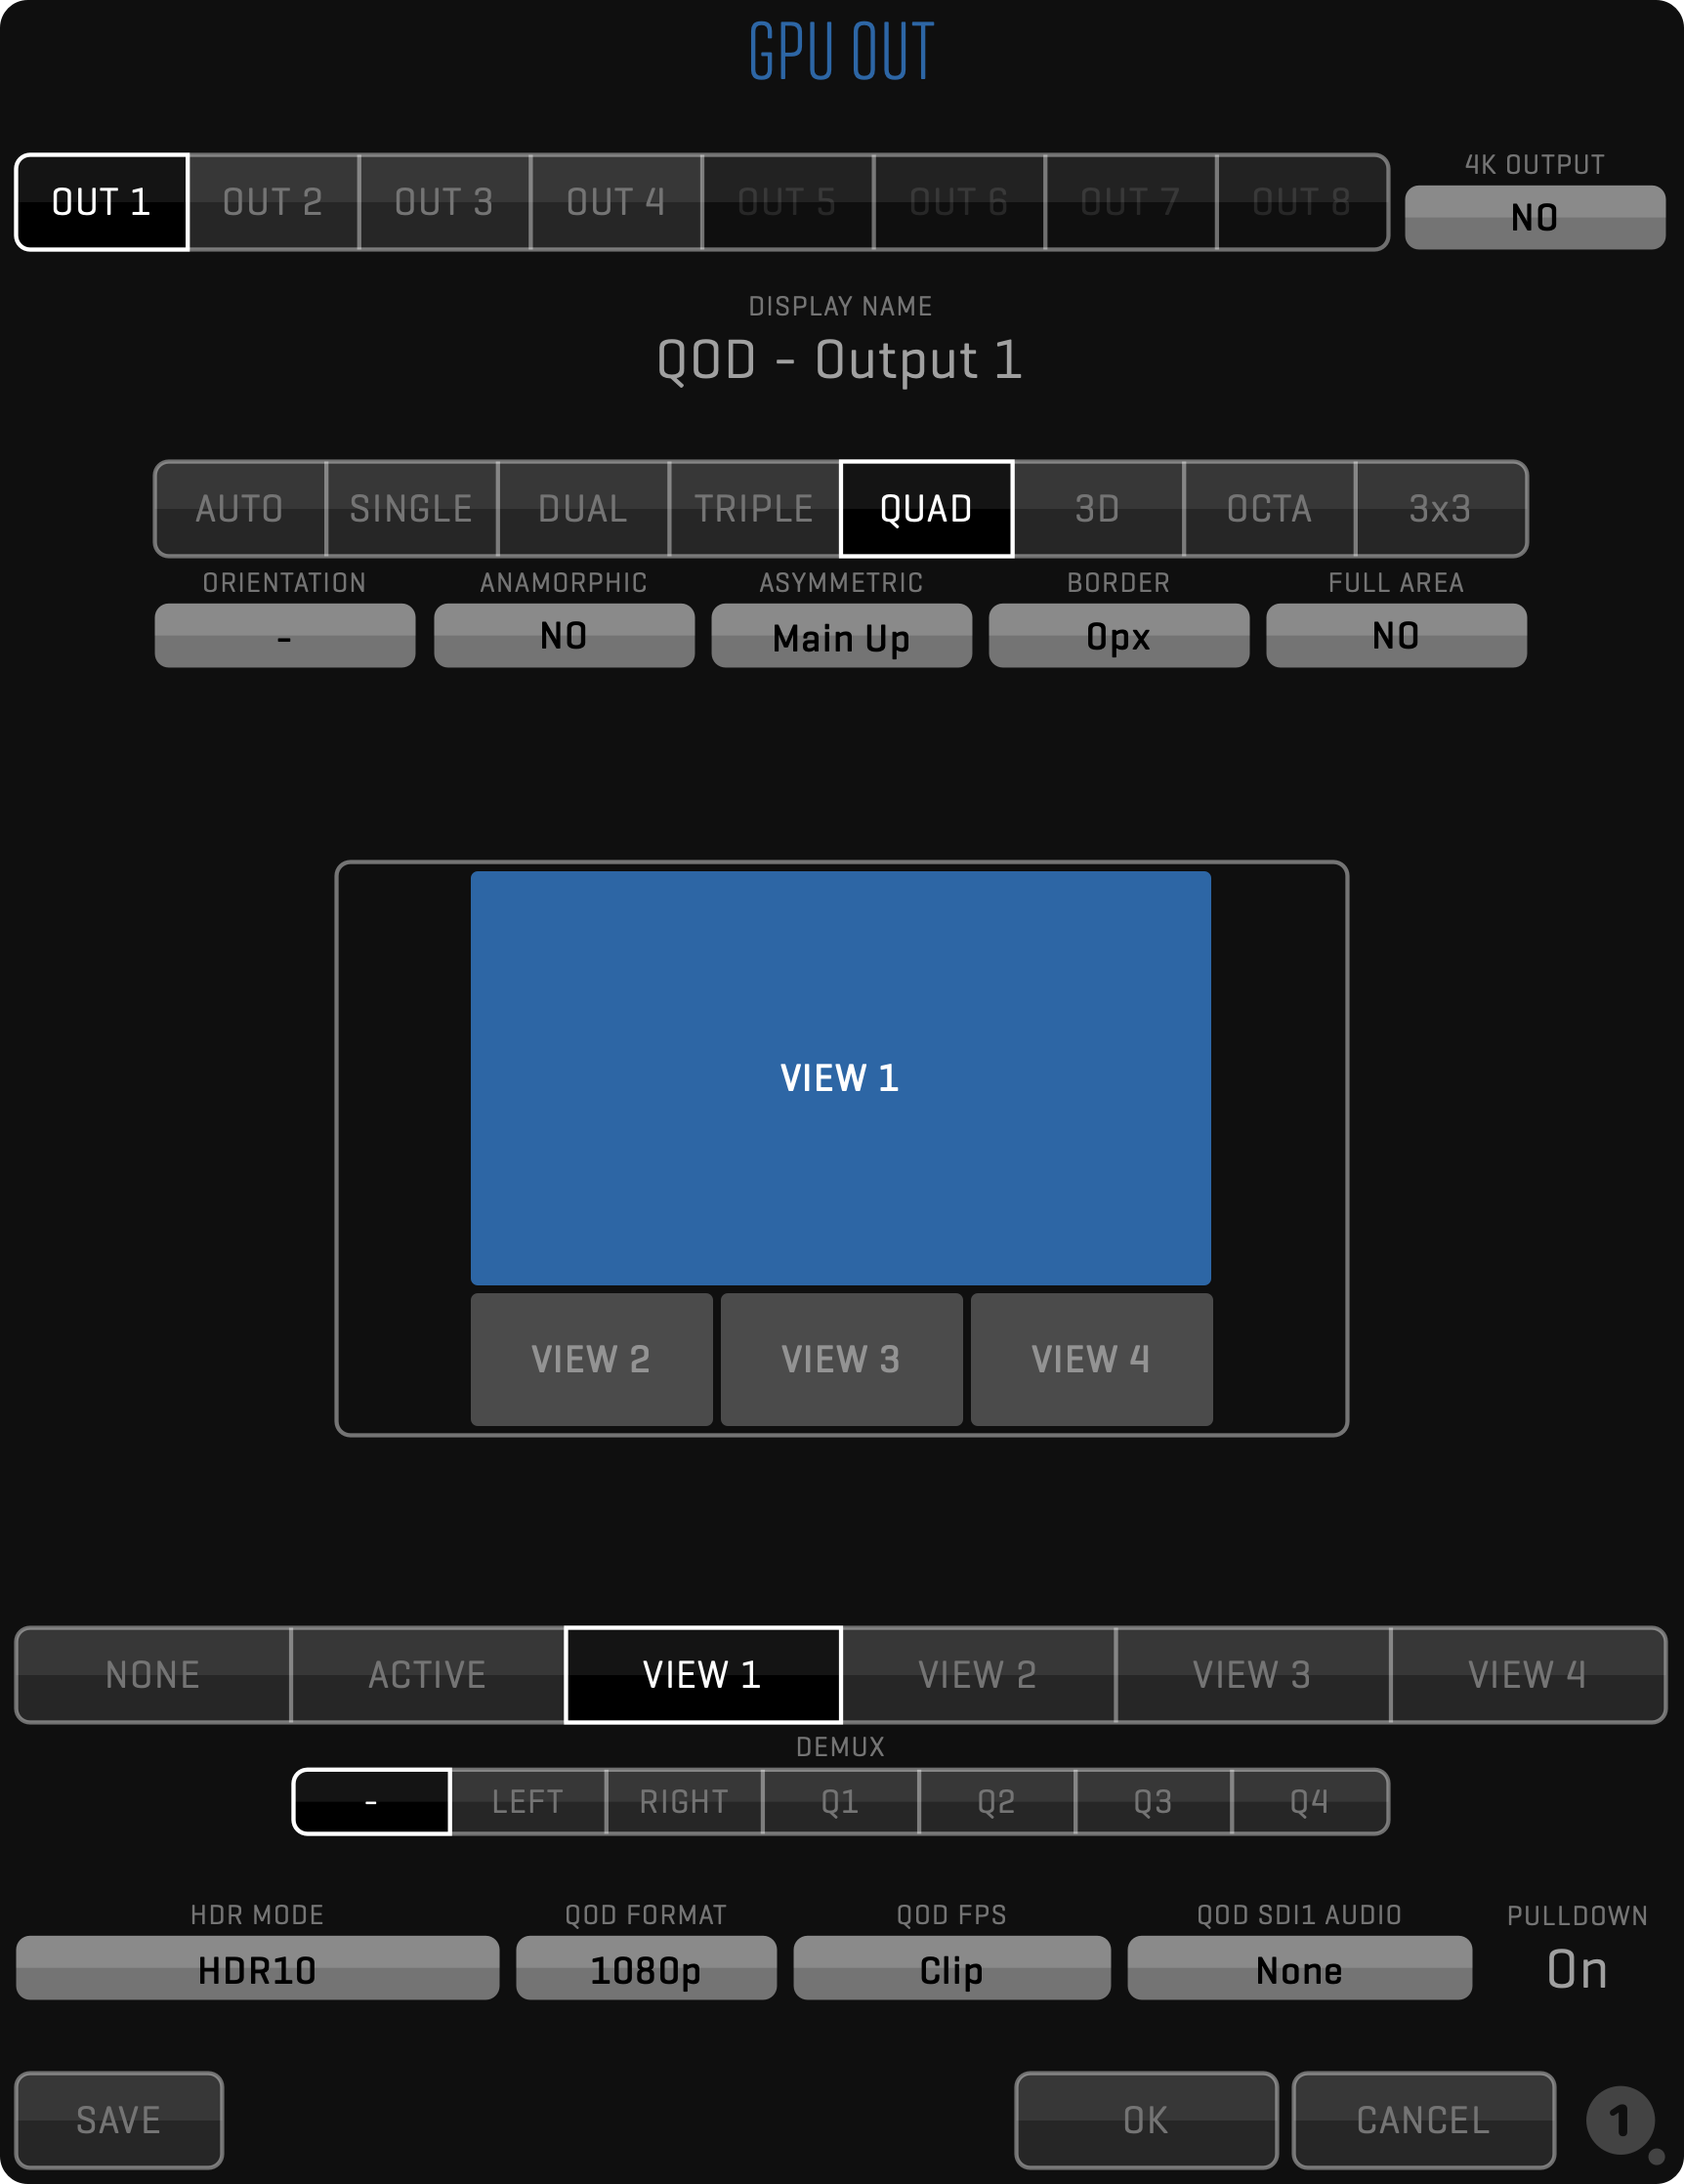
4K OUTPUT
Since QOD+ has four 3G SDI connectors, you achieve 4K output by using all four output connectors. QTAKE sends one quadrant of 4K resolution into each QOD+ SDI OUT connector. Therefore your monitor has to support quad link SDI to display the 4K QOD output. Alternatively, you can use a 4x3G -> 12G SDI or 4x3G -> HDMI converter to get QOD 4K output into your monitoring device.

|

|
|
|
|
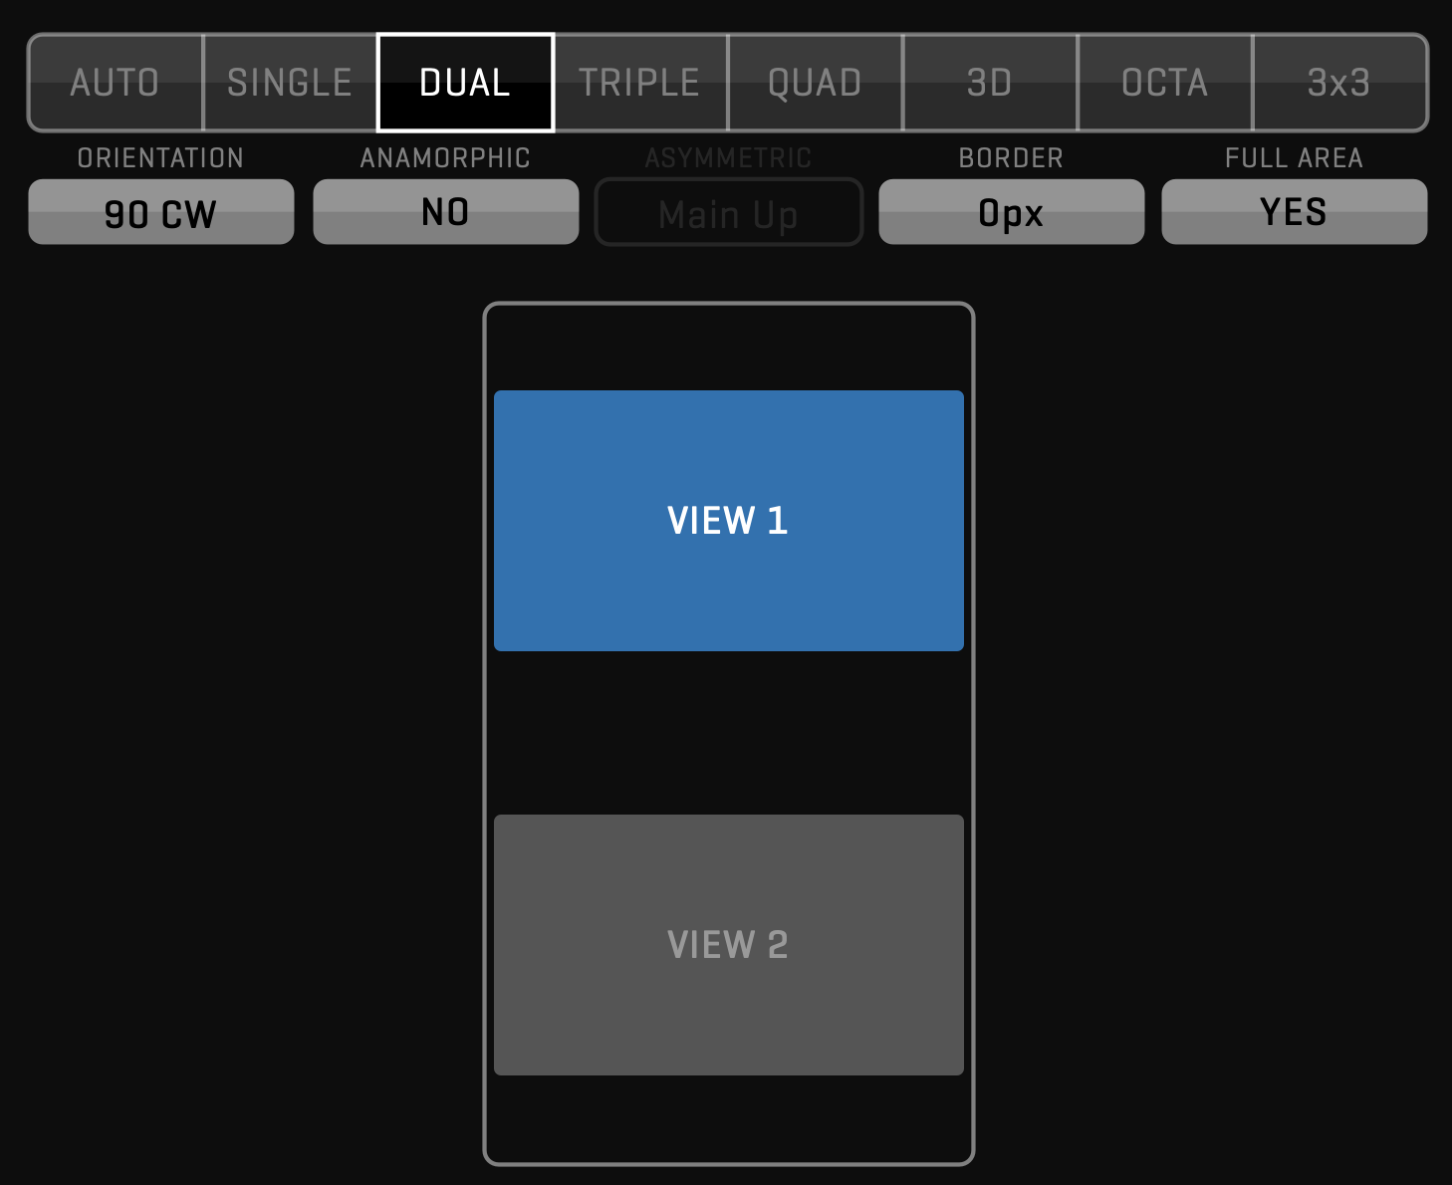
FULL AREA MODE Pro
FULL AREA selector determines the layout distribution of the Views. By default, the selector is set to NO distributing the Views from the center of the screen. If you set it to YES, Views will be distributed to cover the whole screen, which may create gaps between the Views. The effects of this selector are most apparent when changing orientation to 90 degrees or using the ANAMORPHIC option.
|
|
HDR MODE Pro
To read more about QTAKE SDI HDR output, refer to this section of the QTAKE Pro User guide.
- HDR10 - The default HDR mode.
- Dolby Vision® Meta - Adds Dolby Vision metadata with SDI signal that can be read by compatible devices (e.g. eCMU, another QTAKE system).
- Dolby Vision® iCMU - Applies iCMU for SDI output. This mode does not require an HDR monitor.
SAVE BUTTON
The button allows you to save the current GPU OUT configuration as the default setting. Once saved, this configuration becomes the preset for all new projects, eliminating the need to manually configure GPU OUT settings each time.
This function streamlines your workflow by automatically loading your preferred GPU OUT configuration whenever you initiate a new project, ensuring efficiency and consistency.
QOD+ DIP SWITCH CONTROL
When using QOD+ with another software or no USB connection is available, you can set the QOD+ operational modes via DIP switches. Refer to the image below to set the requested modes. More details are available in the STANDALONE OPERATION section.
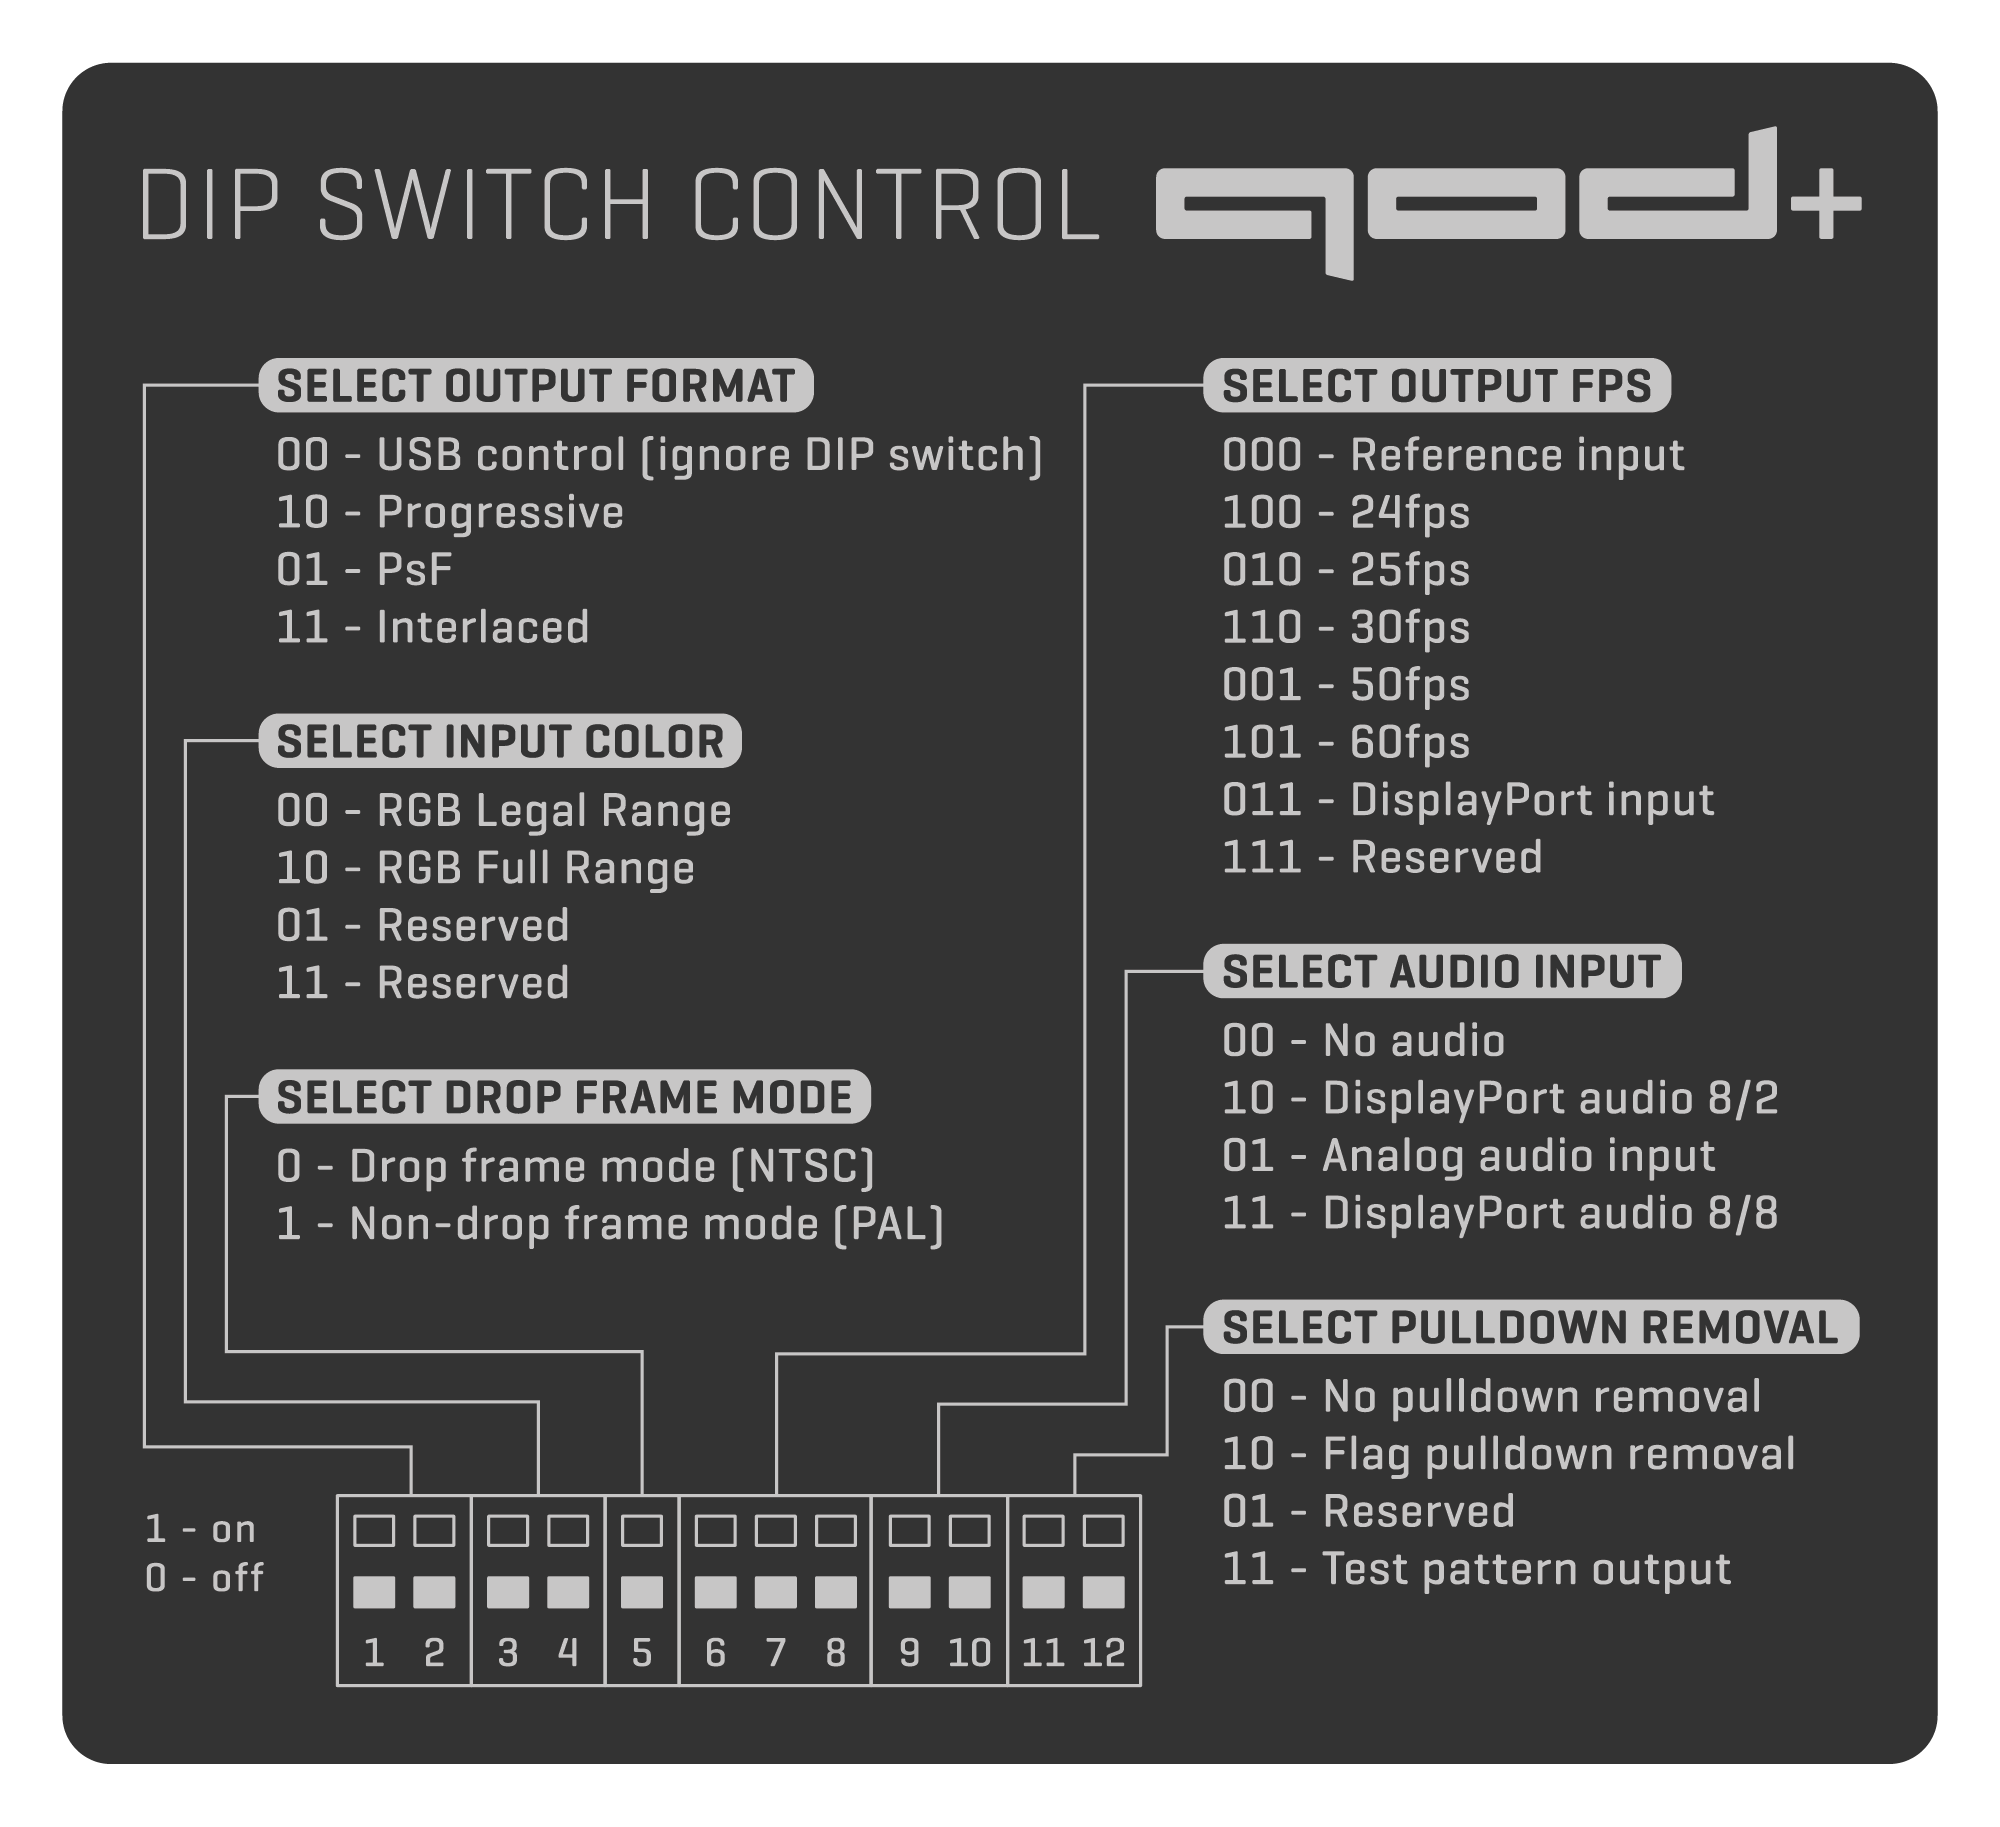
STANDALONE OPERATION
You can use 12 DIP switches on the side of the QOD+ to set the QOD+ into standalone operation mode. When you set the QOD+ into standalone mode, it will ignore commands and communication sent through the USB interface. The DIP switches control the following options: (1 = on, 0 = off).
DIP Switches |
1 |
2 |
3 |
4 |
5 |
6 |
7 |
8 |
9 |
10 |
11 |
12 |
Note |
|
|---|---|---|---|---|---|---|---|---|---|---|---|---|---|---|
| Output Format | USB Control | 0 | 0 | Ignores DIP switches | ||||||||||
| Progressive | 1 | 0 | Standalone mode | |||||||||||
| PsF | 0 | 1 | Standalone mode | |||||||||||
| Interlaced | 1 | 1 | Standalone mode | |||||||||||
| Input Color | RGB Legal Range | 0 | 0 | |||||||||||
| RGB Full Range | 1 | 0 | ||||||||||||
| Reserved | 0 | 1 | ||||||||||||
| Reserved | 1 | 1 | ||||||||||||
| Frame Mode | Drop frame mode | 0 | ||||||||||||
| Non-drop frame mode | 1 | |||||||||||||
| Output FPS | Reference Input | 0 | 0 | 0 | ||||||||||
| 24fps(23.976fps) | 1 | 0 | 0 | Depends on Frame Mode | ||||||||||
| 25fps | 0 | 1 | 0 | |||||||||||
| 30fps(29.97fps) | 1 | 1 | 0 | Depends on Frame Mode | ||||||||||
| 50fps | 0 | 0 | 1 | |||||||||||
| 60fps(59.94fps) | 1 | 0 | 1 | Depends on Frame Mode | ||||||||||
| DisplayPort input | 0 | 1 | 1 | |||||||||||
| Reserved | 1 | 1 | 1 | |||||||||||
| Audio Input | None | 0 | 0 | |||||||||||
| DisplayPort audio 8/2 | 1 | 0 | ||||||||||||
| Analog audio Input | 0 | 1 | ||||||||||||
| DisplayPort audio 8/8 | 1 | 1 | ||||||||||||
| Pulldown Removal | No pulldown removal | 0 | 0 | |||||||||||
| Flag pulldown removal | 1 | 0 | ||||||||||||
| Reserved | 0 | 1 | ||||||||||||
| Test pattern output | 1 | 1 |
QOD PREFERENCES
These QTAKE preferences are relevant to the operation of QOD+. Use the PREFERENCES button in the INFO menu to open the window with preferences and set the required options.
Alternatively, you can use the Text Edit application to edit the content of the preference file. QTAKE preferences file resides in the [System volume]/Users/[User name]/Library/Application Support/com.in2core.QtakePro/Prefs folder. If you delete this file, QTAKE will recreate one with the default settings. Changes will take effect next time QTAKE starts.
GPU group
Enable GPU Output
Set to =1 to enable QTAKE graphics card output.
Essential for QOD+ operation.
Full Range Video
Set this to =1 to enable full range video processing.
Default value (=0) uses SMPTE levels (legal range).
Legal Range GPU Output
Set to =1 to enable legal range GPU output.
QOD GPU Vendor
Sets the manufacturer of the host GPU to ensure QOD+ compatibility.
=0 equals automatic detection (recommended), =1 AMD, =2 NVIDIA, =3 Intel.
GUI group
GPU Out 1 Label=GPU-OUT 1
GPU Out 2 Label=GPU-OUT 2
GPU Out 3 Label=GPU-OUT 3
GPU Out 4 Label=GPU-OUT 4
Use this settings to edit GPU-OUT label in the VIEW toolbar (i.e. DIRECTOR, CLIENT).
TROUBLESHOOTING
If macOS or QTAKE does not detect the QOD+, use the following steps to reset it:
- Quit QTAKE
- Turn off QOD+
- Turn DIP Switch 1 to position ON, all other DIP Switches to position OFF
- Turn on QOD+
- Turn all DIP Switches to position OFF
- Start QTAKE
SUPPORT
Need help? For technical inquiries and support, please contact our support.
Important Safety Instructions
- Carefully read and follow all instructions and keep them for future reference.
- Do not use this device with water.
- Clean only with a dry cloth.
- Do not use this device with any heat sources or near fire.
- Protect all cables.
- Refer all servicing to qualified service personnel. * Servicing is required when the device has been damaged in any way, either by physical or electrical means.
- This product uses semiconductors that can be damaged by electrostatic discharge (ESD). When handling, care must be taken so that the device is not damaged. Damage due to inappropriate handling is not covered by the warranty.
.png)
Disposal Information
QOD+ shall be disposed of separately from household waste. When it reaches its end of life, take it to a collection point designated by local authorities. Separate collection and recycling at the time of disposal will help conserve natural resources and ensure that QOD+ is recycled in a manner that protects human health and the environment. For more information about electronic and electrical waste equipment that will ensure the safety of human health and environment disposal, recovery, and collection points, please contact your local city center, household waste disposal service, reseller, or manufacturer of the equipment.

EU compliance Statement

INCORE hereby declares that this electrical device is in compliance with the essential requirements of 2014/30/EU Electromagnetic Compatibility Directive.
Download copy of EU Declaration of conformity.
COMPLIANCE
If for import of QOD+ to or it’s operation within any country other than Slovakia it is required to fulfill additional legal requirements than those provided by the manufacturer herein, you agree to obtain all permissions and for legal compliance.
Copyright and Legal Notices
QOD+ is a trademark of IN2CORE s.r.o.
All other trademarks are the property of their respective owners.
Pro supplement mark
The feature marked by the Pro supplementary mark applies only to the current version of QTAKE Pro.